Content
1. Washbasin made from a bottle
2. How to make a garden washbasin with a tap?
3. How to make a vanity cabinet with your own hands?
4. VIDEO: DIY washbasin.
5. Ideas for garden washbasins that you can make yourself.
The long-awaited dacha season is a time not only for planting and harvesting, but also for landscaping the dacha plot. In a properly equipped summer cottage, everything is at hand: garden tools within walking distance, a convenient country toilet and, of course, a garden washbasin. Agree, it is more convenient to quickly wash your hands using a dacha washstand than to go into the house, to a bathhouse, or ask someone to pour water from a bottle.
Currently, there are a huge number of models of garden washbasins: simple and functional, traditional and original forms. However, the skillful hands of a summer resident strive to make something for his plot on his own, and making an outdoor washbasin for a summer house with his own hands is even easier than ever.
The Russian construction portal Stroyka.ru will tell you how to make a washbasin for your dacha with your own hands.
Canister washbasin with sink
A washbasin made from a canister can be easily upgraded. This is done to increase the comfort of the structure during operation. To make a sink, you can use any suitable container. A fairly common option that can often be found in dachas is the use of a basin. It is located below the washbasin level.
Photos of washbasins are recommended for viewing, as they allow you to understand that even out-of-date items can be made into a convenient and useful design. The variety of homemade washbasins is incredibly wide. There are devices made from buckets, pots, kettles and many other improvised containers.
Thus, there are several simple ways to assemble a washbasin for a summer house with your own hands from scrap materials. Most often, when working in the garden, a simple bottle washstand will be enough for a summer resident. Do not forget that the choice of the required variety depends entirely on individual needs.
Write to us in the comments:
What other options for dacha washbasins made from scrap materials do you know?
Source
Washbasin with tap made from a can, small barrel or bucket
This is a more thoughtful, but simple to implement washbasin design that even a teenager can make with their own hands. An outdoor washbasin for a summer house can be made from any aluminum or enamel container of a suitable size. You will need a brass spigot, a couple of rubber grommets, a nut and a drill bit.
We drill a hole in the lower part of the future washbasin using a drill attachment. We insert the tap there, put a gasket on the inside and secure everything with a nut. The washbasin for the cottage with your own hands is ready. Such a washbasin can be hung on a pole or you can make a special cabinet for the washbasin with your own hands.
Models on stands
Counter-mounted washbasins are containers with taps mounted on a frame. The frame has “legs” at the bottom that go into the ground. Thus, the washstand on the stand moves freely and is installed in any part of the garden plot. For ease of installation, a crossbar is installed above the support legs - this is a kind of “pedal”. You can quickly and securely install the structure by pressing the crossbar with your foot.
The frame structure of the washbasin on the counter must be reliably protected from moisture, especially its supporting parts that are immersed in the ground.
Plastic washbasin for a summer house on a stand
A tank with a tap can be purchased or made independently. Please note: the immersion depth of the legs for reliable stability increases in proportion to the weight of the structure. This is an important factor when choosing the tank material and its volume.
An interesting version of a washbasin with a sink on racks
Where is the best place to install a washbasin?
Of course, there are a lot of places in the country where you can put a washstand. But you must choose where to install: outdoors or indoors.
At home, installation will be more difficult, since complex work with water supply and sewerage is required, but in winter it is best when the water is at home.
You can install the most universal washbasin “Moidodyr”, which is good to bring home in cold weather and leave at the dacha in the summer.
Also, the installation of a washbasin entirely depends on what material it is made of (or part of it, for example, a cabinet); It is better to install washbasins with wooden parts at home, rather than those made of plastic or painted metal.
If the washbasin is on the street, then you can use an ordinary bucket to drain it, thanks to which the flowing water will be collected and drained directly into the ground - this is the most ergonomic, “cheap and cheerful option.”
We make crafts for the playground with our own hands
— photos of the best options with explanations and tips.
What filters are used for country pools? How to make a sand filter for a pool with your own hands - what materials and tools are needed. Step-by-step master class with photos and video explanations.
Materials for production
They are traditionally wood, metal and plastic. Plastic is more convenient to use and can be cleaned without problems, while tanks made of metal or galvanized steel are stronger and more durable. Stainless steel is considered the best.
Wood is used to make the frame. These can be sheets of plywood, fiberboard, etc. Unfortunately, the lifespan of wood is short, and for greater safety it is better to keep such models under a roof.
To extend the service life of wooden parts, they should be treated with an antiseptic, varnish or paint.
What your washbasin will be made of must be chosen in accordance with the place and conditions of use. For hand washing, plastic will do, but if you expect to use the sink frequently, choose more durable materials.
Have you ever made a washbasin in your country house?
Yes I want to do it
Self-leveling washbasin
A pour-over washbasin is one of the simplest and is sold in almost every specialized store and is simply a container and a lid into which water is supplied manually (at the bottom there is a water faucet, which, when pressed, opens the water).
Such a washbasin is made from a variety of materials, but most often it is the plastic model that is used and can be mounted on a specially equipped panel, a grape arch, the wall of a gazebo or the wall of a house. To use, you only need to add water.
Hanging washbasins are highly mobile and can be installed almost anywhere in a summer cottage, but to install them you must find any vertical surface (for example, a tree, a wall).
Advantages of a sink over a washing machine
The purpose of combining a sink and a washing machine is to save already scarce bathroom space. This is also the main advantage.
Installing a sink above the washing machine will allow you to place all the necessary plumbing and electrical equipment in a small area. Moreover, there is no need to look for a place for an automatic machine in another room (kitchen, hallway).
Sometimes installing a washing machine under the sink is the only option to place equipment in the bathroom
Design ideas do not stand still, and every day new models of sinks designed for installation above machines appear on the market. This allows you to find more interesting interior solutions, which is difficult to do in a small, limited space. Undoubtedly, such a sink will become the highlight of the bathroom, and the saved space will make your stay in the bathroom more comfortable.
Sometimes even a few advantages can cover multiple disadvantages. The sink above the washing machine is one such case.
The easiest way
Instructions:
1. Light a candle and split an awl over its flame. Then make about 10 holes in the lid, distributing them as evenly as possible.2. Now use the same method to make two parallel holes in the middle of the container. Make sure that they are the same diameter as the wire.3. Thread the wire through the holes on the side. Having selected the desired branch, tie the ends of the wire on it. If you did everything correctly, then the washstand can be turned over like an hourglass.4. Place the bottle upside down, fill it with water to the middle and screw on the cap.5. Now turn the bottle over. If water does not flow from the punched holes, then they need to be expanded. Otherwise, you can start using a brand new bottle washbasin. When you wash your hands, turn the bottle upside down.
The disadvantages of this design are that in a strong wind it can turn over on its own, and the bottle only has to be filled to the middle. Therefore, this method is only suitable if you are not going to be in nature for a long time.
How to make it yourself
Often, summer residents save on buying a special washbasin for their summer house and build a similar washbasin with their own hands. By cutting off the bottom of a bottle with a capacity of two liters or more, you can get a homemade washbasin for your dacha. To get a kind of lid, you don’t have to cut off the bottom all the way.
The bottle cap will act as a tap; in order for the water to flow, you need to slightly unscrew the cap, and to close the water, you need to screw the cap on. This design is attached to any surface using wire. In a country house where there is no house, such a homemade washbasin is perfect and will fit perfectly into the exterior of any courtyard.
You can also make a washbasin out of a bucket for your dacha with your own hands. For these purposes, you can use not only a plastic, but also a metal bucket equipped with a lid. This part is necessary to prevent debris from getting into the water.
A hole for the faucet is drilled at the bottom of the bucket in any convenient place, a plumbing fitting is cut into the bucket and the faucet is attached to it.
If desired, you can install the simplest old sink under such a tank, as well as a bucket for collecting dirty water.
It’s not scary to leave them unattended in an uninhabited dacha, because it’s unlikely that anyone will need to steal them, unlike new purchased washbasins.
A beautifully designed bath is extremely important and necessary. After all, where else if not here should everything be as beautiful and neat as possible?
In the bathroom, most people relax, rest, basking in the foam of pleasure and warmth. Today we will not talk about the bath itself, but about its important component. And to be more precise, about the washbasin. Gone are the days when it was just an element for washing hands. According to modern renovation trends, this element of the bathroom is usually decorated very elegantly, beautifully and thoughtfully.
This is exactly what we will talk about next. We will tell you not only about it itself, but also how to make it yourself.
Washbasin for a summer residence: types and their features
If we look at the country washbasin globally, then all country-type products can be divided into two main types - an outdoor washbasin and a similar product intended for installation in a country house. The difference between these two varieties is quite significant and cannot be ignored when choosing. Let's take a closer look at the differences between these two country washbasins.
- Outdoor washbasins for the dacha. In most cases, this is a container in the form of a tank, from which the liquid flows out by gravity - you simply press a special valve and a certain portion of water falls into your hands. This washbasin can be used both in combination with a sink and without it. The main advantage of such washing devices is their mobility - they can not only be easily transported from place to place, but can also be installed on any vertical surface. A wall, a house, a fence, or even a tree trunk—the water from such a washbasin drains directly into the ground. Such containers can be made from either plastic or metal - their design can be called primitive and can be easily reproduced at home, as they say, from scrap materials. You simply hang an ordinary plastic bottle on the same tree, having previously cut off its bottom, fill it with water and use it for your pleasure - the cap is used as a tap or valve in this design. By unscrewing it more or less, you can adjust the amount of water pouring out of the bottle.
- Washbasin for home and cottage. This is a more complex product, which in all respects resembles a washbasin for an apartment - the difference between them lies only in the ability to work without
plumbing
. The Moydodyr washbasin for a dacha has a rather complex design - it is a full-fledged cabinet on which a sink and a storage tank for water with a tap are placed. In the same cabinet, under the sink, a bucket is installed to collect contaminated water - it is in this bucket that the disadvantage of such a country washbasin lies. You need to constantly monitor its filling and manage to empty it on time. The presence of a container of impressive size (usually about 10 liters) allows you to install a heating element in it - a heated washbasin
water for a summer residence is the optimal solution in choosing these products. The only “but” is that for such a washbasin to work, you need to have
electricity
: if it is missing, then such a function in the washbasin will simply be useless.
You can see how to make a practical and convenient washbasin for your dacha with your own hands in this video.
Both types of country washbasins are quite easy to make with your own hands. The most important thing here is to choose the right materials. Well, we’ll talk about assembling such a device next.
Features of country washbasins
A washbasin that can be used for a summer residence is generally a small structure that does not have a connection to water supply or sewer pipes, but performs simple functions that enable the user to maintain the proper level of hygiene of the body and home. So, usually the structure of a washbasin consists of only a water tank and a small sink (and in some cases there is none). The latter can be hung on the wall or installed on a cabinet. The water container can have different volumes - this will determine how often you will have to fill the tank in order to use the washbasin. However, such designs are not particularly large in size.
Design of a self-assembled country washbasin
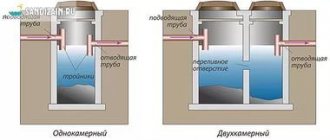
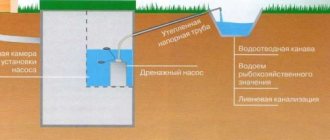
Washbasin for a summer residence with a drainage channel
Typically, the washbasin tank is filled with water as needed. To use it, you need to open the tap or press a special lever, and the water will flow. Once the tank is empty, you can refill it with water and use the sink.
Original heated country washbasin
On a note! Typically, country washbasins are installed on the street near the house or bathhouse. But some design options can also be installed indoors, provided that proper drainage of used water is organized.
A dacha is a great place to relax, but don’t forget about gardening work.
You can use a dacha washbasin in the following cases:
- the need to rinse your hands after dacha work;
- washing hands and face to maintain hygiene;
- washing dishes;
- rinsing small items.
Heated washbasin for a summer residence
Due to its small dimensions and small volumes of water, it will not be possible to use a washbasin for larger purposes (for example, taking a shower).
Washbasin for a summer residence - decor
Advantages of a country washbasin:
- ease of installation anywhere;
- ease of making with your own hands;
- small dimensions;
- simplicity and ease of use;
- mobility - the washbasin can be easily moved to another place if necessary;
- the water in it quickly heats up under the rays of the sun - you can use warm water. However, there are country washbasins with the ability to heat water.
Simple plastic washbasin (washstand)
Disadvantages of this design:
- the need to frequently collect water;
- in cold weather, the water in the sink will remain cold;
- for the winter it must be emptied and removed from the street, otherwise it may be damaged;
- impossibility of full connection to the water supply and sewerage system.
The cheapest and easiest way to make a country washbasin
Simple washbasin with cabinet and sink
Self-production
You can make a vanity stand yourself. For this we will need such things as: an angle grinder, a welding machine, steel pipes. We should have at least two supports, with a distance between the ends of the legs of 20-25 cm.
Making a stand
You can make a similar counter for a washbasin yourself. You will need steel pipes, a grinder and a welding machine. For greater stability of the racks - supports there should be at least two and the distance between them should be 20 - 25 cm.
Work progress:
- We measure and cut the length of pipe we need (two pipes).
- The ends of the pipes need to be cut at an angle so that they fit better into the ground. The end of the post, thanks to its sharp angle, fits into the ground very easily.
- We cut off the top strip and the bottom jumper to which we will attach the washbasin.
- Then we weld the top bar and jumper to the supports.
- Instead of pipes, you can use 25x25 mm steel angles or fittings.
If you decide to build a washbasin with your own hands
A device for washing hands can be made from a regular plastic bottle, preferably from 5 liters). You don't even need a special tool.
You just need to cut off the bottom, turn it over, secure it to a wire or clamps, to a grape arch or tree. To make the water flow, you just need to unscrew the lid a little.
Plot
33 votes
+
Vote for!
—
Vote against!
Not everyone at their dacha has running water, but the need for water arises quite often: it is necessary to rinse your hands repeatedly after gardening work, to wash vegetables or fruits, or to wash dishes after eating. All this can be done using a washbasin. It comes in handy not only inside a country house where there is no running water, but also on the street, in the garden or next to the gazebo where there is a dining table. The good thing about a portable washbasin is that it can be installed anywhere. There are several types of washbasins that differ in design: from the simplest to convenient units with a cabinet and heating. The latter are so convenient that they can partially replace a full-fledged plumbing system. Until recently, in order to make a washbasin for a summer house with a sink, you had to make many of the elements yourself. Now the modern market can offer various ready-made options. However, let's remember how you can make a washbasin with your own hands. After all, a handmade item is not only unique, but may also have many elements or functions that you need, but they are not provided in ready-made models.
- Types of washbasins for the garden
- Simple wall-hung washbasins for a summer residence
- Outdoor washbasin for a summer house on a counter
- Washbasin with cabinet for a summer residence - “moidodyr”
- Heated washbasin for a summer residence
- Do-it-yourself washbasin for your dacha
- Water container - which washbasin to choose
- How to organize heating in a washbasin
- Washbasin cabinet frame
- Vanity unit and countertop for washbasin
- Sink and washbasin drain
Types of washbasins for the garden
The main difference between all washbasins is functionality. To make the right choice, you need to understand exactly what you want to see and how you are going to use it. Is a simple wall-hung washbasin enough for you or do you need a unit with a cabinet or even hot water?
Simple wall-hung washbasins for a summer residence
The simplest washbasin is a slightly barrel-shaped container with a press-on spout. The volume of such washbasins does not exceed 3 - 5 liters. Thanks to special fastening elements, such a washbasin can be hung anywhere where there is a suitable vertical surface. For example, on a fence, on a tree, on a board driven into the ground or other convenient surface.
You need to pour water into a simple washbasin manually. But drainage can be organized in different ways. A lot depends on where the sink hangs. For example, you can place a container under the sink to collect waste, and then, as the bucket fills, take its contents into the compost pit. If the washbasin is used quite rarely, you can not place anything at all - let the water pour on the ground. And to make water seep through more easily, you can pour a layer of crushed stone or small gravel under the washbasin.
Such simple washbasins are still popular, as they allow you to easily and quickly wash your hands after dirty work in the garden or garage. But due to its small volume, it is difficult to use for washing dishes after a family dinner.
Wall-mounted washbasins with a larger volume from 10 to 18 liters are more convenient due to the fact that they require less frequent filling of water. The shape of such washbasins can be different: rectangular, oval, slightly rounded. The material of manufacture is either plastic or stainless steel. As a rule, washbasins with a volume of more than 10 liters are equipped with a valve located on the front wall. Such taps are very convenient: turn off the valve and use water, turn it on and the water stops flowing. In models with a pressure spout, you need to constantly press it, which can sometimes be inconvenient or difficult.
Large wall-hung washbasins can be attached to a vertical surface, such as a wall, or hung on a cabinet. They are used both indoors and outdoors.
Outdoor washbasin for a summer house on a counter
A rather unusual version of outdoor washbasins is a unit on a counter. The water container is mounted on top of a metal stand. You can install such a washbasin anywhere, including where there is no vertical support. At the bottom of the rack there is a crossbar, after pressing with your foot the horns - supports are firmly driven into the ground. Thus, the washbasin on the counter is quite firmly fixed in any part of the garden.
It can be used to wash your hands or face while working; just unscrew the valve and the water will flow by gravity. The capacity of countertop washbasins is usually from 8 to 15 liters.
You can make a similar counter for a washbasin yourself. You will need steel pipes, a grinder and a welding machine. For greater stability of the racks - supports there should be at least two and the distance between them should be 20 - 25 cm.
- We measure the required length of the supports and cut off two pipes.
- In order for the posts to easily penetrate the ground, the end of the pipes from which they are made must be cut at an angle. The sharp end of the stand easily pierces the ground.
- We cut off the lower jumper and the upper bar to which the washbasin is attached.
- We weld the jumper and the top bar to the supports.
Instead of pipes, you can use reinforcement or steel corners 25x25 mm.
Washbasin with cabinet for a summer residence - “moidodyr”
The Moydodyr washbasin is a structure consisting of a cabinet, a sink and a washbasin (filler tank). It is more functional, it can be installed both inside the house and outside. Despite the fact that a washbasin with a cabinet is heavier than simpler models, it can be dragged from place to place by two people. A bucket or other container for drainage is installed in the cabinet under the sink.
Thanks to the presence of a sink in a washbasin with a cabinet, you can not only wash your hands and face, but also conveniently wash dishes or fruits and vegetables. For example, a bowl of freshly picked strawberries can be placed inside the sink. The valve on the wash basin allows you to thoroughly wash the berries under running water.
As you can see in the photo showing a washbasin for a summer cottage, similar models of washbasins can be equipped with a mirror, a towel hook and a soap stand. Inside the cabinet you can store dishwashing detergents and washcloths.
If you are going to install a washbasin with a cabinet inside the house, then you can choose any model, including one with a wooden cabinet. On the street, wood, chipboard or plywood will quickly become unusable. For outdoor use, washbasins with a painted metal cabinet or a cabinet lined with polycarbonate are better suited.
Heated washbasin for a summer residence
The heated washbasin is a more advanced model of the washbasin with a cabinet. In fact, they differ from each other only in that a heating element is installed in the water tank, which heats the water. The sink and cabinet are exactly the same.
In early spring and autumn, the water in the washbasin is practically not heated by the sun. And if water from a well is used, then it is simply ice-cold. The heated washbasin allows you to feel complete comfort. Wash with warm water, wash dishes with hot water. All this is possible thanks to the thermostat. Using it you can set the required temperature from +30 to +70 °C.
A container with a volume of 10 to 20 liters is usually made of durable plastic, similar to that used in electric kettles. Sometimes heated models have a stainless steel body. Ready-made heated washbasins, which can be bought in a store, have standard dimensions: cabinet width and depth 0.5 m, cabinet height 1.0 - 1.5 m.
Do-it-yourself washbasin for your dacha
The cost of washbasins is not that high. For example, prices for a washbasin with a cabinet and heating start from 85 USD. So if you have an extra hundred dollars, then there is no point in going to the trouble of constructing a washbasin with your own hands. But if you really want to do everything yourself, or you have a unique functional design in mind, then below we will give recommendations on how to make a washbasin for your dacha with your own hands.
Water container - which washbasin to choose
If you want to make a washbasin with a cabinet for your dacha, then it makes no sense to fool yourself and make a water container yourself. It is unreliable, unaesthetic and ineffective. For example, you can make a tank from an old 5-10 liter water bottle, but why? The cost of a washbasin with a valve tap does not exceed 10 USD, but it looks much more beautiful.
The water container for a washbasin with a cabinet should be from 10 to 20 liters. It makes no sense to take less.
The material used to make the container also matters. Most often, washbasins are made of plastic and stainless steel. Which one to choose depends on personal preference, but there is an important caveat.
Important! A stainless steel washbasin for a summer residence is more preferable because it is more reliable and durable. If you accidentally drop a plastic sink filled with water, the chance of it bursting, cracking or splintering is much greater than if a stainless steel sink is dropped. We rarely think about such things, but when we encounter them with our own eyes, we regret wasting money.
The shape of the washbasin is also important. Usually few people pay attention to this, but in vain. It's all about the pressure of the water that will flow out of the tap. If the container is flat, almost horizontal, then water will flow out of it in a small stream. The higher the water column in the washbasin tank, the greater the pressure. For example, among rectangular washbasins, it is better to give preference to one that has an elongated shape. Better yet, take a washbasin whose bottom is not flat and slopes towards the faucet.
Faucet location . Recently, washbasins with a valve tap on the front wall have become very popular. Have you noticed that the water pressure from such a faucet is less than from a small 3-5 liter washbasin with a pressure tap? The thing is that in a valve tap, water pressure is lost due to the rotation of the spout of the tap itself and due to the fact that it is located not at the bottom, but on the front wall. Choose a washbasin model in which the faucet is located as low as possible. Otherwise, you will encounter the following problem: you will have to add water to the washbasin before it runs out, from about half the capacity. The reason is a loss of pressure.
How to organize heating in a washbasin
The cost of ready-made heated washbasins starts from 20 USD. This is quite inexpensive, considering that the heating device is equipped with a temperature controller from +30 to +70 °C. You can also make a similar unit yourself. To do this, you need to buy a heating element with a thermostat and install it in the tank.
Important! Please note that the heating element is most effective if installed at the bottom of the container, at a level of 2 - 5 cm from the bottom. It makes no sense to install the heating element at the top.
The difficulty of installing a heating element in a washbasin yourself is this. The heating element cuts into the body of the container and the block with the thermostat remains on the outer wall of the washbasin. It is quite difficult to seal the washbasin body after insertion. You can, of course, immerse the boiler into the container through the lid without making holes in the body, then there will be no problems with sealing.
Washbasin cabinet frame
When planning to make your own washbasin with a sink for a summer house, the frame of the cabinet and the cabinet itself are the most obvious design elements that make sense to make yourself.
The easiest way to make such a washbasin is if you still have a dishwasher from Soviet times. The shape and size of the old kitchen sink are completely suitable for constructing a washbasin. A cabinet with an opening door and bottom, a place under the sink and the sink itself. You only need to attach a board to the finished sink body on which you can attach the washbasin container.
If the old sink is not available, then you will have to make the cabinet yourself. The cabinet frame can be made from wooden blocks with a section of 50x50 or 80x80 mm, as well as from a steel angle 40x40 mm or 25x25 mm.
- Convenient height of the sink cabinet is from 85 cm to 1 m.
- Take a steel corner or a wooden beam and cut 4 pieces 85 cm long.
- We measure the sink that we are going to install in the cabinet. The size of the frame should be such that the sink fits easily on the edges of the frame.
- Then we cut 8 pieces to fit the size of the sink, usually 50 cm.
- We weld or knock the frame together.
Remember that the sink will be placed on the inner edges of the frame, so use them as a guide. After manufacturing, the steel frame must be primed and painted, since it will quickly rust in frequent contact with dampness and water.
Vanity unit and countertop for washbasin
The frame of the cabinet can be covered with different materials:
- Wooden boards;
- Plywood panels;
- Steel sheets;
- Polycarbonate sheets.
- Plastic panels.
Wood and plywood will quickly get wet outdoors. Although if the wood is varnished, it can last a long time.
We cover the back and side walls of the cabinet completely, firmly securing the material to the frame of the cabinet. On the front wall of the cabinet you need to make a door, which you then hang on its hinges.
It is advisable to make the floor inside the cabinet plank with a distance between the boards of 1 - 1.5 cm, so that air can circulate, and even accidentally spilled water can seep into the ground.
You don’t have to limit yourself to just a cabinet under the sink; you can make a countertop and a convenient drying rack for dishes:
- On one side or both sides of the cabinet we make a tabletop or drying rack.
- We take wooden boards with a cross section of 25x15 mm.
- We knock them together in such a way that we get a drying rack. Between the boards we make a distance of 1.5 - 2 cm.
- The dryer can be made two-level, then at a height of 35 cm above the ground we make another frame for the dryer and fill the boards.
A drying rack next to the sink is convenient because you can place freshly washed dishes in it. The cups can simply be turned upside down and left to dry. Plates and pot lids can be inserted into the gaps between the boards and fixed vertically to drain excess water. And simply place pots and pans upside down on the drying rack.
It is not necessary to connect the dryer frame to the washbasin cabinet. The wooden dryer must be varnished.
Sink and washbasin drain
The sink for an outdoor washbasin can be plastic, enameled or stainless steel. The last two are the most durable and practical. You can buy a new or used sink and carefully install it into the frame of the cabinet.
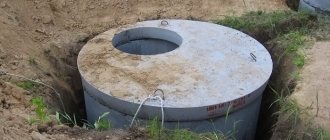
Draining water from a washbasin can be organized in different ways:
- Place a bucket, which you empty as it fills.
- Drain into a sewer or into a ditch.
- Drain the water directly into the ground, having first poured a 25–35 cm layer of crushed stone under the cabinet.
The option with a bucket is the most optimal. The fact is that in the washbasin we not only wash our hands and face, we often wash vegetables and fruits here; along the way, the tails come off and are thrown straight into the sink; also, when washing dishes, food residues are also washed into the sink. As a result, wastewater is obtained with organic residues. It is better to take a bucket with such slop to a compost pit or heap, where the remains will rot.
It is possible to arrange the drainage of water into the sewer, but then it will not be possible to dump cleaning materials and food debris into the sink, as they can clog the pipe. A regular corrugated sewer pipe connects to a sink drain and is routed underground to a septic tank or drain. Some people simply dig the pipe in at a depth of 25–35 cm at a distance of 1–2 m from the washbasin, and the water simply soaks into the soil.
If desired, an ordinary dacha washbasin can be turned into a real masterpiece, especially if you use wood for decoration. But remember that it is better to put wooden products in a dry shed or garage for the winter. This also applies to heated washbasins.
Washbasin cabinet design and types
First you need to understand what a cabinet for washstands is? In simple terms, this is a kind of design that imitates a cabinet. First of all, it is needed in order to perform a purely aesthetic function. It covers the sink knee, which isn't exactly bad looking, but isn't attractive enough either. The second purpose of such a cabinet is to organize some space under the sink, to make sure that everything is used as rationally, wisely and thoughtfully as possible. This cabinet can accommodate shelves on which, for example, various chemicals, cleaning products or supplies of household goods can be stored very compactly. Each housewife herself will find a use for this space.
As for the types of sinks, we can distinguish the following: rectangular overhead, rectangular overhead and mortise. In general they are all similar. One might even say that these are only variations, not species. Therefore, the general manufacturing scheme will be given.
It happens that purchasing finished products in a store cannot be done for one reason or another. Therefore, instructions will come to the rescue that will tell you how to make a cabinet under the sink with your own hands. It's not difficult at all. Moreover, almost anyone can do this, even if they have no prior experience in repair work. To make a vanity cabinet you will need the following materials and tools:
- boards, chipboard sheets and slats;
- metal canopies for doors;
- hammer;
- saw;
- pliers;
- nails;
- screws;
- screwdriver;
- paint, water-repellent coating.
Heated washbasin
A heated country washbasin is a more advanced model of a washbasin with a cabinet. The main feature (and difference from a simple washbasin with a cabinet) is that the water tank has a heating element that heats the water.
Thanks to the thermostat, you can set the temperature from +30-70 0C - and thanks to this you can feel comfortable: wash dishes with hot water, wash yourself.
One thing to remember is that the heating element must be installed only at the bottom of the tank.
The container (volume 10-20 l) for such a washbasin is most often made of plastic, similar to that from which electric kettles are made. Ready-made store-bought washbasins have standard dimensions: the height of the cabinet is 1.0-1.5 m, and the width and depth are half a meter.
Successful examples and options
The placement of a washbasin in the country depends on the needs of the household. A simple structure is installed in the garden, where a hinged tank is mounted on a frame. Climbing annuals can be planted around the legs of the frame to decorate the supports. In the yard it is more convenient to use a cabinet with a sink. The advantages of a corner location include creating a hygiene area hidden from prying eyes. If you decorate it with plants or paintings, this area will acquire a special charm. Advanced summer residents place cabinets with a computer for adjusting the heater in the country kitchen, bathhouse or shower.
It is very convenient to purchase a washbasin model with a pump for pumping water using a foot pedal, where the tank is connected by a special hose to a common tank for water intended for household needs. The pump allows you to fill the washing tank with water without contact, which will be a great advantage when working with soil and for hygiene purposes.
Country craftsmen, with creativity and imagination, arrange a wash corner, creating stylish compositions from wood, stone and metal.
Source
| Such washbasins, as you might guess, are installed outdoors. Usually these are suspended structures, fixed to a wall or some kind of support, and may not have a sink (in this case, the water simply flows to the ground). They are small in size and easy to use. There is no water heating function (warm water can only be used on sunny days, when the liquid is heated by the thermal energy of the sun). | They have one standard option - the one that hangs on the wall. The only differences here can be in the materials, shape, dimensions of the product and the method of water supply. |
| These washbasins are installed indoors - in a bathhouse, at home, on a veranda, etc. They usually have a more complex design, since here it is necessary to think through a water drainage system (it can be discharged either into a container, which is then emptied, or into a pipe, connected to a cesspool or taken outside the house to the site). Also, this version of washbasins suggests, in some cases, the possibility of supplying water to the container to be filled and the possibility of heating the liquid. | Such washbasins can be divided into 4 categories: on a counter, with a cabinet, with a filling system, and with a water heating function. |
Let's start making a cabinet with our own hands
You must first take all the necessary measurements. There is nothing complicated here, since the cabinet will consist of a table top, 2 side walls and 2 doors.
After taking measurements, you can start cutting out the parts for the cabinet with your own hands using a saw of the necessary components from chipboard
It is very important to make the necessary spaces and openings, for example for pipes. In the countertop under the cabinet, a special opening is cut to fit the size of the sink
Now the boards need to be painted in the desired color (if there is no laminated part on top). As a rule, some light shade is chosen for the bath. It is also worthwhile to cover the chipboard with a water-repellent coating, since in the bathroom you will have to deal with water, which can ruin the countertop. If desired, a more durable and expensive material can be used for this part of the cabinet. But this is a matter of taste and possibilities.
Next, lay the so-called frame under the washbasin with your own hands. First, the tabletop is put on from below. It is necessary for someone to temporarily support it, since it is not yet secured in any way. At this time, the side walls are attached to the tabletop. In fact, they will act as a support for the entire structure, and therefore their height should be ideal.
Shelves in the cabinet are made from thinner chipboard sheets or even from plywood. Then we move on to attaching the doors. They are attached using special door awnings. The size of the doors should also be adjusted as much as possible.
Thus, the do-it-yourself washbasin cabinet is ready. As it turned out, there is nothing complicated or difficult about this. Yes, and you can do this easily with your own hands. Good luck in your endeavors! And may you be able to make a beautiful and original cabinet.
Washbasin made from a metal barrel
To make such a washstand, you will need to find an empty metal canister and a tap. The material used to make the faucet can be plastic. A plastic locking device is of lower quality and durable, but it costs much less, which is a plus. It is not necessary to use a barrel as a tank. Any available container (for example, a bucket) will do. A wooden or plastic barrel may also be suitable for a washbasin.
Important! Under no circumstances should you use a canister under the washbasin in which toxic chemicals or any other harmful compounds were previously stored. The use of such a canister can cause irreparable harm to your health.
The procedure for assembling a sink for a summer house from a metal barrel consists of several stages. The first thing you need to do is prepare all the necessary tools and materials. Next, you need to drill a hole in the canister. This is necessary in order to install the faucet. A fitting is mounted in the hole. The fastening of this element must be tightened tightly.
Once the fitting is installed, you can begin installing the valve. There's nothing complicated about it. The connection pipe of the shut-off device easily fits into the fitting coupling. In order to prevent liquid leakage during operation of the tap, it is necessary to seal the threaded connection. For this purpose, linen thread is used. If there is no flax thread, you can seal the joint with a sealing compound.
At the end, all that remains is to fasten the structure. To do this, hang it from a wall, tree, or place it on a special stand. The appropriate installation method depends on your specific situation.
Interesting: How to build a summer shower for your dacha yourself
Designs with a cabinet
The next type of washbasins refers to stationary washbasins, which can be moved to almost any place in the garden or summer cottage.
The moydodyr washbasin is designed on the principle of hanging washbasins, only much more comfortable thanks to a metal or plastic sink.
Slightly more complicated models are equipped with a mirror. And a shelf for soap accessories. You can place it indoors (it’s best to choose a heated model, which we’ll talk about later) and outdoors. Despite the fact that such a washbasin is quite heavy, it has great functionality.
Before you buy a washbasin with a metal, plastic or wooden cabinet, you need to decide where you will place it - this entirely determines where it is best for you to place the washbasin.
You cannot place a cabinet made of wood (chipboard, plywood) outdoors, because it can rot and deteriorate due to weathering (precipitation, temperature changes).
A cabinet made of wood is very suitable for a room, preferably one with heating; a cabinet covered with polycarbonate or painted metal is well suited for the street. You can make practically works of art from wood, but you should remember what was said above (wood can deteriorate outdoors).
Types of designs
Despite the fact that when most people mention the phrase “country washbasin,” they imagine a small tank installed on the wall of the house, there are a lot of varieties of this type of design. And they differ not only in the color and material from which they are made, but also in size, appearance and even a number of design features.
On a note! Among country washbasins, there are the most primitive options and, at the same time, complex designs that have the function of heating water or unusual decorative design.
Outdoor washbasin
Table. Summary table of types of washbasins.
Washbasins with cabinet
More advanced models are washbasins with a cabinet or sinks. They are equipped with a sink, a water tank with a tap, and a cabinet. The cabinet is made of wood, metal or plastic.
This washbasin can be used both outdoors and indoors (for example, on a country veranda). These models are no longer so mobile and are considered more stationary.
Depending on the model, moydodyrs are equipped with a mirror, soap dish, and towel hanger. Buckets are either installed inside the cabinet to drain water, or a corrugated pipe is used to drain the drain into a sewer pit.
Tanks in moydodyrs are designed for a larger volume (up to 32 l), which is also important for convenience
The presence of a sink makes using the washbasin more comfortable. Here you can calmly wash fruits or dishes.
The design of washbasins with a cabinet can be different. Some models no longer only have functional value, but also become an integral element of garden decor.
Choosing a washbasin
Everything is simple here - you need to choose products depending on the specific needs of a person for clean water. For installation in a greenhouse, the simplest washbasin is sufficient, which you can even make yourself. But in the house, if funds allow, it makes sense to install a washbasin with the ability to heat water - washing and washing dishes will be much more pleasant.
Wastewater disposal
As for the volume of water consumed, you need to take into account the number of people who will use the washbasin, as well as the frequency of use. So, for one summer resident a small washbasin with a capacity of 5 liters is quite enough, but if several people live in the house or work on the site at once, then it is recommended to install a structure with a volume of at least 10 liters.
Choosing the best washbasin for your cottage
As for the material, you should focus on your preferences. The metal is stronger, more durable, does not fade, but will rust over time. Plastic is not subject to corrosion, but is more fragile and can fade under the sun. But it is quite inexpensive. Wood is used if a cabinet is needed under the washbasin. It is not recommended to make a tank out of it.
The photo shows another version of the cabinet, in the manufacture of which wooden boards were used
The most convenient types of washbasins for the dacha are portable models
To the question “Make or buy?” everyone must answer for themselves too. So, the simplest washbasin can either be bought for little money in a store or made from some container in an hour. But complex designs with a cabinet are easier to buy. Although, if you wish, you can do them yourself. Below we will look at several options for creating simple washbasins for your dacha.
Decorating a country washbasin
Do-it-yourself washbasin for a summer residence; manufacturing principle
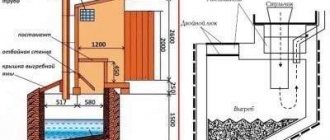
Both a washbasin with a water heater for a dacha and a washbasin for a dacha without heating the water are made according to the same principle. As you understand, the difference between them lies in the presence or absence of a heating element. Both products consist of three parts, the manufacture of which will have to be taken care of in the process of solving the question of how to make a washbasin for your dacha yourself?
Sink. Let's start with it, since, in general, there is no need to make it - it would be more correct to say that it is almost impossible to make it at home. It is better to buy a sink or use an old one - you can use any that is available
Even a kitchen sink will do – mortise or counter-mounted, it doesn’t matter. Just based on its type, you will have to make a cabinet for it.
Cabinet - in a simplified version it can be called a small table or a large stool
The only condition for making such a base for a sink is that it also serves as a base for installing a storage tank. In most cases, the back of such a cabinet rises up to a height of up to 800 mm from the level of installation of the sink - in fact, it is a panel, apron or work wall. Whoever likes to call it what you prefer, call it that way - the tank is mounted behind it. If you are not particularly interested in the appearance of the product, then you can attach it to the front - in this case, its installation will be a little easier. Such a cabinet can be made from a fairly wide range of materials - in most cases, either natural wood in all its diversity is used, or its sheet composite in the form of chipboard, OSB, plywood, etc. In general, you can work with whatever you have at hand - by and large, the cabinet can even be assembled from plasterboard or laid out with brick.
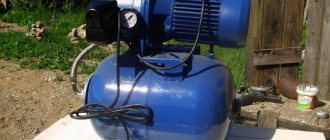
Water container. Without it, neither a simple nor an electric sink for a summer residence will be able to work. The ideal solution for a country washbasin would be a rectangular container - it is easiest to place it on a cabinet. In general, any tank will do - both metal and plastic. The main thing is that you understand how it will be mounted on the cabinet. By the way, mounting the container on a cabinet is by no means the only option for solving this issue - by and large, a container (of rather large volume) can also be installed in the attic of the house. With this approach to business, you can even do a full-fledged plumbing installation in the house. But let's get back to making the container. Everything is simple here - the finished tank will need to be equipped with at least one outlet for a tap and, at a maximum, another threaded hole with a diameter of one and a half inches will need to be made for installing a heating element into it. The necessary pipes with internal threads will have to be welded into the container in the required places.
And the rest, as they say, is a matter of technique, and assembling a washbasin is not a difficult task. First you need to fix the sink on the cabinet, then install the tank, having first screwed the faucet into it and, if necessary, a heating element, which can be freely purchased on the market (such elements are used in storage water heating tanks). Well, of course, you will need to properly connect such a heater to the power supply network - it is better to ground it so that no one is accidentally shocked.
In principle, that’s all - as mentioned above, a washbasin for a summer house is a fairly simple product to make yourself
The only thing I would like to add is to pay some attention to the aesthetic characteristics - they completely depend on your approach to the matter and your vision of this product. You shouldn’t think that you can’t put together something worthwhile from old and useless things - here it’s just the opposite
Using old things and objects is the key to uniqueness; I’m not afraid to say again that everything depends on your diligence. Take the time to update the same old boards (for example, using a grinder and a special circle) and you will get a quite decent and attractive product.
DIY wooden sink
Hello, dear readers and DIYers!
Many of you are sure that washbasins and sinks can only be made of metal, glass, or ceramics. However, many craftsmen are simply afraid to experiment with ordinary wood, even though the choice of various special epoxy resins and adhesives that can protect wood from moisture is very large. In this article, Vladimir, the author of the YouTube channel of the same name “Vladimir Natynchik”, will tell you how he made a sink from wood.
This project is not very difficult to make, but will require experience with carpentry machines.
Materials. — Pine timber 85X85 mm — Dowels — Polyurethane glue Kleiberit 507.0 — Two-component epoxy resin — Sandpaper.
Tools used by the author. — Clamps — Self-centering jig for dowels — Circular saw, pushers — Thicknesser — Belt and orbital sanders — Miter saw — Hand router — End mills — Radius cutter with thrust bearing — Screwdriver — Ballerina cutter for wood and plasterboard 30 — 120 mm — Drills Forstner - Ruler, tape measure, square, hammer, pencil. Manufacturing process. So, the main and only material for making this sink will be 85x85 mm pine timber. There are small cracks in the central part of some of the bars, and Vladimir takes them into account when cutting them into boards.
The curing process of this glue occurs due to reaction with water. If the material being glued is too dry, then you need to organize spraying of the seams. Processing of glued products is possible after 3-4 hours, and it will gain maximum strength within a day. After polymerization, this glue is resistant to solvents and water, and is very durable.
The author glues two panels from three boards and tightens them with clamps, placing additional bars under their jaws.
After the glue had dried, the author processed the surfaces of the shields using a surface planer (that’s why he had to make two shields, because the machine couldn’t cope with a larger width), and sanded them.
The bottom of the future sink will be made from these two shields. Each shield has dimensions 600x250mm. Now they need to be connected to each other using dowels. The master drills holes for them using a self-centering jig. This device is quite expensive, but you can make it yourself by reading the following article.
Glue is applied to the end of the shield, and the dowels are hammered into place.
Next, Vladimir cuts ten blocks 140 mm long from the block.
The saw blade is then set at an angle of 15 degrees, and one end is cut on each block. For greater cutting accuracy, the master installed a stop block and secured it to the table with a clamp.
From the resulting elements, two blanks for the side walls are glued together. The hardest part of this project is having to wait for the glue to cure at each step.
After sanding with a belt and then an orbital machine, the workpieces acquire such a beautiful appearance.
Sparing no glue, the master glues the side walls to the top side of the bottom.
Next, using a Forstner drill with a diameter of 35 mm, drill a hole for the mixer.
The next hole is for the siphon. To ensure that the rim of the mesh is flush with the surface, the author uses a ballerina cutter to cut a circle 2 mm deep and 70 mm in diameter.
Focusing on the circle made, the master removes the remaining material with an end mill. This is how the correct seat for the siphon turned out.
After milling, all surfaces of the product are carefully sanded with sandpaper up to 240 grit by hand. As a finishing coat, the master applies a two-component epoxy resin.
A few days later, after the resin had fully polymerized, he conducted a series of water tests on the shell. No swelling of the wood, much less leaks, were detected. The photographs even show small drops; the water literally forms balls rather than spreading over the surface.
In the end, this is how beautiful it turned out. Vladimir has yet to make a cabinet for this sink.
Good mood, good health, and interesting ideas to everyone!
The author's video can be found here.
Source
Become the author of the site, publish your own articles, descriptions of homemade products and pay for the text. Read more here.
A practical way
Instructions:
1. Cut off the bottom of the bottle. Burn the edges with a candle flame so you don’t cut yourself on them later.2. Step back a couple of centimeters from the top and make holes using a hot awl or nail.3. Find a branch on which to hang the washbasin, inserting wire into the holes.4. Unscrew the lid and make 7 holes on the side of it with a hot nail. Tighten the plug.5. Pour water into the bottle. The principle of using a washbasin is that you need to unscrew the lid just a little and the water will flow out. Please note that you cannot remove the plug completely, otherwise all the water will end up on the ground.6. If you took a hammer and nails with you, you can nail the bottle to the tree trunk for greater reliability.
Today, the most popular way to make a washstand from a plastic bottle is using a syringe.
The principle is the same: cut off the bottom, make a hole in the cork for the syringe, cut off the upper narrow part of the syringe, place the syringe in the cork hole with the piston down. Nothing complicated, but how convenient!
Bobrakova Natalya, especially for the Advisor.
2016, Advisor. All rights reserved. Without the written consent of the author or an active, direct and indexable link to the source, republication of materials in whole or in part is prohibited!
Washstand for a summer house made from a plastic bottle
The simplest solution, which allows you to create a simple washbasin, involves the use of a plastic bottle. This washstand is temporary, however, it copes well with the tasks assigned to it.
Let's look at the process of creating such a washbasin step by step. The first step in assembling a simple washbasin is to hang a plastic bottle, neck down, on a string or wire. You can place such a device on any tree or pole. The disadvantage of this design is its disposability. When the water runs out, you will need to remove the bottle from the support and refill it.
Rigid fixation of plastic containers will help correct this problem. Nails, screws, or a metal clamp are suitable as fasteners. For larger containers, other methods are also suitable. For example, a five-liter bottle can be fixed on a rack, making it easier to transport and use.
The bottom of a bottle fixed in a rigid way must be cut off. This will allow you to add water when it runs out. The simplest version of the washbasin does not require any manipulations with the lower part. In this case, the lid is simply unscrewed until the required stream of water is obtained.
But there is another method - using a nail with a blunt tip. To make such a simple locking mechanism, you will need to make a hole in the lid for water. Its diameter should be slightly larger than that of the nail leg, but less than the diameter of the head. Thus, when not used, the nail head tightly covers the hole and retains water in the container. In order to use such a washstand, you just need to lift the nail by pressing it from bottom to top.
Note! Experts recommend fixing the bottle at a convenient height for use. You can make several devices from ordinary plastic bottles and check which option is best for you.
The disadvantage of a bottle washbasin is that the nail rusts quite quickly, and the design itself is not designed for complex operations. Washing dishes under such a sink is quite difficult. A more multifunctional option is a canister washbasin equipped with a tap.
Washbasin made from a plastic canister
Interesting: DIY plumbing in a private house