Basic information about the tinning process
Tinning is divided into initial, carried out on a new or long-stored soldering iron, and working, performed immediately before soldering.
How to tin a soldering iron tip? First, the tip is mechanically cleaned of scale, oxide film, slag and other contaminants, then a thin layer of molten solder, most often tin-based, is applied to the prepared surface.
For mechanical cleaning the following are used:
- abrasive stone;
- sandpaper;
- another soldering iron.
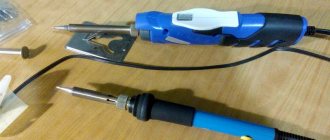
Cleaning a soldering iron with a non-burn tip
For inexperienced soldering workers, craftsmen recommend starting with a file. As the solder strengthens his skills, he selects the most convenient stripping methods for himself.
Preparing the wire for soldering
To solder copper wires, they must be tinned in the same way as the soldering iron itself. To work, you need to warm up the tip to operating temperature. The tip is dipped into flux or rosin, then onto solder, after which the wire is pressed tightly. All this must be done quickly so that the rosin does not have time to evaporate. This work will have to be repeated several times. As a result of the procedure, a high-quality layer of solder should be obtained on the surface.
The process of tinning oxidized parts differs in time. It is recommended to first remove oxides using an abrasive material. In very difficult cases, tinning acid, chemical compound or solder paste will be required. Solder wire is sometimes used for soldering. In this case, you need to dip the rod in rosin, then apply it to the surface that needs to be tinned, and put solder between them. Rub the edge of the solder with the tip of the sting.
Read also: Soft start for electric saws
Some wires may be protected with enamel. To remove it, you can treat the wire with acetylsalicylic acid, that is, regular aspirin. The tablet is placed in place and pressed with a soldering iron. After some time, the tablet melts and the acid attacks the varnish and is destroyed. After such a simple procedure, tinning the wire is not difficult.
Preparation and Maintenance
The more intense the work, the sooner the soldering iron tip burns out and becomes overgrown with scale scales.
During prolonged heating to high temperatures, the copper from which the tip is made partially transforms into molten tin, and partially abrades on the soldered surfaces and contacts. Physical and chemical erosion of the substance occurs. In addition, under the influence of heat, an oxidative reaction of copper with atmospheric oxygen occurs. On models that allow you to regulate the temperature, it is recommended to reduce it when there are breaks in soldering, or simply turn off the soldering iron during this time.
Sequence of operations to remove scale:
- Carefully remove the sting.
- Clean off the scale layer with fine-grained abrasive paper.
- Apply a graphite protective layer to the tip by rubbing it with a pencil lead. This will slow down the reappearance of the scale layer.
- Lightly tap the body of the electric heater and turn it to remove scale from the recess for the copper rod.
- Insert the tip back into the mount.
To ensure electrical safety, each time before starting work, you should inspect the insulation of the network cable for the absence of mechanical damage and melting.
From time to time it is also useful to measure the insulation resistance value. The measurement is taken between the plug contacts and the tip. The value must be greater than 10 mOhm.
Soldering iron overheating
In the absence of a voltage regulator, the soldering iron can heat up above 3000C, which leads to its burning. If it is not possible to measure the temperature of the tip, overheating can be noticed by boiling and splashing of rosin.
You can reduce the temperature of the soldering iron using a power regulator - a dimmer. Here you can select a conventional incandescent lamp brightness control device. It is important that it matches the power.
You can assemble a thyristor regulator on the Kr1182PM2 microcircuit with your own hands, which allows you to control devices with a power of up to 150 W.
Do-it-yourself microcircuit-based power regulator
Lamp HL1 is shown as the load. Instead, you can connect a soldering iron, which is an active load. The power is regulated by variable resistor R1.
Dimmers provide smooth switching on and off of the load. This is not required for a soldering iron and you can get by with a simpler device.
Circuit diagram of a simple thyristor regulator
The positive half-cycle is not controlled and passes through the diode VD1. Regulation is carried out only through a negative half-cycle by controlling the thyristor VD2 using a variable resistor R2. This is quite enough for a soldering iron.
Miniature control devices are built into the handle of the soldering iron. The best ways to maintain optimal soldering temperature are used in soldering stations, where the mode can be manual or automatic.
Common soldering station "Weller"
For a home network with a stable supply voltage, manual heating control is sufficient, depending on the brand of solder.
The soldering iron wears unevenly. When burned out, irregularities appear on the surface of the tip. From time to time it needs to be sharpened and tinned.
Copper dissolves in solder when heated, and prolonged heating without use leads to the formation of a layer of oxides. Therefore, it is recommended to turn off the soldering iron or reduce its temperature during pauses.
Features of the sting
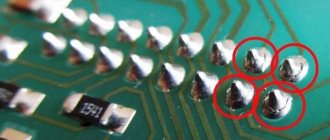
The sting is the main (and only) working part of the device. It is heated by an electric heater and heats the solder, rosin (or other flux) and the parts to be soldered. During operation, an invisible oxide film forms on it, reducing the wettability of the material. Visually it looks like this: tin or rosin does not spread evenly over the entire area, but collects in a drop and flows down.
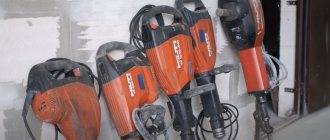
The size and geometry of the working body are chosen so that they correspond to the operations performed. So, when soldering parts of large sizes and thickness, choose a powerful soldering iron with a thick tip. To install microcircuit legs, on the contrary, a particularly low-power device is required, with a thin tip and good grounding, so as not to damage sensitive components due to static charge or overheating.
Soldering microcircuits
A universal soldering iron is sharpened with a spatula. Thin parts are soldered with the narrow side, and more massive ones with the plane of the blade.
Soldering temperature
The quality of soldering depends on the heating temperature of the electric soldering iron, i.e. connection of parts. If the temperature is low, then the solder does not spread over the surface of the product, but forms a lump, the solder joint turns out to be loose, matte in color and has low mechanical strength. The temperature can be assessed when using rosin as a flux - it should boil and give off steam abundantly, but not burn instantly, but remain on the tip in the form of boiling drops.
Overheating the tip is also harmful, causing combustion and charring of the flux. Overheating is indicated by a dark film of oxides appearing on the solder, as well as by the fact that it does not adhere to the tip and flows off it.
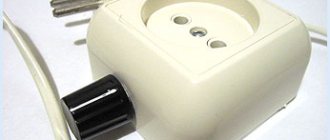
How to tin a soldering iron with a copper tip
Tinning a soldering iron is a simple job and usually does not cause any difficulties. If the surface of the rod is well prepared and cleaned, then both tin-lead and silver solders fit well on it.
Soldering iron with copper tip
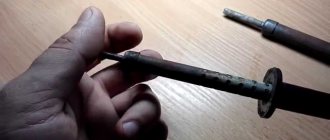
It is necessary to clean the surface of the rod to the condition of a new part. First you need to work with coarse sandpaper, level the surface and give it the required shape. If it is technically possible, it is a good idea to polish the surface - this way it will oxidize more slowly.
There is another technique - binding. To do this, the tip should be pulled out of the heater and, like a blacksmith, forged with a hammer on an anvil (or a massive vice). A surface compacted in this way will also oxidize much more slowly.
After machining, it’s time to actually tin the tip. Experienced shareholders recommend various methods:
- Place a few pieces of solder in the rosin can. Heat the soldering iron and dip the stripped tip into it. Rosin melt will act as a flux additive and will prevent the metal from becoming coated with an oxide layer. Instead, it will be coated with a layer of tin. Next, you need to take a square of coarse natural cloth and wipe the freshly tinned tip. In this case, the tin will rub over the surface and stick to it perfectly. The disadvantage of this method is a lot of smoke and a strong smell.
- The next method of tinning the tip produces less smoke, but requires more labor. A piece of coarse natural cloth should be laid out on a smooth board, sprinkled with crushed rosin or a whole piece should be placed on it. Dip the stripped tip into rosin and rub the surface with a solder rod. This operation will have to be repeated several times, and then rub the working surface on rosin cloth.
A soldering iron with a copper tip must be tinned each time before soldering and always after storage without use.
Why doesn't tin stick to the soldering iron?
There are few reasons why solder rolls off a soldering iron, or rather, there are only two. The first is a dirty tip, the second is an oxide film. Eliminating both problems makes full soldering possible.
The most common solder for home soldering is tin-lead solder (POS) with a melting point of 190 to 300°C. As a rule, this is enough for soldering work. If you allow the soldering iron to heat up more strongly, the solder and flux will simply burn out, and the combustion products will stick to the tip.
Most often, the soldering iron tip is made of copper, which oxidizes at elevated temperatures. It is because of the copper oxide film covering the surface of the tip that solder does not stick to it.
How to tin a soldering iron tip while working
If you carefully clean and tin the tip, then after half an hour of work, or even earlier, tin will no longer accumulate on it. The copper slowly began to burn, and slag residues accumulated on it. There is no point in pressing the soldering iron harder, stop for tinning. There are a number of techniques for tinning the tip.
Using a wooden block
A rough wooden block (spruce or pine, they contain natural resin, similar in composition to rosin). Pour a small amount of flux composition onto the block and put a small piece of solder. If you notice dross, you can strip and tin the tip again with little interruption.
In a metal sponge
This quick tin tip method will require some preparation. Place a household wire dish sponge in a metal cup. The lower part of the sponge should be coated with a thick flux, such as soldering lard. By slightly immersing the tip in the sponge, it can be cleaned of slag and scale. And if you pick up a drop of tin and immerse it deeper into the sponge, it will turn out to be tinned.
Tinning the tip with a metal sponge
This method can be used to clean and tin both a classic copper tip and modern ones made of nickel or ceramic.
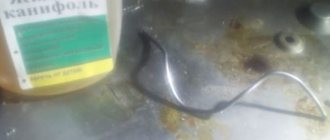
In rosin
This traditional method of tinning requires a certain amount of dexterity and speed of movement. Copper oxidizes very quickly, and you may not have time to bring the tip from the point of mechanical cleaning to the container with flux. Therefore, they clean directly under flux, placing a file under the tip. You need to rub the tip over the file until the flux melts, after which you can tin it by holding a tin rod.
Tin the classic way
Another traditional method of tinning involves the use of refractory solder. The refractoriness of the solder allows it to evaporate more slowly from the surface of a tinned soldering iron and will remain on the copper longer. It will require:
- file with frequent notches;
- rough board made of coniferous wood;
- rosin;
- a piece of refractory solder.
The sequence of actions is as follows:
- put solder on the board;
- clean one side;
- dip deeply into rosin;
- quickly clean it on a board, running it over the solder;
- repeat for the second side.
Next, you should tin the round surface between the edges.
Soldering Kama Sutra. A quick guide to using a soldering iron for beginners
IBM PC specifications
, the only tool needed to manipulate the iron is a screwdriver.
There's not a word about the soldering iron. But, nevertheless, sometimes you have to use it. Why? Firstly, the developers of the specification did not provide for some non-standard situations, and, secondly, they could not even think about what seasoned overclockers would need to do with a computer. In other words, you often have to solder in pursuit of megahertz, and this fact is undeniable. Another question: how to solder? After all, if the turning away reflex is more or less familiar to everyone, the soldering reflex is known only to certain advanced individuals. Therefore, I give an instruction: within the next ten thousand characters you must learn to solder like the most seasoned radio electronics engineer. As a “maximum plan”, you can put old man Goryachev in your belt. I give permission... Let's solder swords into ploughshares. The first question that arises in your mind is: what to solder with? I answer: with a soldering iron. Logical, right? But then the difficulties begin. It is assumed that you have not yet tarnished your reputation with your soldering skills, and therefore you do not even have a soldering iron. So, you'll have to go and buy it. Which soldering iron should you choose? Undoubtedly radio-electronic
.
You are unlikely to be able to solder a hole in a pan with it, but it will cope with the stubborn legs of radio components and microcircuits with a bang. We need a low-power ( 40 Watt
) soldering iron with
a thin,
pointed tip.
Along the way, stock up on a few pieces of rosin
and a thin long wire of low-melting
solder
.
We will also need a thick wooden board, a roll of regular wire, sandpaper and a little patience. When all this equipment is on the desktop, and patience is firmly established in all the convolutions of the brain, you can begin to prepare the workplace. Place a wooden board in the most visible place - this will be our working area. Shake a few pieces of rosin and a little solder onto the edge of the board. Place the soldering iron somewhere on the edge. To prevent it from rolling, it would be nice to make an impromptu stand from a spool of thread sawn along the axis. Now let's figure out what we need and why. Sandpaper is needed to strip the ends of wires or parts. Any wire has a thick
layer of oxide film that serves as insulation.
This is what we will remove with sandpaper. We will solder directly. It is the glue that binds all our compounds. And rosin serves to clean the working surface and remove the thin
oxide film that forms on any conductor over time.
First experience Our first experience will be the reliable soldering of two pieces
| Preparing the soldering iron for work. As a Soviet-era propaganda poster teaches us, first you need to clean the soldering iron tip with sandpaper (or a file, but this method is not suitable for thin tips), then dip it in rosin and rub it on the solder. |
wire. To prepare, you need to do two things. The first is to take a roll of wire and cut two pieces that we will solder. And the second is to prepare the soldering iron for work. It is advisable to carry out this procedure every time before starting the soldering process. 1.
Sand the soldering iron tip with sandpaper.
2.
Plug it into a power outlet and wait until the soldering iron tip gets hot enough (this will take a few minutes).
3.
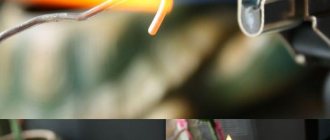
Lower the soldering iron tip onto a piece of rosin.
It should melt, boil and smoke desperately. If this does not happen, it means that the soldering iron is not heated enough. If boiling occurs instantly, and not after a few seconds, it means the soldering iron is overheated. Move the soldering iron tip around the molten rosin, twisting it a little. 4.
Touch the tip of the soldering iron to the end of the solder.
Wait about ten seconds for the solder to melt. Make sure that a thin layer of solder adheres to the tip and covers it evenly. 5.
Rub the soldering iron tip a little on the sandpaper to remove excess solder.
Now the soldering iron is ready for use. Take the wires and solder them. How? Quite simply. 1.
Using sandpaper, sand the soldered ends of the wires until they are shiny.
tin
each of the soldered ends of the wires .
This is done like this: a)
Place the tip of the wire on a piece of rosin.
Press the tip of the soldering iron on top. The rosin will melt and envelop the end of the wire. b)
Place the tip of the wire on a piece of solder.
Press the tip of the soldering iron on top. The solder will melt and coat the end of the wire. To ensure even coverage, rotate the wire slowly while tinning. 2.
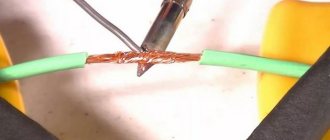
Twist the soldered ends of the wires together.
3.
Touch the soldering iron tip to the solder.
Wait until it melts. A little solder will seem to be collected on the tip. This only happens when the soldering iron is heated to the desired temperature. If it is underheated, the solder will not melt, and if it is overheated, the solder will not be collected on the tip. 4.
Cover the area where the wires are twisted with solder from the soldering iron tip. The solder will instantly harden, and you will get a beautiful and reliable solder.
Why do we need a blacksmith? That's all. Not so difficult, right? Now let's learn how to do something more meaningful than soldering two wires. After all, learning to solder is not an end in itself, but a severe necessity. You can use soldering skills, for example, in the following cases: * The wiring coming from the cooler to the motherboard has come off
board. This happens quite often, especially considering the not very good quality of these same wires. Buy a new cooler? No, it's better to solder it yourself. * On many cases, the Reset
is recessed into a special niche, so you have to press it with a pen or any other sharp object.
Such buildings are definitely not made for Russian people. After all, you have to reboot a hundred times a day. As an advanced hardware engineer, you simply must correct this injustice. Let's replace the existing pimple with a normal button. This is not difficult to do. It is enough to carefully drill out the place where that shameful pimple used to be, attach a button there and solder the wires that previously led to this obscenity on the bright face of your desktop to the terminals of a normal button. You already know how to solder. AMD Athlon
multiplier . My favorite pencil broke, and in general, graphite won’t help much here. And a reliable solder channel is just right. And this is only a small part of what can be done if you know how to solder. But in order to finally join the ranks of radio amateurs, you still need to learn how to solder not just conductors, but radio-electronic parts. This is what we will do now.
Tricky capacitor But, nevertheless, capacitors are also useful. And this is also a radio component. Using the example of a capacitor, we will learn how to solder more complex things. Let's say we need to replace a burnt-out condenser (a diminutive of “capacitor”) on the motherboard. Naturally, we will not tear apart the real motherboard, but will take something similar. Surely you've come across old printed circuit boards, maybe from your grandfather's tube receiver, or maybe from a TV, or just from an unnecessary electronic item. Of course, editing then and editing now cannot be compared: now it is much more subtle and precise. But editing even rough editing will be good practice for you.
So, in front of you is an old unnecessary board from God knows what. Select a part for experimentation on it, and then use scissors or wire cutters to cut out the legs of this part almost to the root. Now buy any small-sized Conder from a radio store and prepare it for soldering. How? Yes, everything is the same - each leg of the capacitor must be tinned. Just take into account the fact that this is not a simple wire, but a whole radio component, so there are several subtle points. Point one - remember that radio components cannot withstand overheating. There are certain restrictions on the time of direct contact of the soldering iron tip with the leg of the part. For resistors and capacitors this limit is approximately 7-10
seconds, and for transistors and diodes -
4-6
seconds. Don't be horrified: it's not as little as it seems. A master craftsman can solder any radio component in half a second. You can do it in two to three seconds. In addition, we will use some military stratagem. For our Frankenstein experiments, we will also need tweezers. If the wire did not heat up much during soldering, and it was quite possible to hold it in your hands, then the radio components instantly heat up to a high temperature. Holding them with your hands is not only impossible, but also dangerous. Therefore, we arm ourselves with tweezers, and, as a last resort, with lineman’s pliers. And now about our trick. You should hold the part with tweezers not by the body, but by the base of the leg. Moreover, for the base of exactly the one that you are currently soldering or tinning. What's the trick? - you ask. The point is that our tweezers will not only be a tool that holds the leg, but also an excellent heat sink. This means that the soldering time for each part can be reduced by two or three seconds. In such conditions, it is simply unrealistic to burn the part, unless, of course, your hands grow from the right place. Let's hope that's the case.
Soldering the radio component 1.
Use sandpaper to clean both legs of the capacitor.
| Solder the capacitor. The main thing is not to overheat. Carefully strip the leads, tin, mark the location and, with a slight movement of the soldering iron, drip a little solder onto the joint. |
2.
Do the following with each leg: carefully take it by the base with tweezers and tin it.
Be aware of the limited heating time. 3.
Bend both legs down so that they freely occupy the desired places on the board.
Using tweezers, bend about one millimeter at the end of each leg. 4.
Use the heated soldering iron tip to grab some solder.
5.
Press the bend of each leg to the desired location and drop a little solder on top. Try not to move the tweezers for a few seconds. That's all - the part is securely soldered. We will do the same with the jumpers on the Athlone, and with the unsoldered cooler wiring, and with the careless button, and with everything else. The only thing is that you can solder the button as much as you like - there’s nothing to burn out.
Strong and forever Soldering differs favorably from other types of connections precisely in that it is “strong and forever.” I hope that now you also understand this and have once and for all joined the great army of hardcore hardware people. Finally, let me give you some general tips that will make your interaction with a soldering iron simple and painless. * Prefer soldering to any twisting. Twists are very unreliable and can lead to either alternating contact or a short circuit. So fight the twisters! * Always remember that a soldering iron is not only a useful tool, but also a capricious one. You have to keep your eyes open and your eyes on the lens with him! It is difficult to get burned with a soldering iron, but it is quite possible. * When placing a soldering iron on a tree, do not be afraid to start a fire - this
almost impossible. An amateur radio soldering iron simply does not have enough power for this. However, the use of special stands is preferable. * If you solder something very thin (for example, the legs of microcircuits) with a thick tip, all this will most likely end in tears. Need an ultra-thin tip? Please. Take a piece of red copper
and wrap a few turns around the tip.
Bend the end of the wire forward. Here's your second sting. * One more tip about microcircuits. And it concerns not only soldering. You may have seen this warning in the installation instructions for various video/sound cards: “Before opening the case, stand on an antistatic mat.” Do you think this is the nonsense of illiterate imperialism? Unfortunately no. This, of course, is not about your safety, but about the safety of the card itself. There is always a slight static charge on your fingertips. It is very small, but if it comes into contact with a microcircuit, it can damage it. Moreover, this applies to any microcircuits, not just computer ones. Therefore, when installing cards and boards, do not touch the chips on them. And before soldering the microcircuit, touch the unpainted
part of the heating battery with your hand.
This way you will remove the static charge from yourself. * Rosin fumes are slightly poisonous, so solder only in a well-ventilated area. In Russian - open the window. * If you don’t have rosin on hand, and you really need to quickly overclock the processor to the speed of light, instead of rosin, regular... citramon
.
Well, or aspirin . There is nothing surprising here, since both tablets are excellent acids that will perfectly clean the surfaces of conductors from the oxide film. And their pairs will also save you from headaches. Well, that’s all the advice that will help you avoid unpleasant moments when soldering. Good luck with your stitching and everlasting conductivity!
How to tin a modern soldering iron tip
According to manufacturers' declarations, tips made of ceramic or nickel do not require tin-plating. In real life, they are also susceptible to the formation of soot and scale. It will not be possible to tin such a soldering iron in the usual way. You will need:
- cotton rags;
- jar of rosin;
- solder rod.
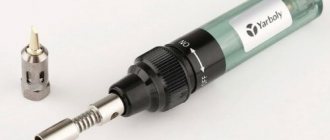
Soldering iron with ceramic tip
You should wipe the tip on a rag and immediately immerse it in rosin. Along the tip you need to immerse a solder rod in boiling rosin. It will melt and stick to work surfaces.
Proven method and prevention
The previous methods were invented relatively recently. Our ancestors carried out tinning a little differently, using a file with a fine notch. You will need a workbench to do the work, which is sometimes replaced with a board, as well as rosin and refractory solder.
Procedure:
The procedure will take at least 10 minutes. This time pays off in that you can work with the tool longer without additional cleaning.
Preventive measures against oxidation:
Conscious craftsmen always have a tool at the ready. It is advisable to tin the soldering iron tip after work and additionally before it, after long-term storage. Preventative measures during soldering will help get rid of weak adhesion of solder to a tip made of any material.
Tinning methods
There are several ways to clean work surfaces before tinning:
- Using abrasive materials. Needle file, file, whetstone, sandpaper.
- Using forging. It is recommended to remove the tip before processing it.
- Using another soldering iron. The tips rub against each other.
After stripping, you should immediately, without waiting for the oxide layer to recover, immerse the tip in a container with rosin. A rod of solder is also immersed there, melting it and allowing it to spread over the surface of the rod. This operation should be repeated several times to ensure that the working surfaces are completely covered with solder.
Next, rub the tip on a pine or spruce board to ensure even distribution of the solder.
Tinning with rosin
The tip must be carefully inspected. If there are areas not covered with solder, the operation should be repeated until a dewy continuous layer is obtained.
You won't be able to tin it once and for all. Tinning needs to be repeated periodically.
File and sandpaper
The classic way to prepare and tin a soldering iron tip before starting to work with it is to process it with a file (sandpaper) together with the use of high-quality rosin.
When preparing a tip using this method, you first need to sharpen one of the edges of the tip with a finely cut file, after which it is immersed in rosin and rubbed over a wooden board with molten solder.
Note that this procedure must be repeated several times. Upon completion of tinning, one facet should be sharpened and tinned in the same way.
To tinning a copper tip sharpened “to a cone”, it is first sanded with sandpaper along the entire working circumference, after which it is tinned with a rotational movement on a wooden lining with molten solder.