What it is?
A person who has at least once seen the operation of a gas welding machine can well imagine the design of a gas soldering iron.
. This tool consists of three parts:
- Gas filling tank;
- Flame adjustment button;
- Connector.
In fact, the design is a little more complicated, but if you do not plan to change the nozzle or air intake, and this is not worth doing, then you will not have to disassemble the soldering iron. The main advantage is the ability to use stings of different shapes and purposes. You can replace the working tip within a few seconds if it has cooled to an acceptable temperature.
The principle of operation of a gas soldering iron
Unlike gas welding, when soldering with a gas soldering iron, an open flame is rarely used. The design of the soldering iron provides a special catalyst, which looks like a ceramic mesh coated with platinum. Thanks to the catalyst, the soldering iron flame does not burst out, but burns evenly on the surface of the ceramic grill and heats the tip. Ceramics is a fairly fragile material, so it is not advisable to drop the soldering iron. Many craftsmen make a catalyst for a gas soldering iron from a nichrome thread, which is quite capable of replacing the original.
So, let's take a closer look at how a gas soldering iron works:
- The tank is filled with gas
, which is usually used to refill kitchen or ordinary lighters. Refilling a gas soldering iron takes 15-30 seconds, and the operating time of the tool will depend on the selected power; - Fuel is supplied to the nozzle
through a valve that controls the gas supply intensity, that is, the operating temperature; - The gas is ignited
using a piezoelectric element or flint, or simply from a match - it all depends on the model; - Using the regulator button, the required flame length is set
, that is, the temperature required for soldering.
You can bring the soldering iron into a state of “combat readiness” in half a minute, which is an undoubted advantage of the tool. In any case, before using a gas soldering iron, you should carefully study the instructions. Note “before” and not after half the apartment was almost burned down.
Use of gas soldering irons
The multi-faceted personality of the tool allows it to be used for various purposes:
- Heating
of rusted parts, heat-shrinkable pipes, etc.; - Cutting
plastic – the best gas soldering irons are capable of not only cutting, but also fusing and welding plastic parts; - Cleaning
of old paints and varnishes; - Soldering
with a gas soldering iron (with an open flame, where the temperature rises above 1000 °C) allows you to solder using high-temperature hard solders; - Repair
various equipment, including automotive electronics, while standing on the side of the road; - A mini gas soldering iron, also known as a “pencil”, allows you to spot solder microcircuits
and circuit boards even in conditions of complete absence of electricity; - The tool has gained wide popularity among installers and electricians working on sites under construction or without power.
Comparative characteristics of electric and gas soldering irons
Mobility and convenience
:
- Electric – tied to the network
, limited by the length of the cord; - Gas – full mobility
; can be used in hard-to-reach places; does not require electricity; Having a gas cylinder on hand makes it easy to refill at any time.
"Combat readiness":
- Electric – the average tip heating time is 3-5 minutes
; - Gas – ready for use in 10-30 seconds
;
Operating modes:
- Electric - only expensive models
; - Gas - any model
has the ability to adjust the flame and several modes: using a replaceable tip, you can solder with a gas soldering iron using a thin stream of heated air, burner.
Temperature:
- Electric - virtually all models have an operating temperature of 450°C
; - Gas - depending on the tasks, the temperature can be adjusted from 500 to 2000 °C
.
Rating of gas burners for soldering and repair
1st place – mini gas burner with soldering attachment
Designed for both heating medium-sized parts and for contact soldering due to the heating of the tip from the flame. A kind of soldering iron without wires. The gas tank capacity is 8ml. The flame temperature when filling with butane reaches 1300 degrees Celsius, and the tip temperature – 450 degrees. The flame length is adjustable from 4 to 6 cm. The burner length is 13 cm and the diameter is 1.5 cm.
small and inexpensive, the refill is enough to solder several medium-sized parts, there is a nozzle for contact soldering, it is easy to refill.
2nd place – gas micro burner
There is nothing in it except a tank with a filling valve and a nozzle with a gas supply regulator. The ZC57100 does not have piezo ignition and it is supplied unfilled, so you will also have to buy a gas cartridge - it will be suitable for lighters. In general, to solder two wires or heat heat shrink without a soldering iron, such a torch is enough. The burner is also about 20 cm long and weighs 43 g.
This is the cheapest burner that can be found and the price of such a micro burner is 200 rubles.
the cheapest, easy to refill.
small flame, the filling runs out quickly, there is no piezo ignition.
3rd place – mini gas soldering iron KVT XZ-1
This remarkable soldering iron from the gas powered brand features piezo ignition and comes in a case with a set of 4 soldering tips, a spool of solder, and a tip cleaning sponge. Thus, the declared power of the soldering iron for contact soldering is 137 W - this is a lot for a soldering iron with a length of 21 cm and a weight of 120 g. Electric soldering irons have never dreamed of such weight and size characteristics. This soldering iron is not positioned as a torch, but it can be used as a torch - the flame is pencil-type.
This soldering iron is good for everyone, except for the price of 2300 rubles, which is why it landed in 3rd place.
burner from a famous brand, easy to solder, set of components, good case, high heat output.
4th place – gas burner IRIS BARCELONA
This torch is not only designed for soldering, welding, repairing electronic devices and jewelry. The flame of this burner is of course adjustable. Can be charged with a standard lighter gas cylinder. The flame length reaches 3 cm. The operating time is about 20 minutes. The flame temperature reaches 1300 degrees Celsius. The length of the burner itself is exactly 20 cm.
small size, piezo ignition, brand.
The length of the flame does not allow heating medium and large parts.
5th place – butane burner KVT X-220
It is positioned as a burner for construction and repair work. She looks very stylish. The knurled handle fits nicely in the hand. Has a piezoelectric flame ignition system. The capacity of the cylinder for highly purified butane is 22 ml. This amount of gas is enough for 110 minutes of continuous operation. The flame length is adjustable from 30 to 80 mm from a sharp wedge-shaped flame to a soft flame with yellow tongues. The weight was only 226 grams with a length of 14 cm.
a good option for desktop work, there is a stand, piezo ignition, and a comfortable handle.
It's bulky, you can't put it in your pocket, you can't fit it into a narrow place.
The main thing is to choose correctly
A master planning to purchase a new tool for himself will try to find out which gas pin is better
. There is no clear answer to this question. First you need to decide for what purpose you are going to purchase this unit, and then find a store where you can buy a gas soldering iron at an affordable price and of appropriate quality. Well, let's say you've already found a place - our store has goods from the best manufacturers. There are still goals.
Hobby or home use
– Inexpensive models are suitable as tools, but preferably not made in China. An average tool can easily cope with everyday tasks: soldering a part, connecting wires, soldering or cutting plastic, even starting a fire from wet wood. By the way, for lovers of hiking and relaxing in the lap of Mother Nature, we offer gas soldering irons and burners that will save you from the unnecessary hassle of cooking or heating food.
Professional soldering
– here you need a tool with the ability to fine-tune and a wide range of tasks performed. An excellent choice would be the Dayrex gas soldering iron, which is suitable for working with hard and soft solders, heats up parts perfectly, and easily cuts plastic. It is better to refill a professional gas soldering iron (the instructions are often silent about such nuances) with proven, well-purified butane. Using cheap gas for a gas soldering iron, you risk quickly ruining the catalyst - it will simply become clogged with solid impurities. However, if such a problem does happen, then there is no need to panic - just take out the catalyst and clean it.
By trusting a professional gas tool, you get the opportunity to quickly get to work and carry it out at the highest level. And we, in turn, are always happy to provide you with gas soldering irons from trusted manufacturers and at affordable prices.
In practice, motorists often have to deal with the need for soldering or welding. Several years ago, quite by accident, I saw a gas soldering iron made in the GDR used for these purposes, and that’s when the idea came up to make a similar one, but powered by gas. The result exceeded all expectations - and now the gas soldering iron takes its rightful place in my tool kit. Its operation during the repair of bodies, radiators, and tips of large-section copper cables confirmed the operability of the design. The main advantages over the traditional “hammer” and blowtorch are: the possibility of continuous soldering, maintaining a given temperature, which is important when performing a large amount of work, as well as the ability to regulate the degree of heating.
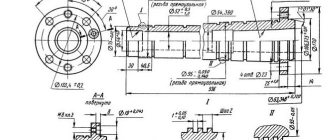
To make a soldering iron, you needed a PPB-1 plug valve, used in the oil pipeline of the GAZ-53 car. Its modification consisted of turning the front part to 12 mm and cutting an M12x1.5 mm thread. A jet with a hole with a diameter of 0.8 mm is made of brass and pressed into the valve body. It should be noted that the holes in different taps differ by 0.1 mm in one direction or another. Therefore, the adjustment of the nozzle seating surface was carried out individually.
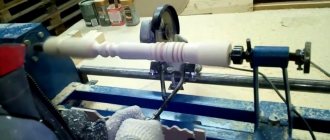
The material for the nozzle was a piece of stainless steel pipe with an internal diameter of 23 mm and a wall thickness of 1.5 mm. The workpiece is processed to the required dimensions on a lathe. The rear part of the nozzle is also rolled on a lathe using a pressed block.
For the gas pipeline handle, a duralumin rod with a diameter of 20 mm and a length of 160 mm was used. A through hole with a diameter of 4 mm is drilled in it. In the absence of a special tool, this operation is performed in two steps from different sides. Next, one of the ends of the rod is machined to fit the existing diameter of the hose. The textolite handle is fixed with EDP glue. The threaded connection of the rod with the tap is sealed with FUM tape (sealant).
The soldering iron tip is made of a copper bar with a cross-section of 20×20 mm. A rod with a diameter of 9 mm from the intake valve of the MTZ engine is used as a rod. The connection to the tip is M8 threaded, followed by caulking. (It makes sense to make several different soldering iron tip shapes at once, depending on the purpose.)
1,2 soldering iron holders; 3 — soldering iron rod clamp; 4-nozzle body; 5 — jet; 6 - tap PPB-1; 7- handle; 8 - gas pipeline.
1 – sting; 2 – rod.
Since the operating pressure of a standard (household) gas reducer is not enough for normal operation of the burner, an adjustable reducer is used. To prevent liquid gas from entering the burner channels, the cylinder is only in a vertical position.
It should be noted that this device is no more dangerous than a regular blowtorch, and when working with it, general fire safety rules should be observed, including ensuring the tightness of the gas pipeline connections.
The burner is ignited with the tap barely open. The tap regulates the strength of the flame and, consequently, the degree of heating of the soldering iron tip. To ensure complete combustion of the gas-air mixture, the distance from the nozzle to the heated surface of the soldering iron is at least 15 mm.
Y. SHORETS,
Novoselki village, Vitebsk region.
Noticed a mistake? Select it and press Ctrl+Enter
to let us know.
In many areas of activity, there is a need to ensure strong permanent connections between parts that have the same or different chemical composition. This type of connection includes soldering, which is based on fastening two or more parts using heated solder. The difference in the chemical composition and physical properties of both the parts themselves and the solders used requires different heating temperatures at the joints. Usually soldering is divided into low-temperature and high-temperature. In the first case, it is necessary to ensure that the added solder is heated to a temperature of 450 °C; in the second case, the temperature must be significantly higher than this mark. To implement this technological process, modern manufacturers offer a large number of types of soldering irons. True, such an electrical device as a soldering iron can be made independently at home. The most important thing is to understand the scope of its application, what you plan to solder: microcircuits in electronic equipment or samovars.
Making a gas burner from scrap materials: step by step
List of materials and tools:
• drill; • Bulgarian; • hammer; • sandpaper; • brass blanks for the divider nozzle; • thin brass tube with a diameter of 15 mm; • wooden blocks; • vice; • silicone seal or FUM tape; • hoses for connection; • valve for adjustment.
How to make a nozzle and handle
First of all, we take a brass tube and attach a handle to it - for example, from an old burner, or from a wooden block, having processed it beforehand. We drill a hole in the block for a brass tube with the appropriate diameter. Having inserted the tube into the timber, we secure it with silicone or epoxy resin.
Next, we proceed to a more labor-intensive and time-consuming stage of work - manufacturing the nozzle. The hole size should preferably be 0.1 mm.
You can use a drill to make a slightly larger hole, and then adjust the edges to 0.1 mm. The hole must have the correct shape so that the flame is even.
Required physical characteristics for a homemade soldering iron
The wide selection of soldering irons on the market today makes it easy to choose a device to solve specific problems. However, many people try to have a homemade soldering iron. To do this, you should consider the required physical characteristics of a homemade soldering iron.
These characteristics are divided into the following quantities:
- voltage supplied to the heating element (for electric soldering irons);
- heating element power;
- the presence of a power regulator;
- the size and shape of the sting;
- solder heating method;
- handle configurations;
- cost.
According to the first parameter, either a standard alternating voltage of 220V, or a constant voltage of 12V, 24V is supplied to the electric soldering iron. The voltage value determines the power of such soldering irons. It has discrete values at 20 W intervals. That is, 40 W, 60 W, 80 W and so on. More advanced devices have a special power regulator for the soldering iron.
The size and shape of the soldering iron tip has a fairly wide range of design solutions. Often, special attachments are used to work with complex radio-electronic devices (for example, for soldering microcircuits, depending on its design).
Modern soldering irons use the following methods for heating solder:
- Using an electric current applied to a heating element. In this case, the following are used: nichrome wire, ceramic rod, induction coil, pulse converter.
- Gas apparatus. The solder is heated due to the combustion of the gas jet. You can call it a mini welding machine. Such devices belong to professional equipment.
- Infrared stations. The solder is heated using infrared radiation. It creates a heating zone from 10 millimeters to 60 millimeters. The size and shape of the heating zone may vary depending on the design of the infrared window.
The most commonly used devices are those that heat the tip using electric current. The small number of elements and the simplicity of the design allow us to say that you can make a soldering iron with your own hands.
The procedure for self-assembly of a soldering iron
The need to have a homemade soldering iron can be dictated by two considerations: the characteristics of existing samples do not meet specific requirements, and the desire to reduce the cost of purchasing a soldering iron. To understand how to make a soldering iron with your own hands, you need to consider its structure.
A typical electric soldering iron includes: a heating element for the soldering iron, a tip, a body, a protective apron, a handle, and a lead wire. All of the listed elements can be made with your own hands or selected from ready-made elements from others, for example, faulty appliances.
Currently, there are a large number of homemade designs of such devices. The most popular are the following:
- changing an existing design or adding necessary parts (for example, changing the diameter of the tip);
- adding a soldering iron heating power regulator;
- homemade micro-soldering iron;
- resistor device.
Changing the design of a soldering iron involves changing the shape of the tip, and thereby reducing the power and time of contact with the part.
There are times when even low-power soldering irons (for example, 25 W or 40 W) are not able to solve the required problem. In this case, a nichrome wire is wound in a spiral onto the finished tip, leaving one end free, as a new tip. Thus, it is possible to significantly reduce the diameter of the tip, which reduces the contact area with the part.
The use of a homemade power regulator in combination makes it possible to obtain improved heating characteristics. In amateur radio literature, you can choose a power regulator circuit based on your requirements, access to the required radio components, and experience in assembling radio devices.
Typically, a thyristor or triac is used as a regulating element. A microcontroller is used to stabilize the output parameter. The choice of body shape remains with the manufacturer. More often, ready-made housings are used: sockets, extension cord housing, housing from a mobile phone power supply, and so on. Therefore, making such a power regulator for a soldering iron yourself is quite simple.
USB soldering iron
A DIY USB soldering iron can be connected to any Power Bank device - it’s very convenient.
To make a soldering iron with a USB plug, you must first take a copper wire with a millimeter diameter and use pliers to make a ring at one of the ends. The ring must be large enough for the bolt to fit through it.
Then you need to take a nichrome wire 7 cm long and wind several spirals onto a copper rod on the side where there is no ring (closer to the end, but not at the very end - this is important!)
It is worth paying special attention that the copper rod and nichrome wire must be insulated from each other, for example, with fiberglass. Next, the copper wire should be attached to a suitable size bar with a bolt
In the next step, two copper wires are screwed to a nichrome wire, the switch is glued to the bar, and the wires are soldered to the switch. Then you need to wrap the lower part of the bar with electrical tape - this is how the wires of the mini soldering iron are fixed
Next, the copper wire should be attached to a suitable size bar with a bolt. In the next step, two copper wires are screwed to a nichrome wire, the switch is glued to the bar, and the wires are soldered to the switch. Then you need to wrap the lower part of the bar with electrical tape - this is how the mini-soldering iron wires are fixed.
Finally, a USB plug with a wire of a certain length is taken and connected to the copper wires. Polarity is not important in this case. Before heat shrinking, those areas where the wires are connected to each other must also be insulated.
In addition to this, you should also tape the wire from the USB to the bar with electrical tape. After this, the performance of the soldering iron can already be checked on some workpiece.
Soldering iron with a resistor as a heating element
An interesting design can be implemented using a powerful resistor. With its help, you can make a soldering iron with your own hands. To assemble such a device you will need the following parts:
- Resistor of the PEV series, designed for power up to 10 W, with a rating of 15 to 27 Ohms. It should be taken into account that it will be connected to a 12V or 24V network.
- Copper rod. It will act as a soldering iron tip. It should be taken into account that the outer diameter of the rod must correspond to the inner diameter of the resistor hole. The rod should fit tightly in this hole. You can provide a hole into which a bolt will be screwed to secure the rod.
- A ready-made spiral, which is present in the resistor, is used as a heating element. It is designed for a specific resistance and will provide the necessary dissipation power.
- Power cord with plug.
- Handle for attaching the resistor. It must be made of dielectric material and have high thermal insulating properties. In addition, for convenient operation, the handle must be given an ergonomically sound shape.
If such a device is planned to be used to solve a wide range of problems, it is advisable to connect it to a power regulator.
DIY making
A homemade gas burner consists of the following elements:
- gearbox;
- body made of metal;
- head and nozzle;
- an element designed to regulate the fuel supply;
- a unit designed for fastening and fixing a gas cylinder.
The simple design means that you can create it yourself from scrap materials.
A gas torch for soldering with your own hands can be created as follows:
- It is recommended to start work by making the burner handle. A variety of materials can be used to make this structural element. If possible, you can remove an already made handle from another device.
- The gas supply tube must be made exclusively of high quality steel. This is due to the fact that such a material can withstand high temperatures.
- When creating a device, you should pay attention to the dimensions of all parts. The diameter of the tube duct should not be more than 1 centimeter. Only in this case it is possible to ensure high pressure under which the gas will be supplied. The wall thickness of the tube used is from 2 to 2.5 millimeters. Only in this case can the tube withstand strong impact.
- The handle is attached to the tube using glue or other high-quality material.
- The body can be made of steel. Many experts recommend using a brass rod, the width of which should be no more than 2 centimeters. The divider is also made of this material.
- Several holes are created that allow oxygen to circulate. This is due to the fact that fire cannot occur without oxygen. It is recommended to create about 4 holes, the diameter of which is 1 millimeter.
- The next step is to press the divider into the body of the manufactured device. The flange is installed with a certain clearance. Due to the created gap, it is possible to slow down the flow of a huge gas flow that approaches the igniter.
- The nozzle is designed to supply gas from a cylinder. You can make it yourself, using a special rod. You can form a blind hole in the nozzle by drilling; the diameter should be 2 millimeters. The bridge is created using a 4 mm drill.
- To supply fuel, a hose is installed at the end of the tube. It is worth considering that gas supply requires a hose made of special fabric and rubber.
Soldering iron made from wire resistor
In addition to PEV brand resistors, you can assemble a soldering iron from a wire resistor. Use MLT type resistors. When choosing a resistor, you can calculate the future power of a homemade soldering iron. For example, using a standard 12V power supply and a current of approximately 2.5A, a soldering iron with a power of 30 W is obtained. By decreasing the voltage, the power can be reduced to the required power. For example, with the same circuit parameters, but a voltage of 5V, the power will be 12.5 Watts. This calculation shows that the output is a low-voltage soldering iron, assembled with your own hands. Thus, you can assemble a miniature soldering iron from a non-wire resistor.
This soldering iron can be installed quite easily at home. If everything is done correctly, a soldering iron made from a resistor, assembled with your own hands, will last quite a long time. This technique is usually used to assemble a miniature soldering iron from a non-wire resistor.
Of interest is the homemade design of the so-called pulse soldering iron. Its implementation should be started if you have experience in reading electrical diagrams and experience in their installation and configuration. The advantage of such a soldering iron is its high heating speed (it is 5 seconds). To implement this design, you can use a switching power supply, which is used in fluorescent lamps.
Particular attention should be paid to the area of application. What radio components are planned to be soldered. If these are microcircuits or field-effect transistors, it is necessary to provide for the possibility of grounding the tip. This will remove electrostatic charge and will not lead to breakdown of semiconductor junctions.
A soldering iron is a simple tool that almost every owner has. Repair of TV, cell phones, radio equipment, connection of wires, antennas, cables is carried out using soldering. You can use welding, but it is not easy to use at home.
A gas soldering iron is needed to perform minor repairs on electronic devices. In order to save money, it is easy to do it yourself.
If you don’t have the necessary tool at home, you can make a soldering iron with your own hands.
Manufacturing from MLT and PEV resistors
A popular version of a homemade mini-soldering iron is using an MLT resistor (this abbreviation stands for “metallic, varnished, heat-resistant”). This is not even a mini, but a micro-device, but it heats up to 190°, which allows you to melt POS-60 solder.
To create it, in addition to the resistor itself, you will need:
- two insulated single-core copper wires;
- wooden block.
The resistor is the main part of the future device, and therefore its choice must be taken responsibly. It is better not to buy cheap Chinese products, but to give preference to domestically produced copper resistors.
To make such a mini-soldering iron, first the resistor is cleared of paint with some sharp object and the copper wire is protected. Then a loop is created from one end of the wire, freed from insulation, and placed on one of the edges of the resistor. And to the other edge they attach (ideally solder) the second end of the same wire.
Now you need to make a small twist from another copper wire to attach it to a wooden block (it will play the role of a handle here). The tip should protrude beyond the bar by no more than 1 centimeter, and the end of the resistor by no more than 2.5 centimeters.
They also make mini-soldering irons from a PEV-20 resistor (resistance 2 kOhm), inserting a copper wire tip into it, attaching a handle and wires. This mini-soldering iron can work from your home network. This is a very popular and simple design. The main thing in it is to make the copper rod correctly. For the tip, take either the rod of an old soldering iron or a piece of copper busbar.
Types of soldering irons and soldering rules
Soldering is the process of obtaining a permanent connection, which is obtained using a special tool - a soldering iron.
Soldering irons can be electric, induction, pulse, or gas. The easiest way to do soldering is to use a screwdriver heated with gas, but this is not very effective because the screwdriver cools down quickly.
Another version of the tool is a copper bar, which has a point on one side and is mounted on a rod with a handle on the other. The tool is heated on a gas stove or with a blowtorch.
Depending on what you will be soldering, different types of soldering irons are used. If the amount of work is large, then it is better to use an electric soldering iron, and a gas tool is perfect for soldering in difficult conditions where there is no electricity or it is turned off.
Before starting work, read these simple rules to get a good result:
- surfaces must be well cleaned;
- they must have a tight connection;
- During work, the elements to be connected must be heated to the required temperature.
To insulate the soldering area, use electrical tape or a special tube, which is slightly heated and fixed.
Return to contents
Choosing the right tool
The choice depends on your priorities in work, because you can solder various parts, but at home they often deal with problems such as extending wires, soldering connectors, antennas, and electrical equipment.
For work in the country or at home, an electric soldering iron, which has a reasonable price, is well suited. It’s convenient that you can work with it for a long time. Its disadvantages:
- temperature is not regulated;
- the tip overheats;
- the presence of static electricity, which can damage soldering elements;
- short service life;
- poor insulation of the soldering iron tip.
A convenient and functional device is a gas soldering iron, the main advantage of which is that you can work anywhere, regardless of the presence of an outlet. Such a tool has a fairly high price, but it can solder everything you need.
A gas soldering iron is convenient to carry with you or carry in a car.
You can repair electrical equipment on the road when your car breaks down or fix an antenna on the roof of your house.
Gas tools are mobile; they operate from a canister filled with gas. You can use them as a gas burner. The price of the tool may vary. It depends on the manufacturer, type of flame, degree of protection, heating temperature.
Return to contents
From the boiler
It is also possible to build a soldering iron for pipes with your own hands from a bucket boiler. To do this, two blanks must be made from aluminum plates. One of them will serve as a substrate for the thermostat, and the second will serve as a holder for the propylene nozzle.
Attach the thermostat to the boiler in a place located near its handle. For ease of operation, you can attach a light bulb to the thermostat terminals, which will serve as an indicator during operation.
The insulators must be connected using thermal tape. Use screws to connect the body parts through insulators. Place a nozzle with a bent aluminum plate on it inside the spiral.