There are various ways to decorate the surface of wood, one of the simplest and most effective is pyrography, or wood burning.
Any wood product can be made beautiful and unique by adding just a few contrasting touches.
It is not difficult to become a master of creating masterpieces using the burning technique. To do this, you don’t need to purchase expensive equipment, just buy or make a wood burner.
It's really simple - to create a beautiful and original thing, you don't even need artistic talent; you can download any images from the Internet or purchase an album of drawings in a store.
Methods for creating images
The principle of creating a pattern by burning is that part of the wood is charred and darkened, thereby standing out in contrast against the general light background. Working with a very thin tool, you can paint pictures on wood.
There are various pyrography technologies, many of them are complex and require special equipment. Among others:
- open flame treatment;
- firing using a clay stencil;
- burning with hot sand;
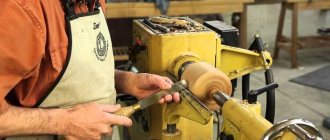
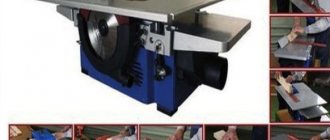
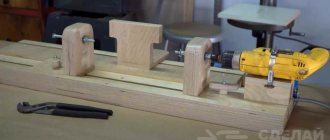
- friction burning on a lathe.
These are quite complex techniques, but an electric device is best suited for creating pyrography masterpieces at home. In the design of such a wood burner, the high temperature of the tip is created due to the flow of electric current through it.
The industry produces various models of burners, so it is not difficult for a novice master to choose the right tool. In addition, if you have the skills to work with a soldering iron, you can assemble such a device yourself.
What is a burning device?
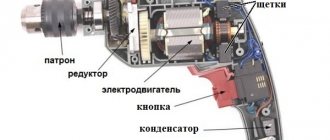
From the point of view of radio electronics, the circuit of an electrical device for drawing on a wooden surface is quite primitive. The basis is a step-down transformer that generates a voltage of 6–12 V. The burning device also consists of an ergonomic handle with a pin and an electrical cord. Depending on the design, the transformer is located in the handle or a separate block. In the latter case, this is a professional drawing apparatus. For children under 10–12 years old, such a device may be difficult to master.
1
Types of burners
Choosing a burner is a responsible matter. The quality of the resulting products largely depends on its characteristics. Both professional wood artists and beginning craftsmen use two main types of burning devices. These are devices with a wire tip and models with a solid tip.
With hard pen
This device is in many ways reminiscent of a regular soldering iron. Its working part is a sting, which is heated by a nichrome wire hidden under a metal casing. Unlike a soldering iron, a burner is equipped with removable attachments of various geometries. Depending on the price of the device, their number can reach 20 or more pieces.
The abundance of attachments allows you to make strokes of different widths and shapes, and by combining them, create unique images. Wood burners with a hard pen are characterized by low price, high durability, and ease of use. As disadvantages, it is worth mentioning the heating time (5 minutes or more), as well as the bulky design with a long handle, which complicates the performance of delicate work.
With wire pen
In burner devices with a wire pen, the heating wire itself is the working tool. The current is supplied directly to the pen, so the instrument is ready for use almost the moment it is turned on. Devices of the middle and highest price categories have a power regulator, which allows you to select the optimal thermal mode for any type of work. The small thickness of the wire used and its bend create a small contact patch with the material, which allows you to easily perform the most delicate work.
The disadvantages of this type of burner include the relatively high price and difficult repairs.
Separately, it is worth noting the string cutter-burner. This is a device that allows you to use heated nichrome thread to cut parts from a thin board or wood-based sheet material.
Burner handle.
The handle of the burner is made of a marker body, into which a rectangular piece of foil PCB with two tracks is tightly inserted. You can use double-sided PCB. Brass pins with bolts from a regular 220V plug are soldered to these two tracks on one side, to the bolts of which a sting made of nichrome wire is screwed. On the other hand, the ends of the wire going to the secondary winding of the transformer are soldered to the PCB tracks. And this entire structure is located inside the marker body. The pins from the marker body should protrude a certain distance in order to distance the nichrome tip and the marker body to prevent it from melting. That is, the tip should not be located directly close to the plastic of the marker body.
How to work correctly
It is easy to notice that the working tool of a wood burner resembles an ordinary pencil, and therefore the technique of working with it is not much different from ordinary drawing. It’s just important not to forget that the “pencil” is very hot.
The entire work process can be represented in a few simple steps.
Preparation
You need to choose a board on which the drawing will be applied. Its surface should be flat and smooth. To level the wood, the wood is scraped and treated with sandpaper.
A good material for burning, especially for a beginner, is plywood. It is cheaper, its surface is almost ready for work, you just need to smooth it with sandpaper.
Drawing
For those who have drawing skills, it is not difficult to cope with such work; moreover, craftsmen can do without a sketch, working straight away with a burner. For beginners, we can advise you to select a suitable picture on the Internet, print it and transfer it to your work surface. Here, old time-tested copy paper will come in handy; you can scale the image using the square transfer method.
For a novice master, it is worth choosing simple drawings that are not replete with small details. In addition, it is better to immediately make something concrete, not some abstract board, but, for example, a plywood stand for a microwave oven, which can be decorated with floral patterns.
Burnout
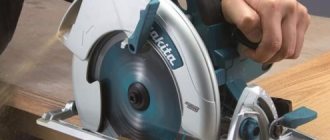
Using the heated tip of the burner, they begin to apply a pattern along pre-designated lines. The handle of the instrument is held like a regular pencil.
Drawing begins with the outer contours. Straight lines are performed with quick movements without pressure. It’s not difficult to make an accent or draw a thick line; you just need to slightly reduce the speed of the burner’s movement. In curved areas, you must hold the tool perpendicular to the surface of the board, avoiding excessive pressure.
Note! If there are several closely spaced lines, you should not try to draw them as quickly as possible; the wood must cool, otherwise the spaces between them may burn out.
The shade of the line can be changed within a fairly wide range. This is easy to achieve by changing the temperature of the tip, the shape of the working tool (in the case of replaceable attachments) and the angle of inclination.
Final processing
The completely finished image is processed with fine-grained sandpaper. Then they are coated with a layer of furniture varnish and, if desired, partially or completely painted.
Pyrography progress
- All necessary materials and tools are prepared in advance.
- A piece of wood of the required size is selected. It is better to do the drawing on the smoother side. Wood varies in hardness from 1 to 10. Accordingly, hardness 1 refers to the softest wooden surfaces, and hardness 10 refers to the hardest. For the first attempts, it is better to use soft wooden pieces.
- It is recommended to place the burner on a special stand, as it heats up instantly.
- Then you need to sand the piece of wood on which the design will be applied. You can use sandpaper for this.
- Instead of continuous lines, it is necessary to apply strokes. You can't press too hard on the wood, otherwise it will be difficult to control the pencil and then erase the extra lines.
- There is no need to rush to get the job done faster. Wood burning itself is a long, painstaking process. For beginners, it is recommended to try to use the same amount of force when applying the design. The design can be made darker by holding the burner handle on a specific area.
- The piece of wood must be positioned so that the grain is directed downward. This will help make drawing easier, since the device will move downwards all the time. Burning against the grain will significantly increase the resistance.
The simplest homemade burner
To decorate a small board with pyrography or simply try your hand at something new, you don’t have to buy a professional machine.
From a soldering iron or radio components
You can make your own wood burner using a soldering iron. To do this, it is better to choose a model with a replaceable tip. Nozzles with the required profile can be easily made from a copper or brass rod.
A practically professional burning device can be made according to a circuit with current regulation in the primary winding. To work, you will need very few parts: a transformer, several resistors, capacitors and dinistors. The circuit is not particularly complicated, however, manufacturing the device will require knowledge and skills in working with a soldering iron.
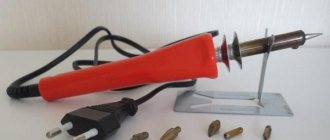
Mini burner
If soldering radio components doesn’t appeal to you or you simply don’t have the time, you can make a device of the simplest configuration. To make a mini-burner you will need:
- unnecessary power supply (charger) from a mobile phone;
- syringe needle;
- sewing needle;
- material for the handle (wooden skewer or brush handle);
- soldering iron and solder;
- shoe thread;
- electrical tape or heat shrink tubing.
The process of making a burner is not particularly complicated. You should start by preparing a syringe needle. The plastic part is bitten off from it; it is not needed in this device.
Both needles are attached to a wooden handle diametrically opposite. The easiest way is to secure them with threads. The sewing needle is carefully bent to such an extent that its point barely touches the point of the hollow syringe needle.
The plug is cut off from the old power supply; it is also not needed. The ends of the wires are stripped. The wires are soldered to the needles. Polarity doesn't matter. At this point, the production of a homemade wood burner is almost complete.
As a final touch, it is necessary to give the product an attractive appearance and create conditions for convenient use. The wire is wound to the handle. This can be done using the same thick thread. This design will be convenient and reliable, however, it is worth strengthening the thread with glue, and after it hardens, put heat shrink on the handle or wrap electrical tape.
Note! Heating of the tip occurs almost instantly. The principle of operation of the device is extremely simple: resistance arises between the needles and the needle from the syringe (due to the fact that it is thin-walled) becomes hot.
Perhaps, such a burner will not be able to make a picture (insufficient power, not the most convenient tip), but you can practice and decorate, for example, a cutting board.
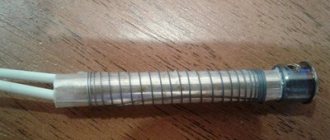
Nichrome wire holder for wood burner:
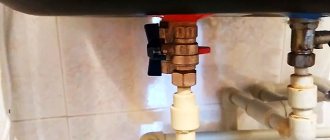
Surely, assembling the power supply for the burner will not be difficult for you, but what to do if you do not have a convenient holder handle (electrode)? I offer you a very simple but very convenient version of the handle. You will need a thick wire, a dielectric (or wooden) handle from an old burnt soldering iron, a piece of PCB or carbolite or other dielectric heat-resistant material, electrical tape, nichrome wire (you can bite off a piece from an incandescent coil for an electric stove) Figure No. 2, and electrical terminals Figure No. 3 .
You need to remove the terminals from the insulation and screw them to the PCB as shown in Figure No. 4,5.
CNC burner
The burner will help add originality to the interior, diversify it with handmade products, but not only. You can make good money by making paintings created by fire. Landscapes, decorative panels, portraits, household items and kitchen utensils with elements of burning are in consistently high demand.
The use of modern technologies will significantly simplify the creation of masterpieces using the burning method. Computer-controlled machines have long become commonplace in wood and metalworking shops. There are similar solutions for pyrography. Such a burner can be connected to a personal computer, transfer the required image to it, and it will do the rest itself.
To make your own CNC wood burner, you will need significantly more knowledge and materials. Typically, such machines are purchased for production purposes. But for those who want to assemble the device themselves, you can use a laser for burning.
In general, there are two directions in the development of CNC burners. They differ in the main working tool.
Laser burner
As the name itself suggests, the main part of the machine is the laser. It is from this that its main advantages emerge:
- high accuracy of drawing due to a small contact patch;
- versatility, the machine can be used when working with wood, leather, films, paper;
- The burner is immune to changes in temperature and humidity.
Disadvantages include the low speed of the laser burner and difficulties in drawing halftones. In addition, the cost of such devices is high.
Burner body.
The body of the burner is made of 10 mm plywood. The necessary parts of the body were cut out with a jigsaw, the ends were sanded with a belt sander to the size required for assembly, coated with PVA glue and tightened with self-tapping screws with countersunk heads. Drying for about a day. After drying the body, the parting plane of the two halves – the cover and the body – was polished with a surface grinder. The body and lid are mounted on miniature canopies. This entire assembly is also processed by a belt sander to a single form - factor with the removal of a certain certain amount of chips. As a result, we have an excellent homemade housing for the burner with a well-fitted parting plane and smooth sides.
We open the body of the burner several times until the desired shade is obtained.
Dry the body. As the stain dries, the wood fibers rise to form a velvety surface. Such a surface cannot be opened with varnish. Expanded wood fibers will look terrible. The body needs to be polished. To do this, we take a small wooden block that is convenient to hold in the hand, press its corner against another piece of wood, and then rub it on the wooden body. That is, we rub the body with the rounded corner of the bar - as if we are crushing the swollen fibers raised by the stain. Polishing should be carried out along the direction of the wood grain using uniform moderate force over the entire surface of the body. The process is long and painstaking, but the result is worth it. It is also recommended to first practice on a sample to prevent damage to the burner in the absence of experience.
Let's sum it up
It should be noted that burning today is not just a hobby, but can become a way to earn money. Every day the demand for burning landscapes and portraits is increasing - this activity competes with wood carving. Initially, it was created to diversify the interiors of ancient houses of the 19-20 centuries. When it was impossible to buy beautiful furniture in stores, you had to create it yourself.
In fact, you can make any type of wood burner in no time. A drawn drawing or sketch will simplify the assembly process and creation of the device.
It doesn't matter how complex your device is - the main thing is to get the tip right. The quality of all created paintings depends on it. If the burner draws patterns on wood as accurately as possible, you will be able to draw images of any complexity.