For professionals, the title of the article may cause a condescending smile. It would seem, what’s so complicated here? I cleaned the contacts, scooped up some solder with the nose of the soldering iron, and applied it to the connection point. For an experienced radio amateur, this process really does not cause problems. But if everyone (including professionals) knows how to solder correctly with a soldering iron, where do unsoldered boards, short circuits between adjacent contacts, and parts that fail due to overheating come from?
Our material will tell novice craftsmen how to learn to solder using traditional and non-standard methods, and for those who consider themselves professionals, it will help improve their skills.
What is soldering
Without referring to Wikipedia, we will explain in our own words. Soldering is the joining of metal contacts using a conductive melt, followed by its solidification. In this case, unlike welding, none of the parts being connected should melt during the process. Of course, after the conductive melt (solder) has solidified, reliable electrical conductivity of the connection must be ensured. Contact resistance cannot affect the characteristics of the electrical circuit.
General rules for working with a soldering iron (we will consider all these points in detail in the review)
- The connection point must be mechanically cleaned of dirt, protective coating and oxides (if the dimensions and design of the parts and conductors allow).
What you can focus on: some metals, in principle, cannot be cleaned of the oxide film, at least in air. Only under a continuous layer of special fluxes (we are talking about aluminum and alloys based on it). The fact is that the “winged metal” oxidizes instantly. - To degrease the connection point, special cleaners are used: fluxes.
They should not have a destructive effect on the metal you are working with. Even if the joint seems perfectly clean, soldering without flux is almost impossible. When you touch the heated tip of a soldering iron, thermal oxidation occurs.Important: metals used in electrical engineering (aluminum, copper, silver, gold) in their pure form have good adhesion. Standard solders seem to stick to the surface, securely fixing after hardening. The oxide film layer not only prevents “sticking”, it is also a dielectric.
And when heated, fluxes activate their cleaning properties, and not only remove invisible contaminants, but also prevent oxidation.
Special fluxes have been developed for various materials. Even acids are used.
- The shape and dimensions of the working tip of the soldering iron tip must correspond to the contacts and soldering conditions. The material does not matter: it can be copper, ceramics, or hard alloys, silver-plated.
- Choice of power - the range of 25–60 W is suitable for soldering printed circuit boards. Too high a temperature can not only overheat the soldering area, some radio components fail when exposed to heat. The other side of the coin: low temperature will be removed from the soldering zone by massive contacts or a thick heat-conducting conductor. You will have to keep the tip in the working area for a long time - hence the overheating of the parts again. For example, when the question arises of how to solder a capacitor, it is important to know exactly the degree. The golden rule of soldering: high temperature and short-term heating. This skill comes only with experience.
- Solder selection. From the point of view of adhesion, all types work well. That is, selecting contacts for a specific metal is not task No. 1. But the melting point should be treated carefully. On the one hand, low-melting compounds make it possible to minimize the thermal effect on parts. On the other hand, this creates two additional problems: Firstly, low-melting solder “unsolders off” just as quickly. If the temperature conditions of the contact connection are not very favorable, there is a possibility of loss of contact during operation. Secondly, you will definitely encounter the fact that the solder is already in a liquid state, and the contacts have not yet warmed up for normal adhesion. As a result, the soldering point again overheats.
Let us repeat, these are only theoretical principles, from which it is not yet clear how to solder with a soldering iron. You will see detailed instructions below.
How to re-solder a BGA chip
In phone repairs, there are a lot of different breakdowns related specifically to microcircuits. These BGA chips may be responsible for certain functions in the phone. For example, one microcircuit may be responsible for power, another for Bluetooth, a third for the network, etc. Sometimes, when the phone falls, the balls of the BGA chip move away from the phone board and it turns out that the circuit is broken, therefore the phone loses some functions. In order to correct this issue, repairmen either heat the microcircuit so that the solder ball melts and again “grabs” with the contact pad on the phone board, or they completely dismantle the microcircuit and “roll” new balls using a stencil. The process of rolling balls onto a BGA chip is called reballing. In the Russian expanses this term has not taken root and in our country it is simply called “rolling”.
Our guinea pig will be a mobile phone board.
To make it easier to solder “those black squares” on the board, we will use an infrared preheater or popularly “bottom heating”. We set the temperature on it to 200 degrees Celsius and go drink tea. After 5-7 minutes we begin to fend off our patient.
Let's focus on the BGA chip, which is simpler.
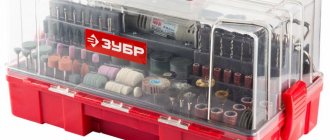
Now we need to prepare the tools and chemistry for soldering. We can't do without stencils for various BGA chips. Those who are seriously involved in repairing phones and computer equipment know how important this is. The photo below shows the entire set of stencils for a mobile phone repairman.
Stencils are used to “roll” new balls onto prepared BGA chips. There are universal stencils, that is, for any BGA chips. There are also specialized stencils for each microcircuit. At the very top of the photo we see specialized stencils. Bottom left - universal. If you choose the right pitch on the chip, you can easily roll balls onto any of them.
In order to reball a BGA chip, we also need the following simple tools and consumables:
Here is the familiar Flux-off to all of you. You can read more about it and other chemistry in the article Chemistry for an electronics engineer. Flus Plus, Solder Plus solder paste (gray mass in a syringe with a blue cap) is considered the best solder paste, unlike other pastes. The balls with it turn out like factory ones. The price for this paste is expensive, but it's worth it. Well, of course, among all the other junk there are also price tags (buy them so that they are very sticky) and a simple toothbrush. We will need all these tools to reball a simple BGA chip.
In order not to burn the elements located nearby, we will cover them with thermal tape.
Lubricate the microcircuit generously around the perimeter with FlusPlus flux
And we begin to warm up our BGA with a hairdryer over the entire area
This is where the most crucial moment comes when soldering such a microcircuit. Try to heat with an air flow slightly less than average. Raise the temperature literally a couple of degrees. Doesn't unsolder? Add a little heat, and most importantly DO NOT RUSH! A minute, two, three... it doesn’t come off... add heat.
Some repairmen like to chatter “hahaha, I can unsolder the BGA in a matter of seconds!” They unsolder, then they unsolder, but at the same time they do not understand how much stress the soldered element and the printed circuit board receive, not to mention the nearby elements. I repeat once again, TAKE YOUR TIME, TRAIN ON CORDS. DO NOT HURRY to tear off an unsoldered microcircuit, it will backfire on you, because you will tear off all the dimes under the microcircuit! Use special devices to lift microcircuits. I found them on Ali via this link.
And so we heat our microcircuit with a hairdryer
and at the same time we check it using a chip extractor. I wrote about him in this article.
The microcircuit, ready for lifting, should “float” on the molten balls, let’s say... like a piece of meat on jellied meat. We lightly touch the microcircuit. If it moves and returns to its place, then carefully lift it with the help of antennae (in the photo above). If you don’t have such a device, then you can use tweezers. But be extremely careful! Don't use force!
Currently, there are also vacuum tweezers for microcircuits of this kind. There are manual vacuum tweezers, the operating principle of which is the same as that of the Desalt Pump
and there are also electric ones
I had hand tweezers. To be honest, she's still a piece of shit. Hardcore repairmen use an electric vacuum cleaner. One has only to bring such tweezers closer to the BGA chip, which is already “floating” on the molten balls of solder, and it immediately picks it up with its Velcro.
According to reviews, electric vacuum tweezers are very convenient, but I still haven’t had a chance to use them. In short, if you decide to, go electric.
But let’s return to our microcircuit. With a tiny push, I make sure that the balls are really melted, and with a smooth upward movement I turn the BGA chip over. If there are many elements nearby, then it would be ideal to use vacuum electric tweezers or tweezers with curved jaws.
Hurray, we did it! Now we will practice soldering it back :-).
Now the most difficult process begins - the process of rolling the balls and soldering the microcircuit back. If you haven't forgotten, this is called rolling . To do this, we must prepare a place on the printed circuit board. Remove any solder that remains there. We lubricate the whole thing with flux:
and start removing all the solder from there using good old copper braiding. I would recommend the Goot wick brand. This copper braid has proven itself very well.
If the distance between the balls is very small, then use copper braiding. If the distance is large, then some repairmen do not resort to copper braiding, but take a fat drop of solder and, with the help of this drop, collect all the solder from the patches. The process of removing solder from BGA patches is a very delicate process. It is best to increase the temperature of the soldering iron tip by 10-15 degrees. It also happens that the copper braid does not have time to warm up and pulls out spots behind it. Be very careful.
Next, we spray Flux-off there to clean our place for the microcircuit from carbon deposits and excess flux.
and sand it using a simple toothbrush, or even better, a cotton swab dipped in Flux-Off.
It turned out something like this:
If you look closely, you can see that I still tore off some of the spots (there are black circles at the bottom of the microcircuit, instead of tin ones) But! Don't be upset, they are, as they say, single. That is, they are not electrically connected in any way to the phone board and are made simply to securely attach the microcircuit.
Next, we take our BGA and remove all the excess solder balls. As a result, it should look like this:
And now the most interesting and complex process begins - rolling balls onto the BGA chip. We put the prepared microcircuit on the price tag:
We find a stencil with the same pitch of the balls and attach the microcircuit to the bottom of the stencil using the price tag. Using your finger, rub Solder Plus solder paste into the holes of the stencil. It should look something like this:
We hold the tweezers with one hand and a hair dryer in the other and begin to fry at a temperature of approximately 320 degrees on a very low flow over the entire area where we rubbed the paste. I wasn’t able to hold the camera, hair dryer and tweezers in both hands at once, so there weren’t enough photos.
We remove the finished microcircuit from the stencil and lubricate it with a little flux. Next, heat with a hairdryer until the balls melt. We need this so that the balls fall evenly into place.
Let's see what we got as a result:
Damn, it's a little sloppy. Some balls are a little larger, others a little smaller. But all the same, this will not interfere at all when soldering this chip back onto the board.
We lightly lubricate the nickels with flux and put the microcircuit in its original place. Align the edges of the microcircuit on both sides according to the marks. There is only one mark in the photo below. Another mark is opposite it diagonally.
And using a very small air flow from a hairdryer with a temperature of 350-360 degrees, we seal our little thing. If sealed correctly, it should fit normally on its own, even if we are slightly skewed.
Selecting a soldering iron
If you are not involved in radio work professionally (most likely this is the case, otherwise you would not have studied this material), you have in your arsenal an ordinary soldering iron in one copy. We are not talking about a soldering station at all, since it is quite expensive (albeit a very convenient kit). But for a novice master this is overkill.
Let's return to soldering irons. The classic is a nichrome heater and a copper tip. In fact, this is the best combination, but for manual control. No temperature control, smooth slow heating. At the same time, the copper tip holds the temperature perfectly, and often compensates for the heat dissipation at the soldering site. Another advantage is that the soft material allows you to mold any tip configuration. You can literally rivet and cut out a tip for a specific type of soldering.
The only drawback is that copper burns out quickly, and this type of tip is actually a consumable item. It constantly has to be sharpened with a file.
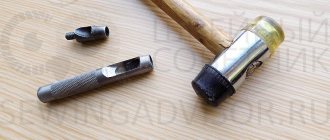
Tip: Be sure to use a hammer before shaping the tip with a file. Once the copper rod is sealed, it will last longer. A little lost time is more than compensated for by ease of use.
The illustration shows the classic “screwdriver” shape. A universal tip for most amateur jobs.
If your “heating device” is equipped with a temperature controller, you must take into account the inertness of copper. It dials the set number slowly and also slowly cools down.
The ceramic tip with silver plating is a modern accessory. If the question is how to work with SMD format parts, or how to desolder a chip from a double-sided board, this is your option. However, they are not so convenient for soldering powerful heat-intensive wires and contacts.
Such a soldering iron heats up instantly, and you can precisely control the degrees on it (if there is a regulator).
The heating method can be any. The same ceramic heater as the tip, or nichrome. Induction heaters are also used on copper soldering irons, but these are rather exotic.
What can a soldering iron be useful for?
There are many areas of application for this high-tech device. Here is a partial list of tasks, in which you will probably find your own recurring problems.
- Soldering wires and repairing electrical extension cords;
- Soldering and replacement of radio components in household appliances;
- Repair of lamps and LED lamps;
- Repair of thin-walled metal pipe connections;
- Repair of leaky metal tanks and containers;
- Quickly burns holes in plastic;
- Cutting off excess parts in plastic parts and housings;
- And so on.
It will be interesting➡ What is a digital ammeter and why is it better than a regular one?
As can be seen from this list, there is always a use for a soldering iron, as long as your hands are fairly straight. And in some cases, the simplest and most inexpensive soldering iron will do, as long as the power is sufficient, for example, 60 W.
It is perfect for soldering wires. But for “electronic” tasks it is better not to overdo it with power, because The tracks on the boards do not like too high temperatures and easily peel off, and the radio components themselves fail. Below we will tell you which soldering iron to choose for soldering radio components. When choosing a soldering iron, you should decide for what purpose you need this electric tool.
How to solder or desolder a microcircuit without a soldering iron
You already understand that successful soldering requires heating the part to the melting temperature of the solder. It can be melted using a heat gun or soldering hair dryer. This is an analogue of a construction hair dryer, only it is compact and often equipped with special molded nozzles.
With its help, the working area is heated, while the solder melts not at a certain point, but over a relatively large area. This is an effective method, especially if it is necessary to desolder the microcircuit (all legs heat up at the same time). But with this method there is a risk of damaging the part itself from overheating.
If you remove the faulty element, no problem.
In general, a soldering gun should only be used in cases where the traditional soldering method is not possible. For example, when mounting SMD parts (who doesn’t know, they don’t have legs) on a radiator plate.
Main selection criteria
So, first, let's briefly look at the most important parameters that you should pay attention to when buying a soldering iron.
Heater type
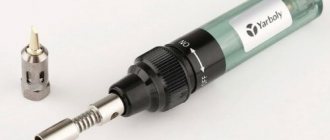
First of all, devices are divided into electric and gas. First, let's talk about those that run on gas.
It is recommended to choose a gas soldering iron for soldering wires in junction boxes. It is convenient because it works offline, without electricity, which is important for electrical installation work. In addition, such a device can be used as a heat shrink hair dryer.
The disadvantages of gas devices include the difficulty of working with microcircuits, as well as the fact that when gas burns, substances harmful to the body are released into the atmosphere, so working with such a device for a long time is extremely dangerous to health.
It is advisable to choose an electric soldering iron for soldering microcircuits and the same wires, if there are no problems with the power supply. Electric models are divided into the following types:
- Spiral. The cheapest, most practical and durable type of heater. The disadvantage is that it takes a long time to heat up, but this is not so important if you need to choose a soldering iron for your home.
- Ceramic. More expensive and at the same time fragile (may stop working even with a slight impact). The advantage is that it heats up quickly. If your main goal is to choose a device that heats up quickly and strongly, a model with a ceramic heater will be the most optimal solution.
- Pulse. Another design option that can heat up quickly. It is better to choose a pulse soldering iron for soldering microcircuits and for working with printed circuit boards. Such a tool will cost more and is used to a greater extent only for the listed works.
Separately, mention should be made of such an option as a soldering station. With its help, you can solder wires and microcircuits faster and better. For radio amateurs, choosing a soldering station will be the most optimal solution!
Power
As for choosing the power of an electric soldering iron, the following recommendations should be taken into account:
- power up to 10 W can be used for soldering simple microcircuits;
- from 20 to 40 W is the optimal power for domestic use;
- It is advisable to choose a 60-100 W model if you are going to solder wires;
- Home craftsmen should not use more than 100 W, because Such devices have their own specific scope of application (soldering of radiators, metal parts, etc.).
Additional features
Also, when choosing a soldering iron, you should pay attention to such points as:
- The handle must be well protected from overheating. In this case, a wooden handle has the best performance. Plastic handles heat up faster, which interferes with smooth operation, and ebonite handles are heavier than their analogues, which also reduces ease of use, especially when soldering microcircuits.
- The tip should be copper; it is easier to process and also easier to clean from carbon deposits. It is advisable that the kit includes a set of stings of different shapes. It is also good if it is possible to replace the tip or adjust its length. It is believed that a straight tip is the most convenient for work, especially for beginners.
- The power cord must be flexible, long and always double insulated.
- The plug for connecting to the network is better when it is dismountable. It seems like a small thing, but it still indicates the quality of the device and at the same time simplifies its repair.
- Pay attention to the package. As a rule, high-quality soldering irons are supplied with a case, a stand for the tip, a sponge for cleaning the tip, etc.
- We recommend choosing a soldering iron with a thermostat, which will allow you to adjust the heating temperature of the tip to suit your own conditions of use.
- The constant temperature support function will protect the device from burnout.
That's all the advice we wanted to give you. As you can see, there are many nuances that you need to pay attention to when choosing a soldering iron for your home.
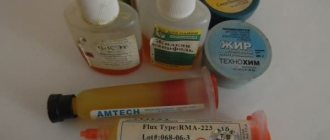
Flux selection
We will talk about soldering copper parts. There are special acid compositions for iron and aluminum; this is a topic for a separate material.
In fact, it's everyone's personal preference. You just need to try different formulations and determine the best one for yourself. Some people like soldering fat (the consistency is like grease), some like liquid flux. We will talk about traditional rosin.
More precisely, how to solder correctly with it.
This flux is based on pine resins and has excellent cleaning properties. It provides mechanical and chemical cleaning, in addition, it protects the surface well from oxidation when heated. There is only one drawback: in its pure form, rosin is solid. This means that it cannot be applied to the parts to be joined in advance. However, the technology is there:
- Having touched the rosin with the tip of the soldering iron, we collect solder on it;
- we immerse the legs of the part or the wire in the flux using a soldering iron (it melts), while the surface is covered with a thin layer of solder;
- similarly apply solder to the soldering area;
- connect the tinned part (wire) to the soldering point;
- touch the flux with a soldering iron, then pick up solder, dip it in rosin again;
- Immediately transfer the tip to the soldering zone.
Parts have been soldered this way for many decades. With a certain skill, there are no restrictions on the choice of materials for joining. This technique is ideal for training. If you master it, the other methods will seem even easier.
Tip: To clean solder surfaces that have a layer of oxide on them, regular pharmacy aspirin is suitable. It contains acetyl salicylic acid. It must be ground into powder and applied to the contacts.
What is a soldering iron and how does the device work?
An electric soldering iron is a type of electric tool that is used to join two parts together using soft substances. Such a soft substance is solder, which melts and turns into a liquid state due to exposure to high temperatures. When the high temperatures stop, the solder hardens (which happens almost instantly), thereby providing a reliable connection. The device in question is the main weapon of electronics engineers, through which not only the connection of wires and semiconductor elements is carried out, but also their separation.
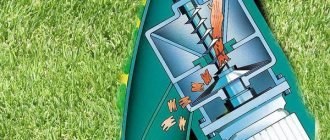
The device has a simple design externally, but inside it consists of various parts, the purpose of which should be understood. It is not at all necessary to know the structure of a soldering iron in order to learn how to use it correctly, but this information will help if it fails. The device consists of a number of the following elements, which have their own characteristics:
- It is based on a metal rod made of red copper. It is this rod that heats up and melts the solder when connecting parts. Red copper is used as the basis of the rod, since this material has a high degree of thermal conductivity (transfers heat well). The end of the rod has a wedge shape, which is necessary for working with small semiconductor elements. The end of the rod is called the tip, as on screwdrivers
- The heating element is a steel tube into which a red copper rod is inserted. The tube is wrapped in mica or fiberglass, over which nichrome wire is wound. When current passes through the wire, it heats up and transfers heat to the metal tube. As a result, the rod heats up and goes into working condition. There is a protective layer of mica on top of the nichrome wire. It protects the spiral from contact with the metal body of the soldering iron, thereby increasing the safety of the electrical device. Its second protective function is to retain heat and not transfer it to the steel body of the device
- Handle - made of heat-resistant plastic or wood, and allows the master to comfortably work with the tool
- Wires and plug for connecting to a socket. The wires are connected to the terminals of nichrome wire. To ensure reliable connection, aluminum clamps are used, which are soldered to ensure reliable contact. Clamps at the connection point are used on powerful soldering irons, and on low-power devices, the connection is carried out without additional fixation, but with the obligatory application of solder. Aluminum plates for connecting copper wire with nichrome thread are used to increase the reliability of the connection, as well as to dissipate heat. The more powerful the soldering iron, the more the copper wires heat up, so aluminum clamps dissipate heat. This information will be useful if, when repairing a powerful soldering iron, a decision is made to remove aluminum plates. The thickness of the copper cable core is selected depending on the power of the device
- The steel body is the part of the tool that contains the heating element. The body may have (depending on the model) a threaded screw through which the rod is secured. The housing design may contain holes closer to the handle, the purpose of which is to remove heat
How the soldering iron works inside is shown in the photo below.
It is useful to understand the structure of a soldering iron for anyone who plans to repair it in the event of a breakdown.
Soldering with liquid or paste fluxes
The advantage of such compounds is that they can be pre-applied to the connection point. That is, the flux begins to work even before heating. When touched with a soldering iron, the second stage of the reaction occurs, and the liquid flux serves as a lubricant for the spreading of solder.
Another plus is that a paste or liquid cleaner increases the contact patch. The main problem with soldering non-flat objects is that the heat transfer area from the soldering iron is minimal. If the point of contact is moistened with flux, the temperature is transmitted more efficiently.
The only drawback: there is no mechanical impact on the surface.
Information: some old-school professionals dissolve pine rosin with alcohol or a more liquid flux, and an effective composition is obtained with virtually no drawbacks.
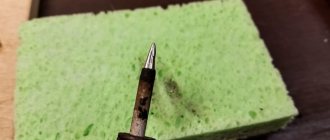
How to use a soldering iron sponge
To clean the soldering iron tip, special sponges are used, as mentioned above. Beginners often wonder why these elements are needed and how to use them correctly. There are several important rules that you need to know in order to properly use sponges to clean the tip of the device.
- Ceramic soldering iron tips must not be cleaned with metal sponges, as this will damage the top layer of the surface.
- It is not at all necessary to buy a special sponge, since a regular piece of fabric can play its role. However, this method is suitable for cases when you need to solder something quickly. If you plan to solder for a long time, then for such cases it is better to purchase a special sponge
- Viscose sponges should be soaked in water before use. However, you don't need to make the sponge very wet, as keeping it damp is enough. The tip is wiped on the sponge during operation. For dry cleaning of the tip, viscose sponges are not suitable
- Copper shavings - designed for dry cleaning of the tip, but the disadvantage of such a sponge is that it is quite expensive, and sometimes even more expensive than the soldering iron itself (depending on the model)
- Metal sponge - it is not specifically designed for working with a soldering iron, but this does not prevent it from being used to clean the tip of this tool. The advantage of such a sponge is that it costs 10 times less than copper shavings, but copes with the task of dry cleaning the tip no worse
Now that the technology of soldering with a soldering iron is known, you can start training. You can start finishing soldering only after you have had enough practice.
To summarize, it should be noted that an electric soldering iron can be replaced with a regular lighter. If you need to solder wires without a soldering iron, then this is done very simply - the wires are heated using an open flame (with a lighter), after which you need to place solder at the junction and continue exposure to the open flame. When the solder melts, this will entail the connection of the conductors.
You need to treat the tool with all responsibility, and remember the most important thing is that a soldering iron is an electrical appliance that cannot be disassembled if it is connected to the network. It is also prohibited to leave the tool connected to the outlet for a long time, as a fire may occur. And one more important point - do not check the heating temperature of the tip with your hand, because in this way you can get a very severe burn.
What kind of solder to solder
These alloys are made from tin, lead, copper, nickel, or silver. Tin-lead solder (PLS) is used to work with circuit boards and household wiring. Despite the great variety, they can be divided into two types:
- soft (melting point up to 300°C);
- solid (melting point over 300°C).
Any form of release: lump, wire, powder, paste. A universal option is wire up to 2 mm in diameter. It is convenient to put it on the soldering iron tip or insert it directly into the soldering zone.
An interesting offer from manufacturers is solder paste or powder. This is finely dispersed solder, to which liquid flux is added for viscosity. The result is a consistent composition with high adhesion, which can be used for soldering without prior fluxing. We simply apply the paste to the contacts and heat it up.
You can work without a traditional soldering iron, using a soldering iron. Thanks to the fine grinding, the solder melts quickly and instantly spreads over the work area (with the help of flux).
This is a good option for a beginner master. The work is simple, but you won’t be able to learn how to solder efficiently in difficult conditions: when you don’t have good flux and solder at hand.
How much does a soldering iron for microcircuits cost in stores and online?
This type of tool is quite difficult to find on sale. Tips are most often sold for conventional soldering irons, which can also be used to solder microcircuits. But if you want to purchase a separate device for these tasks, then look better and you will see that they are still on sale. The cost of such devices starts from 300 rubles, for very simple devices for home and infrequent use, and can reach about 6-8 thousand rubles for equipment designed for professional use.
It might be interesting➡ How to connect an ammeter to an AC or DC circuit
Whether to choose a ready-made soldering iron for microcircuits or to make one yourself is up to everyone to decide for themselves. Sometimes it is enough to change the tip in your existing soldering iron to a thinner one or a more convenient shape. Any job requires its own tool, and the work of dismantling or installing microcircuits requires a special soldering iron, which in skillful hands will ensure high-quality contact of the microcircuit with the board tracks, and cleanliness, beauty and, most importantly, normal operation of the installed device.
How to solder with copper
Copper, nickel or silver are used as the base for specialized solders that are not used in consumer electronics. Copper solders have a melting point of 800–900°C, so it is impossible to work with them in relatively delicate printed circuit boards. With their help, contact pads are soldered in electrical engineering; the main application is the assembly of copper pipes. The composition is produced in the form of wire.
Types of soldering irons based on the principle of heating the working part
Before you learn how to solder with a soldering iron, you should understand the types of tools available. Depending on the method of heating the rod, devices are of the following types:
- Soldering irons heated over an open fire - these are the very first types of tools through which parts were connected (mainly massive parts were connected with their help). The principle of their operation is based on the fact that before connecting parts, the tool must be placed in an open fire and wait for the red copper rod to heat up. Today, these tools are almost forgotten, and are only rarely used when the need arises.
- Nichrome - these are ordinary rod devices, which are also called electric. The rod is heated by passing an electric current through a spiral nichrome wire. The device gained its popularity due to a number of advantages - simplicity of design, maintainability, low cost, and resistance to damage. Their main drawback is that with daily (or frequent) use, the coil burns out. In addition to this minus, it should also be noted that the rod takes a long time to warm up, so after plugging the device into the outlet, you need to wait a while
- Ceramic - free from the disadvantage that is present in nichrome soldering irons. After switching on, they very quickly gain temperature, and at the same time maintain it at the set value. Due to the use of ceramics, the cost of devices increases. And this is not their only drawback, since ceramics are fragile, and if the instrument is dropped from a height, it may fail. Ceramic soldering irons are highly powerful and resistant to frequent use.
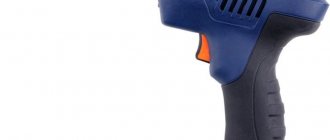
- Pulse — such devices are produced in the form of pistols. They got their name because when you press the button, the tip heats up almost instantly. After soldering the parts, which also takes a little time, the tool button is released and the rod cools. These instruments are based on high-frequency transformers and frequency converters. By means of such a converter, the voltage frequency is increased to 1800-4000 Hz, and the transformer is designed to reduce the voltage. The tip of the device (it is not removable) is connected to the secondary winding of the transformer, which helps to increase the current strength, which means that the parts heat up as quickly as possible. The presence of power and temperature regulators allows the device to be used for working with small and large parts and elements
- Induction - These are the most advanced types of soldering irons. The main feature of the devices is that the rod is heated through an inductor coil. The tip is covered with a ferromagnetic layer, inside of which a magnetic field is created using a coil. When a magnetic field is created, an electromotive force arises and currents are induced, through which the core heats up. The heating element is called an inductor. The main advantage of the tool is that the rod is heated with automatic temperature maintenance. When the temperature reaches its maximum value, the ferromagnetic layer loses its magnetization properties, which helps to stop heating. As soon as the temperature decreases, the ferromagnetic properties increase, so the heating process automatically continues. The tip on such devices is replaceable, so it can be used to work with parts of different sizes
- Wireless - they are also called mobile or battery-powered, and they are intended primarily for soldering where there is no electricity. The devices operate on replaceable batteries and are compact in size. The disadvantage is that the batteries need to be changed or charged regularly, which depends on the frequency of use.
- Portable — such devices operate from a special USB port. This is a popular port that is available on many devices, including cars. Characterized by low power, but it is sufficient for soldering small semiconductor elements
- Gas - another type of autonomous devices, the functioning of which is ensured by replaceable gas cartridges. Such a tool is also called multifunctional, since without a rod attachment, it turns into a regular gas burner
From the above list it is not difficult to choose the appropriate option. If you solder parts occasionally, then the best option is a nichrome soldering iron. Having understood the issue of types of devices, it’s time to figure out how to solder with a soldering iron.
Practical advice in unusual situations
- Installation and dismantling of elements with two legs is easy. How to desolder a microcircuit from a board with a soldering iron, since you need to heat several legs at the same time? Use a heat-conducting object with a large area. For example, copper braid.
- If, after removing parts from the board, the hole is closed with solder, use a toothpick.
- A third-hand clamp can be used to secure elements before soldering.
User manual
There are often nuances in work that need to be corrected. The main points will be discussed below.
Soldering chips
When operating microcircuits and chips, it is necessary, first of all, to exclude the possibility of overheating of the chip. To do this, you need to touch each of its contacts for no more than three seconds. After this, the contact must be cooled and only then can the soldering process be carried out again.
Before soldering, the chip contacts are prepared and processed by applying a thin layer of solder to them, which will improve contact with the surface. Flux is applied to the legs of the element and a tip with solder is passed over them. If the procedure is carried out correctly, the contact will be shiny and smooth, without various accumulations of solder.
Pin chips
If the chip has leads in the form of pins, then the process of soldering it into the board occurs as follows:
- The microcircuit is installed in special holes in the surface of the board.
- On the opposite (back) side, flux is applied to the pin contacts.
- Each pin is soldered on the same reverse side.
- Remains of flux are removed.
Soic chips
Chips of this type are soldered slightly differently. This method is most often called "solder wave". Its essence is that molten solder in a liquid state fills the space between the metallized part of the board and the contacts of the part. This creates a drop that is capable of conducting electrical impulses.
The solder wave method is performed in the following few steps:
- Tin and moisten with flux all surfaces that will provide contact.
- Place the microcircuit on the surface of the board so that all the legs are aligned with the metallized tracks.
- To begin with, you need to solder only one corner contact.
- Next, the second contact is soldered, located diagonally in relation to the first. In this case, you need to make sure that all other contacts remain on their metal tracks.
- Next, flux is applied to all soldered and free ends of the microcircuit.
- Next, using the tip, the solder is evenly distributed over the contacts.
- If solder bridges form between the contacts, you must remove them, as the jumpers will interfere with the operation of the components. Removal occurs using a special metal braid. To do this, place it on top of the jumper and pass it with the tip of a soldering iron. In this case, the solder is absorbed into the braid.
Important! When performing soldering using the “wave solder” method, there must be a sufficient amount of flux at the places where soldering is carried out directly to ensure wetting of the surfaces.
Dismantling microcircuits
Planar chips are desoldered from the board using the following algorithm:
- Using acetone and ethyl alcohol, remove the varnish from the contacts completely.
- Flux is poured onto all contacts that will be soldered.
- Close all contacts using solder, accelerating it with a heated tip. The applied solder must remain liquid.
- Then you need to run the sting over all contacts, melting all the solder.
- Remove the chip.