How to make a tongue and groove with a hand router
To make this tenon joint, we will need the router itself and the work table.
To facilitate the process, you can make an additional device such as a conductor. The procedure is as follows:
- We install two slatted stops on a plywood sheet, cut out holes to suit the size of the groove for the drawer and the leg. Rack stops must be secured across the width of the router. They fix it across the working plane. To fix the longitudinal displacement, two other stops are placed at the ends of the intended location for installing the joinery machine.
- To move the workpiece along its length, we mount a pair of bars to the tabletop that correspond to the dimensions of the workpiece.
- We mark the axis and dimensions of the grooves. We install the additional device so that the markings on the workpiece and the jig completely coincide.
- It is necessary to set and secure the stop.
- Secure the jig to the bars using self-tapping screws.
- It is necessary to take a straight cutter and set the milling depth, taking into account the thickness of the manufactured jig. After this, you need to fix the workpiece with a clamp and process the groove.
Let's start cutting out the spines.
- For small production volumes, it is best to do this on a circular machine.
- First you need to measure the depth of the groove, which will correspond to the length of the tenon.
- We measure the resulting value on our workpiece. The length of the tenon will be determined by the difference between the width of the workpiece and the length of the groove, the height of the workpiece and the width of the groove, divided in half. The resulting material residues should be removed to obtain a spike.
- After this, you should set the size on the machine equal to the length of the groove, taking into account its width. The circular saw should be fixed at a level equal to ½ the difference between the width of the workpiece and the length of the groove from the tabletop line. Make a couple of cuts along the length of the tenon.
- We fix the saw blade at a height equal to ½ of the difference in the heights of the workpiece and the width of the groove from the tabletop line. Two cuts are made from the end of the workpiece.
- Let's start sawing. To do this, it is necessary to fix the circular saw to the length of the tenon, and the distance from the disk to the stop should correspond to a value equal to ½ of the difference in the width of the workpiece and the length of the groove. We make two cuts along the width of the product on both sides.
- We adjust the distance from the cutting disc to the stop. It should be equal to a value equal to ½ of the difference between the heights of the workpiece and the width of the groove. We make two slits. We round off the edges of the resulting tenon with a carpenter's knife and sand it with sandpaper.
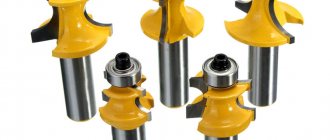
Tenon cutter for router
Tenoning templates come in a variety of configurations. They serve to facilitate the work of cutting joints such as tongue and groove, as well as to speed up the work. With their help, you can make frames, box joints, and cut out various joints for furniture. The size of the groove, as well as the evenness of its edges, will depend on the shape of the template tooth. To make a tenon cutter with your own hands, you will need guides, with the help of which you will mill the tenons. They should be mounted on two opposite sides of the housing in a checkerboard pattern, located equidistantly. If these conditions are met, they will fit together perfectly.
Dovetail wood cutter
They are most often used in conjunction with milling machines and machines for making grooves in products made of hard and soft wood. Manufactured from monolithic hard alloys.
Designed to work in conjunction with cylindrical cutters.
How to choose a groove with a router
When performing this work, you need to know that the technique will directly depend on the location and size of the groove. If it is open, then your tool is attached to the tabletop, and the workpiece is guided along the cutter. Accuracy will depend on the position of the plank and the height of the cutter. To avoid mistakes during the sampling process, always make a test run on scrap wood. Sampling should be done in stages, several passes must be made. After each pass of the cutting part of the router, to prevent it from overheating, it is necessary to remove waste from the working surface of the tabletop. This can be done using a template cut out of plywood, which should be followed by a cutter with an upper bearing.
We hope that the information obtained from reading this article will be useful to you and useful for use in the household.
This is interesting: Design and characteristics of a screw-cutting lathe
How to choose a groove with a router?
The solution to the problem depends on where the grooves are located and what size they are. Here are some recommendations for home craftsmen:
- The use of open grooves involves securing it to the tabletop and guiding the workpiece along the cutter.
- Accuracy is determined by the height of the cutter and the location of the bar.
- It is recommended to use wood waste for trial operations. This allows you to avoid mistakes.
- Sampling is carried out in stages, with several passes being carried out.
The main thing is to get rid of wood waste in a timely manner after completing each stage. Then the instrument will definitely not suffer from overheating. When doing the work, it is easiest to use a template cut out of plywood. They pass through it with the cutter itself, with the bearing installed.
T-shaped (T) connection
The lap joint is another variation of the half-timber joint, which is widely used in the creation of frame structures. In this case, the end of one part is adjacent to the middle of the second. A fold is cut out on the first (according to a similar pattern as in a corner joint), and a landing groove is cut on the second. Below is one of the schemes for creating such a groove manually.
Make markings on the front side, focusing on the width of the counter part.
Using a thicknesser and a square, mark the edges.
Make cuts in the waste part. They will facilitate subsequent sampling with a chisel.
Use a wide carpenter's chisel to remove the waste. Remove layers, moving from the center to the edges.
Clean the groove. The edge and shoulders must be perfectly smooth and meet strictly at right angles. This will ensure that the parts fit as tightly as possible.
Tools used
The creation of tenons and grooves, with the help of which the connection of two wooden blanks will be ensured, involves taking a sample of material on the side surface of a beam or board using a hand router. In this case, all geometric parameters of the elements of the future connection must be strictly maintained.
To perform this operation with a hand router, you can use tools with shanks with a diameter of both 8 and 12 mm. The most universal in this case is a groove cutter, the cutting part of which works as follows:
- the lateral surface forms the walls of the groove and the sides of the tenon;
- the end side processes the bottom of the groove and removes a layer of material of the required thickness from the base of the tenon.
Cutting a tenon with a mortise cutter
Thus, using a tool of this type, it is possible to form both a tenon and a groove on the side surface of a beam or board. Moreover, their sizes can be adjusted within a fairly wide range.
In cases where higher demands are placed on the reliability of the connection of wooden parts, the grooves and tenons are made not of a rectangular shape, but of a shape called “dovetail”. Grooves and tenons of this configuration are created using dovetail cutters. It is also possible to perform the procedure for forming grooves and tenons of this shape with a manual milling cutter, but for these purposes you should use devices of a different design.
Dovetail sampling using a template
So that the question of how to make a groove in a board or beam or a tenon on their side surface does not cause any particular difficulties, it is better to use a power tool equipped with comfortable side handles, a wide guide sole and the option of protecting the spindle from turning during the process of replacing the cutter. In addition, it is desirable that such equipment have a side stopper, due to which the overhang of the cutter used with it will always remain constant.
» data-lazy-type=»iframe» src=»data:image/gif;base64,R0lGODlhAQABAIAAAAAAAP///yH5BAEAAAAALAAAAAABAAEAAAIBRAA7″>
Watch the video Working with a router. How to make a groove for extensions and hinges using a router on v4k for free
913 | 327 Do-it-yourself apartment renovation (Remontkv.pro) | 5th year
? FREE video course on working with drywall: https://remontkv.pro/gkl/free? 50% DISCOUNT on my video course “Do-it-yourself apartment renovation” https://remontkv.pro/kurs ✔️ Recording of the webinar “3 steps to successful renovation”:
? My VKontakte group: https://vk.com/remontkvpro
If you have an irresistible desire to make better cuts for hinges in the door and door frame, or to create a groove in the door frame for subsequent installation of the extension, you need to acquire a router (buy, rent, borrow from friends, etc.).
Having become the happy owner of the above tool, you can easily, efficiently and quickly realize your intended goal.
Key words: working with a router, working with a hand router, working with a wood router, how to work with a wood router, how to make a groove, router, techniques for working with a router, inserting hinges with a router, wood router
In this article, we will introduce you to the process of cutting various joints with a hand router, and consider the process of making additional devices for increasing labor productivity, such as tenoning templates and a dovetail wood cutter.
Making planks with grooves at home
Often you have to make furniture or make repairs at home, using the simplest methods and what is at hand.
If you need to make a groove in the board with your own hands, be patient and have the necessary tools:
- A circular saw. The most practical tool, but, unfortunately, not everyone has it.
- A regular hacksaw for wood. It will take longer to work with it, but this accessory can be found in every home.
- Electric drill. It is also quite accessible, but before making a groove in a board with a drill, it is advisable to practice on an unnecessary block, practicing the skill.
Making a groove with a circular saw
Making a groove with a circular saw.
The optimal materials are wooden boards, bars and the like. The price of raw materials is minimal; in extreme cases, what is available on the farm is used. The most successful solution is a through, single open straight end connection.
The joint will be strong and reliable:
- It is recommended to make tenons with a thickness of ¼ of the thickness of the plank and a groove of the same size.
- The height and length of the groove must correspond to the dimensions of the plank.
- Prepare a pencil and ruler for marking.
- Decide on the coordinates of the cut and mark it.
- The cut should be made along a line inside the side that will then be separated.
- For a circular saw, the instructions recommend a blade width of 2-4 mm.
- Sawing in the middle of the marked line removes 1-2 mm of excess, since two grooves are made on each plank.
Note! To prevent the workpiece from being damaged, make cuts along the inner sides of the drawn lines. In this case, a visual correction is made for the thickness of the canvas.
- If you need to join two parts at a 90º angle, cut the pieces at 45º at the ends.
- For an end-to-end open miter connection (single straight), mark the cut locations on the oblique cuts of the planks.
- Before removing the groove from the board, double-check that the cut is correct on all sides.
- For an angular single connection that is not through the eye, an eye is made instead of a groove. In this case, the width of the tenon is left unchanged, and the length will be 0.3-0.8 of the width of the board being attached.
- Since the circular saw rounds the edges of the eye, leaving the shape of the tenon unchanged, it is advisable to refine the corners by turning them with a rasp.
Groove using a drill
The photo shows a groove being cut out with a drill.
The method is quite labor-intensive, but it can be called an alternative to the one described above. If you were unable to get a hand router, prepare a drill and chisel, ruler and pencil.
- Select a drill with a diameter corresponding to the width of the future groove.
- To guess the depth of the groove, you can make a mark on the drill itself (for example, draw it with bright paint).
- Draw two parallel lines along the block at the required distance from each other.
- Having secured the workpiece in a vice, drill a furrow, carefully monitoring the vertical position of the drill and maintaining the depth.
- When finished, remove all excess with a sharp chisel and sand with emery cloth.
Note! It happens that a furrow with a concave bottom and a spike with a convex end are required. Before making the moon groove in the board completely, drill to a depth slightly less than required. Subsequent processing and adjustment can be conveniently done with coarse sandpaper or a round file.
Using a hacksaw on wood
Making a transverse groove with a hacksaw.
Well-done markings will help a lot here.
Making relief chamfers and folds
Monolithic panels and frames are often made with relief, rounding and other chamfers to decorate the appearance, add lightness and protect sharp edges. The fold is a more functional part; for example, it is used when attaching a panel to a frame.
Making a fold with a straight cutter
You can cut folds with a straight cutter using a ruler, moving it along the edge of the workpiece. The same method can be used to create a bevel with a V-groove cutter or a concave chamfer with a round groove cutter.
Making chamfers
The creation of shaped chamfers or folded wide panels is carried out using chamfer cutters with guide tips. Practice on scraps of wood to learn how to guide the tool with the tip only lightly touching the edge of the board - this will reduce friction and prevent burning of the wood.
Bevel the edges of the faux panel by working counterclockwise one at a time. so that the rotation of the cutter helps to cut it into the workpiece. If the panel is solid wood, sand the end edges first. and then move on to the side ones. In this case, possible chips at the cutter exit from the far ends of the end edges can be corrected by passing the cutter along the side edges. When finishing only the end edges, press a piece of wood or lath against the far edge to reinforce it.
Processing the inner edges of the frame
Sometimes it is more convenient to process the inner edges of the frame after it has been assembled. The outer edges are processed as described above, and the inner edges are processed using an inner edge router or a wooden block in the shape of a right triangle, attached at the hypotenuse to a straight edge. In this case, it is important that the geometric vertex of the right angle (in fact, it is cut) coincides with the center of the cutter. Move the machine clockwise along the inside edges of the frame. The cutter will leave rounded corners, but if desired, they can be made rectangular using a chisel.
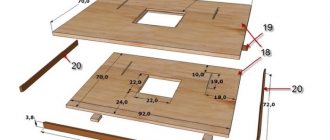
Making a device for picking out a tenon
When parts are processed manually, the milling cutter itself does not have additional spatial fixation. But the overall result of the work and the accuracy of the connection itself in the future depend on this.
To assemble the simplest design that can cope with the task, you will need to use:
- Several guides that remain stationary. They should be side and top or bottom.
- The length of the sample is adjusted through the use of an appropriate movable bar.
For manufacturing, the following sequence of actions is used:
- A plywood sheet is taken, from one edge of which the side elements are mounted in a vertical plane. It is necessary to create appropriate cutouts in the center of the material.
- The sides are equipped with guides. The base of the hand cutter moves along them later.
- The side strips are fixed on the upper guides. Then the movement of the working milling cutter associated with these parts becomes limited.
- The plywood sheet, which became the basis for the installation, also serves as a surface for installing the moving element. Then the amount of edge overhang for the future workpiece is easier to control under any circumstances. Fixation is ensured with ordinary screws and other types of fixing devices.
There are several points during manufacturing that require special consideration:
- The upper guides have a height corresponding to the sum of the thickness for the part under processing and a small gap at which the wedge involved in fixation is installed.
- The forming tenon has a certain length, which is taken into account when determining the vertical thickness of the cutouts in the side elements.
When such devices are used, the work is carried out with the participation of hand-held milling cutters of any modern model.
Fixtures are made in the following way if dovetail connections are required.
- A hole is created inside a sheet of plywood with several layers. The cutting part at the cutter itself protrudes from this part.
- A plywood sheet is prepared in advance, on the bottom of which the manual router itself is fixed. Clamps and screws are perfect for doing the job, as are other types of fastenings.
- The board, 2.5 centimeters thick, is attached to a plywood sheet, which subsequently participates in the movement of the prepared part. The function of the guides is taken over by the design. Boards are consumables with one-time use.
This is interesting: How to correctly insert and remove a drill bit into a hammer drill, screwdriver and drill
Wood cutter "Dovetail"
For mortises and tenons under similar circumstances: only half the normal width. This is explained by the characteristics that compounds of this type have.
The main thing is to set up the device correctly and fix it in a suitable position.
The tongue-and-groove joint should end up with some clearance. It is necessary so that later you can conveniently use the adhesive composition.
How to achieve good results with a saw machine
TIP 1: Set up your machine for clean, neat cuts.
Before you start cutting workpieces, make sure all your machine settings are correct to ensure clean, straight cuts. The longitudinal stop and the grooves for the cross (angular) stop must be parallel to the disk, and the head of the cross stop is installed exactly at an angle of 90° to the disk. Even small deviations can affect the quality of the connections and their subsequent assembly.
Stacked groove discs usually consist of two outer discs, several central cutting elements (chippers) and metal or plastic spacers (you can make your own spacers from paper or cardboard). Determine the required sample width, then install the appropriate number of chippers between the outer disks (see picture), slide the entire stack onto the saw spindle and tighten the nut. Don't worry if there isn't enough room on the spindle for the stock flange, just set it aside. It is much more important that the nut is screwed in completely.
TIP 3: Make trial passes, ensuring accuracy.
Cut grooves and tongues on test scraps and check that the settings are correct. To change the width, add or remove spacers and chippers. We prefer to cut out the tongues and grooves to a slightly smaller width than required (literally a few fractions of a millimeter), and then grind the inserted part to its thickness so that it fits tightly. Do not forget to grind the entire part with the same abrasive numbers so that when finishing the product there will be no differences in the smoothness of the surfaces. And be careful that the top layers of plywood veneer do not have areas that have been worn through.
TIP 4: Use a splinter guard to prevent ragged edges.
You can make your own splinter guard for your saw. Adjust the groove disc to the required width and lower it below the table surface. Insert a wooden plate, planed and sawn to the shape of the opening, into the table opening, which should be flush with the table surface. Press the plate securely from above, placing the clamp along it and slightly to the side of the disk. With the machine turned on, slowly raise the disc to a height approximately corresponding to the sampling depth. Turn off the machine and measure the blade overhang, then make a test pass on the trim.
TIP 5: Sharpen the entire set, not individual discs.
Carbide teeth become dull over time and require sharpening. Always sharpen each blade and chipper, even if you have never used them, so that all teeth are the same height. If this rule is not followed, some chippers will dive deeper into the material.
TIP 6: Apply tape to prevent thin veneer from chipping.
When sawing sheet materials lined with veneer, there is always a risk of chipping. To maintain the integrity of the veneer, apply a strip of masking tape along the cut line and along the back edge of the piece to provide support for the wood grain. First make a minimum depth pass to just score the veneer, then lift the disc and make a second pass to the final depth as shown in the photo.
The first 1.5mm deep cut cuts the veneer cleanly (left). After cutting the groove to the required depth, carefully remove the tape to avoid tearing off the veneer fibers.
Reduce feed according to the amount of material being removed.
TIP 7: Use a pusher and support boards
We sawed out the left groove in this oak board, supporting the edge of the workpiece with a scrap, but did not use it for the right groove. The support trim helps avoid chipping.
When cross-cutting, the blade will tear out the fibers where they exit the workpiece unless some precautions are taken. Attach a wooden block to the crosscut (miter fence) to serve as a support board, as shown in the next tip, or insert unnecessary trim between the workpiece and the head of the fence.
TIP 8: Longitudinal stop as a limiter.
When making a groove or cross seam, use a longitudinal stop instead of a stop and a wooden overlay to reduce chipping. Sandpaper prevents the workpiece from sliding.
For grooves and folds at the end of workpieces, use longitudinal and transverse stops at the same time, as shown in the photo. Since the cut does not go right through the workpiece, there is no risk of it getting pinched or kicking back. Add a high rabbet pad to keep the blade clear of the rip fence.
For quick installation, secure the cover to the longitudinal stop with double-sided tape. Install a groove disc whose thickness is greater than the width of the fold. Make a cutout for the disc in the trim as shown in the pictures. Then, using the longitudinal stop, adjust the width of the fold and process the workpiece.
Useful DIY crafts
In order to make something useful, for example, a box, it is not necessary to have a whole arsenal of complex equipment and expensive tools. You can get by with a minimum of tools and mechanisms . To perform carpentry work you will need:
- milling cutter;
- electric jigsaw;
- Sander;
- several clamps;
- set of cutters
You can use absolutely anything as a material - for example, scraps of parquet boards, pieces of plywood and waste chipboards, but always at right angles. To simplify the work, you need to make a simple milling table. To process workpieces, you will need a large-diameter straight groove cutter. The process looks something like this. On a makeshift table, plan the ends of parquet board scraps. Mark the sides of the box and use a jigsaw to remove all excess.
The resulting blanks must be processed with a thicknesser to maintain the size of all sidewalls. If you don't have a surface planer, you can use a milling table. To do this, set the stop to the size of the workpiece and move the part between the stop and the rotating cutter towards you. The next operation to calibrate the sidewalls in length is performed with a jigsaw.
You can connect the sidewalls together with a mustache. To do this, you need to mill the ends of the sidewalls with a conical cutter with an angle of 90 degrees. This can be done using a router. Thus, the ends of the sidewalls have the same bevels of 45 degrees. Next you need to make grooves in the sides for the bottom. For this, an end mill with a diameter of 6 millimeters is used, equal to the thickness of the plywood. The parts are connected using glue. The product looks neat and beautiful both outside and inside. What else can you do with a hand-held wood router? Anything: for example, a shelf for things, drawers for storing vegetables or tools, kitchen furniture.
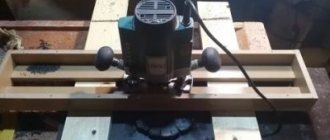
Toolbox
In order to make a tool box, it is necessary to strengthen the carpentry joint of the sides by inserting additional tenons. The operation is called cutting tenons with a hand router. It is very difficult to do it manually, so you need to make a simple device - a milling table . The principle of its manufacture is simple:
- Assemble a simple wooden table consisting of a table top and legs.
- Attach a hand-held milling machine to the bottom of the tabletop, making a hole in the tabletop for the cutter to exit.
- Make a carriage with a stop bar from thick-layer plywood according to the size of the table top. A groove is cut in the carriage for the cutter to exit.
A device for cutting tenons in a board works as follows. Mark the place to be milled and, pressing the board against the stop bar, move the carriage, directing it towards the cutting tool. The resulting finger joint between the parts will be strong and reliable.
Do-it-yourself tenoning device for a router
Using tenon saw , you can make tongue-and-groove joints. The tenoner comes to your address completely assembled.
Why you need a tenon cutter can be found here.
How to work with an FMT tenon saw:
What is included in the package when purchasing a tenon cutter:
When communicating with customers, changes were proposed:
— rotary stop for basing workpieces;
- corner for pressing small workpieces;
- side stops - “ears” for pressing small workpieces;
— a clamping bar has appeared that can be installed in different holes in the inclined plate;
The FMT tenoner with the parts installed after the upgrade looks like this:
Set of parts for modernization:
The changes also affected the inclined plate:
You can see more details here:
Structurally, the tenon cutter has not changed and performs the same functions. The upgrade kit can be ordered separately.
All parts of the tenon cutter are made of metal, 3mm thick.
For the convenience of working with a tenon cutter, you can use the following devices in terms of fixing workpieces:
— lever clamp — clamps
Example of installing a lever clamp on an FMT tenon saw:
At the moment, it is possible to apply a protective (anti-corrosion) coating to parts - galvanizing.
Coating thickness is 3-5 microns. The appearance of the coating can now be seen here
When purchasing a tenon cutter, you need to perform several simple operations for high-quality work, namely:
Set the rotary stop at an angle of 90 degrees with respect to the horizontal table. Because During transportation, the settings may be lost. And loosen the indicator screws and install it opposite the corresponding protrusion.
The tenon cutter comes with a set of templates for making various types of tenons. The dependence of the template and cutter on the size of the groove and tenon can be considered below.
Template sizes depending on the cutter and tenon/groove size.
This section will help you quickly figure out which template needs to be applied for a specific connection:
The dimensions of the tenon/groove are indicated in Fig.1, Fig.2, depending on
They need to select the desired cutter and template (Fig. 3).
The following is a general table for all types of templates that are supplied with the tenon cutter:
For round tenons, special templates are used:
The templates differ from each other in size by 0.2 mm (the template with a triangle is larger) - this was done in order to eliminate errors when using cutters from different manufacturers.
The tenon cutting kit includes 5 templates without deviation and 5 templates with deviation +0.2mm for the production of round tenons f15, 20, 25, 30mm - for them a f12mm cutter is used, and for f35mm a f10mm cutter is used.
Using these templates you can make a spike.
- How to make a groove?
— It’s very simple - we take a Forstner drill, respectively f15, 20, 25, 30 or 35 mm and make a groove.
Here is a real example of making a tenon joint. Production is carried out only for demonstrative execution of the tenon and groove.
Making a spike:
We make a groove and try it on:
* Tenoner (tenon-cutting device) is a device designed to facilitate tenoning in woodworking.
Tenoners are assembled and ready to be sent to customers:
This is what the template set looks like:
More templates for making round tenons:
When making tenons, a situation may arise when the connection turns out to be loose or too tight. To do this, the tenon joint gap can be adjusted:
At this moment, the tenon cutter is equipped with a plate for attaching the router, which has holes for the following models of routers:
By clicking on this link you can see the models of milling cutters for which there are mounting dimensions for the soles.
It is also possible to manufacture plates to individual sizes - but in this case these dimensions must be provided.
A logical question arises: “How to make precise markings for making holes yourself?”
I answer: The delivery set includes a centing washer:
It is inserted into the central hole of the plate for attaching the router:
Next, install a cylindrical cutter f8mm or rod f8mm into the collet of the router, clamp and center the router relative to the plate, mark and make holes.
Accessories for a wood router: DIY production, instructions and assembly
Products made from wood are distinguished by their uniqueness and environmental friendliness, which is why they are so valued. But you won’t be able to make a wooden masterpiece with your own hands without a hand router. In addition, it will need accessories with the help of which the craft takes on a given shape.
You can even make them with your own hands, and no special strength or skills are required. Before working with a router, you must first familiarize yourself with each of these devices, as well as learn the principle of their operation . In this article we will look at the most necessary designs for a router.
Device - rip fence
This device, as a rule, is already sold along with the router. Therefore, there is no need to develop and create it independently.
For reliable support of the processed material, this element is used.
With it, the movement of the cutter becomes rectilinear relative to the base surface, which can be a table guide, slats or a straight edge of the part .
This device makes it possible to quickly mill various grooves and process edges while firmly holding the material.
Guide rail
If you need to make a straight cut with a router, then you cannot do without this device. To make it you will need any flat board, for example, you can use a piece of chipboard .
First you need to find out the distance from the edge of the milling base to the center of rotation, and it is always the same. To do this, you need to screw a guide to the unnecessary part of the material and make a test cut.
Then you should measure the gap from the edge of the cut to the tire, to which the radius of the cutter is added. As a result, it will be possible to obtain the required value.
For example, it is 59 mm, and the diameter of the groove cutter is 14 mm, that is , its radius is 7 mm .
Then you should draw a line for the cut, from which we retreat a distance of 52 mm (59-7), and draw another one. We fix the guide along it and make the cut.
Circle milling
Compasses are used for such purposes. With their help, the router can move around a circle. The simplest of them is a device consisting of a rod, one end of which is equipped with a screw with a pin, and the other is attached to the base of the tool. Of course, it is better to use a compass equipped with two rods.
In general, there are many proprietary and even homemade devices for a router for cutting circles, which differ from each other in ease of use and dimensions. Quite often, compasses have a mechanism that changes the radius of the circle . As a rule, it is a screw with a pin at the end that moves along the groove of the router.
But you don’t have to buy a milling compass to cut out circles. Instead, you can use a rip fence. To do this, the device is attached to a groove on the sole. A screw is screwed into it, which is recommended to be equipped with a sleeve so that its diameter matches the size of the hole. That's it, the compass is done. The radius can be adjusted using the stop.
Devices for replication and copying
To create a series of identical products use:
- Angle lever;
- Copy probes.
There is a scale on the angular lever, the division value of which is 1/10 mm . It allows you to center a stop ring under the cutter, which helps accurately reproduce the shape of the part on the workpiece during copying. It is often equipped with a chip guard and support plate for best edge finishing.
Using copy templates and rings
Copy rings are a round plate with a protruding edge that slides along the base surface along the template. This device provides an accurate path for the cutter to move. Basically, this element is installed on the base of the workbench. There are several methods for attaching it:
- Installation of special antennae in the holes on the sole;
- Screwing the ring into the threaded recess.