How to cut a thread on a pipe with your own hands
To make threading on a pipe with your own hands, you initially need to perform a number of preparatory measures:
- Carefully clean the tube in the area where you plan to get the threads.
- Clean the end part of the product with a file.
- Lubricate the working area to reduce resistance.
In order for the thread cutting process to be convenient and the end result to meet the requirements, before carrying out the action you need to secure the product in a vice. This will allow you to fix the part so that you can perform the necessary actions with both hands. After this, the following actions are carried out:
- A wrench with a die of the required diameter is used, with the help of which a rough pass is carried out. In this case, it is important to keep the die strictly perpendicular to the pipe.
- The roughing pass is the basis of thread cutting, so do not rush and perform the actions slowly but efficiently.
- A rough cut allows you to get 2-3 threads of thread. This is exactly how many threads are needed for the tool to take a secure position.
- The next step is to twist the rough die and use the finishing die. With its help, the required number of threads is cut on a pipe that is planned to be installed in a water supply or heating system.
- After each pass, you need to make 0.5 turns back to clear the cutting area from chips.
- At the final stage, you should use the third die, which carries out a control pass.
When threading, it is important that all actions are performed slowly, and with each subsequent turn the cut area is cleared of metal shavings.
Instructions
In order to cut a thread on a pipe near a wall, no special knowledge is required. All work is carried out according to the standard scheme. In some cases, it is necessary to hollow out the wall slightly so that threads can be cut without much effort.
Before starting work, you should close the riser. Then the structure is cut off leaving an area for carving. The pipe should be cut with care. Make sure that the cut is smooth. This way you can fix the die faster and easier. If the cut is not very smooth, you can use a grinding wheel to give it the necessary texture.
In order to cut threads on structures near the wall, you need to use a die. A chamfer on the cut will help make the first turn easier. Before work, it is recommended to coat the die and pipe near the wall with lubricant. Then the die is put on the structure. In order to cut the product, careful rotational movements are performed: 2 revolutions forward and 1.5 in the opposite direction. Try to do the work extremely carefully.
For reliable fixation, 7 turns are required, which in general is 10 millimeters. Make sure the die is moving correctly. Its movement should be smooth, slow and precise. Don't allow jerks.
When performing work, it is important to carefully secure the structure. It's good if you don't do this alone. If the structure has two bends, it is recommended to purchase a bench or a special tool for making turns manually to make turns.
Before working with the tap, it is recommended to coat the turns with lubricant. You can use lard as it. If there is no sealing grease, you can use fum tape. For the tap you will need a silicone gasket.
So, job done. However, that's not all. It is necessary to check the design for reliability and quality and conduct an inspection. After a visual inspection, it is recommended to open the water and see if the structure is leaking. If all is well, you can consider the job done.
Pipe cutting
Cutting techniques and tool composition
Depending on the type and parameters of the thread, you can cut it at home in several ways:
- use special cutters and thread combs;
- using dies and special taps;
- use of flat or round dies;
- cut using cutters.
If you need to cut external threads, then the best advice would be to get a set of “blanks”. This is a special threading kit, which includes a set of cylindrical dies and a lever handle.
Additional tools and materials that you will need will be a vice, grinding and lubricant.
Attention! The vice must be secured to a table or a special tabletop, and the distance between the jaws when open must allow the pipe needed for cutting to be secured.
Influence of bolt and nut material on the strength of threads
Rice. 2. Dependence of load-bearing capacity on the relative make-up length H/d at different material strengths of threaded parts. 1 - σв = 1660 MPa; 2 - σв = 1210 MPa; 3 - σв = 930 MPa; 4 - σв = 740 MPa; 5 - σв = 680 MPa.
The ratio of the mechanical characteristics of the materials of the bolt and nut significantly affects the process of deformation and the nature of destruction of thread turns, therefore the load-bearing capacity of connections at different ratios σв, b/σв, r varies significantly, even for bolt and nut materials with the same elastic moduli.
In Fig. Figure 2 shows the change curves of the load that destroys the thread of M24x1 connections, depending on the H/d ratio at different strengths of studs made of steel 30KhGSA (lines 1 and 2) and 45 (lines 3, 4, and 5). The material of the nuts is steel 45 (σв = 680 MPa). It can be seen that by increasing the tensile strength of the studs from 740 to 1660 MPa (high-strength studs), it is possible to more than double the load-bearing capacity of the connection thread. This circumstance, explained by the improvement in the conditions of deformation of the nut turns (displacement of the load to the base of the nut turns), should be taken into account when designing and manufacturing connections of cast, forged or stamped housings made of ductile and, as a rule, low-strength low-carbon steels (for example, connections of vessel bodies and apparatus of high pressure by flanges, etc.).
Rice. 3. Scheme of coil deformation and stress-strain curves with increasing load on the connections of steel bolts and nuts.
Cutting the turns of a stud or bolt
Note that at σв, b≈σв, d, a cut of the hairpin turns is observed; The strength of the connection in this case is low (curve 4 in Fig. 2).
Collapse of threads
When σв,b≈(1.3 ... 1.8)σв,г the connection is destroyed due to plastic bending of the turns (crushing); In this case, the turns of one of the parts often break out. The load-bearing capacity of the connection in this case is much higher than in the case of destruction from cutting the turns of the stud. This leads to an important practical conclusion: to make fuller use of the mechanical characteristics of nuts (body parts), it is necessary to use bolts (studs) made of material with σв,b≥1.3σв,г. With large thread diameters (d>24 mm), simultaneous breaking of the bolt and nut turns is observed as a result of plastic bending.
Shear of nut turns: greatest strength
When σв,b>2σв,г the connections are destroyed, as a rule, as a result of cutting off the turns of the nut; the strength is the greatest (curve 1 in Fig. 2). In Fig. Figure 3 shows diagrams of the deformation of turns (section drawings) of connections between M16 steel bolts (σb, b = 880 MPa) with steel nuts (σb, g = 435 MPa) under stepwise loading until failure. According to the dependencies showing the change in the relative deformation of the connection (along the threaded part), small plastic deformations in the thread appear already at stresses amounting to 40% of the destructive ones. Intensive growth of plastic deformations begins at stresses σ = (0.7...0.9) σт; the destruction is very abrupt and is accompanied by an increase in temperature in the joint to 60°C.
If steel studs are screwed to housings made of light materials, such as aluminum and magnesium alloys, then the load-bearing capacity of the threads of such connections also increases with increasing strength of the stud material.
↑ To the beginning
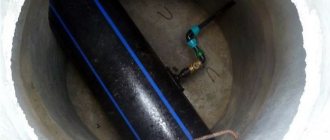
Cutting a thread on a pipe
You don't have to remove the old paint. We lubricate the place where the thread will be with solid or liquid lubricant: grease, lithol, engine oil.
We also coat the cutters on the die.
In neither case do you need to apply a lot of solid lubricant, since after cutting the chips will stick to it and will not fall down, and therefore be removed. We put the guide clamp on the pipe.
In theory, the clamp is rotated with a specialized tool - a ratchet, but since we have a one-time job, it will not be profitable to purchase an expensive tool. We take an adjustable wrench and adjust its size to the rear skirt of the clamp. Rotate the tool, making several turns around the pipe. The cutters are now engaged.
If the pipe is flimsy and unstable, it needs to be held with another adjustable wrench like this:
And use another adjustable wrench to rotate the nozzle. The cutting sequence is as follows: 2-3 turns of the die forward, 1 turn back. This must be done so that the chips break, fall off and do not interfere with further cutting. If this is neglected, chips can jam the threads.
In total, you need to cut 4-5 full turns of thread.
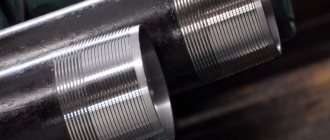
As a result, the thread on the pipe is cut.
Also keep in mind that the cutters in the die have a small cone. This is necessary so that you can start and cut threads with ease. As a result, I lead to the fact that the final turns may not be complete and not cut in depth. Therefore, in order to get 3-4 full turns of thread on a pipe, it is visually better to cut 6-7 turns. After all the work, the thread can be checked by screwing any adapter or fitting onto it.
The thicker the pipe, the greater the force required to rotate the nozzle. The method is not tricky, almost no proper skills are required, even a beginner can do it. It is impossible to skew the thread, so there is no need to be afraid.
The influence of thread design parameters on its strength
Rice. 1. Dependence of the minimum breaking force on the relative screwing length of the nut
The results of testing threaded connections under axial tensile loads show that if the nut height is insufficient, the connection breaks due to thread failure. To increase the load-bearing capacity of the thread, increase the height of the nut (make-up length of the connection). In Fig. Figure 1 shows a typical dependence of the force that destroys a connection on the make-up length. Light dots on the curves indicate the destruction of the thread, dark dots indicate the breakage of the rod along the threaded part outside the body. The material of the nuts is normalized steel 45 (σв = 680 MPa), the bolts are heat-improved steel 45 (σв = 950 MPa). Curves 1 were obtained when testing connections with a thread diameter d = 32 mm, curves 2 - d = 24 mm, curves 3 - d = 18 mm, curves 4 - d = 12 mm, curve 5 - d = 6 mm.
Effect of thread diameter
It has been established that with an increase in the diameter of the thread (with a constant pitch and height of the nut), the load-bearing capacity of the connection, estimated by the load that destroys the thread, increases either in proportion to the diameter (for connections of steel studs with body parts made of aluminum and magnesium alloys, or nonlinearly (for steel connections In the latter case, the intensity of the increase in the load-bearing capacity of the thread decreases with large diameters, but not significantly, and in practical calculations it can be assumed that the strength of the thread increases in proportion to its diameter.
Effect of thread pitch
Reducing the thread pitch (see Fig. 1) while keeping the outer diameter and height of the nut unchanged reduces the strength of the connection, since for small threads it is more difficult to ensure, within the same accuracy class, that the threads overlap, the same as for large threads. In addition, radial deformations of the nut body during loading also have a stronger effect on the load-bearing capacity of connections with fine threads. A decrease in joint strength with decreasing thread pitch was discovered later.
Strength ratio of nut and bolt material
The degree of influence of the thread pitch on the strength of the connection largely depends on the materials of the threaded parts of the pipelines. With a significant difference in the tensile strengths of the materials of the bolt and nut (σв, b/σв, r> 1.4) and the same elastic moduli (Eb = Eg), the strength of the thread with increasing pitch changes proportionally to the ratio σв, b/σв, g.
This can be explained by the improvement in the conditions for deformation and destruction of the nut threads due to the displacement of the highest pressure in the contact zone to the base of the nut threads. Note that at σв, b>>σв, r, the plastic deformations of the bolt threads are negligible.
For connections with nuts made of a material with a lower elastic modulus (for example, a magnesium alloy with E = 40 GPa), the influence of the pitch is no less significant than for steel connections.
Required nut height (make-up length)
From the analysis of the curves in Fig. 1 it follows that when σв, b/σв, г < 3 in a certain range of d/P values (up to d/P< 12) it is possible to find the required relative height of the nut Hн/d, at which equal tensile strength of the bolt rod and turns is ensured shear (crumpling).
The required height of the nut depends on the diameter and pitch of the thread, the ratio of the mechanical properties of the materials of the threaded parts, as well as the type of connection, which affects the nature of the load distribution between the threads. Increasing the height of the nut beyond what is necessary is ineffective, since the strength of the connections, limited by the load-bearing capacity of the bolt rod, does not increase. In Fig. Figure 1 shows curves of changes in the required nut height (make-up length) depending on the d/P ratio for connections of bolts made of steel 38ХА (σв = 1150 MPa) with nuts made of ML7 alloy (σв = 160 MPa, curve 1), AL5 alloy (σв = 220 MPa, curve 2), steel 20 (σв = 450 MPa, curve 3), steel 35 (σв = 550 MPa, curve 4). The increase in required nut height with increasing d/P ratio is due to the effect of diameter and pitch on the strength of the connection threads and bolt shank (or stud for flange connections). Recommendations for choosing the required nut height are given in the table. 1.
Table 1.
Minimum make-up length (nut height) for steel studs
| Nut material | σв, MPa | lmin/d (Hmin/d) at σm, MPa | ||
| 400…700 | 850…1200 | 1300…1700 | ||
| Steel (titanium alloy) | 400…700 | 0,6…0,8 | 0,9…1,1 | 1,2…1,6 |
| 850…1200 | 0,9…1,1 | 0,6…0,8 | 0,9…1,1 | |
| 1300…1700 | — | 0,9…1,1 | 0,6…0,8 | |
| Cast iron | 180…250 | 1,3…1,5 | — | — |
| Duralumin | 360…440 | 0,8…0,9 | 1,3…1,8 | — |
| Silumin (cast) | 150…200 | 1,3…1,5 | — | — |
| Bronze | 200…250 | 1,3…1,5 | — | — |
| Beryllium alloy | 400…650 | 0,6…0,8 | 1,1…1,3 | — |
Note. The symbol “—” indicates that it is impossible to ensure that the stud rod (bolt) is equally strong against breaking the thread turns for shearing.
↑ To the beginning
Existing threading options
Pipe threads are divided into five types, but the most popular options are conical and cylindrical. Household members often encounter such types of pipe threads. There are two methods for threading a water pipe:
- Automatic, which involves cutting threads on water supply pipes using special machines and power tools.
- Manual. For this, special hand tools are used.
If, as part of his job, a person needs to cut threads on a large number of pipes, then it is appropriate to purchase a special power tool, which will facilitate manual labor.
When the need to obtain a threaded connection is an isolated case, then manual technology is suitable for such purposes. On water pipelines, as well as pipes of heating systems, thread cutting is performed using a die.
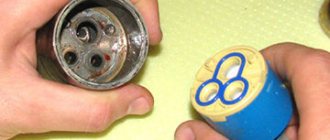
A die (another name for a die) is the simplest device intended for cutting external threaded connections on pipes.
The die is a steel disk, and its inner diameter has axial holes in different numbers, which depends on the size of the product. The edges of these holes form cutters, with the help of which thread cutting is performed. To ensure the reliability of such a tool, it is made of alloy steel or hard alloys.
Dies can have different shapes (round, square, hexagonal or prismatic), but most often disc options are used. Disc dies are intended for making threaded connections on water pipes. To make it convenient to work with the die, they are equipped with additional knobs, as well as clamps in the form of screws. Dies are also solid, split and sliding.
Solid dies for threading pipes have one significant drawback - rapid wear of the cutters. This is due to the rigidity of the product’s own design. Split or spring-loaded dies have a less rigid design, which significantly increases the service life of the product. Due to the spring-loaded mechanism, such a tool for cutting threads on pipes allows you to vary the diameter of the resulting threaded connections in the range from 0.1 to 0.3 mm. A device of this type is highly resistant to cutter wear, but is not capable of providing high accuracy.
Sliding dies are 2 working parts intended for installation in a mounting module. A die with a special fastening module forms a tool called a pipe clamp. The die is fixed in the die using a cracker and an adjusting screw. It is with the help of the adjusting screw that the thread diameter is adjusted.
Typically, pipe clamps are supplied complete with dies of various diameters. Having such a set, you can always cut threads on a pipe of any diameter.
Accessories for heating radiators. Installation and features
The principle of connecting different types of heating batteries is almost the same, but they differ in the equipment used for this. Accessories for radiators are offered for sale individually, as well as in sets, which contain all the products required to connect one battery.
Popular types of heating radiators
In the vast majority of apartments and houses you can find 4 types of heating batteries:
- Cast iron.
- Aluminum.
- Bimetallic.
- Steel.
There are also plastic and copper radiators, but they are practically not used. Each type of popular battery type has its own specific performance characteristics and connection method. The only exceptions are aluminum and bimetallic radiators, the connection principle of which is identical, as are the components used for this.
Cast iron batteries
Heating radiators of this type have been widely used in the past due to their high resistance to corrosion and oxidation. Despite their massiveness and high cost, they are still relevant today. The fact is that in central heating systems the circulating coolant is too contaminated, so batteries made of other materials wear out in just a couple of years.
Aluminum radiators
Such batteries have an attractive appearance. Aluminum has high thermal conductivity, which means it heats up the air in the room faster. A huge disadvantage of such batteries is their high sensitivity to the chemical composition of the coolant. In this regard, they are completely unsuitable when connected to a central water supply. They are chosen only when an autonomous heat supply is being installed, since it is possible to control the quality of the fluid circulating in the system.
Bimetallic radiators
Batteries of this type have high heat transfer because they contain aluminum. They are very durable and have a long service life. They have a higher cost, which significantly reduces the popularity of this type of radiator.
Steel radiators
Steel batteries, unlike all previous varieties, are not collapsible. They do not consist of sections that can be removed and added at will. Typically, such radiators are of a panel type. Outwardly they look like a rectangular box. They can often be found in office buildings, as well as in residential buildings and apartments. Since panel systems are not dismountable, manufacturers often install on them all the necessary components for radiators from the factory.
Accessories for connecting radiator sections
Cast iron, aluminum and bimetallic batteries consist of sections, the ribs of which can be removed or added, thus adjusting the efficiency of heating the room.
To increase the battery, the following products are used:
- Nipple.
- Pad.
The barrel nipple can have a different diameter, depending on what type of battery it will be used for. The largest connector is used when installing old-style cast iron radiators. The nipple is a short metal tube, on opposite ends of which multidirectional external threads are cut, reaching to the center. Inside the nipple there is a special groove designed to fix the key for assembling batteries.
The principles of working with the nipple are very simple. The sections of radiators that need to be connected are pressed tightly against each other, while a nipple is installed between them. After this, a key is inserted through the side mounting hole of the battery and screwed on. Since the threads are opposite, during rotation the nipple is screwed into the connected ribs.
To seal the joint between the ribs, a gasket . It is threaded onto the nipple initially before installation. Usually you can find silicone and paronite gaskets on sale. When working with cast iron radiators, they are usually not used, but tow and heat-resistant silicone sealant are used instead.
What components for radiators will be required when installing a heating system?
Each type of heating battery has its own characteristics, so the equipment used during assembly is different. It should also be noted that some radiator manufacturers make their products in a special format, so only branded components can be used for them.
Brackets for fixing the battery
First of all, when installing a heating radiator, you need to take care of its fixation. For this, special brackets are used.
There are two types of such components for radiators:
- Wall-mounted.
- Floor-standing.
Wall brackets are fixed in the wall, after which the battery is hung on them. Floor-standing ones serve as a stand, which is made in the form of a rack. The bracket is screwed to the floor with self-tapping screws, and the radiator itself is installed directly on top. Floor-standing types are used if the walls are not strong enough to support the heavy elements of the heating system.
How to cut a thread on a pipe with your own hands
To make threading on a pipe with your own hands, you initially need to perform a number of preparatory measures:
- Carefully clean the tube in the area where you plan to get the threads.
- Clean the end part of the product with a file.
- Lubricate the working area to reduce resistance.
In order for the thread cutting process to be convenient and the end result to meet the requirements, before carrying out the action you need to secure the product in a vice. This will allow you to fix the part so that you can perform the necessary actions with both hands. After this, the following actions are carried out:
- A wrench with a die of the required diameter is used, with the help of which a rough pass is carried out. In this case, it is important to keep the die strictly perpendicular to the pipe.
- The roughing pass is the basis of thread cutting, so do not rush and perform the actions slowly but efficiently.
- A rough cut allows you to get 2-3 threads of thread. This is exactly how many threads are needed for the tool to take a secure position.
- The next step is to twist the rough die and use the finishing die. With its help, the required number of threads is cut on a pipe that is planned to be installed in a water supply or heating system.
- After each pass, you need to make 0.5 turns back to clear the cutting area from chips.
- At the final stage, you should use the third die, which carries out a control pass.
When threading, it is important that all actions are performed slowly, and with each subsequent turn the cut area is cleared of metal shavings.
Using a bolt tap
The option when the size of the new bolt is not of fundamental importance allows you to use the simplest method of restoring a threaded connection.
All you need to do if you find a problem is:
- Take a bolt of the appropriate size and grind it down. Sanding is extremely important as even the smallest piece of rust will become a problem when cutting new threads.
- Having installed the future tap in a vice, grind it like a cone, as in the photo. This will make it easy to insert an improvised tap into a hole of a smaller diameter and distribute it to the desired size.
- After this, cut 3 grooves through which the chips will exit. It is important to cut them at the same angle to the longitudinal rod.
All that remains to be done to obtain a new thread is to clamp the bolt head with pliers, a wrench or an open-end wrench and carefully, but with some pressure, screw a homemade tap into the hole.
All movements must be smooth. Chips that will be displaced during the manufacture of the inner rings must be removed using a soft brush.
See also:
The most useful car care items: testing purchases
How to cut threads on a pipe near a wall
Often thread cutting needs to be done on site when the pipeline is fixed in one part to the water supply or heating system. In hard-to-reach places, it is impossible to cut threads on a pipeline installed near a wall using a die and a wrench. For such purposes, you will need to use a thread-cutting device such as a clamp with a ratchet. With its help, the thread cutting process is simplified several times.
The procedure for thread cutting with a manual die is carried out as follows:
- A nozzle of the appropriate diameter is fixed in the clamp mount, after which you can begin the procedure itself.
- The surface of the pipe - the working area - is cleaned.
- The area to be cut must be cleaned until a metallic shine appears.
- A chamfer is made at an angle of 45-60 degrees.
- The material is lubricated with Litol or Solidol.
- The key is placed on the working area of the pipe.
- Moderate back-and-forth rotations of the instrument are performed.
As with a die, when working with a die, you need to make half a turn back after each new thread to remove the metal edge. To facilitate the threading process, you can use an electric die, but it is rational to purchase such a tool only if you need to use it every day.
On pipes you can cut not only external but also internal threads, for which taps are used. However, the need to obtain threads on the inside of the pipeline arises only in rare cases. Knowing the features of self-threading, you will never have problems with the installation of water supply and heating systems.
How to cut threads on a pipe.
Almost every day, pipeline installers have to use a tool: a tool in a tool holder (die),
Ledger in a lectern holder (die)
or an alternative to it: klupp.
With the help of these simple devices, threads are cut manually, and only if it is impossible to use them, they resort to the help of a welder. Not at all because it is simpler and easier, no. It’s just more difficult to equip and deliver a welder to a site. These large gas and acetylene cylinders, hoses, open fire again. I won’t go into details here; that’s not what this article is about today.
We have the following situation: it is necessary to cut out a steel pipe and install, say, a water supply system in an apartment, from modern material (it doesn’t matter whether it is polypropylene, plastic, or copper). For tightness, we use a threaded connection using an appropriate fitting. In principle, cutting a thread on a pipe is, as I already said, almost an everyday task, but I want to bring to your attention a dozen important points. Without observing these rules, you will no longer be able to do without welding.
Before cutting, treat the pipe and cutting tool with lubricant
Use motor oil, special lubricant, or a piece of lard for this. It will be easier to cut and there will be less wear on the threading tool.
If necessary, hold the pipe with a gas wrench
To avoid breaking and creasing. Relevant for a “loose” pipe, or a “loose” insertion point.
Make the cut at a right angle to the pipe axis
Otherwise, the thread-cutting machine will not achieve proper engagement over the entire plane. The tool will break off.
How to properly cut threads on a pipe with a die
If you are repairing plumbing, changing the water supply system, then you need to know how to correctly cut a thread on a pipe with a die in order to screw on a faucet, coupling, and the safety of repairing your apartment, as well as the neighbors below, depends on the correct thread cutting.
I have already described the thread cutting process itself in the article “How to connect a heating radiator,” but based on questions received by email from readers of my blog, I decided to describe in more detail how this should be done.
In order to cut a thread, you will need the following tool:
- die holder, lerka
- rough thread cutting die
- finishing die
- grease, machine oil or a piece of lard
- grinder or file
READ How to cut high precision threads
Also called dies. first pass and finish.
Why I recommend using two dies:
Firstly, it is easier to cut, and secondly, tool wear is reduced, and with the current quality, this is very important, since now you will cut 3-4 threads, and you can throw away the die.
If you are cutting a thread on a water or heating riser, or a tie-in to an apartment, be sure to make sure it is in good condition, otherwise you risk breaking the pipe.
How to use the filter on the website to select a drill bit for threading?
In the Metal drills section, a filter with the “Threaded” parameter has been implemented, thanks to which you can find the desired drill in literally 2 mouse clicks:
- Choosing a thread.
- Click “Apply”.
- We get suitable drills.
For which materials are the values indicated in the table?
The indicated hole diameters provide cutting of metric threads in:
- gray cast iron
- carbon steels of ordinary quality
- quality structural steels
- alloyed structural steels
- high alloy steels
- corrosion-resistant, heat-resistant and heat-resistant alloys
- heat-resistant steels
- aluminum casting alloys
- copper
A complete list of threads and diameters can be found in GOST 19257-73 - an official technical document with all the nuances and details.
Before you get started, we recommend that you read the practical tips in the article How to properly cut a thread with a tap. And there you can find suitable coolant for different materials.
How to cut threads on a pipe
When you cut the pipe to size, on the side where you will cut the thread, be sure to remove the chamfer, you can also slightly clean the place where the thread will be, if there is paint on the pipe, then it is better to clean it, it will be easier to cut the thread.
Lubricate the thread and the teeth of the die with grease or lard.
Take a die holder with a 1st pass die, or a thread-cutting tool for rough threading (pictured) and pressing it with your hand with force (so that the die catches on the pipe and starts cutting), begin cutting clockwise, approximately 5 turns. After about the 2nd turn, when it gets tight, turn it back half a turn, this will break off the chips, and it will be easier to cut, and turn clockwise again.
When you have cut the rough, take the 2nd die, again lubricate the threads, the die for finishing threads, and repeat the same steps.
And now some tips and nuances.
Do not buy taps with 3.5 turns of internal thread, even if they are thick-walled, such valves can be screwed onto fittings with brass threads; they are not suitable for water pipes or iron pipes.
Be sure to cut the first thread through the guide so that the thread does not become skewed.
If you are cutting a finishing thread without a guide, be careful to ensure that the die is screwed on 1-1.5 turns evenly, without distortion.
Advice: cut at least 5 turns, and be sure to screw the valve onto the bare thread, and count the number of turns, it should be 5; when installing a ball valve on an iron pipe with flax, you need to screw at least 4.5 turns. So don’t be lazy, if the tap is screwed on with fewer turns, be sure to trim the thread. If you screw it on by 2-3, then after a short time 1-2 turns will rot, and the tap will fall off, and there will be a flood. How to properly wind flax on a thread, read here.
Here is the process and tips on how to properly cut a thread on a pipe with a die with your own hands, you can watch the video.
Heating radiator assembly
Assembling heating radiators requires more care and better preparation than disassembling.
Heating radiators can be assembled in any convenient place or location without disconnecting the batteries from the heating system (without dismantling), but it is more convenient to remove them. The choice of the place for future work is no different from the place where the radiator is dismantled (staircase, wooden panel, floor). I would like to add that if such a selection is not possible, you can lay two wooden beams in parallel, with a distance between them of 450 - 500 mm. To level it on a plane, you need to place something under the edge of the beam. The efficiency of the assembly (repair) of heating radiators will depend on the levelness of the site on which the work is carried out.
Radiator assembly tool
What tools are needed to assemble or replace radiator sections? You must first select good fittings, a nipple with a corresponding diameter of 1″ (one inch) or 1 1/4″ (5/4″ - an inch and a quarter) with gaskets (See Photo), a radiator nipple wrench for assembly with a lever and, if necessary, taps for running old threads.
Methods
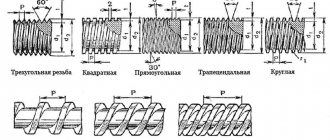
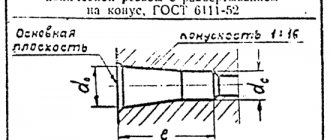
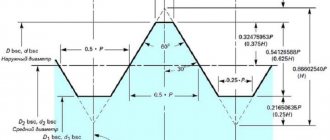
A thread is a type of connection for which the elements and angle of the profile (the cross-section of the coil), as well as the diameter along the outer, middle and inner edges are taken into account. According to the profile, the thread is divided into triangular, trapezoidal, rectangular and other types.
For cutting gas and water pipes, cylindrical pipe threads are used. The last two turns are not completed completely. This is a run-out necessary for a tight connection of pipes. The escape is performed using special types of dies. The diameter of the pipe is measured in millimeters, and the thread in inches.
Cutting is divided into internal and external, left- and right-handed. In the left-hand version, the nuts are tightened to the left, and in the right-hand version, to the right. Types of threads are determined by the methods of operation and are fastening, running and fastening-sealing. The latter option is used for threading pipes at home.
There is a so-called cutting pitch - this is the distance between the turns, as well as the size of the thread depth. Their configurations are different, but they all follow the same rule: the deeper, the stronger.
There are many ways to cut threads: using a die, an automatic electric die, and a thread-cutting machine. External threading is done manually using dies installed in the die frame. Solid and sliding die designs are used. Using split (detachable) structures, the cutting diameter is adjusted.
Sliding dies are placed according to the number values, round ones are installed with special screws on the knob. Then the dies are fixed. In sliding dies, a gasket - a cracker - is installed between them and the screw.
Internal threads are made using taps. Using their device, holes are drilled in a metal pipe, strictly adhering to special calculations. For quality cutting you have to make at least three turns.
Internal threads are applied in the same way as external threads - with a reciprocating motion: two steps forward - one step back. The first approach is carried out with a rough tap. He has only one risk. Then the procedure is repeated with a middle tap with two risks. The cutting is completed with a finishing tool with three notches at the end.
When carving deep surfaces, the tool must be periodically removed and cleaned. In blind holes, long taps are used with the obligatory use of a lubricating emulsion.
Automatic electric clamps greatly simplify threading pipes. They consist of modified gearboxes and a set of dies of various calibers. They are distinguished by high performance and operate from the mains. Despite all the advantages, the tool has its negative features. For example, an electric clamp, with all its power of 1 kW, has a very significant output, so a clamp is used to secure the clamp.
Threading machines are typically used on an industrial scale and in large workshops. The machine has its advantages over manual and electric tools, which include high productivity, accuracy when applying threads, as well as minimal participation of the human factor.
Pipe threading machines are divided into manual, electric and automatic versions. The manual one is used at home - it is compact, transportable, weighs no more than 50 kg, but is not suitable for large diameter pipes. Electric machines are good for small workshops; automatic options, due to their large dimensions and high productivity, are widely used on a production scale.
Some types of pipes can only be cut in industrial conditions. For example, a carbon pipe with a diameter of 32 mm can be cut only after its surface has been treated with a special compound.
After the work is completed, the material is rejected. If the product has defects in the thread, then it cannot be used, so cutting must be carried out with basic skills and knowledge in this matter.
How to cut?
When all the tools are ready, you can cut threads on a pipe, for example, a heating system. It should be noted that it is not necessary to have any special skills to perform this type of work - everything can be done with your own hands.
First of all, you need to study the process itself, guided by the following rule: cutting threads on pipes must be carried out in a certain sequence, otherwise consumption of raw materials and equipment breakdown cannot be avoided.
Before cutting, the pipe must be examined for old paint, corrosion and plaque, and then processed by thoroughly cleaning the surface using special means and tools, for example, a grinder. The end of the pipe must be pre-processed by chamfering for better thread entry. If the cut is made using a pipe cutter, then the edges of the cut will be smooth, without serifs. If this is done with a hacksaw or an angle grinder, then it is necessary to clean them down to the metal with a file - this will significantly improve the joining. Before and after thread cutting, it is necessary to lubricate the cutters and the surface of the pipe with a special liquid.
Dies of the required caliber are inserted into the die frame using clamping screws. Then the clamp is put on the prepared surface of the pipe and a couple of starting turns are made in the direction of cutting. The thread is made only after such fastening.
After this, the ratchet switch is adjusted and clockwise rotation to the right (in the direction of the thread) begins. No special effort is needed. To ensure that chips are removed well, you need to work using the following rotation range: two turns forward, half a turn back. To avoid distortion, the correct position of the die relative to the pipe must be strictly observed.
You can check the quality of the thread using a nut, screwing it onto the pipe.
Having completed the work, you should prepare the thread before installation with sealant, fum tape or linen thread.
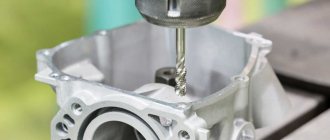
Internal thread cutting
After the preparatory work, the workpiece is secured in a vice and a tap is inserted vertically into its hole using a square.
Pressing the knob against the tap with your left hand, turn it to the right with your right hand until the tap cuts into the metal on several threads and takes a stable position, after which the knob is taken by the handles with both hands and rotated with the hands intercepted every half turn
In order to facilitate the work, the driver with the tap is rotated not all the time in a clockwise direction, but one or two turns to the right and half a turn to the left, etc. Thanks to this reciprocal rotational movement of the tap, the chips break, they turn out short (crushed), and the process cutting becomes much easier.
Having finished cutting, turn the knob in the opposite direction to unscrew the tap from the hole, then drive it through.
Cutting fluids for thread cutting
| Processed material | Lubricant | ||
| Carbon steel | Emulsion. Sulfurized oil | ||
| Structural steel | Sulfurized oil with kerosene | ||
| Tool steel | Mixed oils | ||
| Malleable cast iron | 3-5% emulsion | ||
| Iron casting | B/o. 3-5% emulsion. Kerosene | ||
| Bronze | B/o. Mixed oils | ||
| Zinc | Emulsion | ||
| Brass | B/o. 3-5% emulsion | ||
| Copper | Emulsion. Mixed oils | ||
| Nickel | Emulsion | ||
| Aluminum and its alloys | B/o. Emulsion. Blended oils. Kerosene. | ||
| Stainless, heat-resistant alloys | 50% sulfur oil, 30% kerosene, 20% oleic acid (80% sulfofresol, 20% oleic acid) | ||
| Fiberglass, vinyl plastic, plexiglass | 3-5% emulsion | ||
| Textolite, getinaks | Blowing with compressed air | ||
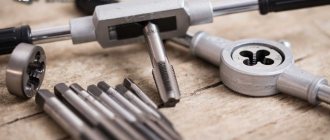
Tools
To carry out the work, you need to prepare all the necessary tools and devices for cutting. In each specific case, the pipe thread set will vary in composition, but for manual use it consists of dies, a die and a holder with a ratchet. The kit is also additionally equipped with a pipe cutter, a gas wrench, a file, a hacksaw, an angle grinder, lubricants and other tools. For those who do not want to work the old fashioned way using the classic method, there is an alternative - a power tool.
READ How to Cut Teeth on a Circular Saw
The main requirements are for the quality of the tool used and preparation for work.
The cutting itself is carried out using dies. Some are cut on one side only, others on both.
For internal threading, the kit may also include several taps with different slot depths. Some are intended for rough processing of the inner surface of the pipe, others for finishing. This equipment is presented in the form of a screw with chip flutes. It is attached to the gates using the tail part.
Using a tap, internal cutting is carried out in several approaches. Their number depends on the material they are working with. For example, special sets of several taps are designed for threading in titanium alloys.
A die, purlin or hole is used to carve various shapes on pipes. It is a steel nut with a cutting base inside, in which there are special holes - grooves for waste. The dies are tubular, hexagonal, round and square. Modifications of their body can be solid, split and sliding.
Sliding (prismatic) models are also called half-dies; they are attached to the die using screws and a special gasket - a cracker. This is necessary to evenly distribute pressure on the screw. Using dies, cylindrical, conical, round or metric threads are cut. The components of the die are special wrenches and chucks with which it is attached to the frame body.
The die consists of a frame in which the cutting elements - dies - are fixed. Each mandrel is equipped with four steel dies. The Klupp is also equipped with a special ratchet handle. Only one die can be inserted into the die holder, and several into the die holder. The cutting mechanism of the passes is capable of cutting two types of threads: 0.5 - 1 ¼, 1 ½ - 2 inches.
A manual clamp, as a rule, cuts pipes of small diameter. They are equipped with a special handle – holder. They can also be used with a suitable pipe wrench. It is small in size, simple and easy to use.
A socket with a holder and a ratchet is a modification of the design with a gear mechanism designed to carry out threads with a diameter of more than one inch. The ratchet is an indispensable mechanism. With the help of left- and right-handed ratchets, it is convenient to work in hard-to-reach places, for example, near walls. Using the ratchet lever, the die is quickly removed from the thread by twisting in the opposite direction, providing a reciprocating method of thread cutting.
In practice, ordinary, oblique and Mayevsky clamps are used.
It is called an oblique die because it regulates the distance between the sliding dies. This tells you the cutting diameter. Designs of this type are the easiest to use.
Mayevsky's clamps are of a more complex design and are used for pipe threading. They contain three sets of replacement dies and specialize in thread diameters up to 2 inches. Designs of this type are used for threading pipes with a small diameter.
Cutting on large diameter pipes is carried out on an industrial scale. For example, to cut a seamless pipe with a diameter of 219 mm, a special machine is needed. Casing pipes (columns) are cut only on special machines under special conditions, subject to all safety measures.
Peculiarities
Carving was invented two centuries ago: then a screw lathe first appeared in Britain. Inventor G. Maudsley discovered a method for applying precise threads and invented a device for measuring it (micrometer) with an accuracy of 0.0001 inches.
Around the same time, mechanical engineer D. Whitworth created the first screw thread profile and proposed a system of its standards. Since then, the invention bears his name - the Whitworth carving. It formed the basis for all kinds of national standards.
Nobody remembers the exact date of the appearance of the thread, but the date of its use can be considered the beginning of industrial production.
The main feature of threading is that the tool for its implementation must be made of a material of greater hardness than the element being cut, and for the manufacture of this tool, in turn, structures with even harder elements in composition must be used.
There are countless options for pipe threading these days. It is only important to choose the one you need. A good result is guaranteed if high-quality materials and tools are used in the work, instructions are followed, as well as cutting technology. When cutting threads, it is best to use a high-quality tool, since a cheap option is unlikely to work for a long time.
Nowadays, most piping systems are made of plastic. It is often necessary to fasten structures using connecting elements made of plastic and metal. In the domestic sphere, such fastenings are a fairly common solution; they are called combined. Modern communication systems traditionally use one of the types of plastic or metal pipes. However, in some cases it is advisable to use combined structures.
To install systems when combining HDPE elements and metal, several connection methods are used, including threaded and flanged threads.
Pipes with a diameter of up to 40 mm are joined using a threaded method. Flange connections are used for larger diameter pipes where it is impossible to tighten the thread.
The connection of a polypropylene pipe with a metal pipe is carried out using fittings that are specially created for this purpose. They are connections, one side of which has a thread for metal, and the other has a coupling for plastic. Multiple combined connections are made with special complex fittings.
Adviсe
It would be useful to know some of the subtleties of operating and choosing tools, as well as how to use them.
Some tips will help in this matter.
- Before purchasing a clamp, you need to make sure of the quality of the materials of its body and components, for which you should study the instructions and become familiar with the technical operating conditions of the device. It is better to choose licensed models from reliable manufacturers.
- A die with replaceable cutters will work longer and better than a regular die. It is best to choose cutters from alloy steel.
- Before cutting threads on water pipes, you should ensure the integrity of the system, otherwise pipe breakage may occur during the work.
- If rust elements are found in the pipe, it is better to remove them using a pipe cutter. An electric model is suitable for this. It can handle large diameter elements. The hand clamp is intended for thin tubular steel surfaces only.
- To make cutting easier and better, you need to use a special liquid for cutters when working, which will simultaneously cool and lubricate the cutting surface - this will reduce the friction force, which will protect the cutters from heating and deformation. Working surfaces, tools and sources are usually lubricated with special lubricants: machine oil or grease. If you don’t have them on hand, you can use a proven remedy - a piece of lard.
- For manual cutting from the inside, it is better to use a pipe cutter and a wrench. Using a gas wrench, fix the pipe and cut it. Due to the length of its handles, it is light and easy to use. A vice may not be needed, but this safety material is sometimes necessary as a reliable fixation of the pipe structure.
- It is better to make cuts in such a way that the diameter of the outer turns is slightly larger than the diameter of the pipe - this guarantees a high-quality connection.
- To ensure a reliable connection in the cut, it is better to make a larger number of turns, for example, five. When completing the carving, you need to go over the surface again to ensure the quality of the cut.
- To set the runs correctly, you need to follow the number values on the marks.
- For good long-term operation of the die, it is necessary to promptly replace failed components. It is better to purchase new teeth to replace worn ones from the same manufacturer.
- It is necessary to combine the design elements of the tool strictly according to the parameters - failure to comply with the dimensions of the dies and die will lead to breakage of the cutters.
You can see how to cut a thread on a pipe in this video.
Sources:
https://gidpotrubam.ru/montazh-i-remont/narezat-rezbu-na-trube https://santehskript.ru/kak-narezat-rezbu/ https://roma100471.ru/remont-santehniki/kak-pravilno -narezat-rezbu-na-trube-plashkoy.html https://stroy-podskazka.ru/vodosnabzhenie/truby/kak-narezat-rezbu/
Manual cutting steps
- Preparing the metal (cleaning it, drilling a hole).
- Selecting a tool. It is very important which tap you use to cut the thread, the purity of the result depends on it.
- Selection of other devices in one place (electric drill, drill, chamfer cutter, wrench, vice, machine oil or grease for lubrication).
- Rotation.
- Final sanding – as needed.