Technology for restoring internal and external threads
Today, thread restorer is used extremely rarely in work. The most commonly used common tools are:
- A drill is used to change the size of a hole.
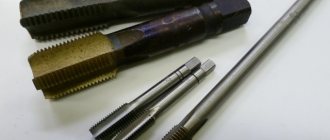
- The tap and die are designed for direct cutting of turns. They are inexpensive and are often used to cut a new surface, but they can also be used to restore a damaged one.
- Spindle or tool for screwing in the insert. It is characterized by the fact that the working part resembles a threaded one; there is a special hook at the end.
- Repair insert, represented by a diamond-shaped spiral. A leash was made at one end, due to which it rotates due to connection with the spindle.
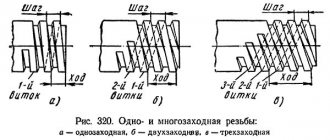
Spindle
In addition, some technologies involve the use of epoxy glue, cold welding or other materials. The choice is made depending on the specific case
How to restore a thread with a tap while maintaining its diameter and location
If you need to restore the thread while maintaining its diameter, use one of the following methods.
Welding the hole and then cutting a new thread
This method is rarely used due to the fact that the strength of the new thread obtained using this technology will be lower. This method is also chosen in the absence of special devices (screws and spiral inserts).
This method of thread restoration includes the following steps.
- Removing old threads by drilling.
- Welding the hole. The choice of technologies depends on the materials of the parts.
To weld holes in steel products, electric arc or gas welding is used in protective environments.
- When working with cast iron parts, gas or electric arc welding is used in a cold state or with general/local heating.
- Electrodes (MNCh-1, OZCh-1, TsCh-1), cast iron rods with a high silicon content and other materials are used as additives.
Note! When working with aluminum products, this method of thread restoration is usually not used. This is due to the fact that the metal actively absorbs gases during welding. Pores form in the deposited layers. With severe shrinkage, cracks appear.
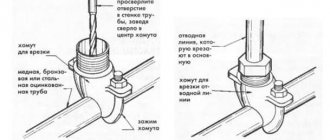
Restoring threads using a screwdriver
Screwdrivers are special cylindrical devices that have threads of the required diameter and pitch on the inside and large threads on the outside. Such products are made from steel, brass, bronze, copper and other materials. At the final stages of production, the screws are hardened and further strengthened.
Photo No. 2: screwdriver for thread restoration
If you need to restore the thread while maintaining the diameter using a screwdriver, proceed as follows.
- Drill out the hole. The drill must be selected in such a way that the diameter of the resulting hole allows cutting a thread for screwing in the screw.
- Cut the thread with a tap. Follow the rules listed above.
- Screw in the screwdriver. It needs to be installed flush. If this is not possible, mill the part and remove the protruding part of the fixture.
- At the border of the new thread and the screw, apply notches using a core. This will prevent the device from unscrewing spontaneously.
Repairing threads using a spiral insert
Spiral (also called wire and spring) inserts are also often used to restore damaged threads.
Photo No. 3: spiral inserts for thread restoration
These devices have high-precision rhombic threaded profiles on the inside. Almost all models are equipped with special driving tongues designed for screwing in devices.
For the manufacture of such products, especially durable high-quality stainless steel is used. This guarantees the resistance of the restored thread to deformation and corrosion.
Restoring threads using a spiral insert includes 4 stages.
- Drilling. Drill out the hole. Select the diameter of the cutting tool according to the table that manufacturers provide with spiral inserts.
- Thread formation. Note! To cut threads, use special taps that differ from standard ones and come with spiral inserts. Follow all rules and recommendations.
- Installation of the device. Place the spiral insert onto the supplied special tool and screw it into the hole.
- Removing the drive tongue. You can get rid of it using a special tool (manufacturers also supply it). To remove tabs from large-diameter inserts, ordinary pliers are suitable.
Image #1: Drilling the hole for the spiral insert
Image #2: Forming a thread for a spiral insert
Image #3: screwing the spiral insert into the hole
Using professional spiral thread inserts has the following advantages.
- The required tension is ensured at the insert landing site. This completely prevents twisting. The devices are located in the receiving threads with virtually no gaps. There is no need to use glue for additional fixation of products.
- Due to the elasticity of the inserts, loads and stresses are distributed evenly. This creates ideal conditions for the transfer of forces between the bolts and the receiving threads.
- Spiral inserts are universal. They are used not only to restore threads, but also when it is necessary to strengthen connections. Spiral inserts are used when working with products made of low-medium and high-strength metals, as well as plastic and wood.
Thread restoration method
Each thread restoration method is suitable for a specific case. An example is the use of epoxy glue, which can repair minor damage to the coils.
If it is possible to change the size of the hole, then a tap is used. It is selected depending on the parameters of the existing turns.
The tool in question is designed to produce turns on metal.
In some cases, it is impossible to increase the diameter, then a screwdriver is used. Such a cylindrical device has coils on the outside and inside with the required pitch.
Tap
In some cases, the damage is represented by a hole that can be repaired by welding. After this, thread restoration is also carried out using the most suitable tool.
Repair of threaded connection parts.
In any machine, over 60% of the parts have threads. When using machines, the threads wear out, the threads become wrinkled, deformed and break off. Moreover, threaded holes are primarily subject to wear and damage. Minor damage to the thread (crushing, deformation of individual turns) is eliminated by calibrating it with a tap or die. When more than two threads are broken or other serious damage occurs, various thread restoration methods are used depending on the design of the part, the type of thread (external or internal), etc.
External threads (on shafts, axles, etc.) are restored in the following ways:
- cutting threads of repair size;
- surfacing and cutting threads of nominal size;
-electric contact welding of wire;
-replacement of the worn threaded part of the part.
The old thread is cut off on a lathe and a new smaller thread is cut.
To restore the thread to the nominal size, mechanized surfacing is used, often vibrating-arc and in a CO2 environment, less often submerged and in a steam environment. Before surfacing, the old thread is cut off. After surfacing, the part is machined and a thread of nominal size is cut.
Threads can also be restored by electric contact welding of wire. After welding the wire, the part is turned and a thread of nominal size is cut.
Sometimes the end of a part with a worn thread is cut off, a new part is made, which is rolled or welded to the remaining part. Then a thread of nominal size is cut. If the thread diameter is large, sometimes it is not cut off, but rather ground, then a ring is pressed in and a thread of nominal size is cut.
Internal threads are most often restored in body and other basic parts made of cast iron and aluminum alloys. At the same time, regardless of the material of the parts, the wear pattern of the threaded holes is the same: the first two or three thread turns have the greatest wear and tear, the remaining threads wear out much less. This is explained by the different load on the threads of the threaded connection: the first turn is loaded five to six times more than the last.
Internal threads are restored in the following ways:
- cutting threads of repair size;
- cutting threads of nominal size in a new place;
- welding the hole and subsequent drilling and threading of the nominal size;
-using polymer compositions;
- installation of a threaded plug (screw);
-installation of a threaded spiral insert.
When cutting repair size threads, it is often necessary to make a stepped stud. Cutting a thread in a new location is possible if the design of the connection parts allows you to change the location of the threaded hole without affecting interchangeability (hubs, flanges, etc.). Before welding, be sure to remove the old thread.
Epoxy resin-based compounds are usually used as polymer compositions when restoring threaded connections.
When installing a threaded plug, the worn threaded hole is drilled or bored, a thread is cut into it and the plug is screwed into it. Then a hole is drilled in it and a thread of nominal size is cut. Often, threaded plugs are additionally secured using adhesive compositions or locking pins screwed into the interface between the plug and the part.
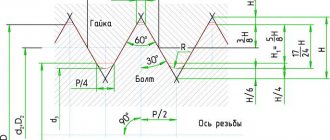
To repair threaded holes, a method for installing threaded spiral inserts has been developed and is being used. The insert is made in the form of a spring spiral from stainless wire of a rhombic cross-section with an acute angle of 60°. The outer and inner surfaces of the insert are metric threads of different sizes. At one end of the insert there is a technological guide with a notch, with the help of which the insert is screwed into the hole using a special key. Then this leash is removed with a special beard.
The main disadvantage of surfacing should be considered a decrease in the fatigue strength of the part (from 10 to 30%) and the possibility of burning through thin-walled parts. Threaded holes have the following main defects: failure
,
clogging
,
crumpling
and
chipping of
individual turns,
wear
along the internal and average diameters, etc. Various methods are used to repair them.
The main disadvantage of welding holes with subsequent drilling and cutting threads of nominal size is a large heat-affected zone, which leads to cast iron whitening, cracking and warping, changing the structure of the material and reducing the strength of the thread by almost half. Cutting a threaded hole in a new location is only possible if its location can be changed without disrupting the interchangeability of the connection (drum hub, etc.).
Stabilization of threaded connections with a polymer composition is used when the total wear of the stud-to-body connection is no more than 0.3 mm. The installation of a spiral insert during the repair of critical parts and assemblies has become widely used.
Cutting a threaded hole in a new location is possible only if its location can be changed without disturbing the interchangeability of the connection (drum hub, etc.). Stabilization of threaded connections with a polymer composition is used when the total wear of the stud-body connection is no more than 0.3 mm, The installation of a spiral insert during the repair of critical parts and assemblies has been widely used. The insert is made of stainless steel X18M10T of rhombic cross-section. Worn threads in the holes of the parts are restored by installing spiral inserts using the PIM-5331 tool kit. The technology consists of drilling a hole to the required size (M8 to A110, M10 to M12, M12 to M14, etc.), cutting a thread with the same pitch; installation of a spiral installation of the required size technologically with the lead down into the installation tool
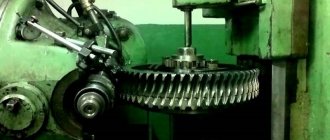
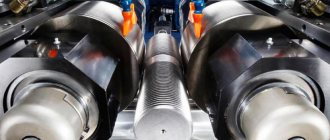
Repair of gears.
In machine assembly units, open gears are often used, in which gears and sprockets experience heavy loads and are not protected from moisture and dust. This causes relatively rapid wear of gears. In addition, closed gears are used in the form of separate assembly units: gearboxes, gearboxes, etc. When gears operate under such conditions, additional dynamic loads arise in the meshing caused by deformations of gears and shafts, as well as supports and housings due to inevitable manufacturing faults and installation In addition, transmissions can operate with significant alternating short-term overloads.
To replace gears in closed gears, dismantling and complete disassembly of the assembly unit is often required.
Gears belong to the category of expensive parts. Therefore, at repair bases that are not equipped with the necessary equipment for the manufacture of wheels, it is possible to restore worn teeth by surfacing, pressing on gear rims, pressing and other methods. The method of restoring gears is chosen depending on the nature of the malfunction, material, accuracy class and production capabilities of the repair company.
Gears received for repair may have the following faults:
wear of the working surface of the teeth; chipping and breaking of teeth; formation of cracks, scuffs, dents and cavities; wear of gear seats and keyways; violation of the correct position of gears and assembly defects.
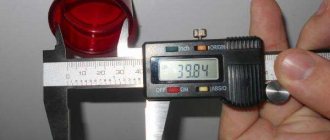
The degree of tooth wear is determined with a gear gauge. To do this, use the drawing to find the required measurement depth and, at this depth, determine the size of the tooth using a caliper gauge. By comparing the obtained result with the nominal size (size according to the drawing), the amount of wear is determined.
Gear transmissions are considered unsuitable for use if the amount of their wear has exceeded the maximum permissible value, which is established for each transmission by the technical conditions for the repair of a given machine.
A worn gear can be repaired: by surfacing individual teeth, by continuous surfacing of the entire rim, by the deformation method, by the method of repair dimensions and by mechanical methods.
After normal welding, the gear teeth are cleaned and coated with a thin layer of sormite hard alloy. The size of the teeth after machining before surfacing should be less than the nominal size by up to 1.5 mm. Surfacing of teeth is carried out in a bath of water.
To surfacing the side surfaces of the teeth, the gear is installed in a bath and surfacing begins from the second tooth from the water surface. The tooth being welded is heated with the flame of a gas burner, after which flux-borax is applied with a sormite rod and the tooth is welded to the required size. After this, the gear is turned so that the welded tooth does not touch the surface of the water, and the next (third) tooth is welded. After the deposited second tooth has cooled (to a dark cherry color), it is immersed in water to harden it.
In the same way, teeth are surfaced with martensitic cast iron. The repaired teeth are then treated with an abrasive wheel with a grain size of 36...46. The profile of the machined teeth is checked with special templates.
Wear and chipping of the ends of gear teeth made of steel grades 40X and 45X is eliminated by fusing a wire of grade 40X steel with a gas burner in a neutral flame. Surfacing can also be done by electric arc welding, using valve spring wire with special coatings. Welding of heavily worn teeth with stalinite must be carried out using the combined layer method. A layer of stalinite charge is poured at the welding site and melted with a metal electrode, or metal rods coated with stalinite are used.
When assembling gears, one should proceed from the standards of accuracy provided for by the standards: kinematic, tooth contact and guaranteed clearance.
For normal operation of gears, two basic conditions must be met: the line of contact of the teeth must be on the initial circumference of both wheels; the transition from one tooth to another should be smooth, without jolts or jerks. The clearance between the teeth is of great importance for the correct operation of gears. When assembling cylindrical gears, the amount of lateral clearance between the teeth is measured with a feeler gauge or by rolling a lead plate passed between the teeth, which is then measured. The side gap is measured between three pairs of mating teeth in three places at an angle of 120° and the largest gap is taken.
The normal side clearance between the teeth of gears is selected according to the assembly specifications. For construction machines, the side clearance is in the range of 0.06...0.1 module. The radial clearance must be at least 0.16...0.20 module.
Application of epoxy glue
Using epoxy glue can significantly speed up the process of thread restoration. Among the features of the restoration work, we note the following points:
- The hole is filled with a special substance, after which you need to wait a little until it hardens.
- The bolt is screwed in to form the required surface, after which the substance hardens.
Epoxy adhesive
Repairing threads with epoxy glue
This method is not suitable when fasteners are used under conditions of high loads or vibration. This is due to the fact that the polymer does not form a durable and hard surface after hardening.
Cold welding
Cold welding can be used instead of polymer glue. It is also applied as a paste, after hardening it forms a strong and hard surface. The recovery process is as follows:
- Both components are mixed to obtain the required paste.
- The paste is filled with the damaged surface, after which you need to wait a little.
- The bolt is screwed in.
Cold welding
Cold welding can withstand a fairly large load, but is easy to use and inexpensive.
Using a thread tap
The tap is used to cut grooves, due to which the required geometry is formed. The instrument in question consists of two parts and can be classified according to a large number of criteria. The features of the work carried out include the following points:
- The tool is lubricated with oil. Due to this, the process of forming turns is simplified.
- When working three turns along the way, there are 1.5 turns in the opposite direction. This is done in order to remove chips from the cutting zone.
- The tool must be positioned strictly vertical to the surface.
- After the required surface has been formed, a control bolt is used. The first pass may be under a slight load, but after that there should be no problems.
It takes a relatively short amount of time to form turns. In this case, you can get high-quality and reliable threads that will last for a long period.
The thread in the hub is broken
Good evening everyone! Today I was flipping the wheels and stripped the threads on the rear hub. Please help me find a hub. Tell me where to find the part number and suspension diagram.
Almost understandable. Well, can you advise anything regarding the replacement of hubs (4) with additional “bonuses” of replacing bearings and brake pads? The dealer says that when dismantling the front wheel bearing may fall apart. Although, I think that if you do it carefully, nothing will fall apart. Likewise, the fender of a car can be changed... And I checked the brake pads six months ago and the serviceability percentage was 95.
Last edited by plumbum; 04.11.2014 at 20:41.
Send the dealer away. Knowledgeable people at the top have already advised you: either studs or larger bolts. Any unofficial service will do it on all hubs and cheaper than 1 hub.
and also the windshield and muffler)))) Broken threads are not a death sentence. take a tap, solid oil and drive out the problem holes, then take the new original bolts and screw them onto the original stamping and off you go.
Yes, the thing is that I already drove the hubs with a sword (12x1.25) Everything goes there without hitting. They couldn’t unscrew the 2 bolts on the front hub at all and, I believe, tore them out. Because The inspection master said that I would have to move around using 2 bolts if I refused to repair... I mean, I drove through 1 hole, which was problematic. Which Peugeot bolts come in the next size range?
Last edited by plumbum; 04.11.2014 at 20:58.
No((((. by the way, install castings and longer bolts. And it seems to me that problems like the ones you have arise when driving on loose wheels. (pneumatic gun)... using a wrench when tightening this cannot happen. There is no need to farm collectively, i.e. it's not safe.
Do you mean Peugeot? Do they have original threads? Once you have already cut it at 12, then cut it at 14. Select the drill based on the thread diameter minus the thread pitch. But again the question is, does 14mm fit into the hole on the disc? If not, then only studs. And then if you make studs, cut the threads on only 1 hole.
Well, the pads are definitely a scam. Although our rear discs are integral with the hub and bearing, and the pads have already gotten used to the disc and may not fit the entire surface of the new one until they are rubbed in. But these are all minor things and I wouldn’t change them. Again, pressing the bearing out of the front wheel hub requires applying force to it and according to science it is recommended to replace it. In fact, if you remove it carefully and don’t use a sledgehammer, you don’t have to change it.
When I was filming the OD, they severely damaged it, incl. The separator was broken.
By the way, I had a theory about the difference between our bolt and the lock, even if they have the same diameter and thread pitch. I’ll tell you right away what kind of bolts we have according to the configuration, I don’t remember, I just didn’t pay attention, so all I’ll say is just an assumption. So let's start with the theory. There are 2 common technologies for manufacturing threaded connections in mass production: 1. Cutting with a cutter or die. 2. Rolling. The bottom line is that the workpiece is placed in a thread rolling machine, the thread profile is transferred between the copiers and onto the workpiece. A very fast and technologically advanced method for large-scale and mass production. The difference between a threaded bolt and a knurled bolt will be the diameter of the unthreaded part. Those. the diameter of the unthreaded part of the rolled bolt will be smaller because when rolling the metal rises and the initial size for knurling is made smaller than for threading. In practice, this is noticeable, for example, when screwing a nut onto a rolled bolt, when the thread is finished, the nut will easily pass onto the unthreaded part (or wrap into the hub), but the cut one will rest against and if you pull well, the thread will break. The lock is clearly made in semi-handicraft conditions and it is unlikely that it may have a rolled thread. Or there may be a difference in the size of the threaded part and the length between the lock and the bolt. Maybe the seal was already resting against the hub with its non-threaded part and was not pressing the disc yet? And then the effort and failure? Attach a photo of the lock next to the original bolt.
Using a screwdriver
When using a screwdriver, a hole is drilled with a suitable drill, after which a tap of the appropriate diameter is selected. A screwdriver is installed in the hole, the upper part is cut off if necessary.
Screwdriver for thread restoration
After this, notches are made on the boundary using a core. This is done so that the screw does not unscrew from the hole. There are a wide variety of screwdriver options on sale, so there will be no problems with selection.
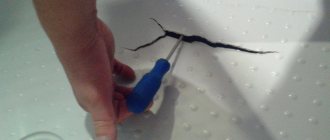
Test. Take 2
The second pin, 12 mm in diameter with a thread pitch of 1.5 mm, is already damaged and ready for experiment. We take the appropriate die and install it on the stud. Let us remind you that the markings on the halves should be directed in one direction. We put on the mandrel. Nothing works. The die is not included in the mandrel!
We tried to establish the cause of the fiasco and checked the thread pitch on the die. It turned out that it is smaller than the 1.5 mm declared by the manufacturer. It is interesting that the characteristics of dies with a diameter of 12 mm with a pitch of 1.25 mm and 14 mm with a pitch of 1.5 correspond to reality.
***
Our test showed that the creators of the thread straightening kit had a great idea that they failed to implement correctly. This means that it will not be possible to restore damaged threads on a stud using this kit. Don't despair: there are other options. You can cut a new thread using a separate - preferably a solid - die or, in the end, replace the studs (savvy and a heavier hammer will help!).
- How to get rid of vibrations when driving caused by unnecessary clearance between the wheel and the hub, see here.
- In what cases it is necessary to re-balance the wheels, read in this publication.
- We talked about how to disassemble a wheel in this issue of Tekhsreda.
Send all questions and suggestions regarding the “Technical Environment” series of issues to.
Other episodes of “Technical Environment” are available in our special project, as well as on our YouTube channel.
Until the wheel flew off: two attempts to restore the thread
The use of footwear
Such fasteners can also be restored by using futorka. This type of threaded connection is a bushing that has a large outer diameter and a smaller inner diameter.
Set of footwear
The scope of application of futorks is very large. An example is the manufacture of furniture or the connection of various pipes, fastening paired wheels.
In some cases, when it is possible to change the diameter of the connection, futorok is used when the turns are damaged.
Selecting Cold Weld for Threads
There are various types of the substance in question on sale. When choosing, the following points are taken into account:
- Recommended area of application.
- Features of manufacturing the working mixture.
- Operating conditions: temperature, humidity and some other points.
Restoring threads by cold welding
Most versions are represented by two components that are mixed to obtain a paste. It is worth considering that the substance does not remain in a plastic state for long.
Disadvantages and advantages
Each method has its own advantages and disadvantages. Let's take the following as an example:
- Cold welding and polymers can be used when the hole diameter cannot be changed. However, the resulting coils are characterized by low strength.
- The tap is used only when the hole can be slightly enlarged. This produces high-quality and durable coils.
- Inserts allow you to expand the range of application of the cutting tool, but the restored thread is also not designed for heavy loads.
In general, we can say that there are simply a huge number of ways to restore fasteners. The choice is made depending on where it is used and what the load is.
The main causes of hub failure
That is why, in case of the first signs of damage, you must immediately contact the nearest service center for repairs. The main causes of part failure lie in the following factors, each of which can occur independently of each other:
- If the driver drives the car carelessly or drives at high speed on an uneven road, the studs on the hub can easily become deformed, and the bearing will crack and begin to gradually fall apart. In both cases, the car owner will feel vibration in the steering wheel and an unpleasant sound in the area of the defective wheel.
- The same thing happens when the vehicle owner rarely maintains the wheels and suspension, which causes loss of lubrication over several seasons and the bearing begins to seize, which leads to its disintegration.
- If a collapsible hub is installed on the car, and the car owner used the services of specialists to replace the bearing or carried out other routine work on the part, he needs to make sure that it is tightened with the required force and evenly. Otherwise, a distortion may occur.
This damage will be noticeable when you press the brake pedal, since the brake discs are attached to the hub. If they deviate from the central axis, the friction material of the pads will not be able to accommodate them over the entire area, and beating will begin.
Therefore, many automobile factories prefer to supply this part assembled, since a large number of nuances during repairs can cause the entire system to malfunction, for which the manufacturer can no longer provide a guarantee.
Bearing for radial hub
- It happens that tire service technicians do not tighten the nuts properly after replacing a wheel rim or during other repairs that involve removing a wheel. In such situations, during operation, it begins to gradually become loose, which causes vibration in the steering wheel. At the same time, the hard steel begins to wear away the threads on the studs, gradually rendering them unusable, and also affecting the bearing due to the uneven distribution of masses.
- In some cases, especially in front-wheel drive cars, over the years the bearing, its seat, and the hole for the axle shaft wear out. Sooner or later, even if there are no signs of failure, these parts must be replaced every 5...7 years. Operating a car with worn elements can cause the disc to jam right on the road while driving.