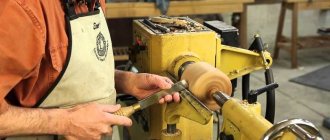
Engraving is an excellent decorative element that adorns any product made of wood, metal or even bone.
Although the art of carving on any material has a centuries-old history, it does not lose connoisseurs in our time. Modern craftsmen, on the contrary, are lucky because they can use professional tools.
Special engravers and drills make the work process easier, faster and of better quality.
To achieve the desired result, you need to know and understand some features of the work process. Let's take a closer look at them.
The most important thing when working with this material is to choose the right wood. For example, some types of trees have a dense structure, while others have a loose structure. The denser the wood structure, the more clearly the completed patterns will be visible. The choice of tool and the complexity of the work also depend on this.
Before starting the process, the wood must be treated: dried, impregnated with resin.
In addition, each type of wood can have its own internal pattern, stripes and color, and this affects the appearance of the future product. As mentioned earlier, the choice of tool also plays a role.
This can be a saw, chisel or plane; special engravers with various cutters are often chosen.
There are several techniques for performing wood carving. For beginning craftsmen, simpler techniques are suitable, without working out small details and using professional tools.
Over time, you can begin to cut out smaller patterns.
Hand engraving on metal is now used less and less , as most workshops are switching to computerized or laser engraving. It takes less effort and time. Jewelry, souvenirs and other small items are decorated by hand.
The peculiarity of this work is that such engraving will be truly unique . And the product will be an excellent option for a memorable gift. For a high-quality result, you need to choose the right tool.
Only mechanical devices are suitable here.
Bone engraving is different in that the work is often performed on a small area, therefore, the number of small details increases . Carving can be done either manually, using a needle or cutter, or mechanically, using an engraver.
The main characteristics that you need to pay attention to when choosing a carving machine are the engine power and the number of revolutions per minute.
A device that includes the ability to withstand high power and operate for a long time has not yet been invented.
If you are going to develop in this area, you will need 2 tools : one will have high power, and the second will be able to work for a long time at low speeds.
The drills themselves have the following characteristics:
- the presence of a pedal for adjusting the speed of rotation of the cutter;
- the motor can be built into the handle of the tool, or it can be located in a separate block with power and adjustment buttons;
- Each type of drill is suitable only for certain cutters (attachments used to make carvings).
There are several types of carving tools.
- Drills for technical purposes . These tools consist of an engraver handle, a power supply, a pedal for control and connecting wires. They are suitable for performing types of work such as grinding, boring, drilling. The disadvantage of this carving machine is that it cannot operate at high speeds, although it is equipped with a powerful motor.
- Micromotors with low power. The advantage of micromotors over drills is that this tool does not have a flexible shaft, and the motor is located directly in the handle. This tool is limited in high power, but can reach high speeds. It is easy to work with such an electric engraver because the hand does not get tired due to the large size or weight of the handle.
- Mini drills with flexible drive. In general, they are very similar to drills, since only the tool handle with the cutter remains in the master’s hand. The motor mechanism itself is connected using a wire. This type is quite powerful, it can reach high speeds. Mini-drills are also very multifunctional, as they can be used to change attachments, cutters and perform a wide range of engraving techniques.
The modern market offers many products from different manufacturers, so every buyer can find a suitable option. Models vary in price category, technical characteristics and appearance.
Technical drills are represented by such domestic ones. The instrument comes with a pedal that simplifies control.
Despite the low speed, a drill from this manufacturer can perform various techniques: grinding, drilling, boring and many others.
This type of engraver is also produced by the American company Foredom . Drills of this brand are slightly more powerful than our analogues; you can change attachments on them, which significantly increases the possibilities of work. Do not worry that this is a foreign-made model, because finding spare parts or elements for it will not be difficult.
A budget version of the DPM 25-2 micromotors is offered by a Russian company. The tool from this manufacturer has good characteristics and a low price. The micromotor has a specialized, medical tip.
Its disadvantage is that it cannot withstand heavy loads and may fail due to prolonged use. Since the motor is located in the handle itself, once it breaks, it cannot be repaired.
You will have to change the engine or even the tool completely.
There are also models with higher characteristics, but their price will be rather high. These are micromotors from the manufacturers Marathon and Strong . They are distinguished by high power and number of revolutions. Such tools are purchased by those who intend to engage in carving professionally. You can also pay attention to models from Korean manufacturers.
They are cheaper and good for beginners.
If you want to purchase a mini drill, then you should pay attention to the model from the Chinese manufacturer, it is called Hammer MD 135A. Despite the low cost, the package includes everything you need to get started: the tool itself and replacement tips.
The engraver is easy to use and the assembly of the tool is good.
If you are a beginner or want to carve as a hobby, you can purchase an inexpensive tool to get a feel for the work process and learn the intricacies. When choosing a drill, pay attention to:
- tool motor power;
- number of revolutions performed per minute;
- torque.
To begin with, you can choose one tool , but in the process you will need two, since one will be responsible for power, and the second for speed. Experts recommend not buying an engraver with 30 thousand revolutions, since rarely anyone works at such a speed. 10-20 thousand will be enough.
Also pay attention to the cutters you will use to carve. They may be included with the drill, but sometimes you have to purchase them separately.
Please note that cutters come in different sizes and may not all fit your tool.
Let's look at the basic rules for working with carving tools.
- For ease of drawing, it is recommended to use a stencil. You need to sketch out the design first and then start engraving.
- The workplace should be well lit. This will make it easier to work out small details.
- It is recommended to complete the large parts first, only then can you cut out the small ones.
- If you are carving on wood, you need to choose varieties that have a dense structure and can clearly display the engraving pattern: linden, alder, pear, beech.
- Before starting work, you need to select the cutting depth. If you are a beginner, it is better to practice on a rough piece of wood beforehand. After you have cut through the background, you need to sand it with sandpaper and begin the main work.
- After finishing the woodwork, you will need to sand the design and cover it with stain.
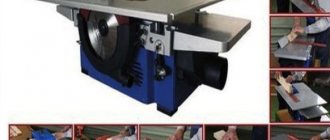
Types of drills
The variety of devices offered on the market comes down to three main types:
- drills for technical purposes;
- micromotors, or engravers for wood carving;
- mini-drills, or compact drills with a flexible drive.
They differ in purpose, size, power, and performance.
The design of both a powerful woodcarving drill and a micromotor is based on two main components: a high-speed electric motor and a replaceable tool mounted in a chuck.
Drills for technical purposes
Devices of this type are equipped with a fairly powerful engine and allow you to solve a wide range of problems. Structurally, they are divided into two blocks:
- Actually a drill. An electric motor is housed in a cylindrical housing. A collet or quick-release chuck is attached to its shaft.
- A power supply unit that houses a mains voltage converter of a transformer or pulse type.
- Power pedal. Allows you to free your hands for more precise holding of the device.
- Connecting cables.
Wood drill for technical purposes
The advantage of such carving drills is the ability to perform various operations on wood:
- drilling;
- boring;
- grinding.
As a disadvantage, it should be noted that the speed is relatively low compared to a Dremel for wood carving.
The market offers models from both domestic and foreign manufacturers. Domestic ones are affordable, but they lack the ability to operate for a long time without overheating, especially under high loads. They are well suited for hobbies; for professional use with significant volumes of work, it is better to opt for imported equipment.
Micromotors
Wood carving drills or micromotors are particularly compact, low power and high speed (up to 30,000 rpm). The attachments are also fixed to the working shaft of the electric motor.
Micromotors
Limited power does not allow the devices to achieve high productivity, but the low weight and size do not tire the hand, and high speeds allow you to perform the most delicate and filigree carving details.
Mini drills or compact drills with flexible drive
This class of devices are the battleships of the world of drills. Structurally, they differ in that they allow the installation of an attachment with a flexible drive shaft in place of the cartridge. Thus, the heavy drive device with the motor remains lying on the table (or suspended), and in the hand of the master there remains only a collet (or quick-release) clamp with the tool installed in it.
Such systems have high power (up to 200 watts) and develop high speeds (up to 30 thousand rpm). They are equipped with a large number of different cutters and abrasive attachments and allow you to perform a wide range of operations.
Hammer mini drill
The kit may also include a telescopic rod for attaching the device in a place convenient for the master.
From antiquity to modern times
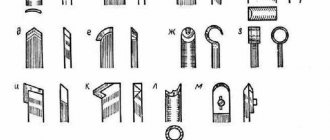
Ancient Rus' is famous for its wooden architecture. Once upon a time, stone as a building material was in great short supply. Only churches and royal chambers in the capital were built from stone (hence the expression “White Stone Moscow”). The wooden huts in which simple peasants lived were entirely wooden. Boyars and nobles also lived in wooden towers. In those days, any home had sacred significance. The construction of a wooden house was approached very responsibly. Skilled wood carvers decorated with intricate engravings:
- Triangular pediments of huts, reminiscent of friezes of ancient temples.
- Platbands are decorative parts used to decorate window frames.
- Entrance and interior doors.
- Furniture in the interior of a mansion or hut: beds, cradles, tables.
- Wooden bars that were placed on windows to protect against robbers and thieves.
- "Skates" of sloping roofs.
Wood engraving developed in this direction until the eighteenth century. Since the era of Peter the Great, carved furniture decorated with intricate engravings has become fashionable in high society. European motifs appear in the subjects of the engravings . Now furniture in rich houses is decorated with skillfully carved scenes on the theme of ancient mythology, ancient Greek and so-called “Gothic” ornaments appear.
Engraving on Karelian birch is becoming increasingly popular, as this material is distinguished by its softness, pliability and noble color. Nowadays, carved furniture is still in fashion. However, the scope of activity of wood engravers has expanded significantly. Modern craftsmen work not only with wood, but also with materials of artificial origin, and engraving is performed not only from memory or a given ornament, but also from photographs. Sometimes a complete illusion is created that a black and white photo has been applied to the surface of the tree. This is achieved using modern equipment.
How to choose the right drill
The main criteria to consider when choosing a wood carving drill are as follows:
- engine power;
- revolutions;
- torque;
- weight;
- ergonomics.
Sadly, none of the devices on the market can simultaneously operate for a long time at high speeds and withstand high loads. Therefore, the best choice would be to purchase two drills:
- high-speed, low-power Dremel for making fine thread parts;
- powerful mini-drill for rough processing and sampling of large volumes of image background.
Many craftsmen also note that 30 thousand revolutions is a large reserve, and most operations are performed perfectly well at 10-20 thousand rpm.
When choosing, you should also pay attention to the set of attachments that will be offered in the kit.
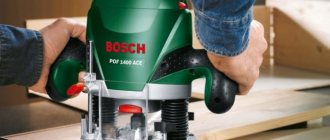
How to make an electric engraver yourself
A tool designed for simple tasks, you can make it yourself using various basics. Appliances with a motor, such as a blender, work well. A hand blender is also good because its handle is anatomically shaped, it is comfortable to hold, and the motor in this device is quite powerful. To do this, you will need to purchase a collet chuck and a switch so that you do not have to manually press the button all the time.
Step-by-step instruction
- Disassemble the blender body.
- Remove the printed circuit board and motor.
- Measure the spindle - a collet chuck will be needed exactly for this diameter.
- Clean the parts, especially the old engine, thoroughly.
- Place the chuck on the spindle.
- Instead of the blender button, install a switch lever. To do this, you will need to remove the button contacts from the printed circuit board and solder the wires for the switch instead.
- Drill a hole in the body for the lever.
- Install the board and switch, put the motor in place.
- Assemble the body.
How to use a hand drill
Every home master wants to get a high-quality and clear image. To do this, you need to follow simple recommendations:
- Make a stencil from thick paper or thin cardboard.
- Using carbon paper, transfer the outline of the design onto the workpiece.
- Draw the contours of the design using needle cutters or small drills.
- Select background areas using large cutters.
- Apply the base, rubbing in the paint or stain.
- Sprinkle the product with bronze powder. Excess powder should be blown off or wiped off with a soft cloth.
Using a stencil can significantly simplify the engraving operation, especially in the case of a repeating pattern. You need to carefully work with the tool near the stencil so as not to damage it and be able to reuse it on other areas of the part.
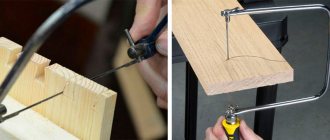
Wood carving with a flexible shaft drill
For beginner engravers, it is better to use devices with a flexible shaft. A true professional who has gained considerable experience can successfully handle any tool.
Safety precautions
A drill, like other cutting power tools, requires compliance with safety precautions. Its requirements are as follows:
When working, it is important that the work surface is stable and clean.
- Work on a strong and stable table that remains in place while carving.
- Wear a robe or apron made of thick fabric, choose sleeveless clothing or roll them up as high as possible. Hair, if long, should be gathered in a ponytail and hidden under a headscarf or light headdress.
- Secure the workpieces with special devices so that the work process proceeds quickly and safely.
- The light should be bright. The lighting fixtures are positioned so that the craftsman does not cast a shadow on the work surface while carving.
- Wear safety glasses.
- Check the sharpness of sharpening points on a wooden block, not your fingers.
- Maintain order and cleanliness in the workplace so that you don’t stumble upon anything sharp among the sawdust that has accumulated on the table.
- Clean the work surface with brushes, not with your hands. From time to time, wipe the tables with a damp cloth to remove accumulated dust.
- After work, put tools and attachments in their places.
- Ensure that electrical tools and their cords are in good condition.
- Check how the tools are plugged into the outlet and untangle twisted cords.
- Turn off the tool, which does not have a ventilation system, every 10-15 minutes. for cooling.
- Remember about fire safety - dry shavings are flammable, so they should not come into contact with heating devices.
- Make sure there is a first aid kit in the work area.
Faulty parts are replaced only with similar ones, and the engraver’s ventilation holes are cleaned immediately after finishing work with it.
A drill used in a workshop or at home will last longer if you provide it with proper care. Faulty parts are replaced only with similar ones, and the engraver’s ventilation holes are cleaned immediately after finishing work with it. It is necessary to regularly check devices and tools used in parallel with carving equipment: the surface cannot have nicks, cracks or other defects.
Don't miss: Metal grinding machines: design, purpose, application
It is necessary to start carving wood with a drill in a well-lit room, on a work table, where there are no unnecessary things. Lack of light and clutter are causes of injury while working. Make sure there are no explosive substances nearby.
When making adjustments, you should unplug the instrument from the outlet. Under no circumstances should you clean or change accessories while the equipment is powered on! The use of tools with defects is strictly prohibited.
Carving Tips
As a material for carving wood with a drill, it is better to choose wood species with a dense, uniform structure, such as:
- Linden;
- beech;
- alder;
- pear.
Species such as oak, spruce, pine and ash are less suitable; they reflect the texture of the design much worse.
The first step is to transfer the outlines of the drawing to the board and cover the background to be removed with shading. The contour of the selected area is outlined with a small round drill with a star-shaped cross section. Next, the entire background area is selected. If it has a large area, you can take a larger drill to speed up the process.
Be sure to use a cutting depth limiter. The cutting depth should be adjusted and practiced on a rough piece of wood. After cutting through the background, it needs to be sanded with sandpaper. Next, you can start cutting out the details of the image itself.
Wood carving
Upon completion of the entire drawing, it is sanded and covered with stain. After drying, you need to go over it with sandpaper so as to wipe off the stained layer from the protruding areas and leave it on the background.
Nozzles for electric engraver - types, methods of application and do-it-yourself modifications
Most often, a set of attachments is supplied with the tool. You can purchase what you need later. Ideally, the attachment should be from the same company as the engraver - only then the manufacturer guarantees quality. But if the “native” attachment is not on sale or is too expensive, you can use analogues or even homemade ones. The main thing you need to pay attention to is that the tail diameter (shank) of the nozzle matches the cartridge in the engraver. Inexpensive nozzles, especially those made in China, most often have a shank with a diameter of 3.2 mm.
Nozzles are usually easy to change. You need to press the stop button, thereby blocking the spindle. Use the key that comes with the tool to loosen the collet chuck, then unscrew it and remove the attachment. Insert new one. For a thicker or thinner nozzle, you will have to change the collet. A jaw chuck makes this task easier - depending on the size range, nozzles with different shank diameters are installed there.
Universal jaw chuck allows quick installation of bits with different shank diameters
Engraving bits, burs
They are produced from various alloys, with different types of coating, and in various shapes. Designed mainly for applying patterns to surfaces. The type of bur depends on the material to be worked with. So, the most commonly used are the following:
- carbide - very durable, high-quality and expensive attachments, a special type of carbide bur - in the shape of a peak, they work well on plastic, bone, with these burs they make tracing - they draw the main lines of the drawing;
- steel - the main cutting tool, they come in various shapes and configurations;
- combined - steel base and carbide head;
- Diamond-coated nozzles are very productive; You can buy them at a medical equipment store, they are also available on Chinese websites - they are of quite acceptable quality.
Diamond-coated engraving bits - burs of this type, even in inexpensive sets, are of good quality
Sometimes manufacturers mark burs with color. The color also indicates the degree of sharpening. Burs with black markings are very productive, but the sharpening of blue and green ones is weaker. Yellow marked burs are good for finishing.
Making a bur - a triangular peak - by hand
If there is no suitable attachment on sale, you can make one. For example, a bur in the shape of a triangular peak. Factory (Kazan) versions are thin, elongated, with a high pyramid, but their tip has some rounding. It is quite possible to eliminate this drawback at home. You can resharpen factory ones, or you can make your own using an old bur - a truncated cone. Sharpen on a diamond disc. Before sharpening, you need to find the middle of the working part of the workpiece bur and sharpen it at an obtuse angle. After you have some semblance of a bullet, you can draw the edges. After sharpening, the attachment must be checked on the material, and then fine-tuned manually using sandpaper.
Video: making a nozzle - a triangular lance with your own hands
Other types of attachments
In addition to engraving, a machine can perform a huge number of operations. It is for them - cutting, drilling, grinding, polishing - that other types of attachments are intended.
The entire array of equipment can be divided into groups. Here are some of them:
- drills - like burs, there are carbide and steel;
- brushes - steel, muslin fabric, thread;
- rubber cylinders - often craftsmen “bring them to perfection” by placing them on used burs, grinding off the tip with an abrasive, giving the shape of a bullet, resulting in a good grinding attachment;
- grinding stones - differ both in shape and material;
- grinding discs - sanding wheels (they can be cut from regular sandpaper and glued to the base, attached to the disc holder), diamond rings;
- special holders onto which felt is screwed; they very often come in sets of accessories along with the tool; instead of such a holder, you can also use an old bur, and attach the felt pad with superglue;
- “Hedgehog” attachments made of tsungsten carbide, these are burs coated with needles and crumbs; they can be used to work with plastic, artificial stone, wood; require special care when using - you can get hurt.
Types and purpose of cutters and attachments
Drill attachments come in the following types:
- Abrasive attachments: cutting discs, cones, reverse cones and other rotating bodies. Designed for grinding thread parts.
- Wire brushes for roughing material.
- Steel cutters of different shapes. To perform basic operations - cutting out contours and sampling the background.
- Serrated blades. For processing thin relief details.
- Drill. For drilling through or blind holes.
- Balls for polishing and grinding thread parts.
- Felt circles. Serve for final polishing.
The cutters are made of high-strength and wear-resistant tool steel. Abrasive attachments are made mainly based on corundum. Abrasive attachments coated with diamond chips are particularly wear-resistant and precise.
Wood carving cutters
The collet clamp allows you to accurately secure and center the replacement tool. However, with strong lateral loads, its tightening must be checked periodically. The quick-release clamp does not have this drawback, but only tool shanks specially designed for it are suitable for it.
Types of engravers and their features
The main feature is compactness and low weight.
There are impact engravers for engraving on metal or stone surfaces. This is a highly targeted type of device. Rotational type devices are more functional and widespread.
Like any other power tool, electric engravers can be divided into two categories: devices for home use and professional devices.
Devices intended for domestic needs are designed to work with wood, plastic and soft metals (copper, aluminum and others). Typically this is a low to medium power tool with a very simple design.
Professional models, compared to “household” ones, have higher technical performance. Such engravers have high functionality and can withstand heavy loads. With their help you can process almost any materials.
Final finishing of products
To finish the wood surface, felt and felt circles are used. They are fixed in a drill and lubricated with polishing paste, which makes it possible to achieve an almost mirror-like state of the wood surface. After completing all stages of mechanical processing, soft wood varieties are coated with transparent varnishes in one or several layers. This coating will protect the product from moisture and significantly increase its durability.
After the varnish has dried, the surface is polished again to achieve perfect smoothness and a mirror shine. Hard types of wood are not varnished, emphasizing the original texture of the material. Sometimes they are slightly tinted.
Purpose and principle of operation of the engraver
The engraver, although universal, is still intended to perform highly specialized work.
Its most common type is an engraving machine with an electric drive, the working element of which is removable attachments that exert a mechanical effect on the surface being processed.
The laser version of this tool does not directly contact the part, but burns the material with a high-energy beam.
This tool does:
- Engraving on stone, wood, metal and even glass. Similar operations are carried out in the manufacture of, for example, souvenirs. The corresponding attachment is clamped into the collet and the engraver can be used to draw on various materials.
- Removing coatings, such as sanding paint and sanding small items or hard-to-reach areas using felt pads, sandpaper and abrasive wheels.
- Making thin cuts, precision cutting in wood and metals. The tool is common among jewelers, as it allows for precise, accurate processing of materials.
In addition, the engraver applies markings, in particular on metal parts, makes seals and impact stamps, and cliches.
Mechanical and laser engraving is used by advertising agencies to apply text and graphics to a variety of materials.
Device and characteristics
The design of engravers of different types is very different.
For example, laser equipment affects the surface being processed with a concentrated beam of light transmitted through a complex system of optical lenses, focusing on a coordinate area.
The elements of a laser engraver, in addition to the optics itself, include:
- Transmission – moves the light emitter (laser beam) through three-axis servos.
- Control system – ensures the coordinated operation of other systems through special electronics and sensors.
- Mechanics – load-bearing units and mechanisms that form the basis of the engraver.
- Cooling system – removes excess heat from the emitter. It is usually based on radiators and coolers.
As for the electric tool familiar to everyday tasks, its design is much simpler and perhaps resembles a miniature drill.
This is often an elongated housing, inside of which there is an electric motor with a shaft that rotates the cartridge.
The latter is necessary for installing all kinds of attachments.
The tool starts when you press the start key, and the spindle lock function is used to simplify tool replacement.
Material
An electric engraver is also known as a drill or straight grinder.
Its body is made of plastic resistant to mechanical and thermal influences.
Ergonomics allow you to comfortably operate the tool with one hand; most models have anti-slip pads made of elastic rubber.
The gearbox can be enclosed in either plastic or metal.
In the latter case, we are talking about powerful straight grinders designed to perform complex work.
Dimensions and weight
The length of a hand engraver is usually 130 - 340 mm, width 14 - 24 mm, and weight 0.3 - 1.6 kg.
Some models may have dimensions comparable to a hand drill.
Hand-held engravers are equipped with collet chucks ranging in size from 0.8 to 4 mm.
Engine type and power
A commutator motor is installed in the monoblock body of a direct rotary power tool, in which the spindle is essentially an armature shaft.
In other words, the gearbox is simply missing.
There are also geared models with high torque.
The power of the electric motor affects both the actual cost of the tool and the cost of its use.
Models with a power of up to 200 W are suitable for solving household problems, and for professional use – over 200 W.
The motor power can be 9 – 2000 W, depending on the specific tool.
Rotational speed
The spindle revolutions per minute of a hand engraver range from 3 to 40 thousand.
This parameter determines the efficiency of working with each specific material, as well as the possibility of performing a certain type of work.
The engraver is equipped with a function for adjusting the spindle speed, either manually or electronically, which allows for high-quality processing.
For example, when grinding and polishing, the speed should be low to avoid overheating of the surface.
It is necessary to sharpen the tool and cut material at high speeds.
For modern models, their indicator varies in the range of 15 - 35 thousand rpm.
Working time without interruption
The continuous operation time of an electric engraver depends primarily on the cooling system.
Professional models are designed for long-term continuous operation, while for household devices it is recommended to alternate 10-20 minutes of operation with 5-minute breaks.
Otherwise, the engraver may fail due to overheating.
Engraver equipment
The equipment of the electric engraver depends on the manufacturer.
The tool may be accompanied by the following additional elements, providing the ability to perform various types of work:
- Flexible shaft – allows for precise machining using a relatively large engraver.
Together with the shaft, a frame is needed, which, in essence, turns the hand tool into a miniature machine by means of its fixed fixation. Typically the frame dimensions are 500 - 650 mm. There are also stands on which the instrument is simply suspended. - Collets of different sizes. Often in the kit the buyer sees two collets for 2.4 and 3.2 mm.
- Removable battery if we are talking about a cordless tool.
The kit may also include attachments that expand the scope of use of the engraver:
- Circular nozzle for direct engraving. As a rule, it has a diamond coating.
- Engraving cutter – for engraving and milling.
- A polishing wheel, often accompanied by polishing paste.
- A rubber roller with a replaceable sanding belt, or rather cylinders of sandpaper.
- Cutting wheels with fastening pin.
In addition to the above-mentioned attachments, the kit may include drills, a stone for sharpening tools, stripping brushes made of metal wire and fishing line.
Additional functions
The engraver can be equipped with additional functionality that increases not only the ease of use, but also its reliability.
This includes overload protection, spindle locking, and the ability to change the speed of rotation of the equipment.
In the latter case, the tool can be equipped with either a slide switch between several fixed speeds, or a regulator for smoothly changing the spindle speed in a certain range.