Soldering an aluminum radiator
The process of repairing a brass radiator.
Aluminum radiators are often installed in the cooling system of cars and the heating system of apartments. Over time, cracks may also appear in them, which are much more difficult to solder than on copper devices. The fact is that a very strong oxide film forms on the surface of aluminum and its alloys, which prevents the solder from fixing to the damage site. In this case, proceed as follows:
- You need to find the leak location using the method described above. It should be cleaned with sandpaper. At this stage, you should not try to remove the oxide film; it will not be possible. The repair area must be degreased and dried.
- In a suitable container (it is better to use a special heat-resistant crucible), melt 2 parts of ordinary rosin and mix it with 1 part of iron filings. They can be obtained using a finely cut file, which needs to be used to sharpen any iron object. Mix the mixture of liquid rosin with sawdust and cool. You will get the flux needed for soldering aluminum. The crucible can be heated on a kitchen gas stove or using a gas burner.
- Apply the resulting flux to the area prepared for repair and thoroughly rub it with a hot soldering iron over the surface of the aluminum at the location of the crack.
- At the moment when rosin with iron filings spreads over the surface of the crack, standard solder with the same filings is added. Iron filings should destroy the oxide protective film, and soldering then proceeds in the usual way.
- To solder large cracks, not standard tin-lead solder is used, but a tin-bismuth alloy. To obtain it you will need a ceramic crucible or muffle furnace. The ratio of bismuth and tin should be 5:95. Solder of this composition can be bought in the form of wire in a store. Its brand is POSV-33 and POSV-50.
- To obtain a more durable seam, it is recommended to use flux instead of flux, which you can make yourself. To do this, you need to prepare potassium chloride (56%), lithium chloride (23%), cryolite (10%), table salt (7%) and sodium sulfate (4%). Grind all ingredients thoroughly and mix with each other. This mixture should be stored in a glass container with an airtight lid away from the sun.
- The finished melt is applied to the damaged surface of the radiator and heated with a hot soldering iron. Next, regular soldering is carried out using tin-bismuth solder.
After completing the work, the radiator needs to be checked. To check, water tinted with potassium permanganate is poured into it. If no water leakage appears within 2 hours, the work is completely done. It is recommended to use gloves when soldering as some components are poisonous. Good ventilation of the room is also necessary.
Determining the location of damage
Car radiators are at greatest risk of damage, as they operate in temperatures with different signs and under the influence of strong vibrations. Cases of mechanical damage to such devices cannot be excluded.
Radiators of air conditioners, which are used as condensers and evaporators, are less often repaired. But such cases also happen. It’s very unpleasant when the climate control suddenly stops working in a luxury car during the hot season.
One of the most effective and affordable repair methods is soldering radiators. If a car radiator is damaged, it is very important to promptly identify the problem and try to fix it.
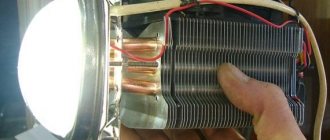
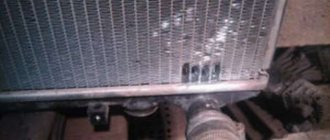
The auto radiator, which is part of the engine cooling system, is a very important component. Structurally, this device consists of two vertical tanks connected by a large number of thin horizontal tubes. The coolant circulating in them releases heat into the air through natural heat exchange and cools down. To improve heat transfer, the surfaces of the tubes in contact with the surrounding air are increased. To do this, thin metal plates - fins - are soldered to them.
Read also: Safety rules in the workshop
Signs of damage to the radiator are an increase in engine temperature during operation, as well as a decrease in the coolant level. Of course, fluid loss can occur not only through the radiator, but most often the cause is this particular unit. Visually, major damage can be determined by observing the coolant leak. But it will be quite difficult to do this on a hot engine, since the antifreeze will immediately evaporate. Some compositions are painted with special pigments that remain on the surface of the part after drying, which helps to identify the location of damage.
If it is determined that the leak occurred in the radiator, but no damage is visible, it is necessary to remove the device from the car, first draining the coolant. After this, you need to close all the holes, leaving one, and supply air under slight pressure into it, lowering the radiator into a container of water. The location of the hole can be determined by the escaping air bubbles.
How to solder plastic car radiator
Soldering an engine cooling radiator is considered a fairly simple task. However, not everyone can cope with it due to insufficient knowledge of how to solder a car radiator on their own. Most car owners prefer to take their car to a service station.
Surface preparation
Before gluing the plastic on the car radiator, you will need to thoroughly prepare the surface for this process. For this purpose, we will need to clean it from grease, dust and dirt. Lightly dampen a rag and very carefully wipe the areas of plastic around the resulting crack.
In order to achieve a better effect, it is recommended to use an alcohol solution
It is important that in no case should you overdo it. The fact is that too active mechanical impact on the damaged area or excessive pressure on it when cleaning can damage the heat exchanger even more.
Preparing the adhesive mixture
Now you need to worry about how to seal the crack on the car radiator. So, let's prepare the adhesive mixture. If you decide to use exclusively glue specially designed for such purposes, then its use will be as simple as possible.
A small amount of adhesive should be applied directly to the damaged area. When a part is missing a certain piece of the body or there is no gap between the two halves that are formed due to a crack, it is recommended to sprinkle the liquid base with the powder component of the glue.
So, if the crack itself is too deep or a sufficiently large part of the body is missing, gluing must be performed in several stages. You should apply glue to the damaged area two or three times, waiting until each layer is almost completely dry. When the resulting gap can be completely filled with dry gradulant, it is recommended to saturate it with a liquid composition. This way you can be completely confident that it will adhere perfectly to the surface of the spare part.
Cold welding
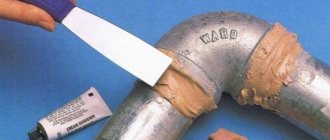
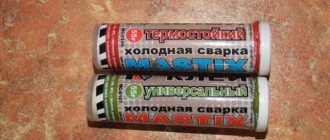
In addition, you can seal a car radiator using cold welding. Since it comes in the form of a fairly thick putty, it will be enough to apply it to the seam and wait until it cools completely
It is important that this same putty must be applied in a neat and even layer so that the seam is of the highest quality.
Cold welding must be used as:
- the main method of restoring performance;
- an additional means of securing the result obtained by soldering or gluing.
A layer of cold welding applied on top of the glue layer will allow you to preserve the quality of the auto part repair for a long time and extend the service life of the part.
Final stage
When the glue has completely hardened and all the main working steps have been completed, you need to carry out final surface treatment. It is necessary to ensure that the resulting seam becomes neat and smooth. For such purposes, the soldering area will need to be treated with fine-grained sandpaper, and ideally with a grinding machine.
In this way, you will be able to get rid of all minor defects that will not have the best effect on the further operation of the product. After this treatment has been completed, install the heat exchanger back in its place.
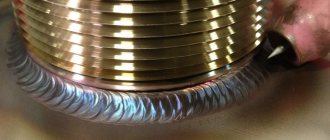
Argon arc technology
Welding of aluminum radiators is carried out with a non-consumable electrode in an argon atmosphere using an aluminum filler rod. This technology is traditionally widely used for welding aluminum products.
Aluminum is prone to the rapid formation of an oxide layer on the surface, which prevents the creation of a complete weld. In addition, the presence of oxygen causes metal spattering, which interferes with the formation of a weld pool.
These problems are most successfully solved by using welding in a protective argon environment.
Welding of copper radiators is also carried out in argon, but with the use of an appropriate copper additive.
It should be noted that, despite the limited use, welding is the most reliable way to repair damaged car radiators.
Connections created by welding are not inferior in strength and service life to those made at the factory during the manufacturing process of the part.
When choosing a repair technology, if possible, you should always give preference to welding the radiator with argon.
Leak test
The quality of the repair can be checked using air or water pumped into the radiator under pressure. The air method has been previously described.
Pressurized water can only be checked during the heating season. To do this, a plug is placed on one side of the battery, and the other is connected to the supply through the Mayevsky tap. Having slightly unscrewed the tap and bypass, fill the radiator with water. To facilitate observations, a strip of white paper is placed under the battery.
If after 10-15 minutes the paper remains dry, the leak has been eliminated and the radiator can be connected to the general system.
If it is not possible to create pressure, then fill the radiator with colored water and leave it for several hours. Usually after 3-4 hours the leak manifests itself.
How to find a leak in the cooling system
Cooling system malfunctions are identified during vehicle maintenance and repair.
To identify damage, the radiator is removed from its installation site. Through a special hole, the coolant is drained into a pre-prepared container. To drain the coolant, the device is turned over and shaken several times.
There are two main methods used to detect leaks:
- visual;
- instrumental.
The instrumental method is carried out using various diagnostic equipment. When a leak is detected, the equipment emits a light and sound signal.
Flux for the most durable seam
To obtain the most durable protective seam at the site of damage to the radiator, a special flux called flux is used. It can also be obtained at home. To prepare flux, you will need the following substances in the following proportions:
- potassium chloride – 56%;
- lithium chloride – 23%;
- cryolite – 10%;
- coarse table salt – 7%;
- sodium sulfate – 4%.
The ingredients are finely chopped and mixed. This melt must be stored in a hermetically sealed glass container in a dark place.
The radiator, as in the previous case, is washed and dried. We thoroughly clean the soldering area with emery cloth and then degrease it. After this, we apply pre-prepared flux to it using a soldering iron. Rub it thoroughly over the surface. Next, we apply solder layer by layer, stretching it over the surface to be repaired.
Features of aluminum radiators
Aluminum ranks 3rd in the world in terms of abundance in the earth's crust. Among other industrial metals, it stands out for its strength, low weight and increased thermal conductivity. High resistance to corrosion upon contact with the environment is provided by the oxide film.
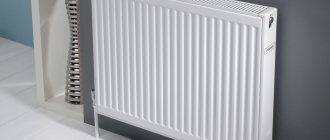
These qualities have made aluminum indispensable in the manufacture of products with a large area and increased heat transfer. The good plasticity of the material expands the design and technological boundaries in the manufacture of heating radiators. Considering that aluminum battery sections are easy to remove or extend, they can be placed in any niche and harmoniously fit into a sophisticated interior.
Aluminum heating batteries will fit perfectly into the interior of any apartment or private house
Having such positive qualities as fast heat transfer and attractive design, aluminum radiators still have a significant drawback - sensitivity to water quality and pressure changes. Because of this, microcracks and fistulas often form on the batteries, causing liquid to leak into the room.
If a leak occurs in the battery, it becomes necessary to seal the resulting hole. The problem can be fixed by soldering or gluing the damaged area. Conventional soldering is not suitable, since a protective film forms immediately after cleaning the area being treated and prevents the solder from reliably connecting to the surface of the radiator.
In order to bypass the aluminum oxide film, even when repairing such a hole, fluxes are used
For effective soldering of aluminum products, fluxes are used that have the following qualities:
- The components included in the product dissolve the oxide film and prevent its further formation;
- Protect the soldering area from environmental influences;
- Do not allow solder to spread over the surface, holding it only on the treated area;
- Reduce the tension of the soldered surface;
- Promotes uniform distribution of solder over the treated surface.
Fluxes are made on the basis of:
- Cadmium;
- Zinc;
- Bismuth;
- Combined substances;
- Plavney (made at home).
Industrial fluxes are expensive, so they are often prepared at home.
Fluxes for aluminum contain organic and inorganic components that allow the destruction of the protective film on the metal.
Difficulties in repairing aluminum batteries
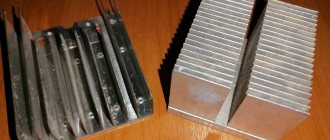
The structure of an aluminum heating battery.
The main problem in working with aluminum is its chemical properties. This metal is soft, but it is capable of oxidizing at the slightest exposure to the external environment. As a result of a chemical reaction with oxygen, a coating is formed, the so-called oxide film, which does not allow the surfaces of the product to be soldered together firmly enough . But this film also protects aluminum from corrosion and destruction, thereby making it a very practical industrial metal.
Read also: Sharpening auger for concrete
How to remove oxide film
Most often, fluxes are used to remove plaque. The latter are mixtures that contain inorganic and organic substances aimed at removing the oxide film, as well as protecting the metal surface from oxidation during soldering, improving the adhesion of the solder to the surface.
Flux can be made either independently or purchased in a special store. The latter may include: zinc, cadmium, bismuth. Homemade analogues are called fluxes.
Difficulties in soldering aluminum radiators
Soldering an aluminum radiator with a soldering iron is complicated by the shape of the product itself. Depending on where the breakdown occurred, the place may be difficult to access, have a surface prone to metal spreading, and so on. Everything is complicated by the high activity of the metal, leading to oxides. When heating aluminum to the desired temperature, it is very difficult to track how well it has warmed up, since the metal almost does not change color at this time. This can lead to melting of the base metal.
Methods for soldering aluminum radiators
There are two main types of soldering used when working with aluminum radiators. The first is to use a soldering iron, which is more accessible, but less effective and convenient. The second method - soldering aluminum with a gas torch gives a more effective result, but is more expensive, and not everyone has the appropriate equipment, since it has a relatively high cost.
Soldering an aluminum radiator with a gas torch
As a flux in each of the methods, the following can be used as solder:
- Cadmium;
- Tin;
- Bismuth;
- Zinc;
- Combined flux;
- Specialized grades for aluminum.
Preparation for soldering
Soldering an aluminum cooling radiator begins with the preparatory process. First of all, you should deal with the surface of the base metal. Mechanical processing takes place here to remove particles of dirt, dust and other unnecessary elements. After this, everything should be treated with a solvent. It could be gasoline, acetone or something similar. These procedures should help get rid of the oxide film.
Soldering an aluminum car radiator requires the correct choice of flux. If you need to prepare it yourself, then this should be done before heating the metal. Otherwise, you just need to prepare it at your workplace to make it convenient to use.
Step-by-step soldering instructions
When all preparatory procedures are completed, you can begin to apply flux to the surface of the base metal. You need to cover almost the entire soldering surface with flux. This must be done in order to isolate as much as possible from the influence of oxygen from the air, since it leads to the appearance of difficult-to-destroy oxides. If the flux is not liquid and the work is carried out with a soldering iron, then it must first be melted before application. When using a gas burner, it can be melted on the base metal.
After this, a small part of the solder is taken and applied to the surface under the influence of temperature. The molten metal will spread a lot, so you need to be careful and not use too much solder. Application should be done with gentle circular movements, evenly distributing the amount of material over the entire surface. It should spread not only to the problem area, but also to the surrounding area.
Soldering an aluminum radiator with tin and other types of solders may have its own distinctive nuances, but the principle of the procedures is almost always the same. Difficulties are caused by large chips and holes. They have to be soldered in several passes. Little by little, solder metal is applied to the edge of the surface. It cools down and then another layer is applied, gradually covering the entire hole. The problem is that solder has a lower melting point than the base metal and can melt quickly.
Soldering mode table
Each solder has its own melting point, which forces the master to select his own temperature conditions for each of them. Here are the main brands used:
| Brand | Soldering mode | Maximum strength parameters of the resulting seams, kgf/mm2 | ||
| AMts | AMg6 | D20 | ||
| P-300-A | 440° C | 11 | 22 | – |
| P-425-A | 12 | 20,8 | 20,8 | |
| 34A | 550° C | 9-10 | – | 28,8 |
| B-62 | 510°C | 12 | – | 23,8 |
Safety precautions
During soldering, you need to ensure good ventilation, natural or artificial, in order to breathe in metal vapor as little as possible. The soldering iron and torch should never be left on for long periods of time when not in use or unattended. This may cause a fire.
Using glue
There is a simple way to solder a radiator with a soldering iron using rosin-based flux. To do this, the damaged metal is prepared according to the following scheme:
- remove paint residues and all kinds of dirt;
- thoroughly clean the metal with an abrasive;
- degreased with a special solvent.
The preparation must be very conscientious; the entire repair depends on this. Flux is prepared in a metal crucible. Melt the rosin and gradually add iron filings there in a ratio of 1:2. Stir until smooth. Sawdust in this case will be an abrasive.
Next, the surface to be repaired is covered with a thin film of molten flux. The quality of future soldering depends on the thoroughness of the procedure. In this way, aluminum is protected from oxidation.
Next, the soldering process begins. Use a soldering iron to grab a little solder and apply it on top of the flux using smooth circular movements. This should be done slowly, carefully ensuring that the solder is evenly distributed over the damaged area.
How does flux behave in this case? Iron filings clean off oxides, and rosin blocks air access to aluminum. The conditions for contact between metals are met.
This method works when you need to solve the problem of how to solder an aluminum radiator if the damage is not great. Large areas cannot be repaired this way. The flux becomes cold very quickly, so soldering a large surface will be problematic.
Holes of small and medium sizes, cracks can be sealed. This option is temporary and is only suitable so as not to drain water from the riser or deprive the room of a heat source. After the heating season, the aluminum radiator must be removed in order to carry out high-quality repairs.
You can seal the hole using:
- Epoxy glue.
- Cement.
- A solution called “cold welding”.
To use epoxy resin glue, you need to prepare fiberglass or thick fabric. Since any of these materials must be wrapped around the radiator, the use of such adhesive is limited. After all, not every place can be wrapped easily and tightly. For some versions of aluminum radiators, this method is not suitable at all.
To seal holes or cracks:
- Cut the fabric into long narrow strips.
- Clean the area from which water is flowing. That is, remove all paint that has peeled off and all particles that are easily removed. This is done with a spatula. Next, take a brush with metal bristles and clean the surface. There should be pure metal left. It happens that a crack appears in a place where it is impossible to reach with a brush. An iron cable can help in this situation. It is pushed through the desired part of the radiator and pulled by the ends one by one, cleaning the desired area. This area is then dried.
- Apply glue to the treated area and wrap it with cloth.
- Apply glue to the fabric and wind another turn. This should be done until there are 4-5 turns. No glue is applied to the top layer of fabric.
- Secure the fiberglass using clamps or wire.
- Wait for the glue to dry. It dries from 2 hours to 3 days. If the room temperature is 20-25 °C, then it will dry in 2-3 hours.
How to solder an aluminum radiator at home
Before proceeding directly to soldering, you first need to remove the battery, drain all the liquid from it, then dry it well. After preparation, you can proceed to one of the soldering methods. These differ depending on whether you choose flux, flux or copper.
Method 1
For this method you will need the following materials and tools:
Materials and tools required for soldering the battery using the first method.
- fine iron filings;
- solder (it is better to use P300A or P250A);
- rosin;
- soldering iron with a power of 100 W or more;
- sandpaper;
- file;
- ceramic crucible.
You need to start work by preparing flux and solder. For this you will need;
- bismuth;
- tin;
- sodium sulfate;
- salt;
- lithium chloride;
- cryolite;
- potassium chloride.
First you need to make solder - mix bismuth with tin. They need to be melted in a crucible in a ratio of 95 (tin) to 5 (bismuth). Then you need to make flux: add table salt (6.5%), potassium chloride (56%), lithium chloride (23%), sodium sulfate (4%) and cryolite (10%). The container with the solution must be tightly sealed, because the mixture quickly absorbs moisture. Warm up the surface with a soldering iron, then apply the resulting melt to the work area. Next, you can apply solder to close the crack.
Soldering instructions:
- First of all, the area around the crack needs to be cleaned with sandpaper. But under no circumstances scratch the surface of the battery.
- Prepare a mixture of melted rosin and sawdust in a 2 to 1 ratio.
- Clean the soldering iron from deposits and plug it into the electrical network to heat it up.
- Treat the prepared surface of the radiator with a mixture of rosin. In this case, rosin must be applied to a heated surface, and not to a soldering iron, otherwise it may char and lose its properties. Only small cracks can be repaired with a mixture of rosin and sawdust, otherwise you will need flux.
- After treating with flux/flux, tin the surface, making circular movements, as if wiping it.
- Over time, the rosin will begin to spread, but you must continue to tin, and at the same time, start adding solder with sawdust, catching it with a soldering iron.
- Solder the crack completely with solder.
The meaning of each component is as follows: sawdust cleans the surface, thereby removing oxide deposits from it, and rosin protects the work area from air and prevents it from quickly oxidizing.
After completing all work, do not forget to check the quality of soldering. Fill the battery with water (it is advisable to tint it with potassium permanganate). Leave the radiator for a couple of hours. If no leak is found, then the work was done correctly.
Method 2
In order not to prepare the flux, the damaged area can be covered with a small layer of copper. To work you will need:
Materials and tools required for soldering an aluminum radiator using the second method.
- sandpaper;
- battery;
- soldering iron;
- solder;
- flux;
- copper wire with a diameter of about 1 mm;
- copper sulfate solution.
When all the materials and tools have been found, the preparatory activities have been completed, you can proceed directly to work. Soldering the radiator is carried out as follows:
- Sand the surface around the damaged area with sandpaper.
- Place a large drop of copper sulfate on the damaged area.
- Connect the negative from the battery to the radiator, and the positive to the copper wire.
- Connect the other end of the copper wire to the “drop” of vitriol so that the wire does not touch the battery.
- Wait a while until a thin layer of copper appears on the surface of the battery (the layer under the drop of copper sulfate).
- Now the surface needs to be washed and then dried. Only after this can you proceed to tinning with a soldering iron and soldering.
- Solder the crack with solder.
How to solder a copper radiator
POS-60 solder is perfect for soldering a copper radiator
A radiator made of copper is easy to solder and POS-60 brand solder, which has a low melting point, is suitable for it. If the radiator is brass, then you can use the more refractory POS-40 solder, but you should warm up the soldering area longer in order to achieve good soldering quality and efficiency. Before applying solder to the damaged surface, warm the area well with a gas burner, and then apply a layer of liquid rosin.
Next, without allowing the radiator to cool, you need to quickly apply pieces of solder and spread them evenly over the entire cleaned area of the damaged area using a heated soldering iron. Rosin will promote good tinning and adhesion of solder to the copper surface of the radiator. A good result is also achieved when using a special flux ZIL-2 instead of rosin.
Self-repair technologies
Method 1. Iron-rosin flux
So, how to solder a damaged aluminum radiator? The easiest way is to use rosin-based flux. The instructions will be as follows:
- Preparation. We clean the area to be treated, removing any remaining paint and dirt, then sand the metal with an abrasive and degrease it with a solvent. The more carefully we carry out all this work, the more effective the repair will be.
- Preparation of flux. We melt rosin in a metal crucible, gradually heating the container and stirring the melting substance. Add iron filings in small portions (1 part to 2 parts rosin) and stir until the mixture is completely homogeneous.
- Surface treatment. We cover the area to be repaired with a thin layer of molten iron-rosin flux. The fewer missed sections, the higher the quality of the repair.
- Soldering. We collect a small amount of solder on the soldering iron, and then apply it in a circular motion to the aluminum under a layer of flux. Iron filings act as an abrasive: they clean off oxides, ensuring a bond between solder and aluminum. Melted rosin allows you to minimize the access of oxygen, so secondary oxidation does not occur.
The main disadvantage of this method of soldering aluminum is its complexity. It is almost impossible to treat such large damage, since the flux hardens quickly and the quality of the repair is reduced.
Method 2. Homemade flux
When repairing fairly large damage to aluminum radiators with your own hands, you can use special compounds - flux. In this case, the work is performed like this:
- Preparation. We prepare the defect site according to the scheme described in the previous section, cleaning and degreasing the metal.
- Fluid components. Sodium sulfate (4%), potassium chloride (56%), lithium chloride (23%), cryolite (10%) and table salt (75%) are individually ground in a mortar almost into powder. After this, pour the materials into the crucible and mix until a homogeneous powder is obtained.
- Preparing the floodplain. Pour the dry ingredients into the crucible and melt until smooth, stirring gently.
- Soldering. We apply a thin layer of flux to the surface, which is preheated using a gas burner. After this, we solder the damaged area using tin-lead solder with the addition of bismuth.
Method 3. Low-temperature solder with sizing
A car radiator differs from heating radiators primarily in the configuration of the tanks. When troubleshooting a problem, you have to solder small thin-walled tubes and plates, so the methods described above will not always be applicable.
An alternative is to use aluminum solder rods with a low melting point. An example of repairing a radiator is given in the table:
| Illustration | Work stage |
| Cleaning up the area. |
Using sandpaper or a special attachment on a drill/screwdriver, we clean the aluminum, removing the film of oxides.
We treat the area with a solvent, removing organic contaminants and oxide residues.
Using small pliers, we crimp the damaged area, reducing the area of the hole. This is done to facilitate the soldering process.
Using a gas burner, we warm up the area. After this, we introduce a rod of solder with a low melting point into the flame and rub it over the damage.
With each pass, solder particles will be deposited into the hole and onto the surfaces around it, gradually eliminating the defect.
After soldering is complete, apply high-temperature aluminum adhesive over the repaired area.
When polymerized, this material will close all micropores, which will significantly increase the reliability of the repair.
https://youtube.com/watch?v=oMgfIKd1unY
Tools and materials
To solder aluminum radiators, you need to have:
- Regular soldering iron.
- Burner, blowtorch or gas stove.
- Crucible (is a fireproof container for preparing solder).
- Emery cloth.
Read also: How can you replace a spray bottle for flowers?
Materials:
- Rosin.
- Tin-lead solder.
- Iron filings.
- Solvent.
How to seal plastic parts of a car radiator
Let's take a closer look at the adhesive method for repairing a damaged radiator using the example of using two-component industrial glue from Hosch.
To seal the radiator tank, you should prepare the following materials and tools:
- powder welding granulate and liquid component of welding adhesive;
- sandpaper;
- acetone for degreasing surfaces;
- gloves;
- cotton buds.
Stages of work:
- Preparation. Both surfaces to be bonded should be cleaned of grease and other contaminants. If traces of other glue remain on the parts, they must be completely removed. In most cases, regular acetone will do for cleaning;
- Applying glue. A minimal amount of welding adhesive is applied directly to the crack. To fill the void or in the absence of fragments of the body, the powder component of the glue is sprinkled onto the liquid base. If it is necessary to restore a large depression, gluing is recommended to be done in several stages (several layers are applied sequentially with an interval of 10 minutes). After the gap is filled with dry granulate, it must be evenly saturated with the liquid component.
- Seam processing. 10-15 minutes after completion of the work, you can begin mechanical processing of the seam using a grinding machine or fine-grained sandpaper to give the seam an aesthetic appearance.
VIDEO INSTRUCTION
Instructions - how to solder plastic parts of a car cooling radiator
To solder (weld) a plastic radiator, you should prepare the following materials and tools:
- A special construction hair dryer for heating the soldering area;
- Soldering iron with a sharp tip and precise temperature control;
- Solder for plastic - special welding rods. The markings on them must match the markings on the radiator housing. As a rule, this is “PA” - polyamide (nylon) or “PP” - polypropylene. Instead of purchased welding rods, you can use pre-prepared strips cut from a similar plastic tank;
- Acetone.
Work order:
- Degrease the repair area with acetone;
- While the soldering iron is heating up, heat the joint with a hair dryer;
- We connect the seam and gradually run a heated soldering iron along it, forming a groove equal in width to the thickness of the welding rod;
- We apply a welding rod and, heating it with a soldering iron, place it in the groove of the seam;
- We check the radiator for leaks, and then install it on the car.
The welding temperature (heating of the soldering iron) is selected in accordance with the brand of plastic. For PP this is about 250 degrees.
How and with what to seal plastic parts of a radiator in a car
Let's return to the removed radiator. If a leak has formed in the plastic part, then consider half the job done. All that remains is to prepare the surface, run to the store for special glue or cold welding.
Surface preparation
There is no need to use any space technology here. You just need to remove all the dirt and wipe the top with alcohol. Vodka will also work. The main thing you need to remember is that the plastic here is very thin and you shouldn’t apply a lot of force, otherwise the crack may go further.
Use of adhesive
There are a great variety of substances for working with plastic in stores. They are all approximately the same, so you don’t need to bother with the choice, the only thing you should pay attention to is that it says on it that the glue is resistant to aggressive chemical compounds.
The operating technology is also described in the instructions for the product in as much detail as possible. However, it is worth noting that if the hole is large enough or a piece of the body is lost somewhere, additional manipulations will be needed. For example, some apply glue in several stages, gradually building up the lost part.
Most experts do not recommend doing this. It’s better to find a piece of soft plastic and try to stick it inside the crack or put it on top and then glue it on all sides. A kind of patch.
Typically, such compositions cost at least 1,000 rubles, so it’s worth considering whether such repairs are advisable or whether it’s easier to replace the part completely.
How to use cold welding
Most often, of course, cold welding is used for these purposes. It’s much easier to work with and the result looks more confidence-inspiring.
It is enough to squeeze the thick paste onto the crack and spread it evenly with any flat object (some use cotton swabs).
In case the crack is large. It is better to first apply the adhesive base, built up in stages, and secure the result on top with cold welding.
How to solder a radiator at home - aluminum and copper
During engine operation, the cooling system is subjected to various loads. As a result of the action of destructive factors, various damage occurs.
To repair the cooling system, soldering of elements is required. The soldering process is carried out using a certain technology. For high-quality soldering you need special tools and materials.
Our article will tell you how to properly solder a cooling radiator and what materials are needed for this.
How to properly solder a copper or aluminum radiator
After cleaning from scale and dirt, perform the following operations:
- Cleaning the damaged area with sandpaper.
- Degreasing with acetone.
- Heating the soldering area with an open flame.
- Applying a layer of rosin
- Treating the soldering area with flux.
- Laying and melting solder.
Heating of the damaged area is carried out with extreme caution. If the heat is insufficient, the solder will not stick.
When overheated, soldering acid quickly evaporates. With sufficient heating, boiling and gradual evaporation of soldering acid occurs.
Solder is applied in a thick layer to the damaged area.
Using a soldering iron in a circular motion, carefully rub the mixture into the surface.
If the solder does not stick to the surface, the soldering area is re-cleaned and the soldering procedure is repeated.
The functionality of the device is checked by repeated immersion in water.
How to solder a cooling radiator at home
To detect the location of a leak at home, they act in a different way. Close all inlets and outlets in the pipes with plugs made of waterproofing materials.
Folk craftsmen came up with the idea of putting pieces of bicycle inner tubes on the outlets of the pipes. To protect against the passage of air, the rubber is tied in a knot. A piece of camera with a nipple is put on one exit. A bicycle pump is used to pump air. The location of the leak is determined by the location of the appearance of air bubbles.
The further course of work is carried out according to the well-known scheme:
- The cleaned grate is placed on a flat horizontal surface.
- Using a brush, lubricate the heated area with soldering acid.
- Solder is applied with a soldering iron.
- Distribute solder evenly over the damaged surface. The work is carried out until the damage is completely filled with solder.
After soldering, the device is tested by immersion in a container of water.
If there is a large amount of damage, you need to contact a specialized workshop or think about buying a new radiator.
Related Posts
- Benefits of using a duct extension for radiators
- GOST 17325-79
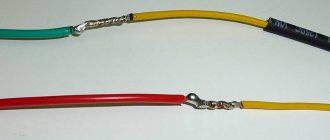
- How to properly solder LED strips to each other
- How to solder wires correctly and what you need for this
- Radiator plugs: installation nuances
- Connection diagrams for bimetallic radiators
- How to seal the joint between the bathtub and the wall? 8 popular options
- Comparison of heating radiators by heat transfer
- How to solder copper pipes correctly: do-it-yourself soldering technology, tools, basic mistakes
- How to glue fiberglass correctly?
- How to drain a heating battery
- What to do if the bottom of the battery is cold and the top is hot?
- What and how to drill into the tiles so that they don’t crack?
- How to update old tiles in the bathroom
- Alabaster: what is it? how to divorce? where to apply?
- How to cut metal using a grinder
- Painting drywall: 4 finishing features
- Connecting the toilet to the sewer without corrugation
- Is it possible to paint the battery during the heating season?
- DIY LED phytolamp for seedlings
- Caring for matte and glossy stretch ceilings
- How to paint wood with stain and varnish it
- Fum tape technical characteristics, how and how much to wind on the thread
- Mounting a mirror on the wall in various ways
- How to remove a suspended ceiling: working with harpoon, cam, wedge fastening, dismantling PVC cloth and seamless fabric covering
Read with this
- Benefits of using a duct extension for radiators
- GOST 17325-79
- How to properly solder LED strips to each other
- How to solder wires correctly and what you need for this
- Radiator plugs: installation nuances
- Connection diagrams for bimetallic radiators
- How to seal the joint between the bathtub and the wall? 8 popular options
- Comparison of heating radiators by heat transfer
- How to solder copper pipes correctly: do-it-yourself soldering technology, tools, basic mistakes
- How to glue fiberglass correctly?
Preparing gumboil
To repair a heat exchanger with your own hands, you should take care of a good flux composition. Flux is prepared shortly before soldering a leaky radiator, since over time the composition decomposes and loses its properties. For two shares of crushed rosin you need to take one share of steel filings obtained with a file.
The composition must be poured into a fireproof container, mixed and heated with a burner. Then stir again and cool.
There is another recipe for flux, which is commonly called “flux”. With its help, you can achieve special seam strength. To create the flux you will need the following ingredients:
- KCl: 56%;
- LiCl: 23%;
- cryolite: 10%;
- NaCl: 7%;
- Na2SO4: 4%.
All components should be crushed and mixed thoroughly. The composition should be stored in a tightly closed container, protected from light.
Soldering a cooling radiator with your own hands is only possible if you have high-quality flux. You will have to prepare it yourself. And it’s better to do this just before you start soldering. So, pour 2 parts of ordinary rosin and 1 part of iron filings into a fireproof container. Sawdust can be made using a file with fine notches, processing any iron workpiece that comes to hand. Heat the resulting mixture over a fire, stir and let cool. That's basically it. Flux for aluminum is ready.