Where is it used?
Double-sided with cutting edges
The use of T-joints is very wide: in the automotive industry, in building structures (trusses, supports, columns, racks), metal furniture (benches, tables, shelves), bridges and overpasses, gas pipelines, oil pipelines, water supply systems, heat supply systems for buildings and structures.
Advantages and disadvantages
The T-joint is the most common and one of the strongest. This connection makes it possible to obtain products and structures of complex shapes. The arrangement of parts in the letter “T” provides additional rigidity to the structure. Quality work guarantees practicality and reliability.
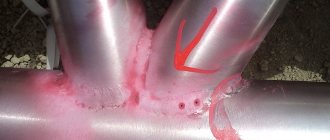
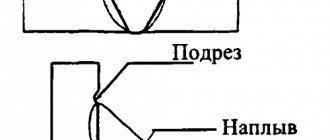
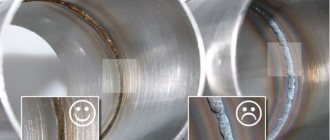
The disadvantage of such a connection may be defects:
Welding defect - crater
craters are depressions in the weld that appear when the arc breaks;
- pores are a consequence of the accumulation of gases in the seam; the cause of such a defect lies in poor quality of metal preparation;
- lack of fusion is a local lack of fusion of the base metal with the electrode metal, the reason: high welding speed, as well as burns, cracks, etc.
Such defects depend on the quality of the work. Low qualifications of the worker will directly cause defects, but equipment and consumables (welding machines, wire, electrodes, shielding gas) are also equally important. The process itself is dangerous, you must follow all safety regulations without exception.
Flaws
There are also some disadvantages that make sewing difficult to use in some areas.
These include:
- The complexity of the connection must be stabilized before welding the part (if this is not reliable enough, the geometry of the structure is violated).
- Many parts, especially those with double seams, are difficult to weld due to the high risk of distortion.
- When used in a professional field, accurate initial calculations of triple welded joints are always required so that there is no danger during work.
Technique, features
For all welded joints, the technique will be standard; it is important to take into account the welding method. The T-joint is convenient, it is easy to form a seam, control the size of the leg and the appearance of the seam.
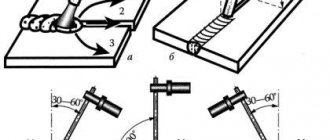
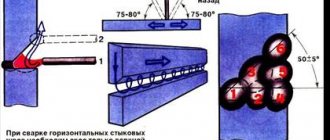
Before starting work, technological preparation of the surface is carried out, otherwise the presence of dirt and rust will reduce the productivity of the welding process and lead to defects. When welding a T-seam, the electrode is placed in a plane at an angle of 30-40 degrees relative to the bottom plate, having assembled the parts and grabbed it - this way the connection will not move.
Single-sided with seam groove in the lower position
It is necessary to check the angle between the parts and the correct location; if everything is done correctly, then you can proceed directly to welding. We excite an electric arc and tilt the electrode slightly towards ourselves and hold it in one position; we should move carefully backwards, making oscillatory movements along the axis of the seam to melt the edges. This is necessary in order to avoid lack of penetration of the corner and one of the sides of the part. You can apply a mark above the corner on the top plate beyond the boundaries of which the electrode should not extend, this will result in a more even seam.
The techniques for welding a T-joint in different positions are somewhat different from each other.
For your information! Considering the welding technique, you can immediately note that it is easiest to perform welding in the lower position, or the “boat” position. Therefore, if there is such a possibility, it is recommended to rotate the welded structure so that the welds are made in the lower position.
After welding, the slag is cleaned off and the surface is treated with a metal brush or other devices.
Application area
T-weld joints can be found in many high-demand metal structures that require welding barriers, metal fittings and frames to create various beams to the ceiling. Widely used in professional activities.
They are often made to strengthen the structure with additional plates, beams and other elements, making them easier and easier to straighten. This can be done during and after the initial installation of the metal structure.
Recommendations
If you weld a thin and thick plate with a T-joint, the angle of inclination of the electrode relative to the thick plate will be approximately 60 degrees. To “pull” more metal from the thick part to the thin part.
It is also advisable to dry the surfaces to be welded for better quality of the weld. [ads-pc-2][ads-mob-2]
Pipe welding
Based on GOST 16037-80, which applies to welded joints of pipelines made of steel and establishes the main types, structural elements and dimensions of welded joints of pipes with pipes and fittings, it would be correct to say that there is no T-joint in it. All seams that are called T-joints are referred to as corner seams . However, when a plate plug or flange is welded to the end of the pipe, it will be a T-joint. By and large, in order not to argue about this, it is necessary to understand that the T-joint of pipe parts or any other rolled metal is performed using a fillet weld and the technique of welding pipelines comes down to the technique of welding fillet welds .
First of all, you need to focus on preparing the pipes before welding the T-joint. The pipes must meet all requirements and be free from defects, contamination and rust, after which welding can be performed.
Tacks should be made; for pipes with a diameter of up to 300 mm, 4 evenly spaced tacks are sufficient. For wider pipes, tacking is done at equal intervals throughout the entire diameter. The end of one pipe must be cut in a certain way so that it fits tightly to the side surface of the other pipe. For pipes with a small diameter, this is not very difficult to do with the help of a few manipulations with a grinder. It’s a different matter when you have to work with large diameter pipes. In this case, as a rule, various patterns and patterns are used when marking.
Video
Useful video about how to cut pipes to weld them end to side.
[ads-pc-3][ads-mob-3] Next, the parts are assembled using tacks or in an assembly and welding fixture. Welding of pipe joints can be performed both in a rotary position (it is possible to rotate the joint around its axis) and in a fixed position (there is no possibility of rotating the joint around its axis). When welding pipes, the weld has to be made along a curved surface, which somewhat complicates the process. It is necessary to divide the joint into sections and perform welding in several steps.
IMPORTANT! In this case, it is necessary to ensure remelting of the previously deposited weld.
Depending on the thickness of the pipe wall, the weld is performed in one or several passes. You should pay attention to the composition of the pipes and select suitable electrodes. The weld on the pipes must be perfect, and the presence of defects must be checked. If there are defects, they are corrected.
Profile pipes are used for fences, frames, and various metal structures.
Advice! When connecting, it is advisable to make sure that the cut is even, otherwise a gap will appear that will have to be welded abruptly.
When making T-joints of profile pipes, tack welding is also performed. The electrode is moved at an angle with oscillatory movements from bottom to top. After welding, the slag is cleaned off.
Video
Upright
With a T-joint in a vertical position, the welding current is set higher for good penetration; welding must be performed from the bottom up with arc separation.
For your information! Vertical seams are made both with arc separation and through passage. This depends on various factors: metal thickness, welding method, electrode brand.
The movement of the electrode is carried out by loops, corners, arc vibrations, etc., the position of the electrode should be 45 degrees, sometimes welding is performed from top to bottom. When igniting the arc, we hold the electrode perpendicular to the surface to be welded; this welding technique is not convenient and you need to carefully control the weld pool . To control the pool, it is necessary to reduce the welding current so as not to overheat the metal, the electrode must be set to the correct position so that the arc pressure maintains the liquid metal, and does not contribute to its flow to the bottom. Welding is performed with a short arc so that the distance between the end of the electrode and the workpiece is minimal.
https://youtu.be/U526FdTC1r4
Down position
By performing welding in the lower position, the welder can achieve higher quality results; the current should be higher if the polarity is straight and lower if the polarity is reversed .
Vertical connection with edge groove, seam in lower position
The position of the electrode is directed towards the root of the welded joint, the arc length is shorter when welding with reverse polarity, the electrode must be moved evenly, without missing the weld pool.
First of all, it is necessary to correctly configure the welding parameters, electrode diameter, and current strength so that the welding process proceeds stably. The electrode must be positioned so that in one plane it is located along a bisector between the surfaces of the parts, and in another plane it is inclined in the direction of its movement.
The welding arc should burn at the joint of the parts. It is necessary to move the electrode at a uniform speed, so that the edges of the parts have time to melt and the weld to form with the desired leg. If it is necessary to obtain a seam with a large leg, it is necessary to additionally perform oscillatory movements with the end of the electrode. Also, a weld can be performed in several passes, but this requires careful cleaning of slag after each pass.
Video
In ceiling position
For the ceiling position, the technique is the same as for the lower position only in a mirror projection. The main difficulty is that the molten metal tends to flow out of the weld pool.
To prevent this, it is necessary to slightly reduce the welding current in order to reduce the thermal power of the welding arc.
Welding should be done with a short arc length. It is also necessary to remember that in the ceiling position, a large amount of splashes of hot metal and slag will fly towards the welder, which requires strict adherence to safety rules, proper clothing and headgear.
[ads-pc-4][ads-mob-4]
Surfacing in ceiling position
When welding in this position, the selection of welding current is important. If the thickness of the product allows, it is more productive to use an electrode with a diameter of 4 mm. It is recommended to perform surfacing with narrow, 1.5-2 diameters of coated electrode, single beads, which allows the use of a medium range of welding current. It is recommended to place the first bead 2-3 times the diameter of the coated electrode along the surfacing boundary using the “pull-welding” method (Fig. 60). Subsequent rollers, from 2 to 5, etc., are recommended to be laid from left to right or from right to left, in this case the welder needs to change his position in relation to the rollers. In this case, the inclination of the electrode must be maintained at an angle of 70°-80° to the product. Otherwise, the surfacing technique is the same as in the lower position.
Welding rules
When making a T-joint, lack of fusion must be avoided; the electrode must be moved correctly to prevent the occurrence of defects. Basically, the electrode is located in the plane exactly between the parts to be welded. The electrode must be directed from the bottom up (raising the molten metal and mixing it with the electrode melt) for the simple reason that the molten metal will flow to the bottom.
It is best to tilt the surfaces at an angle of 45 degrees (boat welding) , then the seam will have the correct cross-section and it will be easier to work at this angle.
Do not forget! You also need to take into account the gap for good penetration.
Before welding begins, tacks must be made . The structure is pre-measured, the angles of the connections should be 90 degrees. Before work, you need to adjust the current, select the right electrode, pay attention to the surfaces to be welded, and stock up on the necessary knowledge and practice. Be sure to familiarize yourself with safety precautions and purchase the necessary work uniform.
Other types of welding
The most important element of any metal structure is the weld. In this regard, the technique of welding vertical seams, as well as other connection options, will be extremely useful for beginners.
There are a large number of methods used to form reliable joints in the case of different locations of parts relative to each other. Special techniques for moving electrodes have also been developed, for example, herringbone, boat, etc.
The simplest types of welding include working in a horizontal position. However, there are more complex types of seams.
Butt
The easiest way to carry out this type of connection is not on a vertical plane, but on a horizontal one.
Drawing of welding seams.
The welding process can be performed in several ways:
- in space;
- on a removable copper lining;
- with a preliminary seam.
In the first case, the most difficult thing is to boil the root throughout the entire product. The use of a copper lining can simplify the task. Due to its high thermal conductivity, it will prevent melting of the surface under the parts as a result of contact with molten material. It can be easily removed after finishing work.
Welded multilayer
This technology involves several passes. Before each pass, the previous layer is cleaned and cooled. In this regard, this connection method differs significantly from others.
The layers are welded using electrodes of different diameters. We weld the bottom one with rods 3-4 millimeters in diameter, and the subsequent ones - 5-6 millimeters. The topmost layer is convex, in addition, it performs heat treatment of the lower layers.
https://www.youtube.com/watch?v=yEz_cweZtyQ
Ring
Used in joining pipes and various parts of shut-off valves. It is a mixed type of arc welding.
First, a vertical seam is made on the side of the pipe using electric welding, then a horizontal seam is formed around the circumference. In the same way, welding of plates located on the ceiling is carried out.
Features of the preparation technique for circumferential welding are as follows:
- the product is thoroughly cleaned;
- deformed areas are trimmed and leveled;
- the edges are cleaned to a shine.
Processing of joints during the welding process is carried out continuously, and turns are welded in several passes. Each subsequent connection is applied only after the previous one has been cleared of slag.
If cracks are found, they are removed and the resulting fragment is welded again.
Ceiling
Characteristics of different types of welded joints.
Every inexperienced welder will be confused when faced with the need to weld a ceiling seam using electric welding. This type of connection can easily be called the most complex welding seam. It should be noted that ceiling welding causes a lot of problems associated with the inconvenient position of the master when working.
Drops of hot metal tend to break off and fall down, which further complicates the work process. The molten metal itself is held in the bath due to the action of surface tension.
Welding a ceiling seam involves positioning the electrode normal to the surface of the product. In this case, the rod performs circular movements. This way it is possible to expand the connection.
The arc should be short to avoid undercuts. It is necessary to weld the ceiling seam according to the following method - the metal should harden at the highest speed. A similar effect can be achieved by using electrodes with a coating that has a high melting point.
In addition to circular movements, you should also make vertical movements. Moving the electrode away from the bath will extinguish the arc. As a result, the metal will begin to cool and the bath will shrink.
Thus, in addition to the standard defects formed during welding, welding of ceiling seams is characterized by another unpleasant feature, which is impossible to get rid of. When making such a connection, you must understand in advance that it will be weakened and less reliable than any other.
In connection with the above, such joints are almost completely absent in industrial production.
Equipment
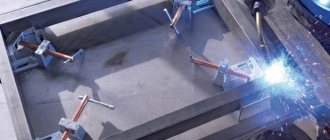
To simplify the assembly process and increase the productivity of manufacturing products using welding, various assembly and welding devices are widely used. For the most part, the assembly of T-joints of parts is carried out on special tables - stocks, equipped with universal clamps, fixing and installation devices. They provide a clear and precise location of parts in the right place in the structure and at a given angle. Various templates and jigs are also used depending on the complexity of the welded structure.
Features of vertical welding
Vertical welding has the difficulty that when creating a seam, the molten metal tends to flow down, which in no case should be allowed. If this happens, then it will no longer be possible to cook on top of this drop, since it contains slag from the electrode.
To create a high-quality track when manual arc welding, it is recommended to use a short arc at a low current. At the same time, the master must make movements from the bottom up to avoid unnecessary drips. When vertical seams are formed from a molten drop, you need to move the end of the electrode a little to the side to allow the material to harden without losing the spark.
Principles of vertical welding
To create an ideal seam, you must adhere to several principles of vertical welding:
- If welding work is carried out using alternating current, then it is imperative to start from the bottom. In this case, the weld crater is filled with material so that it creates a volumetric roller, which in parallel serves as a kind of support for the molten metal located slightly above. This is how the seam is filled.
- With the electric arc method, the metal in the weld crater in a vertical position should harden much faster. For this it is better to make small drops. It is very simple to achieve this effect by shortening the arc (the distance between the product and the electrode).
Conditions for a high-quality vertical seam
Not all novice welders understand how to weld a vertical seam so that it turns out aesthetically pleasing, durable and “correct” in terms of quality. There are several conditions that will ensure that you get a perfect seam almost the first time:
during arson, it is necessary to maintain a perpendicular position of the electrode in relation to the parts; the shorter the arc, the faster the metal crystallizes and the risk of drips that spoil the seam is reduced; during the formation of the track, the electrode must be tilted so that metal drops do not flow down; if due to carelessness the material flows, you need to increase the current strength and the width of the seam. This maneuver will give more time for crystallization. Considering that there are parts that need to be welded only using the technique from above
To do this you need to be careful and smooth. Then the metal will not drain and damage the product. If the plates being welded are very thin, for example tin or galvanized, then you need to do the following:
Considering that there are parts that need to be welded only using the technique from above
To do this you need to be careful and smooth. Then the metal will not drain and damage the product
If the plates being welded are very thin, for example tin or galvanized, then you need to do the following:
- clean the parts as efficiently as possible, remove dust, dirt, paint or oil residues from them, remove the galvanized layer;
- make the seam with dots. In this case, the risk of drips and burns is reduced.
