Carpentry work involves the use of various woodworking tools. Planes occupy a separate class of tools for woodworking. Every craftsman has been familiar with them since school, when in labor lessons the task was to make a blank. Although the wood planer is obsolete, when the need arises for chamfering, it is always able to help out the craftsman.
Design features of planes
You need to start by considering the purpose of the tool. And it is intended for planing wood, that is, to give the wooden surface the desired shape, while eliminating various irregularities, roughness and other defects. The components of the device are:
- Body made of wood or metal - last with sole
- Steel knife, piece of iron or cutter - the main cutting element
- Wedge
- Lever
A more detailed design of a hand plane for wood is shown in the photo below.
The basis of this tool is a cutter, which looks like a rectangular plate with a pointed end. The plate is placed in the block opening at the appropriate angle. A special adjustment mechanism allows you to set the knife to the required distance. This distance is set in order to adjust the cutting depth and chip removal thickness. According to the standard, the blade has a certain sharpening angle, but if the tool is used by a professional, the master sharpens the cutter himself, depending on what type of wood is to be processed.
An equally important element in the design of the tool is the handle. Moreover, a hand plane consists of two handles, one of which is a guide, and the second is a persistent one. The guide handle has a curved design that allows the tool to be grasped by hand. The thrust handle allows you to create the necessary force when performing work.
The body has a smooth surface from which a sharp cutter protrudes. The main condition for the instrument is a perfectly flat and smooth sole. If the sole is not level, then precise processing will simply not be possible. The body of the instrument is made of wood or metal. Home craftsmen give preference to wooden planes, which are cheaper. Woodworkers prefer to work with metal planes, the base of which is made of gray cast iron.
Despite the fact that the hand tool in question has a typical design, today more than 10 varieties of these woodworking devices are known. To begin with, it should be noted that all types of planes are divided into two main groups according to the type of drive - manual and electric.
This is interesting! Electric planers are replacing hand tools, but when it comes to planing wood, home craftsmen prefer the second option.
Types of hand planes and their purpose
Tools for wood processing are divided into the following types according to their intended purpose:
- Finishing
- Shaped cutting
- Rough processing or for general use
Finishing planes include the following:
:
- A sander is a tool used for finishing wooden surfaces. With its help, the master removes irregularities and defects that remain from the use of the previous tool.
The device is based on two sharp knives, the sharpening angle of which is 60 degrees. An additional element of the grinder is a chipbreaker. The chipbreaker is a support plate that is located above the cutting insert - Tsinubel is a device that belongs to the category of finishing tools. This device is used to impart roughness to wooden surfaces. This roughness is similar to a ground surface (adhesion), which is necessary to improve the quality of adhesion, for example, when applying varnish. The incisors are positioned at an angle of 80 degrees and have grooves. The design of the tsinubel uses single knives with a blade that has serrations at the end
- End plane - used when it is necessary to process small-sized wood. The name of the device does not speak about the design, but about the application, that is, it is used for planing the end surfaces of workpieces
- Single - used for repeated processing of wood. The use of the device allows you to obtain clean chips without kinks, but at the same time chips and burrs form on the material being processed. That is why, after using a single plane, you will need to refine it with a sander.
- Double planer - equipped with a cutter and chip breaker, which improves the quality of planing work. After this device you will also need to treat the wood with a sander.
If there is a need to perform finishing processing of woodworking materials, then a complete list of such devices is presented above. They are also called flat planing devices. After treating the surface with a sander, proceed to the use of sandpaper, through which sanding is carried out.
Workplace and additional equipment
When carrying out woodworking work at home, you cannot do without clamps. They help to fix parts individually and among themselves during cutting, gouging, drilling, and gluing.
Other important tools in woodworking are pliers and nail pullers. They are used to remove nails and other foreign objects from wood.
During the woodworking process, it is important to properly prepare the workplace. A workbench is required for plumbing work
This is, first of all, a table at which it is convenient to perform various manipulations. The workbench also contains useful devices:
- front and rear screw clamps for fixing workpieces;
- holes for wedges into which the workpiece rests;
- tray for storing carpentry tools.
A rack is often installed near the workbench where the necessary equipment, materials, and templates are stored. You will need a comfortable chair. It is also necessary to take care of an outlet for connecting power tools and high-quality lighting.
Additional devices that any craftsman should always have on hand include rulers, protractors, levels, and squares. Most likely, you will need consumables (sandpaper, files, circles). Since a full production cycle is usually established in a home workshop, it is necessary to allocate space for varnish, paints, and brushes.
Any tools must be in good condition. If a breakdown occurs, they are restored as quickly as possible or removed to a place where they will not interfere.
Shape cutting tools or planes for complex geometries
A separate category of woodworking devices that are used to produce parts with complex geometric shapes. Structurally, they are similar to a classic plane, but have corresponding distinctive features. There are the following types of planes for figure cutting:
- Zenzubel is a tool with a double knife, the use of which allows you to achieve high quality of the processed surface. Effective for planing perpendicular surfaces and cleaning quarters. The knife of the device reaches 33 mm in width, and its shape is more similar to a shovel. Zenzubel is a close relative of Falsebel
- Federgubel - used for making longitudinal projections on workpieces. It has a special blade design, through which the corresponding groove processing is carried out
- The folding belt is the best device for stripping quarters. The design of the device contains straight and oblique cutters, and the base has a stepped design. The stepped design allows you to select folds that match the desired profile and size
- Shtabgobel - has a rounded blade format, through which fast and efficient processing of concave parts is carried out. This tool is also called a stacker, which is actually due to its design
- Tongue pile - the device has two blocks that are connected to each other using two screws. Using the device, longitudinal grooves are created on the edges. One part acts as a guide, and the second is equipped with knives and carries out the necessary manipulations
- A molding machine is one of the main tools for performing figured cutting in wood. The tool found its application in the production of wooden cornices, baguettes and door slopes. The device is equipped with cutting knives with a shaped edge. The multi-stage sole part is selected depending on what you want to achieve in the final result
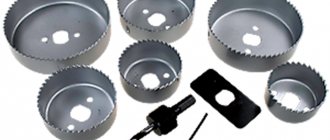
- A groundtube is a block on which a trapezoidal cutter is mounted on the side. Allows you to machine a groove in a part in the longitudinal direction of the fibers. It has two handles, as well as an adjustment mechanism through which the depth of the resulting groove is set
- Selector - designed for profile planing of wood
- Gorbach - has a design corresponding to the name. The curvilinear shape of the tool makes it possible to process the surfaces of round workpieces. Moreover, processing is carried out not only on the outer, but also on the inner diameter of the workpieces
In the garage, one hand plane will be enough, but in the carpentry workshop, all of the above tools should be present. Some of them, although they are interchangeable, require the use of only the right instruments to perform quality work.
General purpose devices or how to rough finish a part
A separate category of planes are universal devices for rough and final cleaning. With their help, you can perform not only rough, but also fine finishing of surfaces. One of the most important tools for a carpenter is the sherhebel. With its help, the master carries out the initial planing of wood, that is, removing the bark. We will consider in more detail what types of general purpose planes there are below.
- Sherhebel - looks like a regular plane in a metal case. The main task of the tool in question is to give the workpiece the necessary shape for its subsequent processing. The tool allows you to remove edges up to 3 mm thick. It is almost impossible to obtain a smooth surface using Scherhebel, so after work you will need to perform finishing work with other tools. The sherhebel differs from a regular plane in that the cutting part with a rounded blade is located at an angle of 45 degrees. The presence of a rounded blade makes it possible to plan wood in the transverse direction
- Medvedka - got its name due to its similarity in shape to the insect of the same name. The similarity is due to the design of elongated handles with side protrusions. Used for leveling large surfaces. Special protruding handles ensure easy use of the tool, which is equally convenient for both right-handers and left-handers. The bear is also intended for use in pairs by two people. The metal cutting tool is fixed with a wedge. The cutter protrudes from the sole by 1 mm, which allows the removal of the corresponding layer of wood
- Planer - the device is equipped with two cutters, therefore, unlike the Scherhebel and Medvedka, it is used for finishing or final leveling of the corresponding wood surfaces. A distinctive feature of the jointer is its long length, which allows you to remove chips from a large surface area in one pass. The design of the tool can use not only two, but also one blade
- A semi-jointer is an analogue of a jointer, which has a shortened length of up to 60 cm. The design uses a double cutter and serves as a tool for finishing the surface of small-sized material
Using these four tools, you can carry out complete processing of the material from start to finish, that is, from removing the bark to manufacturing the required size and shape of the part. It is worth understanding that these tools will not produce a perfectly flat surface, so if necessary, you will need to use additional devices for finishing and shaping.
When to use an electric planer
The advantage of an electric planer is that it can perform various woodworking jobs with minimal effort. An electric planer can be used for rough, finishing and shaped finishing of surfaces. The tool is effective when it is necessary to perform large volumes of work in carpentry workshops or when carrying out repair and construction work. The main disadvantage of the tool is that it is quite expensive, and therefore it is not profitable to buy it for home use if you plan to use the device only once.
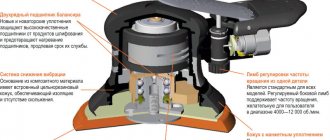
Structurally, the tool is a massive plane, which is equipped with an electric motor, as well as special knives. The knives are driven by an electric motor through a gearbox. The electric tool has the function of adjusting the planing depth, the maximum value of which reaches 82-100 mm, depending on the brand and power. The electric planer also has some disadvantages:
- Noisy operation
- Dusty - this drawback is easily eliminated by using a special bag or connecting a hose from a vacuum cleaner
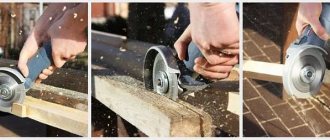
However, against the backdrop of such advantages as fast and efficient removal of chips from the surface of the workpiece, the devices in question are popular. An alternative replacement for an electric planer is a grinder with a special attachment. This attachment is called a plane for a grinder for wood processing.
Area of use?
Among other functions, the electric planer can do the following:
- Chamfer the end and front parts of the lumber.
- Create grooves for further joining of two sections of wood.
- Selecting a quarter, adjusting different sections of wood, obtaining tongues and other actions with the workpiece.
To work with power tools you do not need to have specialized skills. It is enough to read the instructions, follow the safety rules, and have a prepared workplace. Modern models have mechanisms for removing chips, which allows the tool to be used even in small domestic spaces, for example, in a garage.
How to distinguish a sherhebel and a jointer from a planer
Some types of planes have the same external design, which raises the question of their differences. For example, what is the difference between a sherhebel and a regular plane? Sherhebel, unlike a plane, is intended exclusively for rough cleaning of the surface of wood materials. Structurally, it differs in the shape of the cutter, which has a semicircular appearance. In addition, the width of the cutting part on a scherhebel is smaller than on a plane, but it protrudes by 2-3 mm, unlike a plane, where its protrusion is up to 1-2 mm.
Another type of woodworking tool - a jointer and a semi-jointer - has the same external design as a plane. However, there is still a difference, and it lies in the size of these instruments. A jointer differs from a planer in the number of blades, of which there are two on the first tool (depending on the model). The jointer is designed to perform similar tasks with a plane, but due to its two blades and long length, it can be used to finish large volumes of surfaces.
This is interesting!
Despite the identical external design, the planer, jointer and sherhebel have their respective purposes.
Cutting elements. Basic concepts and definitions
A workpiece is an object subject to changes in shape, size and roughness.
After completion of machining, a product (processed part) is obtained from the workpiece, i.e. subject of labor.
The theory of wood cutting appeared in 1870 (founder I.A. Thieme).
Cutting is the technological process of breaking the bonds between particles of the workpiece material along the design surface with the blade of a cutting tool in order to obtain a product (part) of the required shape, size and roughness.
Cutting is an action aimed at changing the shape, size and roughness of an object of labor when performing a technological operation by cutting.
Blade is a wedge-shaped element of a cutting tool. It is designed to penetrate the workpiece material and separate the cut layer.
Cutting processing carried out with a blade tool is called blade processing (GOST 25761–83). If cutting is carried out with abrasive grains, the processing is called abrasive. Abrasive grain is a particle of abrasive material with an irregular shape and linear dimensions not exceeding 5 mm.
Scheme of blade wood processing
The diagram (Fig. 1) shows the workpiece 1 being processed, the blade 4, which moves along the design surface 6, penetrates the workpiece material and separates the cut layer 2. The cut layer is characterized by length l, width b and thickness a. The wood of the cut layer in its entire volume is elastically-plastically deformed, twisted, and destroyed. This part of the material 5 is usually called chips.
Part of the wood specially left for removal during this operation and called allowance P. In some cases, allowance P can be so large that it is not cut off immediately, but sequentially in several passes. Allowances are provided in the workpiece on all sides. After removing the allowances, part 9 is obtained.
Rice. 1. Schemes for blade processing of wood: a – planing; b – milling
The surface 3 of the workpiece that is subject to change during the cutting process is called the machined surface. The surface 7, obtained again during the next pass of the tool, is called processed. It coincides with the design surface 6. The intermediate surface 8, which temporarily exists during the cutting process between the machined and machined surfaces, is called the cutting surface. The latter is always in contact with the blade.
Features of choosing the right tool or what you need to know
An ordinary hand plane is probably present in every master’s arsenal of tools. However, if you need to purchase it, you need to know some features that will help not only save money, but also choose an effective woodworking device.
- Sole - first of all, you need to inspect the bottom of the instrument, which should be perfectly flat, smooth and without visible damage or chips. This applies to all types of planes. It will not be possible to visually determine maximum evenness, but if the base is massive, then even minor irregularities can be removed when preparing the tool for work
- A knife is a working element, the quality of which determines not only the efficiency of work, but also the service life of the tool. You need to choose models in which the knives are made of tool steel. In addition to remaining sharp for a long time, such material is also not subject to wear. Factory planes have a blade that is fixed rigidly to the body without any play
- Handles - when choosing, you need to take the tool in your hands and try it out. If the handles are small, then it is better to choose a plane with large handles. After all, how comfortably the plane fits in your hand determines its use and, accordingly, the quality of the work performed.
It is important to pay attention to the question of who is the manufacturer of the planes. The most popular are Japanese companies Sigma and Stanley, but there are other models. It should also be noted that today it is much easier to find an electric planer than a hand tool.
How to use a wood planer
If you need to plan with a plane, the question arises of how to use it. If labor lessons at school have already been completed a long time ago, then it will not be difficult to master the use of a planing device. However, not everything is as simple as it might seem at first glance. Before using a plane, you need to prepare it. The preparation is as follows:
- Disassemble the tool to check the flatness of the sole
- Then you need to remove the protective coating from the sole. For this, acetone and cloth are used to thoroughly abrade the varnish from the sole and side surfaces
- It should be noted that not all planes are varnished, but only high-quality tools from well-known manufacturers. Varnish is applied to prevent corrosion on the surface of gray cast iron.
- Check the quality of the blade sharpening. To do this, you need to remove the piece of iron from the tool, and then try it on a piece of wood
- The plane of the sole is checked. It should be perfectly smooth. To do this, apply a metal ruler to the surface of the sole and point it towards the light. There should be no gap between the sole and the ruler. If it is present, then the sole has unevenness. It will not be possible to carry out high-precision processing with such a device, but for home use it is quite suitable
- If necessary, level the sole. For this purpose, metal sandpaper with a roughness of P1000 or more is used. The paper must be placed on a perfectly flat surface (for example, glass), and then move the plane in one direction away from you
- Check the blade for nicks. If any, the blade is subject to additional processing
- After this, assemble the tool. How this is done is described in detail in the video material.
After this, you can begin to carry out the relevant work. After the tool is prepared for use, it needs to be configured. To configure, perform the following steps:
- The procedure involves placing the iron from the sole at the appropriate distance
- Initially, it is necessary to connect the chipbreaker with the iron. To do this, the ends of the elements are aligned exactly with each other and secured with a tightening screw.
- After installing the adjusted cutting elements in place, you will need to fix them using a pressure plate
- Carry out a test pass with a plane over the workpiece. Based on the results obtained, make more precise adjustments using a special adjustment lever
- Make more precise adjustments to the protrusion of the iron from the sole. The cutter must protrude equally on both sides to ensure efficient chip removal from the workpiece.
After this, you can begin to use the tool for its intended purpose. To do this, it is necessary to fix the workpiece with clamps or in a vice, which depends on the size. After this, begin performing manipulations. To do this, you need to hold the plane with both hands and apply the same force from start to finish. After this, you need to return to the starting position and perform the passage again.
To summarize, it should be noted that the plane is a unique tool that is popular in the field of woodworking and furniture construction. It makes no sense to buy a whole set of different types of planes for your home, unless you plan to make furniture, etc. But novice carpenters will be interested to learn about the purpose of certain types of wood planes.
Safe work rules
The working element of an electric planer is sharp knives mounted on a drum rotating at high speed. This unit poses the main danger to the person working with the tool. Therefore, you should follow simple rules for safe handling and work with an electric planer, namely:
- work clothes should not have long, hanging sleeves;
- Before starting work, you need to make sure that the tool is in good working order and that the knives are securely fastened to the drum; this should only be done when the power cable is disconnected from the network;
- if necessary, clean and adjust the tool without plugging it in;
- before starting work, check the surface to be treated for the presence of nails or screws;
- When working, be sure to wear safety glasses to protect your eyes from chips;
- the workpiece must be securely fixed on the work table using a vice, clamps and other devices;
- It is allowed to use only those blades that are recommended by the tool manufacturer;
- do not leave the electric plane connected to the network unattended;
- store the instrument out of the reach of children.
Following these simple rules will help protect you from painful injuries and injuries.