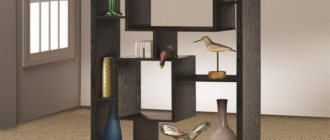
This design with shelves at different levels allows you to properly organize the storage of everything that is commonly called “household utensils”. The choice of materials and designs for shelving is quite large, and depends mainly on the location of their installation. But if we are talking about a metal rack, then it is understood that the product is designed to withstand significant loads, and also to be used in conditions where wood quickly deteriorates.
For example, with high humidity. As a rule, metal racks are installed with your own hands in utility rooms and buildings - storerooms, sheds, garages, cellars, and so on. This article will introduce them to typical drawings and provide useful tips on the manufacturing procedure.
Design features, types of racks
The design of the rack is a set of shelves arranged in tiers. They are fastened together by racks. In the classic version there are 4 of them in the corners. However, there are designs with three posts (2 on the sides and 1 in the center), and as the length increases, the number of supports is added.
The following types exist:
- Frame collapsible models are convenient for mobility. The supports with lintels and shelves are connected with bolts. If necessary, the structure can be easily disassembled, moved and installed in another place.
Frame collapsible model.
- Frame non-separable models do not have detachable units. All elements are connected by welding, nails, screws, which depends on the material. With large dimensions, the structure is considered stationary. It will not be possible to remove a huge rack from the room through a door or window opening without disassembling it.
- Console models differ in design. They have no sides and the shelves are attached to a solid back wall.
Console model.
4. Folding models resemble a stepladder. The main difference is the small dimensions. Folding stepladder racks are better than collapsible structures in that there is no need to disassemble them to transport them to another place. Folding and unfolding a stepladder with shelves takes 30 seconds.
Folding model.
Based on their shape, the following types of racks are distinguished:
- Rectangular models are considered classics. Usually such structures are placed near walls. Depending on the needs, they are made square or elongated in length to the required parameters.
- Triangular models are designed to be installed in a corner to take up empty space.
Triangular and rectangular models are the most popular due to ease of use. Less common are oval structures and other complex shapes.
How to choose material for shelving
The material determines how long the structure will last under certain conditions and how much load it will withstand. If the product is an interior decoration, the design and beautiful finish are important.
For models for domestic use, it is customary to use two types of material:
- Wood is the most popular, easily processed material. There are several options: board, plywood, particle boards. With skillful processing, you will get a beautiful rack that is suitable even for use inside the house. The disadvantage of wood is the fear of dampness. Wood is destroyed by fungus, plywood delaminates, and particle boards turn into a pile of wet sawdust. Grinder beetles love to chew on wood. A wooden structure will last a long time if it is treated with protective impregnations and installed in a dry room.
When choosing wood as a material for manufacturing, you need to ensure that the boards have as few knots as possible. Boards without knots are much stronger than with them.
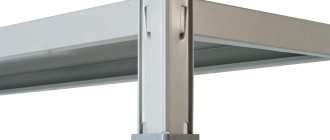
- Metal is an equally popular material. The structure will be durable and will withstand the load from spare parts in the garage if the frame is made from an angle, profile or round pipe.
When choosing rolled metal products, preference should be given to profile pipes, as they are the most durable.
- A decorative option is a rack with a base made of a profile used when installing drywall. The shelves will hold books, indoor flowers, and other light objects. Metal is similarly afraid of dampness and rusts, but compared to a wooden shelving, a steel structure will last longer in a damp room. To protect against corrosion, the product is painted, and it is better to use it when assembling workpieces made of stainless steel or galvanized.
Less common are racks made of plastic pipes, creative designs where glass bottles, ropes suspended from the ceiling and other devices serve as racks.
Construction made of plastic pipes.
The choice of material from which the rack will be made depends to some extent on its purpose. If you need to make a rack for the garage, then preference should be given to metal, as the most durable material.
How prefabricated metal racks are used: intended purpose, formulation of personal preferences
Modern industrial warehouse
In such facilities, prefabricated metal shelving is a relatively simple part of the overall project. For high-quality storage of certain things, an optimal mode is maintained. Products are moved using specialized lifting equipment. Software is used to optimize logistics. Some operations are performed using automation tools.
To store small products, prefabricated metal warehouse racks will be supplemented with special containers
The dimensions of the boxes determine the distance between the shelves and support beams. To simplify the search, labels will be used. The height of the structure is limited by the parameters of the room. Please note that the calculation must take into account the placement of lamps and other equipment elements.
Metal shelving for stores is installed not only in the warehouse, but also in sales areas
Here, prefabricated metal racks are used to store operational stocks and advantageously present goods to potential buyers. The distance between the shelves is selected so that you can easily take the product you like. The end parts are equipped with transparent overlays for placing price tags.
Freezer shelving must maintain integrity over a wide temperature range
In such premises, conditions change greatly during operation, when performing routine sanitary and hygienic procedures. If you make shelves out of wood, they will quickly be damaged. Impregnation of such products with protective compounds is not permissible, since food products are stored here.
Heavy archival metal prefabricated racks are equipped with special mechanisms that facilitate movement
This equipment allows you to clear passages as needed. This solution helps to use the available workspace economically. But at the same time, it significantly increases the cost of the structure. Built-in locks with locks provide reliable protection against illegal actions.
The given options relate to the industrial and commercial fields of activity. But this article will focus on household projects. Nevertheless, it is professional solutions, together with the nuances noted above, that will help more accurately formulate the requirements for a collapsible metal rack for the home:
- Formulate exactly the problem that needs to be solved. If a purely utilitarian use is intended, there is no point in overpaying for a perfect appearance.
- Check the weight, dimensions, and special characteristics of the items. Optimal storage conditions should be taken into account. Some products should not be placed near heating devices or in direct sunlight.
- Next, they study the architectural features of the room. It should be noted that prefabricated metal shelving can be very precisely “tailored” to the configuration of a particular room.
Based on the information collected, a final list of the required characteristics of a prefabricated metal rack is compiled. Next, a package of design documentation is created.
Features of determining the size of the rack
The choice of size is influenced by two factors: the availability of free space for installation and what items are supposed to be stored on the shelves.
The height is often limited to 2 m, so that you can easily reach the top shelf without a stand. The depth depends on the size of the items intended for storage. They shouldn't fall off the shelves, but a large supply is useless. The rack will take up the useful space of the room.
Typically, shelves for books or flowers are made 30 cm wide and up to 1 m long. It is advisable not to increase the last parameter. Long shelves bend under load. The situation is corrected by installing additional racks.
Shelves up to 50 cm wide are suitable for a garage or shed. This is enough to store spare parts, tires, work tools, and garden tools.
If the shelves of the rack are planned to be made from OSB sheets or plywood, then when calculating its width it is advisable to take into account the dimensions of such sheets. This will avoid unnecessary waste and waste of materials.
Helpful tips and layout ideas
The functionality of a metal rack will improve if you implement the recommendations of knowledgeable people:
- to increase the number of shelves for storing jars with blanks, they are made 30 cm high;
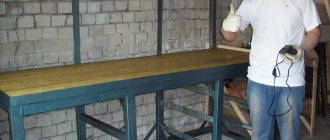
- in order not to be distracted from work by searching for what you need in garages and workshops, workbenches are built into the storage system;
- metal rack on wheels with a stand for tools, convenient to roll out for repairs on the street;
- to increase the usable area of the greenhouse, racks are installed, on the shelves of which boxes with soil are placed;
- space for wheels and bulky items can be left under the bottom shelf, raising it 60 - 70 cm from the floor;
- If you make a drawer with compartments for hardware on one of the shelves, they will always be at hand.
Example of rack layout 1
Example of rack layout 2
A self-made metal rack is not only cheaper than a factory one, but also more convenient to use. It is collected taking into account the characteristics of the room, the number and size of objects. The assembly of a metal structure with the required parameters can be performed even without a welding machine.
Metal rack in the garage from a profile pipe
Metal construction is often in demand in the garage. To assemble its frame, it is optimal to use a profile pipe. The design will be neat and convenient. In addition, the profile tubes fit better at the joints. It is optimal to choose the most popular size: height – 2100 mm; width – 1250 mm; depth – 300 mm.
Assembly sequence:
- Use a grinder to cut a pipe with a cross-section of 20x20 mm into pieces of the required size. You should get 4 elements 2100 mm long for racks, 6 blanks 1250 mm long and 6 pieces 300 mm long for shelves.
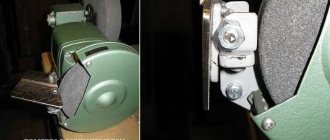
- First we make the side of the rack. On the workbench we lay 2 rack elements in parallel, connecting them with pipe sections 300 mm long at the points where the permanent shelves will be located (top, bottom and center). We fix the structure with clamps and magnetic corners.
We assemble the sidewall from profile pipes.
- We fix the parts at the joints with tack welding. Using a tape measure, measure the diagonals of the rectangular sidewall. If they are equal, completely scald the joints.
- Using a similar principle, we assemble the second side of the rack. It should turn out identical to the first workpiece with the jumpers located at the same level.
- We clean welding joints in all accessible places with a grinder.
- We lay the sidewall on the ground, weld with tacks the crossbars made of 1250 mm long tubes, forming shelves. It is important to set them strictly perpendicular.
We weld the jumpers onto the sidewall.
7. Place the second side of the rack on the free ends of the welded crossbars. We fix the joints in the same way with tacks.
We install the second side panel.
8. Use a tape measure to measure all diagonals. If necessary, we make adjustments. When the diagonals are aligned, we finally seal the joints by welding.
9. We weld a metal coin under each leg. It will prevent the posts from sinking into the ground. If the rack needs to be adjusted in height, we weld a mechanism made of a bolt and an extended nut onto the legs.
Bolt with long nut.
Three shelves are not enough for a rack with a height of 2100. Add 4 more pieces. To do this, we cut 8 blanks with a length of 1250 mm from a profile with a cross-section of 15X15 mm. At the ends of the pipe, use a grinder to cut the side about 15 mm, bend the square inward. Insert the head of a bolt with a screwed nut into the resulting sockets for fitting.
Pipes with curved edges.
We check how the bolt and nut fit into the pipe.
11. On the frame posts, mark the location of the shelves, drill holes and cut threads. We screw in the bolts with the nut screwed to the head.
Screw the bolt into the pipe.
12. We put the tubes on the resulting holders with sockets. The additional shelves are removable and reliable.
We put profile pipes on the bolts.
The frame is ready, all that remains is to paint it and attach the shelves to it. We will make them from OSB sheet. When sawing such a sheet into blanks, it is best to use a file with a fine tooth, this way you can avoid numerous chips of the edge of the sheet.
We fasten the shelves using metal screws. Before screwing in the screws, be sure to drill holes in the OSB sheet with a diameter of 2-2.5 mm. If the holes are not pre-drilled, the OSB sheet will be undermined and crumbled at the moment the screw is tightened.
We fasten the OSB sheet with self-tapping screws.
Metal rack.
Purpose
Metal racks are used to store various items:
- products in stores;
- books in the library;
- finished products, consumable raw materials in warehouses;
- conservation, things, household chemicals for the home;
- documents in office buildings.
It is convenient to distribute boxes on the racks. If desired, individual shelves can be divided into several parts using partitions. This is how products are distributed into categories.
Making a rack from a plasterboard profile
The design is suitable for installation on a balcony, in a storage room or any living room in the house. For racks, a PS wall profile measuring 50x50 mm is suitable. The lintels will be used with a supporting profile of a smaller section of 50x35 mm. The dimensions can be left from the previous master class or new ones can be calculated.
Assembly sequence:
- Using metal scissors or a grinder, cut the pieces to the required size. If there are 6 shelves, then we cut 12 short jumpers for the sides of the rack and 12 long jumpers. We still leave 4 racks.
- Having laid out 2 racks in parallel on the floor, we connect them at the same distance with short jumpers. After checking the sidewall diagonally, we fix the profile at each joint with self-tapping screws with a wide head.
We assemble the sidewall from drywall profiles.
3. Using a similar example, we assemble the second sidewall.
4. We connect the two sidewalls together with long jumpers, which will serve as a frame for the shelves made of plywood sheets. To prevent the shelves from collapsing, we add more jumpers from the cut supporting profile for rigidity. You should get the same lattice as on the sides of the rack.
We assemble a lintel from drywall profiles.
To prevent the finished structure from tipping over, we fix the frame with dowels and screws to the wall. We place plywood blanks or other durable sheet material on the crossbars for the shelves.
We assemble the frame.
Manufacturing of a stationary storage system
Sometimes it is more practical to make a permanent shelving unit for the garage, that is, an option that is mounted on site, attached to the wall. Let's take a closer look at the assembly diagram of this design:
- Markings are made on the wall for fasteners, holes are drilled and dowels are driven in.
- The metal profile or wooden beams are cut according to the diagram.
- The far racks are fixed to the wall, each measured strictly according to its level.
- The frame is connected by horizontal binders from corners along the width (according to the height of future shelves).
- The front pillars are installed and connected to the side strips on which the shelves will lie.
- The front verticals are fastened, after which they form flooring from boards or lay plywood shelves in the prepared grooves.
DIY wooden folding rack
It is convenient to make a stepladder-type structure from pine bars. You will need blanks with a side size of 20x40 mm for the legs and slats of any section for the shelves.
Assembly sequence:
- We cut 4 blanks from the block for the legs. You should get two paired elements with a difference in length of 90mm. Rear pillars – 1800 mm, front – 1890 mm.
- We saw off blanks 400 and 445 mm long for the lintels of the rear and front walls. The shelves will rest on 445mm long lintels. The number of blanks depends on how many shelves are provided. Optimal for a stepladder-rack - from 3 to 5 pieces.
- We apply markings to the rear pillars (length 1800 mm). We mark from above in the following sequence: 200 mm, 540 mm, 940 mm and 1400 mm. In the marking places we draw the contours of the bars for the convenience of precise drilling of holes.
We mark the installation location of the bar on both sides.
4. Using a drill with a diameter of 3 mm, drill 2 holes on each marking.
Drilling holes.
5. Between the racks we lay bars 400 mm long and tighten them with self-tapping screws. It turns out the back part of the stepladder is in the form of a ladder.
6. Using a similar example, we assemble the front part of the stepladder-rack. We use lintels with a length of 445 mm.
7. We retreat 30 mm from the upper edge of the front and back of the stepladder and drill holes with a diameter of 9 mm for an M8 furniture bolt.
Assembled stand.
8. We assemble a frame from two racks and connect the racks to each other with an M8 furniture bolt. We place an enlarged washer8 between the posts. This way the racks will not rub against each other.
M8 bolt with nut and oversized washers.
We connect the two racks together.
9. We assemble the shelves themselves from slats. We fix the longitudinal blanks with self-tapping screws to the jumpers.
We assemble the shelves.
10. Place the shelves on the crossbars of the front part. We fasten the shelves to the racks of the rear part of the rack with one self-tapping screw, driving it into the jumper. On one hardware they will rotate, which will make it possible to fold the stepladder.
All that remains is to polish the finished structure and test how it folds and unfolds freely.
The rack, assembled with your own hands, is decorated. The wood is treated with an antiseptic, the metal is degreased and primed. Painting will not only add beauty, but will also extend the life of the rack.
Drawings of a folding wooden rack
Click to enlarge.
Front pillar drawing
Drawing of the rear pillar.
Shelf drawing No. 4. The remaining shelves are assembled in the same way.
Shelving in the house and important points you need to know
- If the rack is made for the home, then the distance from the floor to the first shelf should be selected in such a way that it is convenient to clean underneath it.
- Small children often like to use structures such as stairs, so for the sake of children's safety, a rack installed at home must be screwed to the wall. This way you can avoid it tipping over and other negative consequences.
- If the rack does not have enough lateral rigidity and it easily swings from side to side, then a pair of jibs must be added to its design, which will give it the necessary rigidity.
Assembly safety rules
First of all, before starting assembly, you need to familiarize yourself with the safety rules. The installation process must be approached with extreme caution. Let's look at the basic recommendations for safe assembly of metal shelving:
- Get personal protective equipment (helmet, gloves, hard shoes).
- The place where the assembly will take place must be spacious, without the presence of third-party objects.
- Good lighting is necessary.
- Use only serviceable tools that are free of any defects.
- The location for installing the future structure must be level.
- Each subsequent tier is installed after the previous one is completely installed.
- There should be no rush during installation.
- You should begin installation only in a sober state.
- Assembly should take place in a place protected from children.
- When installing the rack, the assembled structure should not be unstable; it is recommended to place additional support under the base or secure the rack to the wall with additional pins.
Subscribe to our Social networks