Today, the most popular type of joining parts into a monolithic product is welding. There are many types of it, since welding work is used in many industries, from households to the creation of complex technical structures. It’s not difficult to learn the art of welding, the main thing is to understand the basic concepts, distinguish between types of welding and get good at guiding the electrode (torch) to create a beautiful, durable and high-quality seam.
Welding principles and basic concepts
Before we move on to the technology of how to properly lay a welding seam, let’s look at a few concepts:
- a welded connection is the joining of two parts using a welding method;
- welding seam is a section of a welded joint, which was formed due to the molecular connection of the molten edges of two metal parts, as a result of further crystallization of the metal;
- weld metal is an alloy that is formed as a result of thermal effects on the base metal (part);
- the fusion zone is the boundary between the weld metal and the base metal (product);
- a thermally affected zone is an area that was exposed to heat, but did not melt, but only changed its properties due to heating.
- welding is a process during which metal is melted using special equipment that connects elements by melting their edges;
- electric arc is a discharge that occurs between the workpiece and the electrode;
- An electrode is a special metal rod with various chemical coatings that conducts electric current.
Different industries use different types of welding, which differ in the method of influence, the use of different materials and operating technologies to create simple and multi-pass seams. For example, in arc welding, the main melting element is the electrode, which excites and holds the arc on the workpiece. In gas welding, the heat source is a torch, from which, under strong pressure, an even, uninterrupted flame emerges, formed as a result of the combustion of a mixture of oxygen and acetylene.
Although different types of welding have different effects on the part, the essence remains the same: two metal products are placed tightly against each other or with a short distance if, for example, it is necessary to weld a leaky part. Next, using a welding machine, the master heats the edges of the part so that they begin to melt. At this moment, a so-called weld pool is formed. In addition to the base metal, an additional one (electrode or wire) is often used to increase the amount of weld metal. When the molten material is ready, a path is formed. It then crystallizes and forms a strong compound.
Features of connecting polyethylene pipes
Butt welding of PE pipes has a number of undeniable advantages. Firstly, the human factor is completely eliminated, and as a result, a high level of quality of all connections is ensured.
Secondly, the quality of all welding joints is regulated by a legal opinion. Thirdly, strict records are kept during operation of the welding machine. Both the size and type of pipes being welded, as well as the time the machine spent on the connection are taken into account.
When welding PE pipes, you should follow the following algorithm :
- Mount the ends of the pipes into the welding machine.
- Place a heated plate between the ends of the pipes.
- Press the ends against the heater under the necessary pressure.
- Wait until the primary burr forms along with the melting.
- Reduce the pressure slightly and wait until the ends warm up.
- Remove the heater.
Butt welding process
After removing the heating element, it is also worth adhering to the prescribed work norm:
- Connect the pipes with the required sediment pressure.
- Wait until the assembled structure has cooled completely.
The modern market offers a number of special machines for resistance welding of polyethylene pipes:
- a device equipped with a mechanical drive;
- a device equipped with a hydraulic drive;
- software controlled device.
Flash butt welding procedure
Continuous flash butt welding involves the gradual bringing together of elements while the electric source is turned on. The contact of the ends occurs with separate projections. Due to the fact that the area of the contacting jumpers is very small, a high current density is formed in them, due to which heating and melting occur.
Subsequent bringing together of the parts entails the formation of new jumpers with their melting. After complete melting of the ends, it is necessary to carry out upsetting. In the process of bringing the ends together, liquid metal with oxide films is squeezed out of the joint. When it hardens, a burr is formed, which must be removed while hot.
The method of welding pipes by continuous reflow can be carried out with both direct and alternating current. But, based on energy indicators, the requirements for the procedure also change. When working with reflow using alternating current, an inverter wire with a plus is connected to the electrode, and a minus is connected to the joints being processed.
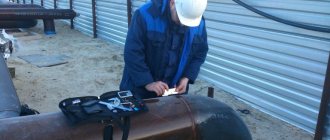
One person can do this job
This type of connection is called “reverse polarity” and is used with metal joints. Directly opposite are the standards for fastening “straight polarity”. In this case, the plus is taken to the part, and the minus to the inverter.
Connecting elements with resistance
In order for resistance butt welding to be technically correct, at the beginning of the process the necessary elements are compressed with an axial amplifier until there is a tight contact of the compressed ends.
Next, a current is supplied, the passage of which allows the joining surfaces to be brought to a plastic state. After this, the current is turned off and the workpieces are deposited to form a compound in the solid phase.
Contact resistance welding allows you to connect parts with a round or rectangular cross-section and an area of up to 200 mm².
To ensure uniform heating of the ends, you need to make sure that they are identical in size and pre-clean them using a chemical or mechanical method.
The resistance welding procedure stipulates the following: the cross-section of the surfaces to be welded should not exceed the size of 200 mm². Otherwise, the quality of welding will decrease significantly, mainly due to oxide formations at the joint.
Most often, this option is used for rods, wires and pipelines made of low-carbon steel. Good results can be obtained if resistance welding is used on low-alloy and low-carbon steels, aluminum and copper alloys.
Butt welding of HDPE pipes (video)
Types of seams and technology
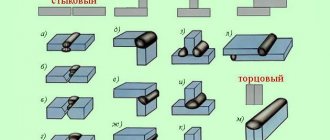
When the master has already mastered how to properly weld, you can proceed directly to the types and techniques of the seam. The key to a quality connection is the correct settings on the welding machine (transformer or inverter), in accordance with the characteristics of the metal and its melting point. Soft metals are cooked at low currents, dense metals at high currents. It is also necessary to take into account the type of weld, since each of them has its own technique. The most common types of seams:
1. In appearance – flat, reinforced and weakened.
2.According to the technique of execution - single-sided and double-sided (in which the master solders the workpieces on both sides).
3.By the number of layers - one-, two-, three-layer.
4. By length - point, double-sided chess, chain, point, continuous.
5.In the direction of force - transverse, longitudinal, oblique, combined.
6. According to spatial placement - horizontal, vertical, ceiling, bottom.
Let's now move on to the technology of making the seam. Let's consider the main stages of work:
1. Preparatory. This step requires some preparatory work to be done. First, prepare the workplace in accordance with safety rules. Secondly, stock up on overalls and a protective mask to prevent eye burns. Third, prepare the product for use. To do this, it must be cleaned of any remaining paint, varnish, oil, dust and other contaminants. To do this, use a metal brush or highly abrasive sandpaper. Then you need to set all the settings on the welding machine and you can start.
2.Creating an arc or igniting the torch (depending on the type of welding). Features of electric arc welding can be read here, and gas welding here.
3. At this stage, welding seams are created (consider electrode guiding techniques in more detail).
4.Final stage. When the track is ready, you must remember to knock off the slag from the roller (for arc welding). Connections created by gas and plasma welding do not slag, that is, there is no debris from them.
Horizontal seam welding technology
The technique for forming a horizontal seam is not much different from laying a vertical one. Features include changing the angle of placement of consumables. The direction of movement of the electrode is not of fundamental importance. You can move from left to right or vice versa, from right to left. The choice depends on the preferences of the welder and the operating conditions.
However, here too you need to adhere to certain rules. Otherwise, melt leakage from the bath is also likely. It is necessary to choose such an arrangement of the electrode in which the burning force of the electric arc would be equal to the gravity force of the metal drops and directed in the other direction. It is likely that you will need to empirically select the most suitable current strength and speed of movement along the joint.
As a rule, a horizontal seam is welded in a continuous manner. But in cases where it is difficult to keep the melt in the bath, it is rational to resort to another technique. For example, in some cases, periodically extinguishing the welding arc helps to obtain a better result. All the subtleties become clearer with experience. Do not despair if at first it is a stretch to call a welding seam such.
The formation of a welding seam with the required penetration depth and width is achieved by carefully moving the electrode from the edge of one workpiece to another in the transverse direction. When welding parts with wall thicknesses up to 4 mm, various transverse stroke techniques are used: the shape of the patterns varies greatly. There are no recommendations, and the welder decides on the method himself. The main requirement is to achieve the required penetration depth and optimal seam width.
Electrode guiding technique is the key to a beautiful welding seam
To create a perfect seam, it is not enough to move the electrode in a straight line along the gap between the parts. There are several methods for creating connections. All of them are based on the smooth movement of the electrode along a certain path, resulting in a smooth path.
To create a beautiful welding seam, the torch or electrode needs to be slightly rotated in relation to the part by 60 degrees. It needs to be done smoothly, but it is important not to hold the conductor in one place so as not to scorch the workpiece. The easiest way is “zigzag”. In this case, the conductor is drawn from the right fusion zone to the left one slightly diagonally. You should return in a mirror image and the result will be as if the master is conventionally drawing a zigzag. This connection can be used for different types of alloys and metals.
If the gap between the workpieces is more than 5 millimeters, then it is better to use the herringbone technique. In this case, more movements are made, which allow you to fuse more material for bonding. It is recommended to start on the right side and lead the conductor with an even horizontal line to the left, then at an angle of 45 degrees you need to return down to the middle of the seam and at the same angle lay a line upward, stretching it above the one from which you started. Thus, you will get a conditional Christmas tree created from many triangles. In this case, the main thing is not to increase the distance between the electrode and the workpiece, so as not to lose the arc (during electric arc welding).
Beautiful connections are obtained using the “loop” technique. It can be used for thin metal when working semi-automatically or gas welding. Here the seams should be applied in smooth, rounded movements, reminiscent of a continuous chain of loops.
In the picture you can see what other methods are used to apply welds.
Operating rules
When connecting pipes using butt welding, the following work procedure :
- Prepare the pipes and clean the edges.
- Lay out the elements on the assembly equipment.
- Center and align the parts to ensure the required gap length.
- Start the joint welding process.
It is necessary to begin welding work immediately after tacking. If the pipe is made of low-alloy pearlitic steel, butt welding should be carried out no later than 4 hours after tack welding.
If the thickness of the parts is more than 5 millimeters, the welding seam must be performed in at least two approaches. Whichever multilayer welding option is used, the joints of the sections must be shifted relative to the lower layers and closed at a specific distance.
For automatic submerged arc welding, at least 50 millimeters are required, for mechanized and manual welding – at least 15 millimeters. Pre-cleaning of residual fragments of fused metal and scale and checking for burns and cracks is carried out.
Resistance welding standards
For such a complex process as butt welding, absolute knowledge and compliance with the rules and requirements is required.
Resistance welding process
The standards according to which pipes are connected are determined according to SNiP 2.04.08-87:
- Installation involves shifting the extreme edges of the pipelines. To correctly calculate this indicator, the formula is used: 0.15S + 0.5 mm, where S refers to the thickness of the pipe walls.
- Contact welding with electrodes and flux is regulated by GOST 16037-80. If the condition of the seams is unsatisfactory, the work must be redone.
- Connecting the edges of pipes is only permitted with chamfers of no more than 5 mm.
- At sub-zero temperatures, assembly and repair of pipelines is prohibited. But if an urgent need arises, it is necessary to heat up the installation materials.
- On wall thicknesses from 6 mm, manual butt welding is performed using a double seam. For smaller sizes one layer is allowed.
- Temporary standards for welding plastic and metal pipelines are based on the material of the pipe. The power of the inverter used for processing also plays a significant role.
Tips from the professionals
Masters who easily create tracks of any complexity and in any position share some tips with novice welders who do not understand why they cannot make this or that connection:
- it is important to maintain the same width of the gap along the entire seam, then it will be of high quality and reliable;
- the distance between the part and the electrode must not be violated, since when the arc is lost, the connection is deformed;
- the electrode or burner must be held at an angle of 60-75 degrees relative to the seam, thus the metal quickly crystallizes without drips;
- when working on a vertical surface, it is better to weld from the bottom up, this way you will avoid the spreading of the metal formed during welding.
In conclusion, it should be noted that we looked at the basic techniques for making a good seam. You can find out more in the following video:
Welding of electrochemical protection terminals
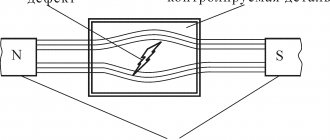
Electric arc length control
The arc length refers to the size of the gap between the surface of the workpiece and the burning end of the electrode, between which a stable electric discharge is maintained. One of the main postulates of competent work of an electric welder is maintaining the arc of optimal length.
The manual says that there are three arc gaps in the welding mode:
- 1-1.5 mm – short;
- 2-3 mm – normal length;
- 3.5-6 mm – long.
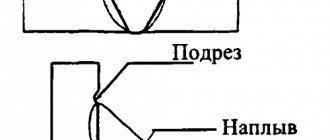
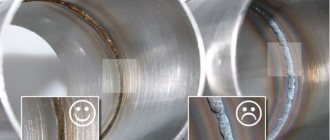
The fact that the seam was welded with a short arc is evidenced by the so-called “undercut” along the edges. It represents a small depression and indicates the low quality of the welded joint as a whole. A defect is formed due to weak heating due to weak heating of the working area in width.
When work was carried out with a long arc, the metal did not warm up well in depth. This occurs because it is difficult to hold a long arc. Its periodic attenuation is inevitable. The result is a heating defect and poor quality of the welded joint.
The only option that will help form a high-quality weld is a normal arc. Its length can be calculated using the formula:
Ld = 0.5*1.1 De , where:
- Ld – length of the welded arc;
- De – diameter of the electrode used.