Wood lathe cutters
The production of original wooden products on machines requires the availability of a variety of high-quality auxiliary tools. In most cases, wood lathe cutters are used for this. Thanks to them, it is possible to bring the workpiece to the required geometric parameters.
Manufacturers offer all kinds of sets, including products with cutting edges of various configurations. You can also make your own wood cutting tools with your own hands.
Studying the machine
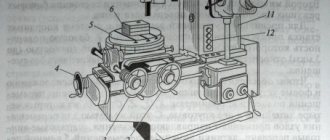
Before you start creating a wooden masterpiece, it is worth studying the structure of the machine. It consists of four main parts.
Firstly, this is the frame, the frame on which all components and assemblies are mounted.
The next important part of the lathe is the headstock. Rotation from an electric motor is transmitted to it through a pulley system or gear transmission. At its output there is a spindle with a rotating center or faceplate for fixing the workpiece. In an industrial machine made for the right hand, it is on the left.
The tailstock is a passive part, which is a free-rotating pointed shaft. Its purpose is to fix a long workpiece. The headstock can be moved to work with parts of different lengths and be securely fixed in any position.
A tool rest or chisel holder is most often a metal table on which a chisel or wood chisel rests. Its design allows you to move freely for ease of use.
Before turning on the lathe, it is worth understanding the controls, understanding the operating principle and task of each part, this will allow you to avoid mistakes and, possibly, an accident.
Types and purpose
The main task of cutters is to give the correct geometric shape to a wooden workpiece on a lathe. Wood cutters perform different tasks:
- The primary layer of wood is removed. Rough rough cleaning. This may include cutters such as rayer or chisel-scraper.
- Give the workpiece the desired geometric shape. These are shaped cutters.
- Cut off the finished product. The so-called cutting tools.
In the store you can buy a ready-made set of equipment, which will contain all the necessary tools for the job. Let's look at each of them in more detail.
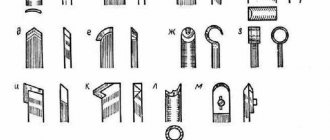
Flat straight
Such a tool has a one-sided sharpening along one of the edges. The cutting part is perpendicular to the central axis of the equipment. These cutters are used for finishing the prepared workpiece.
- It is easy to make a rectangular notch in wood.
- The standard blade width can range from 4 to 40 mm.
- The cutting edge angle is from 25 to 45 degrees. During further maintenance of the cutter, you can make different sharpening angles to “customize” the tool for yourself.
Carpenters call this cutter a “scraper.”
Oblique straight
Another cutter for finishing, in which the cutting part is located at an acute angle relative to the central axis of the equipment. Sharpening of the cutting edge can be single-sided or double-sided, as well as left-handed or right-handed.
- The cutter allows you to make fine lines.
- When sharpening on both sides, an angle of 25 degrees is set.
- The tool is quite versatile and allows you to perform a wide range of finishing work.
This type of equipment is called “meisel” and is basic in the work of a master turner.
Cut-off
As the name implies, this type of tooling is used for cutting the finished product. A cutting cutter resembles a straight slant cutter, with the difference that it has a sharpening angle of 40 degrees on one side only.
Semicircular flat
This type of equipment has a semicircular sharpening of the cutting edge. The cutting part itself is located perpendicular to the axis of the equipment. The main purpose of this cutter is to cut a semicircular groove.
- It is best to have several cutters with different blade widths.
- The edge of the equipment is sharpened, on one side, at an angle of 20 to 40 degrees.
- Experienced craftsmen can find a large number of similar cutters with different blade widths.
Grooved
A grooved cutter, also known as a reyer, is used for rough finishing of the workpiece. Its blade is curved like a groove, the cutting edge is sharpened on one side.
- Reyer can make semicircular shapes.
- The lower part of the cutting edge of a convex shape is sharpened at an angle of up to 40 degrees.
A grooved cutter is one of the most important tools for a master turner.
How is the cutter constructed?
The base is a metal rod, which can be divided into two parts: the working head and the shank. The cutting part has the shape of a triangle with rear and front auxiliary surfaces along which chips flow during the cutting process. Processing is performed with the main cutting edge, which craftsmen call the apex. This is the intersection of the secondary and main edges.
As for sharpening, the condition of this particular part matters. The top may be rounded or sharp. The tool also has different formats. Usually the size of the holder is taken into account - on average from 8 to 25 mm. For universal work, it is better to purchase a set of wood cutters for a lathe, which includes more than 10 pieces. The standard set includes cutters with different shapes, which allows you to make grooves, grooves, chamfer and perform shaped processing.
Do-it-yourself sharpening of cutters
The quality of the treated surface largely depends on the correct sharpening of the working tool.
To do this, you will need an electric sharpening machine with a set of wheels of different grain sizes and a velvet bar for manually editing the blade.
Video of sharpening cutters
Each craftsman chooses the sharpening angle independently, focusing on his skill as a turner, the hardness of the wood, the quality of the working tool and the final desired appearance of the surface being processed.
For a novice turner, the optimal sharpening angle options will be:
- for meisel - the bevel itself should be 40° relative to the axis of the working surface and 40° for each side of the blade;
- for reyer – 50° – 60°.
Over time, as the turner's skill level increases, sharpening angles can be reduced to 20° - 35°.
Ideally, in addition to a set of different styles, it is desirable to have cutters of the same type, the same size, but with different sharpening angles. This will make the turner’s work much faster and easier, and will also extend their service life, because there will be no need to constantly resharpen the blades depending on the type of wood being processed.
Blunt sharpening angles are intended for: hard wood, initial (rough) processing.
Sharper corners of the cutting tool allow for better surface treatment and speed up the turning process, but at the same time there is a high probability of chipping the workpiece and damaging the blade. And such a tool has to be sharpened and adjusted much more often than with more obtuse angles.
The approximate sharpening angle of the blade is formed at the stage of making cutters with your own hands, before the start of heat treatment - hardening.
Order and features
Depending on the nature of wear and the design of the equipment, sharpening is carried out on the front, back or both surfaces. The figure below shows all the surfaces of a turning tool
For standard cutters, as a rule, sharpening is used on all cutting surfaces. With minor wear, only the geometry of the rear surface is restored. Equipment for multi-cutting machines is restored only on the back surface, shaped – only on the front.
Standard sharpening order:
- Main back surface.
- Auxiliary back surface.
- Front surface.
- End radius.
The back surface sharpening parameters are shown in the figure below.
Figure (a) shows the back surface with one sharpening plane, figure (b) shows several. When brazing carbide inserts, the rear surface has three planes:
- along a chamfer with a height of not less than 1.5 mm at an angle a;
- along the remaining height at an angle a+3°;
- along the holder at an angle a+5°.
Sharpening the front surface of carbide cutters has many more varieties (see figure below).
Basic forms:
- Flat with a positive rake angle (a).
- Flat with a negative angle (b).
- Curvilinear with a negative angle (c).
- Flat with negative angle for roughing (d).
- Curved with a negative angle for stainless steels (d), and other materials (e)
During the sharpening process, it is necessary that the cutting edge of the tool being processed is located on the line of the center of the sharpening machine or below by no more than 3-5 mm. The direction of rotation of the circle should ensure that the plate is pressed against the holder, i.e., it should go towards the plate. During operation, a continuous supply of coolant is desirable. With periodic cooling, overstressing of the material structure and the appearance of microcracks is possible.
When sharpening, light pressure and constant movement along the surface of the wheel are required to form a smooth surface. After sharpening is completed, the geometry of the tool is checked using templates or special instruments.
Manufacturing scheme
The choice of metal for the working blade plays a big role in the quality of the cutter. Many craftsmen use old files, rasps and other tools made of high-quality steel for this. Car springs can be a wonderful material for a future wonderful tool. However, such a cutter should be hardened after sharpening.
To make the handle, it is better to use hard wood (pear, plum, apple, oak, beech). Having prepared the materials for the future tool, you can proceed to the following steps:
- Grind out the handle.
- Place the locking ring on the handle. Make sure that the ring fits tightly to the surface.
- Drill a small hole in the end of the handle to insert the main blade.
- If the steel for the blade is not hardened, then it’s time to harden it.
- Sharpen the shank on a sharpening machine. It should be sharp at the end.
- Hammer the blade into the handle. Check the reliability of the fastening.
- Sharpen the blade of the blade to the desired configuration. Use grinding wheels of different grits for sharpening. The sharpening angle can be from 20 to 60 degrees, depending on the purpose of the tool and the personal preferences of the master.
- Visually check the finished cutter for cracks, chips and other defects, which should be corrected immediately.
Start working with cutters on soft wood species (poplar, birch, linden). After making sure that the tool is reliable, move on to processing harder rocks.
Regularly check wood lathe chisels for reliability and strength. Your safety depends on it.
What is required for the work
Let's consider what materials and devices will be needed first of all in order to make homemade cutters for a wood lathe:
| Sharpening machine | A compact option for home use is also suitable, the main thing is that it has a high-quality abrasive wheel, and to sharpen some product options, it is advisable to have sharpening discs of different configurations. |
| Blanks for cutters | For these purposes, it is necessary to use hard steel grades, the most common option is P6M5. Home craftsmen often use old files, taps and other improvised elements (bearing races, etc.). |
| Wooden handles | In order to make it convenient to work with the tool, it is necessary to equip them with a handle, which can all be made on the same lathe, or you can purchase several pieces ready-made. They are available for sale at any hardware store, and their price is quite affordable. |
Important! When carrying out work, you should use protective equipment: gloves and goggles. You should also wear clothing that covers all exposed areas to prevent sparks from causing burns.
A rotating abrasive wheel poses an increased danger; carry out work carefully and slowly
Working method for beginners
Inexperienced craftsmen make several basic mistakes when working on a wood lathe
It is important that each method of work has its own nuances and an experienced specialist knows them
When fastening between two centers
This is one of the most popular methods of working on a lathe. It consists of turning a part that is fixed between the front and tailstock. This way you can make a variety of products, even large ones. This is the optimal method for beginners.
Grinding to cylindrical shape
For this job, you will need a semicircular cutter with a smooth cutting edge to level the surface of the part. The master should begin work with one window of the workpiece and continue to gradually remove excess material without strong pressure. When performing this operation, you should not rush, and the result should be an even cylinder of the desired diameter.
Leveling with a flat cutter
This is the next stage of work. The lathe must be turned off and the tool rest moved closer, since the dimensions of the part have changed. The blade of the cutter should rest on the support and hold with one hand. The second holds the handle, and holds the tool so that it counteracts rotation.
Using a parting cutter
This option is used if the part needs to be cut from the workpiece. The cut is smooth and does not require additional sanding. Before making a cut, you need to mark the part with a pencil. Then you can not make a mistake when cutting.
Making decorative elements
For decoration, the master uses decorative elements. Most often, a roller and a groove are made on a lathe. A cylindrical belt is made between these parts. By combining these decorative elements, you can turn almost any wooden object, from the simplest cornices to complex furniture elements.
We sharpen wood on a machine while clamping at one end
This working method requires a special approach. To hold the workpiece, several types of holders are used, as well as combined ones.
Turning cavities
Before creating a cavity in a part, it must be roughed. To turn cavities, the support headstock is removed from the machine. The workpiece is installed in the headstock clamp. The cavity is turned out using a semicircular cutter.
How to sand correctly
Most often, parts processed on a lathe do not require additional grinding. But sometimes sanding is required. In this case, you should remove the tool rest and take a strip of fine-grained sandpaper. The equipment must be turned on at low speed.
Decorating the details
To complete the finishing, it is necessary to remove the tool holder and sand the product from below with fine sandpaper. You need to turn the skin crosswise. To make the product look beautiful, it must be treated with paraffin or wax while moving.
DIY making
When making these tools, you cannot do without an electric sharpening machine (electric sharpener) with a set of abrasive wheels of different grain sizes. In most operations, it can be successfully replaced by a grinder with cutting and grinding discs.
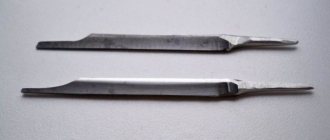
Wood cutter blade
To make a tool blade, any used high-quality steel products are suitable - springs, drills, scalpels, rasps and even bearing rings.
For knives, the easiest choice is a hacksaw blade. Manufacturing consists of cutting it into pieces of the required length, forming the desired blade shape and sharpening.
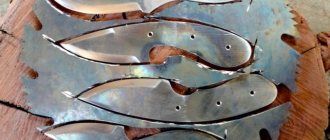
The best option for chisels is a circular saw blade, the thickness of which is very suitable for this purpose. The carbon steel from which it is made holds an edge for a long time, even when processing hard wood. Cutting strips of the required size and grinding them to obtain the required blade shape is done using a grinder or an abrasive disc of an electric sharpener.
An old punch is perfect for a semicircular chisel - it already has the desired shape. It is enough just to cut off the excess metal from it and sharpen it.
During intensive grinding, the metal heats up, which causes a tempering, making it softer and unable to maintain an edge for a long time. Therefore, after giving the blade the desired shape and sharpening, hardening is required. To do this, you need to heat the cutting part using a gas or kerosene burner until it turns crimson and lower it into a container with machine oil.
Lever
Oak is considered the most suitable wood for the handle. Well, where it does not grow, it can be quite successfully replaced by birch, which, being burnt black with a gas burner and sanded, does not require any coating and is very comfortable to work with.
For wood knives, the handle can be made in the following way:
- cut two bars about 12 centimeters long and 12x22 millimeters in cross-section;
- attaching the shank of the blade to the block, circle it with a pencil;
- Use a chisel to select wood to the depth of the blade thickness;
- apply wood glue (PVA or EDF can be used) on the surface of the bars, connect the structure and tighten it with clamps or clamp it in a vice;
- After the glue has dried, plan the handle or grind it on an electric grinder and sand it.
For chisels, the handle can be turned on a lathe or cut from a whole block. Then drill a hole to the size of the shank and, having first put a crimp ring on the handle, which protects the wood from splitting, carefully place it on the blade.
Sharpening wood cutters
The final stage in the manufacture of wood cutters is the formation of the cutting part and sharpening. The main part of the metal from the cutting edge can be removed on the abrasive wheel of an electric sharpener or with the sharpening disc of an angle grinder.
The sharpening angles of the chamfers of all types of cutters are approximately the same and lie in the range of 18-25°, and the length of the sharp part is about 20-35 mm, depending on the total length of the cutter. During the processing process, it is necessary to constantly cool the blade in a container with water.
Further work is performed manually in the following sequence:
- sharpening on an emery block, which is recommended to be periodically moistened with water;
- sharpening on a thinner block or on sandpaper placed on a hard, even substrate;
- final editing and polishing of the cutting edge on a leather belt rubbed with GOI paste.
During the operation of a cutting tool, its blade inevitably loses its sharpness. Regular thorough sharpening of wood cutters is a necessary condition for comfortable work of the carver and high quality of the carved product.
How to sharpen an ax using an electric sharpener
Sharpening an ax with an electric sharpener
You can sharpen it manually or using various sanding machines. An electric sharpener is an installation with an abrasive wheel that is capable of high circulation speed. Before sharpening an ax with a grinder, you should prepare additional tools: a sharpening stone, finishing paste, an element for straightening a wheel, a protractor and protective equipment.
Work must be carried out in full compliance with safety standards, wearing glasses and gloves:
- The electric sharpening machine is installed on a flat surface.
- Defects on the abrasive wheel are eliminated.
- The product is securely fastened.
- The blade is set at the desired sharpening angle.
- The process is repeated until the required cut level.
- A finishing paste is applied to polish the blade.
- Treatment of the blade surface with a composition to protect against corrosion.
The abrasive wheel is subject to heating when sharpening, so periodic wetting of the surface and blade of the ax with water will be required.
It is also important to direct the blade when sharpening towards the rotation of the sharpening wheel.
Craftsmen use several types of sharpening stones. By varying their grain size you can achieve special sharpness.
It is advisable to use sandpaper when the ax is used at a high level.
Types of turning tools
A wide range of tasks that arise when creating structures made of wood requires a large number of turning devices for various purposes. Modern manufacturers offer a wide variety of such products. Any turning tool is tasked with performing certain practical tasks. Each lathe cutter consists of two parts: the working part that performs processing or cutting and fastening elements. Approximately 20 centimeters from the entire length of the metal workpiece are allocated to the working part. This size provides freedom of maneuver for the tool, which guarantees the accuracy of the required operations. The length reserve allows you to process the cutting part many times. The length of the tail is determined by the length of the future handle. It must ensure safe operation.
Despite the wide variety of similar tools, all types of turning tools can be classified according to the following criteria:
- the nature of the tasks performed;
- the material from which it is made;
- tip shape and sharpening angles.
This classification of turning cutters allows you to accurately determine their scope of application. Depending on the nature of the tasks being solved, they can be cutting or processing. Steel grades with increased hardness are chosen as the material for their manufacture. This creates a good cutting leading edge.