It’s annoying when, after carefully calibrating and installing the elements in the desired position, the structure assembled with such diligence falls apart at the touch of an electrode, and you need to assemble everything all over again. It’s even worse when the element is welded, but not in the required position - it has moved imperceptibly or deformed after the metal has cooled. Using universal and specialized welding fixtures helps save time and get a high-quality product at the end.
There are many different devices and mechanisms designed for welding. In industry, where they deal with serial and mass production, specialized mechanized and automated equipment is used - transport devices, mechanisms for laying and tilting products, technological assembly devices, etc. At home, as a rule, manual welding devices of universal action are used, allowing carry out quick assembly of the structure, securely fasten all elements in the desired position and achieve minimal deformation of the part.
Main types of assembly and welding fixtures
Installation accessories
. Installation fixtures are designed to install the part in the desired position - exactly in the position in which it will be in the finished product. Based on their functions and design, they are divided into stops, squares, prisms, and templates.
Stops are used to fix parts on base surfaces and can be permanent, removable or folding (retractable, rotary). Permanent stops, which are most often ordinary plates or bars, are welded or screwed to the base. Removable or folding stops are installed when their constant presence in the part is structurally unacceptable.
Squares are used to install parts at a certain (90°, 60°, 30°, 45°) angle to each other. Squares are easy to use, the edges of which are made rotating and allow you to set any necessary angle between them.
Prisms are used to fix cylindrical products in a certain position. The simplest design welded from corners can be successfully used as a prism. Templates are designed for installing elements of a welded structure in a given position in relation to other previously installed parts.
Fastening devices
. With the help of fastening welding fixtures, the parts, after being installed in the desired position, are firmly fixed in order to prevent their accidental shift or deformation after cooling. Fastening devices include clamps, clips, clamps, ties, and spacers.
Clamp
- a universal tool used for almost any work with metal. For a welder, it is the first most important device, and if it is possible to do without it, then only at the cost of extreme inconvenience and to the detriment of productivity. Clamps for welding can have a variety of shapes and sizes, with a constant throat size and adjustable. Especially convenient are quick-release clamps, in which the clamping occurs using a cam mechanism. In general, it is advisable for a welder to have a set of a variety of clamps, since to assemble one structure, several of them may be needed - of different sizes and configurations.
Welding Clamps
differ from clamps in ease of use and greater suitability for welding work. The parts are fixed by squeezing their handles. The required dimensions of the pharynx are set using a screw in the clamp handle, moving the pin to another hole, or in another way.
Clamps
According to the operating principle, they are divided into screw, wedge, eccentric, spring, and lever. Of all the clamping devices, screw clamps are the most common. The simplest type of homemade screw clamp is a regular bolt with a nut, threaded into the holes of two plates, with the help of which the parts placed between them are clamped.
In wedge clamps, parts are clamped using wedges, lugs, shims and a hammer.
Clamps are a piece of sheet metal with a wedge-shaped groove.
The spring clamp presses the part due to the presence of elastic deformation. It is made from a strip of sheet material or wire made of spring steel.
In eccentric clamps, the part is clamped using a cam (1) mounted on a lever (2) when the eccentric (3) is turned by a handle (4). These devices are convenient in that the clamping is performed in one movement, but their disadvantages include the relatively small working stroke of the cam, which is why they are used much less frequently than screw clamps.
Ties
are used to bring the edges of welded dimensional parts together to a specified distance. Their length and method of attachment to the structure can be very different, depending on the task facing them.
Spacers
They allow you to align the edges of assembled parts, give parts the desired shape, and correct local defects.
Many of the above welding fixtures are easy to make yourself, giving them the sizes and shapes that correspond to the most frequently performed work.
Installation and securing devices
A simple device for fixing parts at right angles is easy to make with your own hands. To do this, you will need two pieces of angle, a piece of strip, two clamps, a square and a welding machine.
The corners and strip cut to the required length (the dimensions can be seen in the photo, the scale is inch) are fixed with clamps using a square.
After fixing and checking the correct position of the corners, the corners are attached to the strip at four points. If you immediately make a long seam or the dots are too large, the structure will fail.
Next, the clamps and square are removed so as not to be damaged during subsequent welding, and the corners are welded with a more reliable seam, alternating short seams on different sides so that the structure does not move. Then the clamps are pressed and welded at several points. Although the clamps do not need to be welded.
Pipe welding equipment
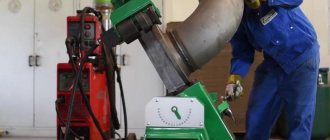
The photo below shows a link centralizer used for welding large diameter pipes. It consists of several links, hingedly connected to each other and forming a closed loop. The ends of the pipes to be welded, placed inside the device, rest on stops that center them relative to each other.
In a home workshop, clamp centralizers designed for welding pipes of smaller diameter will be more useful. For example, the centralizer-clamp model CM151 (in the figure below on the left) is designed for pipes with a diameter of 57-159 mm, and the centralizer-clamp model CS3 (on the right) is for pipes with a diameter from 10 to 70 mm.
Description of welding jigs - what they are, where and how they are used
Welding work in a workshop is not like welding “on your knees” in a garage box. There, just like at home in the garden, the inverter and electrodes will go “into powder.” But in factory conditions the picture is completely different.
Special technologies and high-precision devices take welding to another level.
They ensure that the welder works in accordance with safety regulations, and the process itself proceeds faster. This is important where volume determines the employer's income. Let us characterize in more detail one of the welder’s silent assistants.
He is called a conductor, but does not cook himself. Helps ensure that welding goes without a hitch. How and what needs to be done to work without flaws?
Types of auxiliary mechanisms
Various mechanisms and auxiliary parts are made at factories and at home. The simplest of them are easy to make with your own hands. In general, welding aids come in three types:
- mechanisms for installation, assembly, preliminary fixation;
- clamping devices;
- combined devices.
The first type of fixture is used to install parts in the position required for welding. Clamping welding fixtures firmly fix them and prevent them from slipping or turning. Combination devices perform both functions.
The choice of devices is related to the work conditions. It also depends on the requirements for the accuracy of manufacturing workpieces, requirements for clearances, and the design as a whole.
There are certain requirements for auxiliary devices. They must ensure free movement of the parts being welded caused by heating in the welding zone.
general characteristics
A welding conductor has many “pseudonyms”. It is simply called welding, welding-assembly, simply assembly. Or they say for assembly or welding. Using this device, the assembly of structures to be welded is fixed and outlined.
The assembly model fits together the parts of the future structure surprisingly firmly. Welding will take place without unnecessary inconvenience, and the process will be controlled.
Note that the device is colloquially called a welding jig. The price tag in a retail establishment will read “welding manipulator table.”
Professionals are also more likely to choose a nomenclature term. With this device, the rotation of pipes and large-sized structures is recorded.
Take the same metal beams. In general, it is, in its application, universal. In the retail chain you can see an assortment of conductors of different shapes and sizes. They can handle any type of configuration “from small to large.”
The difference between the devices themselves may lie in the principle on which they operate. Hence the different models. They can be in the form of not a kitchen table, but a table where a vice is located, providing mechanical fixation of structures for welding.
When presented with the full electromechanical version of the device, parts of the structures are easily moved where required. All types of conductors are united by one detail.
Rules of circulation
They are dictated by the conductor model. Basically everything is clear by default. Working with a manipulator at an ordinary stationary table will not be difficult.
We place the parts of the future structure as required, clamp them with a mechanical vice and get started! To work with conductors at a higher level, it is a good idea to read the attached design. From it you will learn the differences between your favorite model.
If the process is not automated, you will have to “flex your muscles” yourself to firmly connect the parts of the structure. Who else besides you, the performer, knows better how to position the surfaces to be welded.
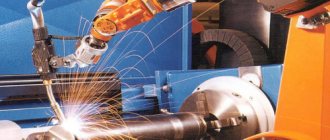
In production with a high degree of automation, the human factor is almost minimized. The workshops there are equipped with the necessary equipment with high-tech processors.
True, in less advanced industries or in artisanal conditions, craftsmen were also not left alone with soulless metal. Manufacturers of welded equipment produce a considerable range of useful tools for them.
You can get hydraulic, pneumatic, electromagnetic, or even vacuum clamps. Then it will take very little effort to fix the parts of the future structure in the desired position.
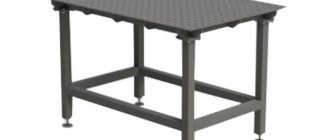
Rotary jig for welding frames, SLOT-TABLE (Russia)
A rotary jig for welding frames allows you to quickly and accurately position a rectangular workpiece, set the length and width, and weld it on all sides.
- 4100
- 4200
- 4300
- 4400
Description
A rotary jig for welding frames is a standard type rotator with the ability to conveniently fasten rectangular frame structures and rotate the working surface around a horizontal axis. When fixing the units on the frame welding device, you can rotate it in a vertical plane up to 225° for models 4300, 4400 or 360° for models 4100, 4200 and weld from different sides.
Manipulators
These devices are adapted to rotate the welded product during operation. The manipulator can rotate the part in the vertical and horizontal plane, tilt it at different angles in the horizontal plane, which ensures a high-quality weld.
There are installation and welding manipulators. The first type of devices, also called positioners, installs the workpiece at the desired point and in the required position, convenient for assembly. Welding manipulators move products along a given path at the speed required for welding.
The main characteristics of manipulators are its load capacity, the maximum possible dimensions and the number of degrees of freedom of its faceplate, to which the part to be welded is attached.
In production facilities for welding work, there is usually a whole range of devices that ensure the installation of workpieces in the desired position, capable of moving them vertically and horizontally, and rotating them.
Additionally, rail tracks, trolleys and other devices are used to speed up and facilitate the welding process. Using standard, proven tools, the welding process is much faster and more efficient, although the use of homemade products never harms this.
Design features of the jig for “SLOT-TABLE” frames
The jigs are universal in use and are suitable for assembly, manual welding and the 4500 model can be adapted for robotic welding. The jig for welding heavy frames can be equipped with an electric motor drive for vertical rotation with hidden rolling bearings in the guide profiles. Jigs for welding frames make it possible to quickly and accurately adjust the length and width of various frames and weld them from all sides. The corners of the frames are located on special equipment and are available for welding from the top and bottom sides. The front left clamping angle forms the 0-point of the X and Y axes. The left traverse is fixed and one or more traverses are moved using a double toothed belt drive. Digital counters can be used to set frame dimensions.
Application of clamping angles
Special clamping angles are used to connect, assemble and weld parts of frame structures at right angles. Spindle clamp fasteners are installed in close proximity to the weld being applied, so that certain irregularities within the weld can be carefully removed. The front left clamping angle forms the 0-point of the X and Y axes. The clamping angles (along the x- and y-axes) move in parallel and can be combined with a digital counter or distances can be measured manually using a tape measure.
Clamps and tightening devices
Clamping devices play an important role. They press workpieces to clamps or tooling planes, and are mechanical, pneumatic and magnetic.
Mechanical clamps are very simple in design, therefore they are the most common. They are reliable, rarely fail and are inexpensive. Mechanical devices are wedge, screw and spring. Wedge clamps are usually used when aligning the edges of a product, when pressing the contacting parts of the parts being welded.
But the most common and universal devices are screw clamps, they are also called clamps . They are used mostly for single production and in the household, and require a lot of installation time. Spring clamps are used when welding small and thin workpieces.
Pneumatic devices can be used as welding aids. They have high performance, are distinguished by accuracy and a “death grip”.
Requirements for welding metal structures
The purpose of the created standards is to ensure safety and high-quality installation of structures made of metals and alloys. You should also be guided by them when assembling household products in the country, in the garage, or on farmsteads. Important points:
- ensuring protection of the welder from electric shock , for which it is necessary to protect him from rain, exposure to ultraviolet and infrared radiation, short circuits when connecting equipment;
- proper preparation and assembly of structures - required to create strong connections with the specified characteristics;
- preparation of welding materials and parts - calcination of electrodes, their proper storage, cleaning of surfaces from dirt and rust.
Errors made during assembly and welding of parts can lead to the destruction of metal structures, which poses a danger to people working in close proximity to them.
Technology of welding metal structures using manual arc welding
The main points relate to the following points:
- Correct calculation of metal structures , selection of materials of suitable quality to ensure rigidity.
- Assembly in accordance with the developed documentation.
- Inspection of the resulting welded joints , checking the dimensions of metal structures.
- Elimination of found defects.
After this, the created metal structures can be put into operation.
Necessary equipment
To install metal structures, a standard set of equipment and consumables is required:
- grinder, drill - electric or pneumatic;
- discs - cutting and cleaning, set of drills;
- hammer, chisel or sharpened turning tool - for beating off slag;
- brush - to remove rust and dirt from the metal surface;
- clamps and clamps - to facilitate installation;
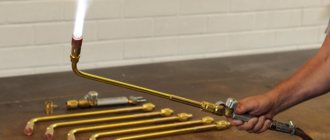
- welding machine - inverter or transformer type;
- electrodes - depending on the type of materials being welded;
- tape measure, square, chalk, markers, building level - auxiliary tools.
How does the assembly and welding process take place?
The sequence depends on the type and purpose of the products. You can look at common examples.
Welding rectangular frames from standard corners
The elements are cut to the dimensions specified in the drawing, so that when folded, a structure with the specified parameters is obtained. The ends must be sawed off with a grinder at an angle of 45 degrees - in this case, the length of the butt joint will be as long as possible. The elements are folded on a welding plate or other flat surface and tacked diagonally - 2 small welds in each corner. At the same time, it is necessary to control the dimensions: the diagonals of the rectangular frame must be the same. After checking, you need to grab the elements more securely.
If you need to weld several frames with equal dimensions, then the next ones are assembled on the first one, which is turned over with its shelves up. This allows you to carry out work faster - it is enough to monitor the location of the corners relative to the initially assembled structure, and there is no need to measure the diagonals.
After assembly, you need to scald the frame; you should start on the side opposite to where the tacks were made.
Welding of a three-dimensional structure from profile (rectangular) pipes
The blanks must be cut using a grinder, observing the dimensions. Assemble the base (bottom frame) with 6-12 tacks (depending on the thickness of the pipe). Check diagonals. Install the vertical posts, checking the perpendicularity using a square, and secure them to the base with 3-8 small seams. Proceed with installation of the top frame. Its elements are securely welded to the vertical posts. Check all diagonals using a tape measure. Only after this is it possible to scald the entire structure, observing the principle: do not overheat the corners . If you completely scald one of them at one time, there is a high probability of deformation, which will be difficult to correct. At the end, you need to cut out rectangular plugs from steel 3-5 mm thick and weld them to the ends of the pipes - this is necessary to prevent water from getting inside.
Welding of products from sheets 2-3 mm thick and steel frames - gates, doors
It is necessary to assemble the main frame so that it fits freely into the future opening. Place amplifiers in the form of rectangular pipes inside - 2-3 per frame. For gates, it is necessary to weld longitudinal and transverse jumpers to increase rigidity. Cut out the outer sheet, prepare it for welding: bend the edges (if necessary), drill holes for attaching locks and latches. Mark the sheet to facilitate installation and secure it to the frame on a level surface. Check all dimensions: corners, diagonals. Scald everything together with small (3-3.5 cm) potholders in increments of 7-10 cm, avoiding heating the structure.
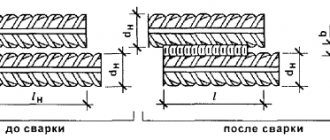
Butt welding of water pipe structures
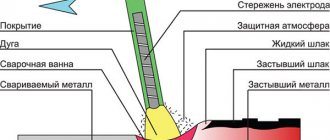
To create a hermetic connection, it is necessary to prepare the edges for welding - make bevels at 45 degrees, but so that the edges are not sharp. The dullness should be about 2 mm. When assembling, it is necessary to maintain gaps between elements: 1.5-2 mm. This is necessary to ensure the formation of a high-quality root seam. During installation, 4-6 tacks are made, which should be full-fledged seams. It is recommended to perform scalding in the lower position, turning the pipe. If the joint is not rotating, you need to move the electrode from the bottom up, the first seam should cover the lower sector of the joint, and the last one should cover the upper sector . Scalding is carried out in at least 2 stages: the root of the seam, the facing seam.
Fasteners
Clamps include devices that ensure a stable position of the welded product. They are made in the form of pockets, stops, mounting pins, prisms and templates.
Removable stops are used in universal stands when it is necessary to adjust for a specific product, or it is impossible to remove the product without deforming it.
Fingers allow you to accurately position the workpiece; they are usually used when working with products that have machined planes. Prisms are used when welding various pipes.
Templates are a design that follows the contour of the product being welded. The parts are installed in a template, welded, and the result is identical products when the welding process is repeated. The part itself becomes the load-bearing element, and the template sets the shape.
When making a single product, sometimes fixation is required in a non-standard way. It also happens that the necessary equipment is not at hand.
In this case, the welder makes it himself from scrap materials. To make homemade welding fixtures, a few pieces of corners and a pair of clamps are enough.
With their help you can get a simple and reliable lock. If you need to get a clamp for a connection at a right angle, just weld the corners perpendicular to each other and grab them with a third corner.
By welding the clamps in the right places, a clamp is obtained for perpendicular connection of products. That is, if necessary, the welder can provide himself with the required devices.
General principles for creating metal structures
The general principles are as follows:
- It is allowed to scald structures only after complete assembly and checking the dimensions;
- Do not overheat either side of the part . You need to cook gradually, from different ends;
- The elements should be tacked in such a way as to prevent deformation (change in size) during welding.
After boiling the first (root) seam, it is recommended to completely remove the cooled slag using a chisel and a brush. If there are defects - fistulas, cracks, undercuts - you need to cut them out with a grinder and boil them again.
Nuances: what needs to be taken into account during preparation and assembly
Often during assembly, inexperienced welders encounter problems:
- the structure is severely deformed . The main reasons are associated either with incorrect assembly or with a violation of welding technology - the current chosen is too high, the sequence of welding of the elements is broken;
- the flat part is guided by a “screw” . To prevent this, you need to scald the part slowly. For example, first one corner of the frame (one seam), then - diagonally - the second (one seam) and so on in a circle, turning the structure from one side to the other. It is also possible to fix the product on a flat surface with clamps and clamps;
- After assembly, the potholders break . Reasons: low current or mistakes made during welding. It is necessary to reassemble the structure;
- There is not enough voltage in the network, the electrode constantly sticks - changes often appear outside the city. The situation can be improved if all consumers are temporarily turned off: kettles, microwave ovens, refrigerators, air conditioners.
Sometimes it turns out that the welded metal structure does not fit into place. This happens when the assembler did not take into account the gaps that are installed for better welding of the seams.
To assemble large volumetric metal structures, it is recommended to use temporary reinforcements - corners, channels, which should help keep the dimensions within the given limits.
For example, when installing vertical posts, jibs are welded onto the main frame to hold them in place. After scalding, they are cut with a grinder.
Rotators
To rotate large structures, so-called tilters are used. They come in roller and lantern types, lever, center and chain.
Roller devices are used to rotate large cylindrical structures. They are useful in the production of circular joints; they have several rollers: one is driven, the rest are used without a drive.
To prevent slipping, the drive roller is secured with a rubber band. Appropriate mechanisms are used for turning conical parts. They have several pairs of rollers located at an angle to each other.
Lever tilters are used when turning flat parts. Centering devices are used when it is necessary to rotate the product 360 °. Chain devices are used when welding large parts of long length.