08/25/2020 Author: VT-METALL
Issues discussed in the material:
- Causes of metal deformation during welding
- Types of metal deformations after welding
- On testing welds and calculating metal deformations during welding
- Methods for eliminating metal deformation during welding
- Ways to avoid metal deformation when welding
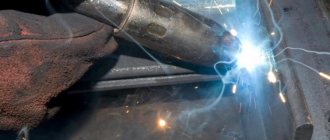
Metal deformation during welding is a phenomenon that leads to a violation of the geometry of products and, consequently, to defective products. This can be observed even in the work of experienced welders. Compliance with a number of rules allows you to reduce the likelihood of deformation and obtain a high-quality and reliable connection.
There are many reasons for metal deformation during welding. Read about what they are connected with, what measures are taken to prevent this phenomenon and what they are doing to correct it in our material.
Causes of metal deformation during welding
If a metal object is subjected to mechanical stress, stress and distortion occur in it. The first is characterized by the force of pressure exerted per unit area. The second is a violation of the dimensions and shape of the product due to force.
Stresses appear in parts under the influence of almost any effort. This may be stretching, bending, squeezing or cutting. During welding, both strain and stress values should be closely monitored. If the permissible values are exceeded, the structure (partially or completely) may collapse.
We recommend articles on metalworking
- Steel grades: classification and interpretation
- Aluminum grades and areas of their application
- Defects in metal products: causes and search methods
Welding deformations arise under the influence of various types of stresses appearing inside the product. Experts combine the main reasons for their appearance into two large groups: the main ones, which are considered inevitable and constantly appear during welding, as well as accompanying ones, the elimination of which is quite possible.
The main causes of deformation and stress during welding include the following:
- Structural modifications that, affecting the metal, cause stress (tensile and compressive). This happens during the cooling of parts made of alloy or high-carbon steel alloys. In this case, the dimensions of the product, as well as the grain structure of the material, are disrupted. As a result, the initial volume changes, which leads to an increase in stress inside the part.
- Uneven heating. Only the working area of the product is subject to primary heating during welding. As the temperature increases, the material expands, affecting slightly heated layers of metal. With intermittent heating, the stress concentration of the weld reaches high values. Its indicator depends on the operating temperature, thermal conductivity of the material and the level of linear expansion.
- Foundry shrinkage. It occurs during crystallization of the material, is characterized by a decrease in the volume of the metal, and occurs due to welding stress (longitudinal and transverse), which appears during the process of melt shrinkage.
Welding stress can be caused not only by mechanical influences. Alloys of various metals generally have their own deformations and stresses. They are divided into temporary and residual. Plastic deformation of the metal during welding causes residual deformation that does not disappear even after the material cools. Temporary ones occur when welding a firmly fixed part.
Incidental or accompanying deformations during welding include:
- any deviations from the standards in the technological process - an example could be poor preparation of the part for welding, incorrect choice of electrode, violation of the welding process, etc.;
- inconsistencies and errors made in the design of the product - these may be an incorrectly selected type of seam, frequently located joints, a small gap between welds, etc.;
- low professionalism and little experience of the master.
Almost any error can cause stress concentration in a weld. Because of them, technological defects in the connection arise: lack of penetration, cracks, bubbles and other defects.
Generalized about welding of profile pipe
Here is some general information that a craftsman must understand when working with rolled pipe:
- under the influence of high temperature, pipes with a profile section are more deformed than round products;
- when the metal melts, the internal space of the rolled pipe may fill and overlap; if the hollowness of the product is extremely necessary, it is important to control the absence of metal droplets inside the pipe;
- When end-connecting rolled metal with a profile section, due to uneven heating or improper formation of the rollers, high stress may appear at the corners of the product.
The thickness of the walls of rolled metal varies over a fairly wide range of values, but it is the welding of thin-walled pipes that requires the master to have certain knowledge and skills.
Methods for welding profile pipes.
Working with thin metal is not as simple as welding thick-walled pipes with an inverter, since a number of important points must be taken into account when working:
- to create welded joints on rolled metal, a current of 10 to 60 A is required;
- electrodes for welding thin-walled profiles should have a diameter of 0.5-2 mm, but no more;
- the seam is performed in one pass;
- the quality of the connection is largely determined by the speed of welding;
- The craftsman must have time to weld the profile until the working edges have cooled down.
If you carefully study the described recommendations, welding a gate with your own hands from a profile pipe will not be difficult even for an inexperienced craftsman. If you perform such work without knowledge of the specifics of rolled metal, the structures will not be reliable, strong and durable.
It is equally important when working with profile pipes not to make a mistake with the choice of electrode, since the operational parameters of the weld depend on this.
The welder must pay special attention to the cross-section of the welding wire: an excessively thin electrode will cause instability in the arc, and an electrode with a large cross-section can burn through a thin-walled product.
The diameter of the welded wire must be selected taking into account the wall thickness of the rolled metal:
- if the cross-section of a rolled metal pipe does not exceed 2 mm, an electrode with a diameter of 1.5 mm is relevant;
- a profile pipe with a cross-section of 2-3 mm is welded with an electrode with a diameter of 2 mm;
- rolled metal with a cross section of 4-6 mm requires the use of welded wire with a diameter of 4 mm.
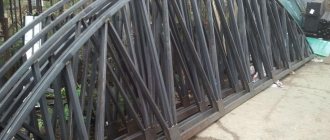
Welding of a truss or other kind of structures made of a metal profile can be carried out in different ways, but the most popular of them are the following options:
We'll talk about this in more detail below.
Types of metal deformations after welding
There are several types of stress. They differ in time interval (period of action), nature of appearance and other factors.
Below is a table of possible stresses (which ones occur and why they appear in the weld).
| Nature of appearance | Voltage type | Reason for violation |
| For reasons of occurrence | Thermal | Uneven heating resulting from temperature changes during welding |
| Structural | If the metal is heated above the maximum set temperature, changes occur in the structure of the material | |
| By lifetime | Temporary | Appears during phase modifications, but goes away during cooling |
| Residual | Remains in detail even after the causes of occurrence have been eliminated | |
| By area involved | Available in all designs | |
| Appears exclusively in the grains of the metal structure | ||
| Present in the crystal lattice of a material | ||
| By direction of impact | Longitudinal | Appears along the seam line |
| Transverse | Placed across the axis of the connection | |
| According to voltage status | Linear | Only happens in one direction |
| Planar | Spreads in two different directions | |
| Volumetric | Impact occurs along three axes | |
During the welding process, the following types of deformation occur:
- Local and general. With local deformations, only parts of the structure are subject to changes. General ones deform the product completely and immediately, changing its dimensions and bending the geometric axis.
- Temporary and final. Residual (final) deformations remain in the product even after it has cooled, while temporary ones appear at certain points in time.
- Elastic and plastic. When the shape and dimensions of the product are restored after welding is completed, the deformation is considered elastic. In the presence of permanent defects - plastic.
The material can be deformed outside the plane of the welded product or inside it.
The multidirectionality of forces acting relative to the cross-section of the material leads to the emergence of various stresses: compression or bending, tension, torsion, shear.
We weld the hinges and install the gate
In order to hang profile swing gates without distortion, the leaves are temporarily welded together with narrow metal strips with a gap of 3 - 5 mm. Then, using bricks or wooden blocks, they are inserted into the opening to the height of the technical clearance. The position is checked horizontally and vertically with a plumb line and level, after which it is fixed with wedges or welded to the posts with steel strips.
To evenly distribute the load on the pipes of the racks and frame, steel strips (ears) are welded to the cylindrical hinges. In this way, canopies can be welded on both sides. The lower part of the hinges is attached to the post, the upper part with the ball is attached to the sash. If it is solid, you need to drill a hole for lubrication. To prevent the movable connection of the canopies from sintering during welding, it is first generously lubricated with grease.
READ ALSO: How to Make a Gate and Wicket for your Home
Depending on the weight of the swing gates, 2–4 hinges are installed. First, they are grabbed, then, after removing the temporary fastenings, the movement of the valves is checked. The final welding is carried out from the bottom up along the perimeter of the ears. To prevent the removal of swing gates by intruders, limiters are installed on the supports.
Testing of welds and calculation of metal deformations during welding
Seams must be tested for reliability and strength of connections. During the inspection, the presence of defects is also checked. This allows you to quickly detect and eliminate defects that arise during the welding process.
There are several types of control that allow you to find flaws:
- destructive - a process that is often used in industrial enterprises, makes it possible to test the physical properties of the seam;
- non-destructive - includes external inspection of the seam, ultrasonic or magnetic flaw detection, capillary method, permeability testing and other methods.
It is important in the manufacture of welded structures to determine the likely stresses and deformations during work. The reason is that they change the shape and size of the product, reduce its strength, which leads to changes in the performance of the structure that are far from for the better.
Homemade sliding gates based on a slipway and corners
An option is offered for a garage with a guide above the opening. The gates are equipped with an automated drive.
List of materials and consumables
You need to purchase the following:
- Guide.
- Roller carriages (4 pcs.).
- Limiter. Installed from below, it prevents the canvas from swaying during gusts of wind.
- Pay. A unit that prevents the gate from swinging when moving.
- Gear rack. It is recommended to purchase a galvanized version. For gates larger than 5 m, a product with a thickness of at least 9 mm is required.
- Gearbox.
- Remote control.
- Infrared signal receiver. Receives infrared rays from the remote control and transmits appropriate commands to the controller.
- Optical sensor. Blocks the drive if there is an object in the path of the blade.
- Electric drive with controller.
- External LED signal lamp.
- Traps. Fix the doors in the open position.
We recommend reading: How many categories do welders have?
Frame opening motor
pp. 5-12 are supplied as a set. You will need 2 of them.
In addition to finished products, you will need the following materials:
- Profiled sheet.
- Equal angle 50x50x4 mm. Used to make a canvas frame.
- Rectangular pipe with a cross section of 45x25 mm with a wall of 1 or 2 mm. Used to make sheathing.
- Wires with a cross-section corresponding to the power of the electric drive.
- Self-tapping screws.
- Screws.
- Dowels.
- Sealant.
- Primer and paint.
Profiled sheet
In addition to the tools used in the example described above, you will need a drill with a set of metal drills and a tap for cutting threads in holes.
Preparation of material
The angle and corrugated pipe are cut into blanks according to the drawing. The material is cleaned of rust and dirt, and scale is removed with a brush. The corner is cut at 45°, the pipe - perpendicular.
They cut corrugated sheets to make cladding parts. This material cannot be cut with a grinder, because sparks damage the polymer anti-corrosion coating. A hand saw is used.
It is recommended to choose corrugated sheeting with a shelf along the edge along the wave. It will allow you to screw 2 sheets at once in the overlap area with 1 self-tapping screw.
Frame assembly
Welding garage doors with your own hands is greatly facilitated if you have the so-called. slipway. The device allows you to assemble 2 identical sheets without distortions or propeller twisting.
Jib for assembling frame structures
It is made as follows:
- Draw a straight line on the ground.
- From it, 2 perpendiculars are laid along the square so that the distance from one to the other is equal to the width of the canvas.
- Along the drawn lines, bench-like stands are built with a length equal to the height of the canvas. The legs are made from a corner, the “seat” is made from a block with a cross-section of 100x100 mm. Using a spirit level, ensure that the upper edges lie in the same horizontal plane.
- Stoppers are screwed to the bars from a small corner so that the distance between them is equal to the width of the canvas.
- Check the equality of the diagonals of the slipway.
Next, proceed to assembling the frame:
- A frame made from blanks cut from a 50x50x4 corner is placed on the device.
- Press it with clamps to the elements of the slipway.
- Lay out horizontally with equal spacing sections of 45x25 mm professional pipes (sheathing).
- The seams are welded.
- They knock down the slag and grind the deposits.
- Turn the frame over and weld the joints at the corners of the frame on the reverse side.
- Treat the joints with a metal brush and a grinder.
- Paint the product.
Swing gates
The frame of the second half of the gate is similarly made on the same slipway.
Finally, “ears” for a padlock are welded to both products at the same level.
Sash trim
The frame is placed on a flat surface and corrugated sheeting is placed on top - so that the waves lie vertically. The sheets are overlapped.
The corrugated sheeting is leveled and screwed to the sheathing with roofing screws, screwing them into the cavity of every second wave.
Gate installation
Installation of the structure is carried out in the following sequence:
- Using dowels above the opening, screw the guide to the wall. The horizontal position is controlled with a bubble level or spirit level.
- 2 roller carriages are bolted to the sashes.
- The toothed racks are attached in the same way.
- Limit switches are fixed to them at the extreme points.
- Place the sashes in place, placing the rollers in the guide.
- Install the electric drive so that the gear is in the middle of the rack.
- Connect the power and check the operation of the automatic gate opening mechanism.
- If the result is satisfactory, plugs are screwed to the ends of the guide to prevent the rollers from falling out.
- Each flap is moved to the “open” position and traps are tried on to fix them.
- Screw the assembly to the wall with dowels, and the counter part to the sash.
- Install limiters to prevent the gate from swinging.
- According to the instructions, attach the LED lamp, optical sensor and infrared signal receiver.
- Connect the sensors to the controller with signal wires.
Gate installation
Finally, check the operation of the device and sew up the doors from the inside.
Methods for eliminating metal deformation during welding
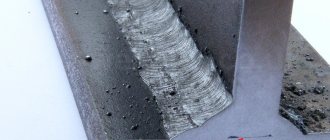
Deformation of the material that occurs during welding can be removed by straightening. It can be cold mechanical, thermomechanical and thermal, including both local and general heating. Before carrying out the latter, the product is rigidly fixed in a device that exerts pressure on the variable parts of the structure. It is then placed in a preheating oven.
The essence of the thermal method is to compress the metal as it cools. The process of heating the stretched area with a torch or arc occurs. At the same time, the material surrounding the heating area must remain cold, which prevents the hot area from expanding significantly. Then, as the product cools, the structure gradually straightens. This method is most suitable for eliminating deformations of beams, strips of sheet material, etc.
The principle of cold straightening is the constant impact of loads on the product. For this purpose, various presses and rollers are used, which exist for rolling long structures along them. To correct deformations of tensile structures, thermal straightening is used. First, excess metal is collected, and then the problem area is heated.
It is difficult to say which method is preferable. For each type, location (outside or inside), characteristics of deformation and stress, as well as dimensions and shape of the product, there are ways to eliminate them. The labor costs and effectiveness of the method are important.
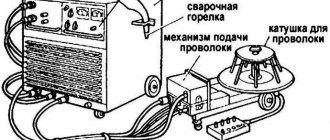
What is the best welding method for welding thin sheet metal?
The higher the temperature in the heating zone, the more likely it is that the metal will move.
Different types of welding have different temperature conditions, so if you often need to weld thin metal, then you should think about the following:
- Oxy-acetylene welding is not the best option for welding thin sheet metal. The greatest deformations occur precisely with this type of welding, since its temperature reaches 3100 °C.
- MMA welding () is everyone’s favorite manual arc welding with a coated electrode. In manual arc welding, the temperature occurring at the end of the electrode is much lower, from 2400 to 2700 °C. Therefore, this type of welding is more preferable for joining thin sheet metal.
- Semi-automatic MIG/MAG welding - the heating temperature is about 1500 °C, and the welding speed is even faster than with manual arc welding. Therefore, MIG and MAG are the most convenient for welding workpieces made of thin sheet steel.
And lastly, this is the correct organization of heat removal in the welding zone. For these purposes, you can use both special heat-removing copper plates and improvised means. For example, you can use wet asbestos to place it next to the weld seam or other materials.
Share on social networks
Ways to avoid metal deformation when welding
Eliminating problems is much more difficult than preventing them. This axiom applies equally to welding. Marriage always leads to additional financial investments. To prevent it, it is necessary to focus on measures that help combat deformations and stresses.
When answering the question of how to avoid or minimize deformation when welding sheet metal, you should remember the relationship between the causes of occurrence and preventive measures. Therefore, before starting work, everything must be carefully calculated and prepared. Only after this stage is completed will it be possible to weld metal structures.
The force applied to a structure is directly proportional to the degree of its deformation. This means that the greater the force acting on the product, the greater its deformation.
- Follow-up and preheating.
These types of heating help improve the quality characteristics of both the welded joint itself and the areas located in its immediate vicinity. In addition, plastic deformations and residual stress are reduced. This method is most often used for alloys that are prone to hardening and crystallization cracks. - Apply sutures in reverse order.
If the length is more than 1,000 mm, the seam is divided into parts with a length of 100 to 150 mm. A new connection is created in the opposite direction from the main welding. In this case, the metal is heated more evenly, which reduces deformation. This method is not a sequential application method. - Forging seams.
Both heated and cold material can be forged. The impact seems to push the metal apart. This reduces tensile stress. This method is not used on structures made of metal that is prone to the formation of hardening structures in it. - Alignment of deformations.
The essence of the method is to choose the order in which the seams will need to be made. The new seam must necessarily create a deformation that will counteract the previous one. This method is often used when welding double-sided joints. - Rigid fastening of parts.
Welding is preceded by strong and rigid fastening of the product in the jigs. After the process is completed, the structure is completely cooled and then removed from the fastener. A significant disadvantage of the method is the likelihood of internal stress in the product. - Heat treatment.
Welding without metal deformation can be carried out using heat treatment. At the same time, the characteristics of the joint and the surrounding metal are significantly improved, the stress inside the product is reduced and the structure of the seam is leveled. Tempering, annealing (consisting of low-temperature or full) and normalization are operations that make up the heat treatment of metal.Normalization is considered the optimal way to process seams of products made of low-carbon steels.
How to cook metal without causing any problems
Let's consider the solution to this problem:
Sequential passage of welding seams . If you need to weld thin sheet metal, then in order to avoid its deformation, it would be advisable to use a reverse-step weld, no more than 300 mm. After the metal has cooled, you can weld the remaining cracks. Thus, thin sheet metal will not lead.
More precisely, there will be deformations, but the previously made, “short” seams will compensate for them. In addition, in some cases, when welding thin metal, it is best to use tacks first, and only then weld the seam.
Preliminary bending of workpieces to be welded . Another method that will reduce the deformation of thin metal involves bending the workpiece in the opposite direction from the stresses during welding. Thus, after the welding is completed, the metal workpiece will return to the desired position under the influence of deformation.