We assemble argon welding from an inverter with our own hands
Reading time: 7 minutes
Tig welding is one of the most popular welding technologies. An argon welding machine provides almost limitless possibilities. You can weld any metal with virtually no restrictions on thickness. But a home craftsman always has the opportunity to purchase a factory-made device. And the reasons can be different: from lack of funds to banal distrust of modern manufacturers.
Fortunately, this problem can be solved quite simply and, most importantly, quickly. If you want to save money or for some other reason cannot buy a factory machine, then do-it-yourself argon welding from an inverter is your choice. In this article we will tell you how to assemble an argon apparatus with your own hands.
general information
Argon arc welding is in many ways very similar to manual arc welding, only argon shielding gas and filler wire are additionally used. At the same time, a non-consumable tungsten electrode is used. The electrode helps ignite the arc and the wire forms the seam. In the world this welding technology is called TIG.
The essence of argon arc welding is simple. First, the torch supplies argon to the welding zone. A second after the gas is supplied, the welding arc is ignited. To ignite an arc, you need to bring a torch with an electrode inside to the metal and press the switch. But why is the arc ignited? After all, there is no reason for this.
An oscillator solves this problem. It ionizes the gas and thereby allows the arc to ignite in argon vapor.
After the arc has stabilized, filler material can be fed into the weld pool. This can be done manually or using a feeding mechanism. The arc melts the metal, but the filler wire allows you to form a weld bead. The wire melts with the metal and mixes with it.
Next, we will tell you what you will need to assemble your own argon welding machine.
Varieties
Welding torches for argon welding come in several types. Basically, they are divided by type of cooling and type of design.
According to the type of cooling, an argon burner is produced with natural cooling and with liquid cooling.
Natural is also simply called air, since this is a purely natural process that occurs under the influence of oxygen. Air-cooled torches should only be used for welding short seams and using a current of no more than 200 Amps. Otherwise the burner will overheat.
Liquid cooling is cooling with water. This burner has a special structure, thanks to which cold water is directed to its body. Liquid-cooled torches are used when welding long seams at any current strength.
By design, there are valve burners, push-button burners, with a valve and a button.
A valve torch for TIG welding is its simplest type. To open the gas supply, simply unscrew the valve. Often such burners are connected only to an inverter. To light the arc, you need to tap the wire on the surface of the surface to be welded. The valve torch is not suitable for welding aluminum.
TIG welding torch with button is a more advanced type. Usually a button has several positions, each of which has its own function. This can be gas supply, welding current adjustment, arc ignition, etc. Such burners are easier to use and allow you to achieve decent quality seams.
Assembling a homemade argon apparatus
What do we collect from?
Do-it-yourself argon welding is assembled from very simple components. We will list the main components that you will need to assemble your argon welding machine yourself.
First, you will need a welding power source. In our case, this is an inverter-type welding machine. You also need an oscillator. Additionally, we will assemble a protection unit for our inverter. The minor components you will need are a welding torch, a gas cylinder with argon, a reducer, gas hose and cables. Let's take a closer look at each component.
About the current source
An argon apparatus is assembled on the basis of some current source. We chose a conventional welding inverter for these purposes. Of course, you can use a transformer or rectifier, but an inverter is preferable.
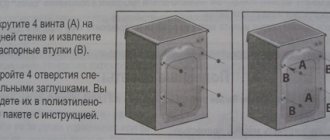
However, keep in mind that it is more difficult to make an argon apparatus from an inverter. If you take a regular inverter and connect an oscillator to it, the device will still not be able to work like an argon one. It will simply fail. So you will have to modify the inverter a little by adding a so-called protection block to the main circuit. The block is assembled on the same board as the oscillator, and the board is mounted in a separate housing.
There is another option. Inspect your inverter carefully. It may have a built-in TIG function. If this is indeed the case, then consider yourself lucky. The inverter does not need to be rebuilt. It is enough to connect a gas cylinder and a burner to it and you can cook. Such inverters are often designed for MMA welding, but are equipped with an oscillator and a protection unit. Therefore, the manufacturer makes it possible to use the device for TIG.
About the oscillator and protection unit
Let's assume that you have a regular inverter without the TIG function, and from it you need to assemble argon welding with your own hands. In this case, you will have to make an oscillator and a protection unit separately. Below is a convenient diagram.
It shows both the block and the oscillator. If you don't know how to apply this pattern, watch the video below.
About the burner and gas
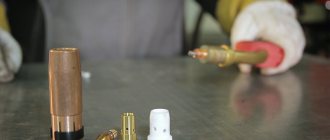
Now about the minor components. You will need a gas burner, but not just any one. And specially designed for argon welding. It has a ceramic nozzle and a special holder for a non-consumable electrode.
You can assemble an argon burner yourself at home by purchasing all the parts on the Internet. But in our experience, this is a waste of time and effort. It's better to buy a factory one, it's not that expensive.
Argon should be used as gas. It comes in black or gray cylinders, so you won't get confused. But it is best to use gas from gray cylinders, since they contain pure argon. It is preferable for welding.
As for the capacity, a 10 liter cylinder will be enough for you to weld at home. It is quite light and compact, it can be brought to the country house or to a garage cooperative without any problems. For home use, it is better not to buy large 50 liter cylinders. You will have difficulty moving it.
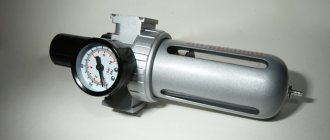
About the reducer and hose
You will also need a special gas reducer. It is put on the cylinder and used to stabilize the pressure in it. The gearbox should also be argon, and not the first one available. For convenience, the gearboxes are painted the same color as the cylinders. So look for a gray or black gearbox.
Pay special attention to the hose. We recommend buying a ready-made one right away and not having to worry about assembling it yourself. A homemade hose will most likely be inconvenient and you will lose a lot of time searching and installing special connectors for connecting the hose to the cylinder and burner.
Assembling the device
So, all the components are assembled, you can get started. Do-it-yourself argon welding begins with connecting the oscillator + protection unit to the inverter. Look at the diagram above, everything is clear there. Take the ground and connect it to the positive terminal of the oscillator. Connect the cable coming from the burner to the negative terminal. If you weld aluminum, then swap these cables.
Next, connect the gas hose and the burner, install the reducer on the cylinder. Connect the burner to the sleeve with cable and gas hose. Then connect the hose to the reducer. Now you can turn on the inverter outlet. But for the oscillator, provide 6V power. Screw the reducer to the argon cylinder.
The gas hose must be connected to a reducer mounted on an argon cylinder. Connect the inverter to a 220 V network, and the oscillator to a 6 V power supply. Everything is ready. All that remains is to configure the device for correct operation.
Setting up a homemade device
Any home-made item or device needs proper adjustment in order for welding to take place more or less efficiently. Our homemade device is no exception. We will tell you about some features that need to be taken into account.
Argon burner connection
- Log in to reply to this topic
#1 KCTRADE
- Top
- Insert nickname
#2 Spec
Please connect a water-cooled argon arc torch to the device
- 1
- Top
- Insert nickname
#3 pro100chaynick
Water-cooled argon-arc torches have the following terminals: - a protective gas supply tube. Do not confuse the gas line with the water line! Connects to a gas reducer mounted on an argon cylinder. Set the argon pressure to no more than 1.5 kgf/cm2, flow rate 8-12 l/min. - water supply tube. Connects to a water supply or to a cooling system operating in a closed cycle. Water pressure at the inlet is no more than 2 kgf/cm2, flow rate is 0.5-0.8 l/min. - a water drain tube, which also contains a stranded wire for supplying welding current. Connects to the “-” welding rectifier. Depending on the burner type, you may have to install an adapter to drain the water to the drain. — control wire for the oscillator or solenoid valve for the supply of protective gas (not in all types of burners).
- Top
- Insert nickname
#4 Spec
Special, you are not entirely right and are misleading people. 1 burners usually combine a gas path and a power cable - the design is different, there may be a bayonet with a gas outlet, there may be a nut - a link or photo to your burner is good 2 it is not advisable to run water into the burner - it can cause accelerated corrosion of the burner 3 if the welder has a built-in the valve then the torch is connected there - if there is no valve, then it would be desirable for the torch to have a valve. I would like to see a photo of the welder’s face (the place where the torch is connected.) for more accurate recommendations and a bunch of photos of the ends of the tail (hose package) of the torch
Attached images
- 1
- Top
- Insert nickname
#5 pro100chaynick
1 perhaps you are right 2 usually a liquid like antifreeze or antifreeze and a cooling unit are used 3 a valve or valve is not a matter of taste but a matter of equipping the source for tig welding - in specialized (modern) ones. In the Soviet-made valve, the valve is placed in a separate block with a flow meter, but you can work without it has a valve burner) so the burner is connected to the built-in outlet from the valve.
- Top
- Insert nickname
#6 Spec
1 perhaps you are right 2 usually a liquid like antifreeze or antifreeze and a cooling unit are used 3 a valve or valve is not a matter of taste but a matter of equipping the source for tig welding - in specialized (modern) ones. In the Soviet-made valve, the valve is placed in a separate block with a flow meter, but you can work without it has a valve burner) so the burner is connected to the built-in outlet from the valve.
- Top
- Insert nickname
#7 pro100chaynick
- Top
- Insert nickname
#8 Spec
1, don’t be so self-confident, - I have campers at work. There’s something like a modular system (additional equipment for adc and p/a or for adc/rds is attached to 1 source), there’s cooling that’s organized for a moment/magazine for a tig the same - current + control is connected to the connectors on the source or set-top boxes, cooling is on a separate block 2 I did not claim that it was antifreeze, there is some kind of proprietary liquid (but it is stickier than vodka) - and antifreeze is usually alcohol-based + all sorts of anti-corrosion additives 3 still not a matter of taste (although this is also present to a large extent) - if it is possible to connect to a valve, then it is better to connect to the valve - with a valve, gas consumption is less and more convenient, besides, the control of the valve is combined with the control of the welder and oscillator without more specific information from KCTRADE further I don’t think the argument is particularly productive and I propose a draw
How to upgrade an inverter for argon welding
Welding non-ferrous metals and alloys is a difficult operation even for an experienced craftsman. Anyone who has ever encountered the need to weld aluminum or titanium knows the prices for these services. Often they are so high that you have to abandon welding and buy a new part or replace the entire assembly. But most often, 80-90% of the price is not the cost of the equipment, but the payment for the services of a welder.
I don’t want to say that argon welding, which is what is used in this case, is very complex and very different from MMA welding. Yes, it is somewhat more technically complex and requires certain skills, but if you have mastered coated electrode welding, then, after a little practice, you can also weld with argon TIG welding.
A logical question is: where can I get the device? There are two ways to solve this: buy an inverter with TIG mode or remake your device. Do-it-yourself argon welding from an inverter is a completely solvable task even in a personal garage, not to mention a workshop or metalworking shop.
Features of argon welding
Welding in an argon atmosphere differs from conventional MMA in the following features:
- produced with constant argon blowing;
- current can be used either alternating or direct (reverse polarity);
- it is necessary to use a tungsten electrode;
- Only very thin sheets can be welded without filler wire;
- an oscillator is required to ignite the arc;
- The electrode wiring technique has certain specifics.
Let's consider all points separately. It may seem that they do not directly relate to the topic of how to make professional argon welding from a regular inverter, but knowing these subtleties, it will become easier to take into account all the features of the device and technology.
Argon welding scheme:
Why is argon needed?
This element (Ar) is part of group (18) of inert (can be seen in the periodic table) gases, which in the normal state practically do not interact with most substances, including metals, acids, salts and alkalis. In terms of prevalence in nature, it is in third place after oxygen and nitrogen, which determines its rather low price compared, for example, with helium.
Practical properties during welding are determined by its weight - it is more than twice as heavy as nitrogen and oxygen; when it appears in the weld zone, it simply displaces these gases and envelops the bath, preventing the occurrence of chemical oxidation reactions. This fact must be taken into account when welding outdoors - strong or moderate wind can deteriorate the quality of welding.
Welding current
Electric current with a voltage of 30-80 V and a force of 20-200 A - ranges used when welding non-ferrous metals in an inert atmosphere. The choice of current parameters is made according to special tables and depends on the diameter of the electrode and the thickness of the metal being welded. By choosing the right current characteristics, you can perform the most complex seams even on a homemade machine.
Electrode
A sharpened tungsten rod used as an electrode is convenient because:
- it does not melt (melting temperature is above 3000 0 C, even at red heat it does not soften) at welding temperatures of non-ferrous metals;
- allows you to get a very thin arc, makes it possible to form a compact seam;
- evaporation of the electrode is no more than 0.01 grams per 1 m of seam.
At the same time, the industry produces such electrodes in more than 25 types; choosing the right one will not be difficult.
Filler wire
An additional material that, when welded, is melted by an electric arc and fills the seam. When hardened, it forms a monolithic compound. On particularly thin sheets, wire is practically not needed, but for welding three-dimensional parts it is necessary.
The wire material is selected in accordance with the metal being welded: for aluminum - aluminum, for stainless steel - from alloy steel of a certain grade.
Oscillator
When welding with a direct current tungsten electrode, it is quite difficult to ignite an electric arc. If you perform this operation by touch, as when welding MMA, then the electrode may burn, the metal will melt, part of the material will be welded to the tip of the electrode, and other troubles.
An oscillator is a special device that generates a high-frequency current to supply an ignition pulse. Subsequently, it periodically generates supporting pulses that stabilize the arc and allows the welder to confidently work with both direct and alternating current.
Before you do a full-fledged argon TIG welding yourself, you need to buy an oscillator, for example UVK 7, or assemble it yourself according to one of the schemes:
But practice shows that a factory-made oscillator works much more reliably. And its price is not so high that you would spend a week searching for parts, assembling and configuring a homemade device.
Moreover, the factory oscillator is very easy to connect to almost any inverter or transformer type device - just use special connectors to hang it on the welding electrical cables. It works in parallel with the machine and does not affect the welding current, maintaining only the stability of the arc.
But when purchasing an oscillator, you should take into account that some models operate at an open circuit voltage of 40 V. If you are planning to weld at U = 28-30 V, the pulse generator may not work.
Accessories for argon welding torch
The design of any tig burner is quite simple. To work with accessories of this type, it is necessary to equip them with a number of accessories that ensure the fixation of the tungsten electrode, as well as the correct supply of gas to the welding site. These accessories include:
The dimensions of the first three accessories are selected based on the diameter of the tungsten electrode used. It is extremely important that the accessories fit well with the consumables, otherwise the result of the work performed will not please you.
Today, ordering a torch for TIG welding is not at all a problem. A large assortment of accessories is already waiting for you in the catalog of our online store. We offer burners and accessories for them at excellent prices and with fast delivery. You can also order any consumables of excellent quality from us. Call us, we will be happy to help!
Source
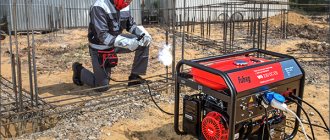
Homemade TIG machine on an inverter
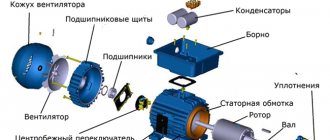
The main parts of such an installation are:
- inverter with MMA welding capability;
- TIG torch;
- argon cylinder;
- pressure gauge;
- oscillator;
- connecting hoses and cables.
They need to be collected in accordance with the following scheme:
After setting the current parameters, turn on the inverter, prepare the metal and start welding.
When choosing the components of the device, special attention should be paid to the welding torch. The industry produces many varieties of them, designed for different electrode diameters and welding current values. For domestic use, which is how homemade devices are used, you need to choose a torch designed for minimum tungsten rod diameters and currents up to 200 A.
You won’t have to work at maximum settings anyway, and there’s no point in paying twice as much for an industrial-grade burner. Many Internet sites recommend making a burner yourself. In principle, this is possible. But if you buy all the parts and assemble it yourself, then the cost will be equal to the factory one, but the build quality and the possibility of adjustments and settings will be an order of magnitude worse. In this case, all that remains is to reassure yourself that the burner was made by yourself.
We can conclude that converting an MMA inverter into a TIG installation does not require intervention in the operation of the device itself - you only need to purchase additional peripherals and assemble everything correctly. Compared to buying an inverter that has TIG mode, it will cost almost half the price.
The editors suggest sharing their own experience of transforming an inverter into a TIG device on the pages of the site. We and our readers are interested in the advice and personal developments of practitioners. Write to us, the most interesting developments will be published under the name of the author.
Setting up a homemade device
Even a factory device must be properly configured. This also applies to homemade equipment. This way the welding will take place without problems and will produce seams of good quality. We will note what you need to consider when setting up a converted inverter.
The first stage is sharpening the electrode rod. For this you need a special sharpener. The tip of the rod should be sharp, like a pencil.
A dull electrode will destabilize the welding arc, and it will not be able to follow one straight line. Therefore, it is impossible to avoid the sharpening stage.
After sharpening, the electrode is inserted into the torch holder. The latter is turned on by turning the valve on the cylinder and pressing the ignition button. Use the gearbox to correct the flow of argon.
It should not be more than fifteen liters per minute. After the gas flow has been adjusted, turn off the burner and pause the flow.
After this, connect the oscillator device with the protective block and bring the torch to the workpiece. Before doing this, place the mass on the metal. The burner should be very close to the metal.
After switching on, an electric arc will occur. Then open the gas and at this time move the burner a little further.
Now the converted inverter can work.
Welding lessons: How to set up a argon arc machine for TIG welding?
Previously, we talked about how to select an electrode, gas and other consumables. In this article we will continue to consider the welding process, or more precisely, working with a tig argon arc machine. For convenience, we will immediately highlight the issues that will be addressed in this material:
For clarity, we use specific models and blanks. We will weld stainless steel, and the tig machine will be the reliable and easy-to-use FUBAG INTIG 200 DC Pulse. In addition to the main functions, the equipment has a pulse welding function.
As for consumables, the example shown uses an argon cylinder, WL 20 electrodes (for direct current) and filler rod.
Correct starting and welding with a TIG torch
The parameters are set and it's time to start. Owners of this welding machine model have two options:
Use contact ignition
Use the high frequency ignition function
The latter will prevent metal burning in case of incorrectly set parameters when setting up the argon arc welding machine. It will protect the metal from tungsten inclusions and allow you to independently control the distance to the part from the moment you start working.
And now the most important thing is how to operate the burner correctly? Most experienced welders weld from right to left. During the process without filler material, the electrode should be positioned almost perpendicular to the surface to be welded. If filler material is present, then it is enough to maintain a small angle (15-20 degrees).
Attention! To prevent the weld metal from oxidizing, it is necessary to ensure that the end of the filler rod is constantly in the protective gas zone.
The welding process is completed by filling the crater. Crater welding is the final section of the weld seam, the length of which is reduced to zero. From the point of view of the quality of the welded joint, it is necessary to exclude the formation of a crater in the final part of the weld. For this purpose, the device provides a smooth current reduction mode.
Popular models of argon burners
Despite the general operating principle of argon burners, each manufacturer brings something different. Some use especially durable or especially flexible materials, others modify the basic design for convenient operation, others set the goal of durability or some other parameter.
When looking at offers based on pictures on sellers’ websites, it is difficult to obtain comprehensive information, especially when prices range from 2.5 to 20 (sometimes higher) thousand rubles, and this is the cost without delivery.
Brief overview of manufacturers
The brand, of course, makes adjustments to the cost of the argon burner, but the name of the device means nothing for operation. Let's consider the products of the most popular manufacturers today.
- AURORA TIG 9V 110A is a torch of a domestic manufacturer, adapted to work with welding machines of the SVAROG brand. It's easy to find and purchase consumables. Devices from this manufacturer, depending on the modification, cost from 2.5 to 4.5 thousand rubles.
- Svarog TS 26V (M12×1) 4m – maximum operating current – 180 A (DC) and 130 A (AC). The electrodes used are from 0.5 to 4 mm, air cooling. Price - from 4 to 6 thousand rubles.
- Bars TIG-17V – current (direct) – 140 A, air cooling, connector type not specified. The train, as in previous samples, is 4 meters long. The cost is about 3.5 thousand rubles.
- TORCH burners are distinguished by their low price (up to three thousand rubles). The advantage is that it works on direct and alternating current. The connector is the same for the entire range of models - M12x1.
The next price segment is represented by argon burners FUBAG (from 5 thousand rubles), AGNI 03 (from 9 thousand rubles), BlueWeld (number 9 costs from 9 thousand, number 26 - from 15 thousand rubles).
According to reviews from experienced welders, BlueWeld argon torches are distinguished by their exceptional quality of work and are reliable in AGNI operation. SVAROG burners are not ideal, but they are quite suitable considering their price. Useful video on this topic
Recommended selection criteria
- If you purchased a welding machine recently, you should try to equip it with an argon torch from the same manufacturer.
- To avoid problems with welding aluminum, you should pay attention to whether the design is designed to work with alternating current.
- It is necessary to carefully study the package. If a set of spare parts is missing, but you really like the price, it’s worth remembering that you’ll then have to spend about a thousand rubles on consumables.
- It’s better to choose not by the picture, but by hand: examine it, figure out whether it fits comfortably in your hand, make sure that the connector is the same type as on the inverter, and that the cable is flexible enough.
When the lowest price is a priority, the buyer must be prepared for the fact that in the process of working with such equipment, unforeseen moments may arise, not critical, but unpleasant: for example, something is not securely connected, it is inconvenient to hold, the cable is too hard, etc.
But a beginner can afford to purchase an inexpensive torch for training, mastering the welding process in an argon environment, and then, having gained experience, look for a more convenient model based on his own experience.
How to make an argon welding machine
When working with non-ferrous metals and their alloys at home, do-it-yourself argon welding is one of the most suitable ways to join metal workpieces.
The desire to independently manufacture a device intended for argon welding is explained by the high cost of industrial equipment, which contains many different components. To this should be added the high price of the inverter itself, which allows welding with argon in a wide variety of modes.
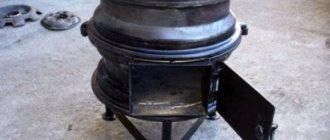
Device and principle of operation
In cases where only one-time home operations are expected, it is preferable to assemble a machine for argon arc welding with your own hands. The implementation of this idea will be facilitated by an approach that uses ready-made blocks that are part of a number of household devices, as well as suitable materials at hand.
Before you start assembling the device with your own hands, it is advisable to study its operating principle and structure.
When equipping an argon welding machine, you must proceed from the fact that for work in an inert environment, in order to save money, not pure argon is used, but its mixture with carbon dioxide.
The consequence of this is the need for several gas cylinders. However, you can also purchase a ready-made mixture in one cylinder, which will simplify argon welding.
The output current generation circuit used in the inverter module is also of great importance. It guarantees a high quality arc without oxidation of the seam.
Based on these conditions, a complete set of equipment for working in an argon environment must contain such mandatory components as:
- a welding current source, which can be any pulse inverter of suitable power with the ability to change polarity;
- a set of several cylinders equipped with reducers and pressure sensors that supply a mixture of gases to the argon welding zone;
- connecting hoses with built-in electrical wires and gas channels, allowing all necessary components to be delivered to the welding site and equipped with a specially shaped connector;
- gas burner with a nozzle and a special holder that allows you to fix a non-consumable electrode;
- An oscillator built into the power supply module with a current pulse delay circuit.
When assembling an argon welding machine with your own hands step by step, you must prepare the hoses and also worry about the reliability of the electrical connections of the supply cables.
Welding technology
To use a semi-automatic machine in an argon environment, you must first install a torch and cable. Only after this a special reducer is placed on the argon cylinder. Check whether the gas pressure exceeds the residual value. The outlet fitting of the cylinder is equipped with a hose, which should be clamped with a clamp. The value on the gearbox must be indicated by the manufacturer; It is unwise to take risks and set a different gas flow rate.
It is important not only to place the reel on the rod, but also to ensure that the pins match the mounting holes . Some people believe that the easiest way to do semi-automatic welding is not in pure argon, but in a mixture with carbon dioxide. This solution is optimal for welding low-carbon stainless steel. The adjusting screw helps set the desired clamping force. Only after screwing the tip onto the burner and installing the nozzle can you connect the device to the network.
Here are the tips:
when welding brass (seam crater), it is necessary to smoothly reduce the voltage in the arc, increasing it itself;
you cannot make a solid brass seam - reviews must be made;
in the process of welding copper, you will first have to carry out low-temperature heating;
Aluminum should be welded strictly with alternating current.
For information on semi-automatic welding in argon, see the following video.
Source
What you will need for assembly
The necessary tools and components, without which it will be impossible to assemble an argon welding machine with your own hands, must be selected according to the list:
- a fan of a given power sufficient to cool several radiators;
- electric drill with a set of drills;
- screwdriver, grinder;
- a hacksaw and a set of screwdrivers;
- soldering iron with a power of at least 40 watts;
- connecting conductors;
- electronic measuring instruments (multimeter and single-beam oscilloscope);
- complete set of radio components.
In addition, you will need sandpaper of various grain sizes and several plates of textolite (plain and foil). To the list of auxiliary tools you need to add a special device for cutting threads and several clamps such as clamps.
When preparing a list of necessary materials and components for an argon welding machine, you should proceed from your financial capabilities.
Execution options
There are several approaches to making an argon welding machine yourself, differing in different levels of material costs. The cheapest option involves the use of ready-made modules and spare parts.
This approach allows us to obtain a simple-to-execute design of an inverter unit that can cook with both direct and alternating current.
In addition to this, you will need a set of hoses assembled with a factory torch and a special unit (oscillator), which greatly facilitates ignition of the arc. And finally, you will need to worry about purchasing a ready-made current supply delay unit.
The second approach to implementing an argon welding project is to make all the prefabricated modules and electronic boards yourself, which somewhat reduces the total costs. However, in this case, the performer will need high professionalism, as well as a sufficient supply of free time.
Regardless of the chosen assembly method, when making an inverter for argon welding with your own hands, you will need a housing in which all structural elements will be placed.
Before collecting spare parts and components, you should carefully study the electrical diagram of the future device and draw up a clear plan for connecting the electronic units.
Variants of schematic diagrams of a welding machine with an oscillator
The basis for a kit for argon welding is always a standard power supply, assembled on the basis of a transformer converter and a diode bridge with capacitive filter elements at the output. With their help, a reduced voltage is generated (from 45 to 60 Volts), which, after pulse conversion in the inverter, is rectified again and provides the required amount of welding current at the output.
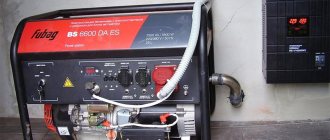
Making an inverter module yourself is fraught with great professional difficulties. The easiest way is to use a ready-made pulse unit from a household appliance with suitable characteristics after it has been modified and reconfigured.
TIG attachment (oscillator, arc exciter) for any welding machine
To make a set-top box you will need parts from an old TDKS TV Capacitors Deflection system Relays.
Also:
Ballast of an old energy-saving lamp Choke from a welding machine or similar (possibly excluded) Power supply (Adapter) 12V Wires Spark plug. A piece of plywood or a suitable frame.
It is very convenient to cook stainless steel and aluminum with a non-consumable electrode in an inert gas environment. In common parlance, argon welding is used, although there may be other gases, for example, helium or mixtures.
You can connect a sleeve with such a torch to almost any welding machine.
The problem is igniting the arc; if on stainless steel it is possible, but very inconvenient to ignite by touch, then on aluminum this is impossible.
Craftsmen light an arc by touching a graphite brush from an electric motor, but this is also inconvenient, affects the quality of the seam and greatly reduces the speed of work.
For high-quality welding and ease of use, from what I had, I assembled an attachment, an oscillator that allows you to ignite an arc with a high-frequency pulse in the best traditions of this type of welding
Extinguishing is not intended and can be done by sharply lengthening the arc. The oscillator is not powered from the mains. Connects with power cables to any welding machine. I use a DC inverter welder to work with stainless steel.
For welding aluminum, a transformer welding machine with alternating current (Aluminum is almost impossible to weld with direct current). It is possible to cook with direct current using a semi-automatic machine (MIG), but this is not always acceptable, and the quality leaves much to be desired.
I assembled the device on suitable pieces of plywood. Since I use it in stationary conditions, I haven’t started making the case yet. A number of modifications and improvements are planned (pilot arc mode, pulse mode and forced arc extinguishing, gas supply valve), after which it is possible to manufacture a housing.
The oscillator is built according to a classical scheme with sequential high-frequency excitation of the arc.
Entrance. Throttle L1 is installed first to protect the welding machine, and secondly for smoother burning of the arc of the argon torch. Capacitor C1 provides the main protection of the welding machine by shunting high-frequency vibrations.
The choke was used from a faulty welding machine; you can use other welding currents designed for welding current (80-150A), or eliminate it completely.
I tested about a dozen different designs. A transformer is installed, wound on the magnetic core of the deflection system of the old TV.
The power winding contains 20 turns of welding wire. I didn’t have a piece of wire of sufficient cross-section, so I ended up winding it with three flexible network wires folded in place. The cross-section of each conductor is 8m2. The pulse winding contains 5 turns of wire, evenly spaced throughout the ring. The cross-section is 1mm2, but can be larger or smaller. This wire contains a pulse with a voltage of more than a thousand volts, the insulation must correspond to this.