Description of different stoves for cauldrons
In general, the stove is a cylinder about half a meter high with a hole at the top into which the cauldron extends at least 2/3 of its height.
The grate is located under the bottom of the dish at such a distance that the heat of the flame evenly covers its bottom and walls.
There are several options for making a stove for a cauldron at home:
- made of metal;
- from car rims;
- with a gas burner.
Made of metal
The design of the stove is a cylinder with a diameter of 30 cm and a height of up to 0.5 m. Instead of a bottom, a grate is inserted - a grate on which solid fuel (wood or coal) is burned. A hole is made in the lid to fit the upper diameter of the cauldron so that its edges rise 2-4 cm above the lid. The working chamber cylinder is mounted on three welded supports.
A metal stove moves freely to any place in a summer cottage, unlike stationary stone structures. The working chamber of the furnace quickly melts and heats up, allowing you to save fuel.
Reference. The disadvantage of the device is the lack of a direct chimney. Installing a pipe will make the structure heavier and more complicated, and the escape of smoke through the holes under the lid will interfere with cooking.
From car rims
Another version of the stove consists of two longitudinally welded disks, one of which has a damper cut out. The unit is small in size and weight, which allows it to be transported in the trunk of a car. The material for the furnace is the most economical, and the simplicity of the design will allow even an inexperienced craftsman to make the device in a few hours.
Important! The diameter of the upper part and the convexity inside the disk do not allow installing any cauldron into such a device, so before choosing this option, find out the dimensions of the existing dishes and disks. Small holes around the top and bottom of the oven create good draft without interfering with cooking
Small holes around the top and bottom of the oven create good draft without interfering with cooking.
- Introduction to oriental cuisine: do-it-yourself oven for a cauldron
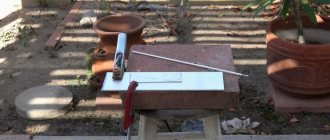
Photo 1. The finished stove is made from two car rims: one has a door cut out, the other is used as a stand for a cauldron.
Gas
A stove with a gas burner is made of metal or brick, differing from other options in the type of fuel. The gas unit has a lower height than a wood-burning or iron device and is mounted on a tripod. The main advantages of such stoves include:
- ease of operation;
- possibility of precise adjustment of combustion temperature;
- small sizes.
Gas combustion in the stove is maintained using portable household cylinders weighing 5-10 kg, which are connected through a special hose at the food preparation site.
Attention! The use of gas furnaces requires increased attention and compliance with fire safety precautions. Combustion stability is largely determined by the quality of the connection between the incoming gas valve and the burner nozzle
Manufacturing a stove with a gas burner requires high-quality materials and a responsible approach from the craftsman
Combustion stability is largely determined by the quality of the connection between the incoming gas valve and the burner nozzle. Manufacturing a stove with a gas burner requires high-quality materials and a responsible approach from the craftsman.
Photo 2. Gas stove for a cauldron. At the bottom of the product there is a burner that runs on gas.
A complete guide on how to season a cast iron cauldron
Stove for a cauldron made from wheel rims
Making a stove for a cauldron from car wheels with your own hands takes just a few minutes - this is one of the most simple, but nevertheless original designs.
The whole process can be divided into several stages.
To make a cauldron stove you will need:
- two rims from a domestic car of the thirteenth radius;
- 1 meter of rectangular pipe;
- three large bolts with nuts;
- 4 nuts for 10;
- wire 8 mm thick;
- Bulgarian;
- welding machine;
- electrodes;
- welding helmet and welding gaiters.
We purchase a rectangular pipe, wire, nuts and bolts at any building materials store or market.
Of course, you can also buy rims, but it’s easier to go to several tire shops where they can give you them for free or for a nominal fee.
You need stamped wheels that are made of steel; cast wheels will not work. They are made of aluminum alloys that are resistant to high temperatures, and they can only be welded in an argon environment.
Main stages of work:
Using a grinder, we saw off the partition on one of the disks. We install one disk on another. In this case, the remaining partition of the previous disk should be at the bottom. The partition for attaching the disc to the wheel is welded to the main rim using spot welding. We need to find the welding points and cut through the metal of the partition to the rim. Don't overdo it, the rim should remain intact. You need to cut the partition at a distance of 1.5-2 centimeters from the weld spot.
After the cut, the metal of the partition is easily removed; you need to pry it out with a screwdriver. It is important to leave fragments of the partition at the welding points. They provide a gap between the walls of the cauldron and the stove, which creates draft in the stove, and the heat evenly envelops the cauldron from all sides. We place one disk on top of the other so that the disk with the sawn partition is on top
In the lower disk, the fastening partition remains intact; this will be the bottom of our stove. We align both disks relative to each other and weld the disks along the entire perimeter. Now you need to make the door. We make a vertical cut in the welded disks to the size of the door. It is very important to leave a strip of metal at the bottom; it will act as a threshold that will hold the coals inside the stove. After the cut is made, we put bolts on it with nuts screwed on them, they will act as hinges for us. We weld the bolts on one side of the cut, the nuts on the other. All that remains is to cut the door around the entire perimeter and weld a long bolt, which will serve as a handle. The edges of the door and the opening must be cleaned of burrs with a file or grinding disc. Now we make handles for carrying the stove. We bend them from wire in a vice. Wire of this thickness bends without much effort, and right angles in the bending areas are given to the handles using a hammer. We put nuts on the handles and weld the nuts to the stove body opposite each other. We turn the stove over and weld three legs. The length of each leg is 30 centimeters. It is also necessary to weld a large hole for the hub, which is located in the center of the disk. This can be done using any piece of metal of a suitable shape. We load the stove with wood and heat it well. During this process, the remaining paint on the discs burns out, and the oven can be painted using any heat-resistant paint.
Advantages and disadvantages
A gas burner is a very popular tool for tourists. Preparing delicious food on the road can be very difficult. And together with the cauldron, the burner significantly simplifies this process. This is not surprising, since the device has many significant advantages:
- ease of operation – using the burner does not require special skills;
- compactness – small size and weight allow you to always have the burner with you in your backpack;
- Duration of operation - one burner can last a very long time if used correctly;
- low price - this device is available to everyone, and if desired, you can assemble it yourself;
- fast cooking - when turned on, the flame immediately burns at the desired temperature, no need to waste time, as when kindling firewood;
- stability – the burner can operate even at low temperatures or in the wind;
- the absence of smoke and soot - this not only makes the cooking process more convenient, but also protects the utensils used.
However, there are also some drawbacks. But there are far fewer of them than there are advantages. The disadvantages include:
- decrease in efficiency due to weather conditions - despite the fact that the burner can operate at low temperatures, the combustion intensity decreases due to cold;
- fuel costs – the burner consumes a lot of gas during operation;
- probable threats - gas has been and remains a dangerous substance, therefore, if equipment breaks down, there is a threat of explosion or poisoning.
But the above disadvantages do not make gas burners less in demand. In any case, more advanced alternatives simply do not exist today. So these devices will remain indispensable and popular among lovers of long hikes for many years to come.
Required burner power
The thermal power of the kitchen stove burner is 2-2.5 kW.
It is not enough.
Even a thick-walled cast iron cauldron cools the meat, stops frying and produces juice.
This is not at all what is needed.
Kazan
To select a burner, we suggest focusing on the following:
- Cauldrons with a volume of <12 liters – 5-8.5 kW;
- For a 40-liter you will need a 20 kW burner;
- A 60 liter cauldron will require 25 kW.
We recommend choosing burners with adjustable flames. It is not always convenient to regulate with a gas reducer, and some reducers do not have this option.
You can watch the video how such a burner works (here a cheap wood-burning stove under the cauldron acts as a cauldron holder and wind protection):
https://youtube.com/watch?v=fg2N60jmZeM%3F
Construction of a stove for a cauldron made from a pipe
When making a stove for a cauldron from a pipe with your own hands, it is important, depending on your needs, to draw up a sketch or drawing of a future kitchen masterpiece
Please note a few points:
Depending on the size of the cauldron, it is important to determine the diameter of the pipe and the dimensions of the entire structure. You should not select a cauldron to match the pipe; it is easier to find a piece of pipe or widen the neck than to buy an expensive cauldron
The depth of immersion in the oven is at least 2/3 of the height of the dish. When the cauldron is completely immersed, the overall height of the structure should be taken into account. But a greater distance to the heated surface will require extra firewood and overall cooking time. It is necessary to determine the height of the stove and the dimensions of the base or legs. The stove should not be placed on the floor; it is better to raise it off the ground - this will not only make it easier to maintain, but will also make it aesthetically pleasing. In this case, you will need to spend money on purchasing a sheet of metal for the bottom, so it’s up to you to decide. It is better to take into account the height of the permanent cook in the family; he should not bend over, putting additional strain on his back muscles. Before manufacturing, immediately decide how often the oven will be used. You will need to use a thick-walled pipe when installing a cafe stove. For home needs, it is enough to find a piece with a wall thickness of 3-4 mm. Select the height of your future stove. The optimal option is the distance from the bottom of the dish to the top of the layer of burning firewood is 300 mm. Depending on the depth of immersion of the dishes, achieve the required gap. If you plan to use several boilers of different sizes, you can change the distance using special inserts.
Design example
Which burner is suitable for a cauldron?
To cook food in a cauldron, you need a fairly powerful and spacious burner. It is best to use a model with a hose. The design of such a device allows you to install a fairly large container.
When selecting a burner for a cauldron, you should consider:
- Power. The larger the size of the cooking utensils, the higher the power rating of the equipment should be.
- Material. Cast iron burners are considered the most durable. They do not deform at high temperatures and exposure to heavy dishes.
- Design. The cauldron has a fairly wide bottom, so when choosing a gas burner you should take its size into account.
- Legs. An important aspect of choosing a burner for a cauldron is the presence of stable supports. The legs should be strong and set wide.
Cast iron gas burner for cauldron
Convenient use of the burner is ensured by piezo ignition and power adjustment. With the help of a properly selected device, you can cook any dish in a cauldron while relaxing in nature.
Possible difficulties
During manufacturing there is a risk of encountering the following troubles:
- poor quality of seam welding;
- the grate gets stuck when lowered into the cylinder;
- lack of structural stability;
- release of an unpleasant odor during cooking.
A common cause of poor weld welding is the incorrect choice of welding electrodes. To avoid this, choosing their markings according to the thickness of the metal being welded will help.
Important! Iron, steel and stainless steel sheets require different electrodes, and the angles must be made of the same metal as the furnace cylinder. To prevent the grate from getting stuck in the middle of the cylinder, its dimensions are selected 5-10 mm smaller than the internal diameter of the body
To prevent the grate from getting stuck in the middle of the cylinder, its dimensions are selected 5-10 mm smaller than the internal diameter of the body.
The instability of the structure results from the incorrect choice of the angle of inclination of the supports. The taller and narrower the cylinder, the straighter the oven legs should be.
An unpleasant odor inside often appears if iron with poorly cleaned paint is used for the structure, so before folding the sheet for the body, it is burned with a blowtorch.
Features of operation
The most important thing in using gas burners at home is compliance with safety regulations during operation. Equipment operating on gas requires special control. The following rules must be observed:
- before each use, it is necessary to check the integrity of the component parts of all equipment (connecting threads, propane cylinder, hose);
- timely elimination of various damages, replacement of spare parts and breakdowns;
- When using for the first time, you should carefully study the instructions, only then proceed to use;
- if a new cylinder is connected, so that the burner interacts evenly, you need to bleed the air;
- when installing the structure, place it only on flat surfaces, especially for models with stands;
- a correctly chosen place with an excellent surface will eliminate the need for wind barriers and tilting the burner during the cooking process;
- Use outdoors rather than inside a tent is recommended;
- carefully inspect the cylinder for integrity, monitor the quality of the fuel.
- It is recommended to periodically clean the nozzles with a sharp needle, as the holes become clogged with repeated use;
- do not skimp on spare parts, carrying out repairs in a timely manner to avoid dangerous situations;
- keep the tank away from fire;
- When starting work in low temperature conditions, preheat the cylinder. It would be even more practical to wrap the cylinder with a thick warming material to prevent the fuel from freezing or use a backing.
- After finishing cooking, be sure to turn off the fuel supply;
- Before disconnecting the burner, check that it has completely cooled down;
- Do not leave switched on equipment unattended to avoid fire hazards.
Undoubtedly, there is no ideal gas burner that meets all the needs of most consumers. But knowing your needs and preferences, having carefully studied the technical characteristics of the models, the pros and cons of gas equipment, you can make a worthy choice. The main thing is to know the principles of operation and highlight the tasks that the purchase of a gas burner will solve.
Review of the gas burner model “TAGAN TG-26” in the video below.
Operating rules
Gas burners belong to the category of universal and easy-to-use devices that tourists and vacationers take with them when going outdoors. The device helps you quickly and comfortably cook any dish over a fire in a cauldron. All this is achieved with strict adherence to the safety rules required when working with equipment operating on gas fuel.
To use the product correctly, it is important to listen to the recommendations of specialists:
- Before starting work, it is recommended to install the equipment on a flat surface;
- before turning on the burners, the integrity of the installation and the gas cylinder is checked;
- When igniting the device, it is strictly forbidden to tilt;
- It is unacceptable to place a gas cylinder near an open fire;
- when using a microburner, only high-quality fuel is used;
- It is strictly forbidden to leave small children unattended near the device;
- After cooking, be sure to turn off the gas supply;
- Before disconnecting the device from the cylinder, it is recommended to wait until all parts of the structure have completely cooled;
- if the device is used for cooking in winter, a special substrate must be placed under the cylinder.
During the cold season, all equipment should be stored at above-zero temperatures. In order to provide it in a barn, garage or outdoors, the cylinder is wrapped in a sleeping bag or any other warming material.
The use of a microgas burner in a tent is strictly prohibited.
Overview of species
There are different burner options.
Balloon
This burner is installed directly on the gas cylinder. Made from steel or titanium. There are types of burners with adaptable mounts that are suitable for different cylinders. The advantage of such devices is their minimal weight, modest price and ease of movement.
Integrated
This device is connected to cooking utensils and a cylinder. In fact, it is also a gas pump, but with a significant difference in gas consumption. Due to the radiator mesh inside the cookware, heating occurs much faster, which significantly reduces fuel consumption. This is the main advantage of such burners.
With hose
Such burners are considered the best option for both home and camp use. The material for production is mainly cast iron, less often steel. Their power varies from 3.5 to 35 kW, which significantly affects the quality of cooking. Burners with a hose connection, in turn, are divided into two types - using bottled gas (propane, butane, isobutane) or natural.
Advantages: can be used for cooking large quantities of food - from 10 to 60 liters, adjustable burner power, which ensures quality and convenience of cooking, the ability to use large cylinders, up to 12 liters.
Disadvantages: relatively high price, cumbersome components.
Gas burners are also classified into the following types:
- desktop;
- mortise;
- floor
Tabletop burners are installed directly on a table or other flat surface. Used both at home and outdoors.
Mortise ones are installed in a tabletop or other suitable surface, after which they are connected to the cylinder. Used at home or in the country.
Floor-mounted ones can be used both at home and in camping conditions - fishing, hunting, on a long hike, as well as in the country.
How to choose a gas burner
First of all, you need to build on versatility. There are multi-fuel burners (gas and liquid fuel) that use only one of these two types of fuel. Power is also a determining factor. Values up to 2 kW - low-power devices. From 2 to 3 kW - respectively, medium power burners, more than 3 - high power.
Dimensions are also important, primarily for a camping burner. Unnecessarily large or small variations should be avoided. You need to start from the number of people and personal calculations
You should pay attention to functionality and equipment, although the latter indicator will certainly affect the price. Operating time, flame temperature and power are significant indicators for soldering irons
You should pay attention to the presence of such amenities as piezo ignition and preheating. Many products of this profile can be found on Aliexpress. You need to choose a burner after studying the nuances that will certainly affect its operation.
For tourist purposes
These are stand-alone devices that can serve as kitchen utensils. Based on power, they are divided into 3 categories. The lowest rates are acceptable for solo hikes and winter fishing; medium rates are suitable for groups of up to 3-5 people; large figures are for eight to ten people. The non-stick coating on the pot will improve efficiency. On long trips, the cost of fuel used increases. You also need to take into account that not all types of fuel can be transported with you (for example, by plane). In this case, liquid fuel is preferable to gas, and it also takes up less space. Weather conditions such as frost, terrain and altitude are key to ruling out certain options. There are two most important aspects to consider: the number of people up to 3 or more, mild or extreme weather conditions.
For soldering
Fuel consumption decides a lot - both material costs and operating time. Therefore, his choice is one of the key nuances. The type of fuel also affects the maximum flame temperature. Gasoline will give a higher indicator than gas, however, it is consumed faster. Consequently, the duration of work will be reduced, and even a more capacious cylinder will not help much. We should not forget about the ideal weight of the structure and, accordingly, the comfort of manual work. The preheating system also increases it. It is worth dwelling separately on fuel containers: they come with or without a valve, disposable and reusable, stationary and removable. There are options with fuel supply regulation, which allows you to control the temperature. Their efficiency is much higher, as is their price. The presence of piezo ignition is an additional argument in favor of purchasing a blowtorch.
Recommendations for use
A gas burner is a fairly simple device to use. But it runs on gas, which means for safety reasons you must follow certain operating rules. We have prepared some important tips especially for you:
- before turning on the burner, check its condition and the condition of the cylinder for damage or breakage;
- if the cylinder is new, release the air at the valve so that the burner operates evenly;
- to install structures, use only flat surfaces, and during the cooking process, avoid tilting the burner;
- Do not turn on the burner inside tents under any circumstances;
- monitor the quality of the fuel used;
- if the nozzle holes are clogged due to frequent use, clean them with a needle;
- any broken parts must be replaced, otherwise the use of such a device becomes extremely dangerous;
- keep the fuel bottle away from fire;
- do not leave the system unattended during the cooking process;
- if you use a burner at low air temperatures, place a substrate under the cylinder, or even better, keep it warm, in warming bags;
- after cooking is complete, turn off the gas supply;
- Allow it to cool before disconnecting the burner from the cylinder.
As you can see, the rules are quite simple. Every lover of long hikes should know them. A gas burner is a useful device not only for tourists, but also at home. Especially if you like to pamper your family with delicious dishes from a real cauldron, prepared according to the recipes of oriental peoples. This device will not only provide you with this opportunity, but will also greatly simplify the cooking process. And firewood and coal will remain only a relic of the past or decoration in your summer cottage.
You can learn about the operating principles of gas burners and their characteristics in the following video.
Options
You can also arrange a gas option for it, that is, create a burner using this fuel. This option is much more convenient, since control over the flame is easier, there is no need to use firewood and wait for a large fire to burn.
It is also important to purchase the right cauldron. It is better to opt for the aluminum or cast iron version
The first one is excellent for hiking. It has compact parameters and modest weight. The second is better suited for home or country conditions. You can also use the steel version at the dacha. The steel in it is heat-resistant and thick.
Even before creating a burner for your cauldron, you need to have knowledge about its specifics. Its walls are of good thickness. The bottom has the shape of a ball. Therefore, this cookware is not stable on flat surfaces. The shape of the cauldron is such that a ring-shaped stand is specially supplied for it. The cauldron should be placed only on it. It is not recommended to place it on a standard barbecue grill or on an outdoor grill model.
If you set out to please yourself and your family and friends with the most excellent pilaf, then you need culinary skills and the right cauldron. You cannot create real pilaf in a container with a flat bottom.
A container with a flat bottom heats up faster in the lower part than along the walls. And heating is distributed evenly throughout the cauldron.
One more nuance: if you just purchased a cauldron and have not yet had any culinary operations in it, then you need to clean it of any remaining machine oil. It remains after the production process. The method for eliminating it is simple: it is washed off with warm water and safe laundry soap is used. The use of modern means for these purposes is prohibited. Because their composition contains elements hazardous to health. And besides, the walls and bottom of this cookware are very porous.
Upgrade Tips
Craftsmen have developed a number of improvements to the design of the cauldron stove. Among them we can highlight;
- Metal stove cauldron with barbecue. By welding the grill to the stove, the metal required for the manufacture of 1 side panel is saved. Space is saved on the site or in the gazebo. You can simply make cutouts - segments for rotating the skewers and use the oven as a barbecue.
- If the structure needs to be moved around the site and finishing elements need to be added to the structure, the stove can be placed on a cart with wheels. By performing simple finishing using twisted rods with curved ends purchased from blacksmiths, you can decorate the stove with different metal patterns.
- You can make a structure with a roof made in the form of a cap. And a small gnome will appear on your site. It all depends on the imagination of the master.
- You can upgrade a steel stove that loses heat when burning. To do this, it is lined with natural stone or brick, and a tandoor or oven can be attached to it. In this case, a permanent structure is created on the site.
How to make it yourself
The devices are sold in specialized stores. However, to save money, it is quite possible to make a gas burner for a cauldron with your own hands, the main thing is to strictly follow the prescribed instructions.
Materials and tools
Before starting the production of equipment, it is recommended to first prepare the appropriate materials and tools. To assemble the microburner structure, you need to make sure you have a gas cylinder. The device can be operated using propane or propane-butane. To make your own unit you will need:
- connecting unit for a gas cylinder;
- heads;
- a hose made from fabric and rubber;
- nozzles;
- gas supply regulator.
Also, during the work process, a steel rod, the width of which is 2 centimeters, can be useful. Fastening of various parts of the device is carried out using fastening clamps.
The assembly of a homemade gas microburner is carried out using the appropriate tools - a screwdriver and a drill. To work with the second type of tool, you need to use drills with numbers 2 and 4.
Step-by-step instruction
In order to properly make a burner with your own hands, it is recommended to follow the step-by-step instructions:
- To produce the equipment housing, 4 holes are drilled in a steel rod - their diameter should be no more than 1 millimeter. Thanks to the openings, oxygen access is provided to support the combustion process. The same holes are drilled in the divider rod. Holes are made in the body, the diameter of which is 5 millimeters.
- A divider is carefully inserted into the frame, the material of which is steel.
- The flange is placed inside the finished structure. When installing it, be sure to provide a gap of 0.5 millimeters. This opening is needed to slightly slow down the gas stream after leaving the igniter.
- To build a nozzle, use a 2 mm drill to make a blind hole in a metal rod. The distance from it to the exit point is more than one and a half centimeters.
- The supply is made using a steel tube with a diameter of no more than 1 centimeter. It is recommended to give preference to products whose wall thickness does not exceed 2.5 millimeters.
- Using a drill number 4, make holes for the jumpers. After this, they are carefully minted. To ensure free placement of the end of the tube on the nozzle, the end is ground using emery.
- A hose is placed on one end of the steel tube. Its second end is attached to the cylinder with a clamp.
- The body, on which there is a divider, is screwed onto the thread of the prepared nozzle.
At the final stage, the finished homemade gas burner is mounted on a stand with legs. For its manufacture, strong metal is used, which is characterized by a high level of fire resistance. All metal parts of the structure must first be coated with paint, which guarantees their protection against corrosion. To ensure the correct direction of the flame in strong winds, it is recommended to make protection using stones and other available materials.
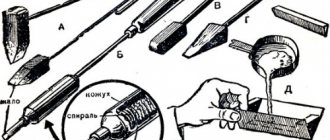
Making the divider blanks
We drill holes in them with a diameter of 4 mm
We make 7 such dividers
We cut the tubes to the size of the dividers
We weld the elements
Cut a ring out of metal and make holes in it
Install the created injectors
Ready
Tripod
Making your own tripod is rational and easy. For the simplest option, you will need metal and a welding machine. More complex products have folding elements in their design. Of course, such tripods are the most convenient to use, but the manufacturing process is much more complicated than conventional ones. If you plan to install a cauldron in the country, you can choose a one-piece design. It is simple and has excellent stability.
Required materials and tools
What you will need to make a tripod:
- fittings;
- welding machine;
- electrodes;
- welding mask;
- welding mittens or gloves
When choosing the material for making a tripod, it is preferable to choose fittings. It is very stable and can withstand high temperatures well. The required amount of reinforcement is calculated only when the height of the finished structure is determined. You will need 3 identical cuts. The larger the cauldron, the higher the tripod should be. The most common tripod option has a height of 50 to 90 cm.
For example, for a cauldron with a diameter of 30 cm, the recommended height of the tripod is 120 cm from the ground (standing on three legs). It may be smaller, it all depends on your wishes, but it is the specified height of the tripod that will allow you to light a fire under the cauldron without any problems.
You will also need two sets of three jumpers of the same size. The first is necessary to connect the top of the tripod, which has a triangular shape. Despite the fact that the cauldron itself is round, if the dimensions of the pieces of reinforcement for a triangular structure are correctly calculated, its position will be stable. In this case, the cauldron is installed inside. The length of the reinforcement on one side of the stand (cauldron with a diameter of 30 cm) will be 21 cm. The jumpers are welded in the center of the tripod, for example, at a height of 60 cm. They provide it with stability.
Step-by-step manufacturing instructions
Making a tripod is very simple. If you wish, you can make your own drawings or use a ready-made one. Having made the necessary sections of reinforcement, they are welded. For convenience, it is recommended to carry out work with an assistant who will monitor the even arrangement of the parts and hold them.
After completing the welding work, it is necessary to clean the seams with a grinder. This is done for the beauty and finished look of the product. When cleaning seams, you can use the following tools:
- Bulgarian;
- cleaning circle.
Connecting rings and chain
Tripod Leg Connection
We clamp the stand so that the hooks do not fall out
Attach the hook
Adjusting the height
Ready
Advantages and disadvantages
A homemade tripod for a fire has the following advantages:
- Easy to make and use.
- Cheap manufacturing.
- The ability to make a product yourself, even a beginner can handle it.
In addition to the advantages, this design has the following disadvantages:
- Cheap look.
- Difficulty in transportation.
- Possibility of using a cauldron of a certain size.
Where to use
The tripod can be used wherever lighting a fire is permitted. However, it is not recommended to install it on a grill. This design is not reliable and may fall. People nearby may suffer burns and injuries. It is best used for cooking when installed in the country, on trips out of town, outdoors or in the forest. For safety, the tripod is placed on the ground and hammered with improvised means (hammer, axe, stone). It will be stable and allow leisure time to pass safely.
Process of creation
A gas burner for a cauldron can also be purchased in stores, but a homemade modification is more convenient. She will become an excellent assistant on hikes and while relaxing in the country.
The main advantages of this burner:
- Ease of use.
- During operation, it does not produce smoke or unpleasant odor.
- There is less soot on the dishes.
To create a cauldron burner yourself you will need:
- Special regulator. Its functions are to supply fuel to the created burner.
- Set of nozzles.
- Heads.
- Unit for mounting a cylinder with fuel (gas).
The DIY working stages are as follows:
- A supply tube is created. A steel tube is used. Its maximum permissible diameter is 1 cm. Required wall density: 2 – 2.5 mm.
- Creating a case for your device. A strong steel rod is used. Its width is 2 cm. There are 2-4 holes in it. They will ensure oxygen gets in. Without them, the fire will not be stable or the device will not start at all. Each hole in diameter reaches 1 mm. Similar holes are required in the cutting rod. A couple of holes are also placed in the body. Their diameter is 5 mm.
- The divider is placed into the housing using pressure. It needs to be pressed very carefully.
- A flange is installed inside the device. The required gap here is at least 0.6 mm. Such a reserve will somewhat slow down the flow of fuel at the outlet section of the igniter.
- Creating an injector. Here you need to use a steel rod and a drill. There should be a blind hole. Drill number – 2. The required distance to the exit section is approximately 1.5 mm. Anything less is not acceptable.
- Creating a jumper. A number 4 drill is used. The created hole must be caulked and the end sharpened. Emery will help with this. You need to sharpen it so that the tip of the pipe sits quietly on the nozzle.
- A hose made from a mixture of rubber and fabric is threaded onto the end of the pipe. The other end is mounted to the cylinder. Fastening is done using a clamp. A screwdriver is used to tighten.
- The body, into which the divider is already embedded, is threaded onto the nozzle thread.
After these stages, the homemade burner can be considered ready. Signs of its correct assembly:
- In operation, it produces an even flame.
- No black smoke appears.
If soot has formed somewhere in the burner structure, slowly turn its body on the threaded section of the nozzle. Examine the connecting points. If the fastening here turns out to be weak, strengthen it: the FUM tape will be used. It perfectly compacts the desired areas. You can regulate the fire by using a valve to introduce gas.
Before using the burner, be sure to examine all its connecting areas for strength and tightness.
After all the indicated steps, the product can be mounted on the stand. The cauldron should easily fit on top. Such a stand can be created from good metal that is not subject to deformation under heavy weight and high temperatures.
It is also very important to protect the flame. This defense will not allow the wind to knock down the fire
And then all the heat will be directed under the cauldron. This type of protection consists of a funnel arranged around the nozzle. When hiking, you can use stones instead of a funnel. But this causes some inconvenience.
A portable gas burner for a cauldron is a device that allows you to quickly and efficiently prepare pilaf during tourist travels. The device has a fairly simple design, so it is not difficult to make it yourself. What burners are suitable for a cauldron and how to build them with your own hands?
What is
A gas burner for a cauldron is a special equipment used for convenient and quick cooking during camping trips. The device has a simple design, which allows you to make it yourself. The body consists of a glass, a handle, a holder, a gas hose, among other elements - two gearboxes, one of which is used to supply fuel, a nozzle, a head, and a unit for attaching a gas cylinder. The burner power can be from 2 to 7 kW. There are installations with and without legs. The units are manufactured from durable metal, which ensures long service life.
The gas burner is easy to maintain, but requires periodic testing of its functionality. Since the equipment does not create soot, the dishes are easy to clean after cooking. Most burners are equipped with piezo ignition, which allows you to quickly ignite a fire without the use of matches or a lighter.
Thanks to the presence of a paint coating, the structure’s resistance to various negative environmental influences is guaranteed.
The process of creating a gas burner
The gas device is sold ready-made in the store, but you can try to make a burner with your own hands. Thus, it will fully meet your requirements. To work you will need:
- special regulator for supplying fuel to the burner;
- set of nozzles;
- steel tube with a diameter of 1 cm, wall thickness up to 2.5 cm;
- drill;
- gas supply hose;
- unit for mounting a gas cylinder;
- burner.
Both pure gas and its analogues - propane or propane-butane composition - are suitable as fuel. The process for creating a device is as follows.
- The burner body is made of steel 2 cm wide. 2-4 holes of 1 mm each are made in it to ensure access to oxygen. Similar holes are required in the dividing rod and in the body. Their diameter is already 5 mm.
- The divider is placed into the housing by pressing.
- A flange with a gap of 0.6 mm is installed inside the device.
- A blind hole is made for the nozzle using a steel rod and drill number 2. The required distance to the exit section is approximately 1.5 mm.
- For the jumper, use a drill number 4. The created hole must be caulked and the end sharpened. This is done so that the tip of the pipe sits quietly on the nozzle.
- A woven rubber hose is put on the end of the pipe, which is then connected to the cylinder. The hose is firmly connected to the pipe with a clamp to avoid leakage.
- The housing with the divider is mounted on the nozzle thread.
- A funnel is built around the nozzle so that the wind does not extinguish the fire.
After this, the homemade burner is ready. Now you need to test it for malfunctions. If everything is done according to the rules, the flame will burn evenly without producing black smoke. Be sure to check the tightness of all joints. The assembled device is attached to the stand. It must be strong enough to withstand the weight of the cauldron and high temperature. The combustion temperature can be adjusted using a valve.
Classification
There are a variety of gas microburners for cauldrons, which differ in the type of fuel used, design, and power. Each of them is characterized by a number of features and advantages, which allows the user to choose the optimal solution for themselves.
By design
The cauldron has a wide bottom, so when choosing or creating a device yourself, you need to take these design features into account. The units are made from a variety of metals. The most durable products include cast iron microburners, resistant to various mechanical damages. In order to ensure comfortable use of the equipment, it is recommended to give preference to options with piezo ignition and power control.
According to design, there are several types of gas burners:
- On-balance - they look like a compact gas stove for a cauldron, which is light in weight. The devices are installed on the cylinder. You can place dishes with a volume of no more than 3 liters on top.
- With a hose - this is a burner for a cauldron, which is connected to the cylinder using a flexible pipe. The device is used to install dishes that have impressive weight and dimensions. This becomes possible thanks to the presence of massive legs with a wide setting.
- With a horizontal cylinder arrangement, these are the most budget-friendly devices, the operation of which is carried out using simple collet cylinders.
- Integrated systems - such a burner for a cauldron is characterized by connection with the cooking container into a single whole. The design provides a significant reduction in fuel consumption.
Thanks to the presence of several types of gas burners, it is possible to select the most acceptable and affordable option for each tourist.
By power
According to the power of the devices, they are divided into several types. Microburners can be:
- high power – 3-7 kW;
- average – 2-3 kW;
- low – up to 2 kW.
Choosing the type of grill
Charcoal grills
You probably cook food at home on the stove and in the oven, and outside the city you have lit a barbecue at least once. So, such food cannot be compared with food cooked on a charcoal grill. What's the difference?
A charcoal grill is a closed fireplace with coals and a barbecue grill, inside of which a special microclimate for cooking is created. The fact is that, in addition to the heat from the coals, the dish is also affected by hot air, the flows of which carry out a convection movement inside the hearth. The second point is the barbecue grill. It absorbs the heat from the coals and transfers it directly to the dish, creating a juice-retaining crust and a beautiful pattern on the meat. And, perhaps, the main advantage of the grill is the special barbecue taste, which is created when fat and juices drain from the meat, fall onto the coals and return back in the form of steam, which saturates the dish and saturates it with new shades of taste.
Sometimes you can see how a charcoal grill is used as a kind of barbecue. The meat is fried on a grill, but without a lid. As a result, instead of convection, the meat is fried only from the heat of the coals from below. Outdoor air constantly cools the grate, preventing it from heating up to full capacity. Cooking this way is more difficult and takes longer, and the dish turns out much drier. Use your charcoal grill correctly and you will be pleased with the results.
Advantages and disadvantages
The cauldron burner is characterized by a large number of advantages:
- simple design that allows you to use the device without special training;
- light weight and compactness, which simplifies transportation;
- simplest possible cooking;
- absence of soot and thick smoke when the equipment is operating, which is a guarantee of comfortable cooking;
- duration and safety of operation;
- Possibility of use even in windy weather;
- low cost, thanks to which the cauldron burner is available to a wide range of buyers.
The device is extremely easy to operate: in order for the unit to ignite, you just need to turn the valve and light the fire. There are models of devices on which cauldrons with a capacity of more than 10 liters can be installed.
The cauldron burner also has a number of disadvantages. Equipment efficiency decreases at low temperatures. Another disadvantage of the installation is intensive fuel consumption.
Types and characteristics of gas burners
Various types of gas burners are used for cooking outdoors. They differ in power ratings and have different design characteristics. Each device has its own advantages and features of use.
There are these types of tourist gas burners:
- With a hose. The design consists of a burner connected to a small fuel cylinder with a flexible pipe. The device is perfect for heavy, massive dishes. Stability of the burner is ensured by strong, wide-set legs.
- On-balloon. This type of device is compact and light weight. Burners mounted on a cylinder are designed for fairly light dishes of no more than three liters.
- With a horizontal cylinder arrangement. Burners of this type are the cheapest. For such devices, simple collet cylinders are used.
Gas burner for cauldron with hose
Integrated gas systems are also produced. In such models, the burner and cooking container are a single unit. Due to this design, fuel consumption is significantly reduced.
Gas burners are divided into three categories according to power indicator:
- high – from 3 to 7 kW;
- average - from 2 to 3 kW;
- low – up to 2 kW.
Devices can be with or without piezo ignition. The burners are equipped with a power regulator. They are considered the easiest to use, take up almost no space, and weigh little. The burners are connected to the gas cylinder through a threaded connection. The device can operate on propane, butane or isobutane.