End trimmer for metal pipes: types, application, functionality
Nowadays, almost all structures in residential and industrial buildings are made of metal, and pipes are often used in such structures.
This allows you to significantly reduce the nodal mass and make the fastening stronger and more rigid. In order for pipes to last a long time and not cause premature failures, they need to be prepared. One of the preparation stages concerns the ends. This process is quite labor-intensive and time-consuming, which is why they resort to using a tool such as a metal pipe trimmer.
The strength and durability of buildings depends on the quality of this assistant, so it is important to be informed about your choice.
Differences from metal devices
Metal and polypropylene trimmers are used in the same way; their difference lies in the design, not the principle of operation. Each type was designed taking into account the functional characteristics of the material with which the work is carried out. If you disassemble the polypropylene analogue, then its design will include:
- Set of couplings, two pieces, different in size. Each is designed for a specific range of product diameters, from 16 to 120 mm.
- A set of steel legs that can be sharpened if necessary.
- Set of handles.
- Aluminium case.
- Special shaver attachment for electric drill. Needed for trimming from the outside. Consists of a guide and a cutting part. The first is made of duralumin, the second of hard alloys.
The shaver works as follows: when inserting a pipe, the cutting part rests on the first one, which is considered a signal to turn on the drill. The required reinforced layer is already embedded in it.
A unique feature of this nozzle is that it is always processed to one size. This allows you to significantly reduce the trimming time and facilitate the work process.
Features of reinforcement of polypropylene pipes
High performance properties of polypropylene pipes are achieved thanks to their coating with a protective layer. If we are talking about products intended for household use, then usually its thickness is no more than 0.1 mm.
Advantages of reinforced pipes:
- Reducing the impact of high temperatures on the product . An ordinary polypropylene pipe is designed for operation in conditions where the temperature does not exceed 95 degrees. This is usually sufficient for installing heating systems or domestic water supply systems. However, in certain situations, such as emergencies, the temperature of the transported liquid may exceed the maximum permissible value. This mode of operation leads to sections of the pipeline being deformed or completely failing. Reinforcement allows you to reduce the impact of high temperatures on the product, preventing system ruptures.
- Increased resistance to temperature changes . One of the main disadvantages of conventional polypropylene pipes is their susceptibility to temperature changes. The result is their sharp expansion and contraction. The product does not tolerate such deformations well, gradually losing its original properties. Over time, the pipes will simply fail. To avoid this situation, they are additionally reinforced.
However, reinforcement has one significant drawback. It somewhat complicates the welding of polypropylene joints. For this reason, pipe stripping is required first. The procedure is extremely simple: removing the top thin layer of aluminum from the product. If this is not done, the quality of welding will decrease, which will lead to a decrease in the service life of the entire pipeline.
It is important to do the work carefully, understanding the general principle. To better understand everything, study the technological process and also prepare the necessary tools. Detailed information on these issues will be presented later in the article.
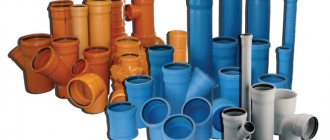
Types of pipes
The following need to be cleaned in one way or another:
- Black steel pipes
. They are cleaned of rust and other contaminants before painting and before manual threading;
In the second case, rust is not simply removed from the ends of the pipe. An entry for a die or die is formed on them - the outer chamfer is removed at an angle of about 15 degrees to the longitudinal axis.
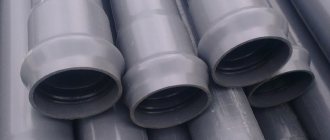
- Polypropylene
pipes reinforced with aluminum foil.
Do-it-yourself pipe trimmer
In mass production of shaped pipes (for example, in sports car and motorcycle workshops, or in plumbing repair shops), a manual pipe ender can be made independently. To do this, the initial diagram of the trimmer, which is shown in the figure, is made according to the workpieces available to the home craftsman.
The design consists of the following parts:
- A base in which milled grooves are made for mounting a clamping device. In turn, the shape of the base can be adapted to an existing workbench, work table, etc.
- An L-shaped bracket with three longitudinal grooves, the presence of which allows pipes of different diameters to be fixed in the fixture.
- Sliders with adjusting and clamping screw.
- Replaceable presser foot.
- A bracket that presses the foot to the slide with screws.
- Bearing unit.
- A swing arm that serves as a supporting surface for the bearing assembly.
- A shaft that is structurally no different from a similar part of industrial facing machines.
To make a shaft, you can use the front shock absorber strut of a passenger car (for example, a VAZ - they are easier to get at a car service center). In addition, the steel grade of the shock absorber strut, in terms of its strength and performance characteristics, fully complies with the rigidity requirements for high-quality trimming of steel (and, especially, aluminum) pipes. The guides of the rack itself are suitable for guiding the shaft: they have a wear-resistant surface coating based on antifriction alloys. The ends of the stand are naturally subject to additional processing - for mounting in a drill chuck, and for installing a core cutter.
Needle bearings should be pressed into the guides, the size of which is selected according to the dimensions of the guides. Two bearings installed in the guide from the return cylinders of a decommissioned hydraulic press will ensure the necessary rigidity and parallelism of the main working unit of the trimmer. Bearings are installed simultaneously at both ends of the housing.
The existing advice regarding the installation of fluoroplastic guides should be treated with skepticism, since the load-bearing capacity of fluoroplastic is much lower than that of bearings.
PPR Soldering Tips
After turning on the soldering iron, you need to let it warm up for about 10 minutes. If there are dirt on the tips, remove them on a hot soldering iron with a non-synthetic cloth or paper. It is not recommended to remove dirt with metal objects - it will damage the non-stick coating.
Before welding, you need to carefully plan the order of assembly of all connections. The order should be such that the pipe or coupling has a reserve of movement for removing the nozzle. In the first stages of working with polypropylene, you need to pay more attention to planning.
Immediately before welding, the pipe and the inside of the fitting are wiped with a clean, dry cloth - the surfaces to be soldered must be clean. Of course, you shouldn’t strive for sterility - there is no need to wipe the plastic with alcohol, as some advise.
The pipe and fitting are simultaneously placed on opposite sides of the heated nozzle and the required heating time is maintained. While the polypropylene is warming up, there is no need to rotate the pipe and fitting for faster fitting onto the nozzle! If the fitting is difficult to fit onto the nozzle, strain your pectoral muscles.
Some nozzles are designed in such a way that when soldering, the fitting fits very hard and is completely put on the nozzle after 3-5 seconds. When should I count the required heating time? The first step is to refer to the same document TR 125-02:
“Heating and melting time is the time counted from the moment of complete insertion of pipes and parts into the working elements of the electric heating tool and their melting.”
For initial experience, this guide is quite suitable. Let me just say that with experience comes an understanding: with “tight” nozzles and standard warm-up time, excessive melting occurs.
Having removed the pipe and fitting from the nozzle, they are connected as quickly as possible and held motionless for several seconds (welding time in the table). Objectively - after removing the soldering iron from the nozzle, there are 1-3 seconds to make the connection. Even after the welding time has passed, care must be taken to ensure that no external forces act on the parts to be joined for several minutes. Even the weight of the soldered pipe itself can deform the soldering area.
During welding, you cannot rotate the pipe in the fitting; you need to connect them in a known correct position. For your own orientation, the pipe and fitting to be soldered can be marked with a dash - then during soldering it is more likely to connect the parts smoothly. Nevertheless, you should not unconditionally focus on the lines; you need to see the picture as a whole. Of course, during the connection process there is time for adjustments - no more than a second, when small flaws in the soldering can be corrected.
For well-soldered parts, a border (shoulder) should form around the pipe at the junction with the fitting. If you look inside the fitting, the edge of the pipe will also have slightly melted edges.
Some plumbers blow into the pipe after welding to make sure the pipe is not sealed. From my own experience, I can say that if the soldering temperature and heating time are observed, this never happens. Although theoretically you could get very low-quality polypropylene from an unnamed manufacturer.
Reinforcement
Polypropylene is a material that has a lot of advantages, but along with them it also has some features. When choosing it for your home, especially for hot water supply and heating systems, they must be taken into account.
There are two main points to remember:
- Operating temperature limited to 95 degrees above
. Although, according to current standards, the water temperature in the engineering systems of an apartment building is limited to the same 95 C, in fact, under certain circumstances, this value can be exceeded. This is more like force majeure, but it happens. - High coefficient of thermal expansion
. The flexibility of polypropylene allows thermal expansion to be compensated to a large extent, but there are situations where any movement of the pipe is undesirable. Let's take, for example, laying a polypropylene pipe under screed or plaster.
Reinforcement completely solves the second problem and partly the first. almost does not expand when heated. In addition, at the temperature at which it begins to soften, the reinforcement will keep it from deforming.
Advice: you should not rely entirely on reinforcement and install polypropylene, say, in the supply water supply of an elevator unit in Siberia, where the coolant temperature can exceed a hundred in winter.
At a minimum, connections with fittings, having softened, may not withstand pressure.
Types of reinforcement
Two materials are usually used as fittings for polypropylene pipes:
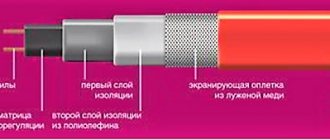
- Aluminum foil
is a layer of aluminum with a thickness of 0.1 to 0.5 millimeters, located outside or inside the pipe, between layers of polypropylene. The method of connecting it to polypropylene is glue; it can be solid or perforated. - Fiberglass mesh
. To be precise, glass fiber reinforced pipes are a three-layer structure, where the inner and outer layers are polypropylene, and the middle layer is a mixture of polypropylene and fiberglass.
So, what does cleaning of polypropylene pipes have to do with it?
The fact is that if your polypropylene pipes are reinforced with aluminum, then before welding with the fitting, the aluminum foil must be removed from the joint.
Cleaning the outer and inner layers: eliminating all unnecessary
To perform the work, in addition to the trimmer or stripping device, you will need additional tools - a pencil (marker), a ruler (tape measure), a knife for cutting polymer pipelines. Stripping for reinforced pipes is carried out only after drawing up an installation diagram and preparing the workpieces.
Work order.
- End trimming. The cut must be strictly perpendicular to the plane.
- Degreasing. The surface can be cleaned with a weak solution of cleaning agent.
- Before stripping, you need to measure the fitting depth. This can be done with a ruler or tape measure. There is an external depth indicator on the surface of the fitting.
- Mark the processing height on the pipe; it should be 1-1.5 mm greater than the depth of the fitting.
- Trimming is performed by rotating the tool so that it is fixed on the outer plane of the pipe. The blades should be parallel to the end.
Do-it-yourself pipe trimmer
In mass production of shaped pipes (for example, in sports car and motorcycle workshops, or in plumbing repair shops), a manual pipe ender can be made independently. To do this, the initial diagram of the trimmer, which is shown in the figure, is made according to the workpieces available to the home craftsman.
The design consists of the following parts:
- A base in which milled grooves are made for mounting a clamping device. In turn, the shape of the base can be adapted to an existing workbench, work table, etc.
- An L-shaped bracket with three longitudinal grooves, the presence of which allows pipes of different diameters to be fixed in the fixture.
- Sliders with adjusting and clamping screw.
- Replaceable presser foot.
- A bracket that presses the foot to the slide with screws.
- Bearing unit.
- A swing arm that serves as a supporting surface for the bearing assembly.
- A shaft that is structurally no different from a similar part of industrial facing machines.
To make a shaft, you can use the front shock absorber strut of a passenger car (for example, a VAZ - they are easier to get at a car service center). In addition, the steel grade of the shock absorber strut, in terms of its strength and performance characteristics, fully complies with the rigidity requirements for high-quality trimming of steel (and, especially, aluminum) pipes. The guides of the rack itself are suitable for guiding the shaft: they have a wear-resistant surface coating based on antifriction alloys. The ends of the stand are naturally subject to additional processing - for mounting in a drill chuck, and for installing a core cutter.
Needle bearings should be pressed into the guides, the size of which is selected according to the dimensions of the guides. Two bearings installed in the guide from the return cylinders of a decommissioned hydraulic press will ensure the necessary rigidity and parallelism of the main working unit of the trimmer. Bearings are installed simultaneously at both ends of the housing.
The existing advice regarding the installation of fluoroplastic guides should be treated with skepticism, since the load-bearing capacity of fluoroplastic is much lower than that of bearings.To make other elements of a homemade pipe trimmer, you can use rolled profiles - angles or channels of the appropriate size. It is better to perform profiling and production of grooves on a coordinate milling machine, thereby guaranteeing their accuracy and parallelism. It will not be difficult to make a clamping device, for which a new clamp with the required diameter and length is suitable.
The rotary lever must have sufficient rigidity, so for its manufacture it is necessary to use a strip with a thickness of at least 12...16 mm. On the part of the body where the rotary lever is installed, it is worth putting angular marks along which it is easier to position the pipe.
Welding polypropylene pipes - a detailed description of the technology
You don’t need to tell anyone what engineering communications are and why they are needed.
We encounter them every day, regardless of where we live - in an apartment building or a private house. As a rule, most problems arise in systems that are called “pipe”. If they are assembled from metal products (in the vast majority of modern “high-rise buildings” and 100% in old buildings), then 3 main disadvantages of such “contours” (lines) can be identified:
- low quality of incoming water, to which rust is gradually “added”;
- periodic leaks at joints;
- the need for regular painting of pipes.
Mainly for these reasons, owners of houses or apartments prefer to replace “metal” with “plastic”. There are several varieties of such products, but most often polypropylene pipes are used for household use. Their popularity is not least due to the ease of installation, which makes it possible to do it yourself without paying. By the way, the cost of one joint is from 400 rubles. The larger the cross-section of the pipe, the higher the price (up to 2,500 with a diameter of 65 cm).
Timing parameters
The author rightly points out that there is no point in paying several thousand rubles for a device that is only needed to perform a one-time job.
But if you rent it (from friends, co-workers, etc.), does the owner still have instructions from the manufacturer of this device? But it is precisely in it that there are recommendations on the heating time, “holding” of the samples when bonding to each other, and their cooling. The table below gives the necessary hints on this issue.
When welding polypropylene, it is important to adhere to the recommended time intervals. If you do not “hold it”, the connection will turn out to be fragile, and voids may also form, which will cause leaks. Overheating will lead to deformation of the material, the appearance of an “accordion” or a decrease in the DN parameter, which will reduce the throughput of the “thread”.
Preparation of blanks
The quality of the connection largely depends on the “cleanliness” of the pipe ends. During the cutting process, burrs may appear on them, which, when heated, will turn into deposits that form on the inner walls at the joints. Therefore, it is necessary to carefully process the pipe ends with a device called a “cutter” (supplied with the device). It is not recommended to use a knife, scalpel, etc. for these purposes if you do not have practical skills in working with polypropylene.
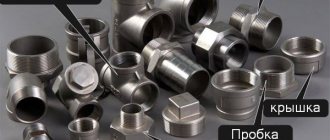
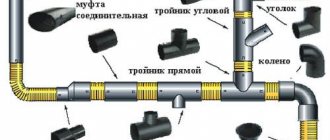
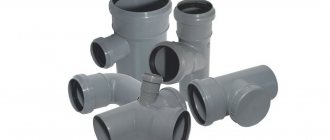
Fitting
It is worth understanding them in more detail. The so-called “monochrome” ones are used only for plastic + plastic articulation. If you need to connect a polypropylene circuit to the “input” (and this is, as a rule, a metal pipe), then for such a connection the connecting element must be of the “combined” type.
Degreasing
The need for such preparation of pipe ends is discussed in the article recommended above. You just need to add that this is done with alcohol-containing compounds. DO NOT use any solvents!
Terminology
Naturally, if a person has not worked with an “iron” before, then some special terms will be incomprehensible. Let's decipher the names of the nozzles:
- mandrel - for fittings;
- sleeve - for pipes.
Practical advice
When purchasing pipes, you must take into account what system (circuit) they are being purchased for - cold water supply, heating or hot water supply. You can be guided by the data summarized in this table.
There is also a technique called “cold welding”. It is performed using a special “crimp” and compression fittings. But for pipes with a cross-section of more than 6 cm, it is recommended to make connections of polypropylene samples using an “iron”.
Operating principle of a metal pipe trimmer
The main task that any trimmer performs is to minimize the gaps that arise when adjusting various elements manually. It is worth understanding that they appear in any case, no matter how professional and experienced the master is. Also, additionally, trimmers allow you to make the welded pipe joint aesthetically pleasing in appearance.
Experts note that depending on the angle of mutual inclination, as well as the diameter of the pipes, their connection can occur along a parabolic, arc or straight line. That is why, by only analyzing the existing situation, it is impossible to clearly determine which specific pairing will be the most successful. This program is usually solved using 3D modeling software. To do this, they use well-known and popular programs such as KOMPAS and AutoCAD. But in practice, their use is quite narrow due to the fact that to work with them you need to have the appropriate knowledge and equipment.
Why is cleaning necessary?
External reinforcing layer
In case the aluminum foil is the outer shell, everything is clear. The very principle of connecting a pipe to a fitting implies that not only the inner surface of the fitting, but also the outside of the pipe must be melted; molten polypropylene will weld with aluminum extremely poorly. No way, so as not to lie.
Internal reinforcement
What if the aluminum layer is inside the pipe? It will not come into contact with the welding site.
In this case, the removal of aluminum is necessary so that the aluminum does not come into contact with water. Otherwise, if there is at least some potential difference, electrochemical processes begin inside the heating system, leading to the gradual destruction of the reinforcing film.
The consequence of this is pipe delamination and a decrease in the strength of the connection as a whole.
Fiberglass
And only here everything is simple: when reinforced with fiberglass, stripping is not necessary for polypropylene pipes. The mesh is located inside the pipe; it does not contact the inner surface of the fitting; not afraid of water.
Tools
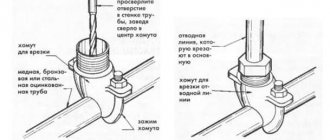
It is easiest to remove foil for external reinforcement. Simple tools will help in this matter - couplings with steel blades inside. They are easy to use, you just need to insert the pipe into the cavity of the coupling and turn, the blades will do their job quickly and accurately. It is very convenient to use double-sided couplings, which make it easy to clean two pipes at once that have a different diameter from each other.
Internal cleaning is carried out using a trimmer. Externally, the design of the trimmer is practically no different from the design of the couplings. So, this tool is a muff, the blades of which are located on the inner end of the device. As in the first option, you need to insert the pipe into the cavity of the device and make several turns.
A universal tool that can be used to remove reinforcement, both internal and external, is a drill with special attachments. Externally, they differ from the same end saw by the presence of a steel rod, which is necessary for installation in the drill socket.
Tools for cutting and stripping pipes
Stripping Tools
You cannot clean a pipe with your bare hands: you must first select and buy a cleaning tool.
In addition, the tool for polypropylene pipes differs depending on what tasks are assigned to it.
So, in our time, masters use:
- shaver;
- trimmer
A shaver is a tool that strongly resembles a coupling with holes and applied handles. Its task is to clean the external pipe from the plastic layer, and then remove the reinforcement.
After processing, the shaver leaves pure polypropylene without reinforcement, burrs, or other inconveniences.
Inside, the shaver is equipped with knives made of tool steel. The outside of its body is made of light metals. It works the same way as a pencil sharpener. Only the cut of the knives is smoother and is designed for the solid structure of polypropylene. You also need to work with it in the same way as with a sharpener.
Plant it, make a few turns (usually no more than 5) and you’re done. Shavers sell for up to $10 per unit.
A trimmer is a tool of a similar type. If the shaver is intended for external stripping of reinforcement, then the trimmer is used for internal stripping.
It already resembles a modified one. Only, unlike a tap, it does not cut threads, but cuts off polypropylene shavings along with the reinforcement.
It makes sense to use a trimmer when pipes are supposed to be soldered through a machine with heating along the inside of the pipe. The cost of a manual trimmer is 5-8 dollars. There are also more expensive models.
Mechanized nozzles are also available. They are mounted on a drill or machine. The parts in question demonstrate amazing efficiency.
The machine strips a single pipe in literally a second, and the quality of stripping is simply ideal. But not everyone has access to such equipment. During repairs or construction at home, the machine can completely replace a manual shaver and trimmer.
Review and interaction with polypropylene pipes (video)
Stripping and soldering
The workflow is simple and can be easily done by hand. All you need to do is strip the pipe and then fasten it to another section or by heating.
Stages of work:
- We are preparing tools and materials.
- We clean it with a shaver or trimmer.
- If necessary, remove excess or burrs.
- We solder the sections.
It is advisable not to overdo it with stripping. Three to five turns with a good tool is sufficient. If you strip more, the layer of polypropylene at the junction of the pipes will become too thin, and this can already weaken the entire structure.
The use of pipes in composite metal structures is very beneficial: pipes give the joints increased strength and rigidity, while simultaneously reducing the weight of the assembly. However, pairing the pipes with each other is labor-intensive and requires special preparation of the ends. This work can be made easier by using special devices - pipe cutters.