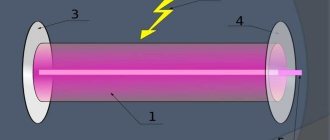
Making a soldering iron for plastic with your own hands
Every man planning to change water pipes in his home should have a special soldering iron that can solder polypropylene pipes. Without it, it will not be possible to correctly connect fittings and pipes into one system. It is unlikely that it will be rational to purchase an expensive device if it will be used, at best, once every few years.
Of course, there are cheaper soldering irons for polypropylene, but they are considered practically disposable. If you want to save money and get a really high-quality tool, then it’s better to make it yourself.
Materials and tools for homemade work • an old iron (the main thing is that it has a heating element in good condition); • Soviet metal construction set; • the drill has a special rubberized handle, which is what you will need for homemade work; • toggle switch; • Bulgarian; • asbestos cord; • electrical tape.
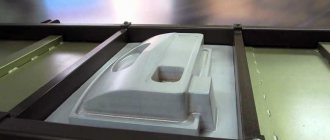
The process of making a soldering iron With this device you can solder not only pipes, but also other useful household items made of polypropylene, if desired. Plastic nowadays replaces half of other expensive materials.
Step 1. Disassembling the old iron
At this stage, you will need a grinder, the heating element of the iron needs to be removed from unnecessary parts and an aluminum cover must be made. We leave only the heating element, light bulb and heating power regulator.
Step 3. Assembling the soldering iron
The metal box from the designer must be attached to the base. There must be an asbestos gasket between these elements. The box is screwed with regular bolts.
Conclusion
A soldering iron for plastic was made quite quickly and without much effort. A very useful thing, considering that only old and unnecessary materials for the home were used for its production.
Source
Range of additional equipment and scope of application
- Cutters (scissors) for PPR pipes. This type of equipment is designed to provide precise cuts at right angles, which greatly facilitates and speeds up the installation process. The cutters we offer are made of high-quality materials and are characterized by high wear resistance. The range includes products for cutting pipes with a diameter of up to 63 mm.
- Welding attachments. This type of product is used to heat the internal and external surfaces of parts. The nozzles are coated with Teflon, which prevents heated plastic from sticking to the elements of the device. The range includes products with diameters from 20 to 160 mm.
- Flanges. Used to connect plastic and metal pipes. The range includes flanges with a diameter of 40–110 mm.
- Sweeps. This type of product is used to clean pipes from reinforcement elements. The assortment includes manual strippers (including Premium) and for drills with a diameter of 20–110 mm.
- Metal fasteners. The catalog contains a wide range of fasteners made of high-quality steel.
Do you need high-quality equipment for installation?
Contact us! We guarantee a wide range of welding equipment and competitive prices. The FDplast plant is ready to offer you additional welding equipment that will be required when installing engineering systems made of polypropylene pipes and fittings, such as: pipe attachments, clamps, flanges, strippers, cutters (scissors) for PPR pipes. The equipment used in the work must be different high level of wear resistance, especially for soldering irons, strippers and cutting tools. If you want to buy polypropylene pipes, then you should also take care of purchasing a reliable tool for working with them. More information on the topic:
Looking for where to buy PPR pipes? Order from us!
Welding of polypropylene pipes
Resistance socket welding should be carried out in compliance with the following sequence of operations...
The Moscow FDplast plant offers to purchase high-quality equipment for welding polypropylene products. The welding machine for polypropylene pipes FD makes it possible to quickly install polypropylene pipes and fittings. Welding has the following advantages:
- minimal costs of consumables,
- high quality connections of pipes and fittings,
- ease of operation of the equipment.
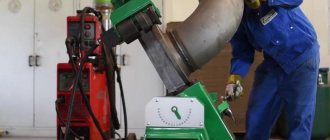
Working with a soldering iron for propylene pipes does not require special skills. These welding machines are often called soldering irons because the operating principles of these machines are similar.
Stages of work
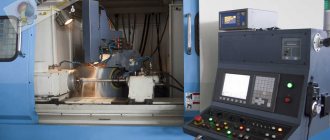
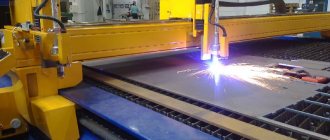
Profile cutting. For a square or rectangular window, cutting the profile should be done at a saw angle of 90˚. When cutting the profile, add a few millimeters for welding. On the profile, immediately label the horizontal and vertical lines with a marker, so that you don’t later get confused and solder the vertical to the vertical.
Reinforcement. Cut the reinforcement profile (iron) 90 mm smaller than the size of the frame profile - 2 pieces each (2 verticals, 2 horizontals). U-shaped iron is suitable for the frame. Insert the iron into the frame profile, making sure that the iron is strictly in the middle. Screw the iron to the profile from the back of the frame using 10 mm self-tapping screws and a drill. The distance between screws should be ≤ 200 mm.
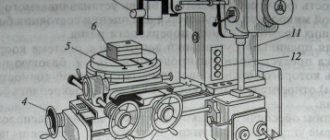
Drilling external drains to release condensate. The procedure for drilling holes is performed only on the lower horizontal of the frame using a copy-milling machine. The recommended length of drains is 27 mm, and the interval between them is from 550 to 700 mm.
Welding frame corners. Before starting work, carefully study the functions of the welding machine and set the necessary parameters: welding and clamping pressure, welding temperature, welding time and cooling. After this, proceed to welding the frame corners.
Cleaning the frame. Using a manual pneumatic angle-cleaning machine, carefully clean the frame welds on both the front and back sides, setting the desired angle for cleaning. Then use a hand pneumatic sander to sand the outside corners of the frame. And finally, use a chisel to clean the welding seams located in the inner corners of the frame - in the gap under the sealing rubber.
Measure the location of the impost on the frame, then put on the template and drill through the plastic with a 10 mm drill so that the impost connector fits. Pierce the outer wall of the frame and the iron with a 5 mm drill.
Measuring and cutting out the impost. Measure the size of the impost along the frame (between the two glazing beads) and add a few millimeters. After sawing the impost to the desired size, process its ends on the machine.
Impost reinforcement. The reinforcement (iron) in the impost is rectangular in shape. The cut-off part of the iron is attached to the bottom wall of the impost using self-tapping screws.
Impost insertion. Install the impost connectors into the frame holes and secure on both sides with 70 mm self-tapping screws. Next, using a drill with a 5 mm drill bit, remove the walls between the frame and the impost in the pass for the sealing rubber (to roll the rubber in a circle). Start and finish rolling the rubber from the top of the frame.
Sash reinforcement. It is done in the same way as on the frame profile, but from the inside of the sash profile. It is unacceptable to screw a self-tapping screw into the middle of the sash profile.
Drains in the sash. Performed as in a frame using a drill with a 5 mm drill bit.
Holes for handle. Drill a 10 mm drill, exactly in the middle of the profile stick.
Welding and cleaning the sash. Do the same as on the frame, only completely clean the outer corners with a dovetail.
Rolling up the sealing rubber. Hang fittings on both sides of the sash and on the frame. Drill holes on the frame for the top and bottom hinges, and then drill holes on the sash for the bottom hinge. Secure the sash to the frame and close. Next, install the double-glazed windows and secure with glazing beads. The window is ready!
Nowadays, you won’t surprise anyone with plastic windows, presented in a large assortment on the market. Not so long ago, this was a novelty for many, but now it is commonplace. If suddenly you are faced with a choice of which PVC windows to choose, then you need to know that there is simply no 100 percent standard. In this article we will look at window manufacturing technology, with all the little things that will be useful to you when choosing this product.
“Profile” comes in various shapes and designs; usually, before ordering windows, it is best to look through the catalog of profile shapes. The brand and quality of the profile may not always coincide with the original appearance.
Selecting a welding machine for PP pipes
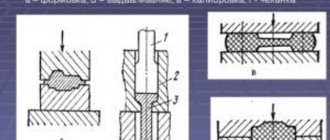
Bell and coupling types require the use of fittings. If this option is not suitable, you should buy a welding machine for polypropylene pipes that performs butt welding of PP blanks. This option is the most economical, as it does not involve the use of fittings. You can also buy welding for polypropylene pipes, which works on the principle of a contact-butt connection. Its essence lies in the hermetically sealed connection of the molten ends under high pressure. The strength of the resulting seams is equal to the strength of the body. The technique is capable of providing a high welding temperature of 250–260 °C, which allows obtaining a strong connection.
- According to the type of connection,
a welding machine for polypropylene pipes can be: socket, - coupling,
- butt.
Welding machines can be divided into manual and mechanical type devices. Mechanical welding is used for welding large diameter pipes. Such devices are distinguished by complicated controls. Manual-type devices are used for welding small-diameter products. The devices are small in size, easy to move, lightweight and reliable.
Also, when choosing, you should pay attention to such criteria as the power of the equipment and the number of attachments included with the device.
Features of the work
Before you start installing plastic windows with your own hands, you need to familiarize yourself with the recommendations for carrying out this work, follow the stages and sequence of performing this work:
After taking measurements, and this must be done quite accurately, you need to contact a company you trust and order the production of windows according to the dimensions you specified.
One of the problems that may arise when installing plastic windows with your own hands may be that you will not be given a guarantee, since in most cases a guarantee is provided if all the work is carried out by the company’s employees.
For the specified type of windows there are no standards for size and shape; they can have a window unit of any size and shape and are made individually. Particular attention must be paid to taking measurements; if they are done incorrectly, the installation of PVC windows will be difficult; they may be larger or smaller than the window opening, which will lead to additional costs of time and money.
The installation of PVC windows has its own characteristics that must be observed, otherwise all the advantages that PVC windows have will be reduced to a minimum. But don’t be upset, if you follow the recommendations for installing windows, taking into account the individual parameters of a house or apartment, then you can install high-quality plastic windows yourself, without involving specialists.
It is worth noting that what encourages people to install PVC windows with their own hands is that some careless representatives of companies that install windows quite often neglect certain stages of installation, thus saving their time. Even if you constantly monitor their work, they may not listen to your wishes and comments, which is why many people decide to install PVC windows themselves.
Return to contents
Taking measurements
Let's consider how to measure windows without a quarter, what actions should be taken in the event of emergency situations.
If you are measuring a rectangular opening, then measure its width and height, do not forget to add the thickness of the window sill. When determining the width of the window, it is necessary to subtract the dimensions of the installation gaps from the result obtained, and when determining its height, the width of the gaps and the height of the installation profile. Measurements must be taken in at least 3 different places in the opening and focus on the most minimal result.
In order to determine the deviations of the opening in the vertical plane, a plumb line is used; in the horizontal plane, a water level is used. If they are significant, then everything must be recorded on paper, taking this into account the size of the window will be determined. If the width of the openings may differ in size, then the height of the windows must be the same; this condition must be met at least on one side of the house. The window should be installed at a distance that is 2/3 of the width of the wall. It can be positioned further only if you insulate the walls, which will lead to an increase in their thickness.
Complete set of soldering irons for PP pipes
Before purchasing a welding machine for polypropylene pipes, you need to make sure that its equipment fully meets the requirements. The following configurations are available:
- with wrenches for nozzles and without the use of any other equipment suitable for working with products of one or two basic diameters,
- with nozzles used for working with small-diameter PP products,
- with a full set of nozzles and other tools used to connect workpieces.
The Moscow plant FDplast offers to buy welding machines (soldering irons) for welding polypropylene pipes of different diameters and different configurations. Use the “Place an order” button or call 514-38-71.
Carrying out preparatory work
The anchors are inserted into the holes in the frame and screwed to the wall with an electric drill.
Materials and tools required to complete the work:
After your order has been delivered to you, you can begin work on preparing the surface of the opening. Clean the space near the window, cover the floor and heating appliances. If necessary, the sashes are removed from the window block and the blind double-glazed windows are pulled out. To pull out a double-glazed window, first remove the vertical beads. Then remove the lower and upper beads, to put them in place, be sure to make marks. If you tilt the frame, the glass unit should come out of it on its own; carefully set it aside.
To remove the sashes from the canopies, first remove the plugs, and then unscrew the clamping bolts, then release the upper part of the opening sashes and remove the hook from the lower canopy. After such operations you will be left with a bare frame. Make at least 3 holes on each side and 2 on top and bottom for anchors on the inside of the frame. For reliable fastening, anchors with a diameter of 8-10 mm will be sufficient.
If the window block is fastened to pre-installed fittings, then you just need to fasten it without disassembling the window; for this purpose, use special screws that are included in the kit.
Since no GOST standards stipulate that the stand profile should be filled with foam, most installers of plastic windows ignore this operation. To avoid the formation of a thermal bridge, it is necessary to fill the installation profile with foam; it is best to perform this operation one day before the installation of the window unit.
The old window must be removed on the day the new unit is installed. If you do not plan to continue using the old frame, then after removing the sashes, it is filed down and easily removed. After the window frame has been dismantled, it is necessary to remove the insulation and seal that is located under it to the surface of the wall, using a hammer drill it is necessary to remove part of the slopes, and the window sill is dismantled.
It is necessary to thoroughly clean the ends of the opening from dust and dirt; if the house is wooden, then a layer of waterproofing must be laid under the frame. After this, you need to take out all the garbage and you can consider that the dirty work stage is completed. At this point, the preparatory work stage is considered completed, and you can proceed directly to installation.
Return to contents
Features of operation
A technical hair dryer for welding polypropylene sheets allows you to bond the material by heating the junction of its two parts. Thanks to digital control, maximum convenience is achieved when using the device. The hot air supply system is fully automated, which eliminates the need for additional maintenance of the device during operation.
The construction welding gun for gluing flat plastic surfaces is equipped with an automatic switch on and off function. Good quality of seams at the welding site is ensured due to the uniform distribution of pressure on the surface of the material thanks to a special pressure roller.
Window installation and proper fastening
All gaps between the walls and the frame of the installed window are filled with polyurethane foam and covered with a waterproofing film.
Substrates are placed on the lower edge of the opening; these can be wooden blocks, or you can purchase ready-made plastic pads. They are installed along the edges and in the center of the frame, and the frame or the entire window assembly is supported on the substrate; this will depend on the installation method you have chosen.
To secure the window on the sides, pegs are also used; they are installed along the edges so as not to cause the frame to warp. Using a water level, the window is installed horizontally; using a bubble level is undesirable, since it has less accuracy. To install the plane vertically, a plumb line is used. After this, you can install the anchors.
If the block is fastened through a frame, then first holes are made in it using an electric drill and holes are drilled into the wall using a hammer drill. First, the window is fastened on both sides at the bottom, the correctness of its installation is checked, and then the anchors are attached at the top and in the middle. The correct installation is checked again and the anchors are tightened.
If fastening is carried out through special fasteners (ears), then they already have space for anchors. In this case, the lower part is also attached first, and then the middle and upper parts, and at each stage the correct installation is monitored.
There is a special groove in the frame for fastening the drainage system; it can be additionally attached to the frame using screws.
After installing the frame, the window is assembled, everything is done in the reverse order that it was when disassembling it. After installing the double-glazed window, first install the top and bottom, and then the side beads, this is done using a rubber hammer. Install the doors and check how they open; they should not open or close on their own.
The next step is to seal the gap between the frame and the wall. Typically, polyurethane foam is used. The disadvantage of foam is that under the influence of natural factors it loses its properties, and to protect it it is necessary to create a good water barrier.
From the inside, you need to cover the foam with a special hydro-vapor barrier self-adhesive tape; it does not stick underneath. A moisture-resistant but vapor-permeable film is glued to the outside. A strip with a foil-coated surface is glued to the bottom, then it is covered with a window sill. After one edge of the film is glued to the frame, the space is filled with foam. In order for the foam to polymerize better, the surfaces must be moistened with water, then the tape is attached to the wall.
Soldering the window frame
After heating the workpieces, you need to press them one against the other using a pneumatic cylinder from a jack. Thanks to the stop system, the molten edges of the workpieces are not pressed into one another by more than 3–4 mm. Compressed air is pumped into a receiver made from an old gas cylinder using a car compressor (up to 4 kg/s).
Before the windows are installed, you need to make sure that all corners are glued and fastened at 90 degrees. If at least one corner does not meet this indicator, the window should be considered defective.
Functional purpose of welding guns
Hair dryers for welding polypropylene have their own purpose:
- fastening of various roofing materials, tarpaulin fabrics;
- shrinkage of couplings and thermoplastic films;
- drying, heating, molding;
- welding of polymer floor coverings;
- removal of unnecessary paint and old varnish;
- defrosting water pipes;
- vehicle repair, bumper welding.
Hair dryers sold by the online store PLAST.RU are indispensable in the work of every welder. All models presented in our catalog meet the necessary quality standards and undergo strict control during the production process. Buying from us means providing yourself with reliable and durable products.
Double-glazed windows for PVC windows
There are simple and energy-saving glasses. The second type of window is different in that it reflects heat and retains it in the room. Such PVC windows are correspondingly more expensive.
Before ordering, you need to decide on the type of glass unit. If winters are mild enough in your area, single-pane glass will suffice. But where severe frosts are commonplace, it is better to install a window with two or three glasses.
The double-glazed windows should dry well, then you can proceed to their installation. They are simply inserted into pre-made window frames. Typically, the profiles have so-called caps with rubber edging - this design does not allow air to pass through from the outside. We also cut these caps with a corner cutter to the size of the window frame, and then insert them into the frame profile.
Accessories
The choice of accessories - handles, mechanisms, etc. should be approached with special attention. Keep in mind that the room where the plastic windows are located must be constantly ventilated. That is, you will often open and close the window, which means you will use the fittings. The service life of windows directly depends on the quality of the mechanisms. Therefore, you should choose more expensive, but reliable fittings, so as not to bother with window repairs later.
Installation of plastic windows
Making plastic windows yourself is not easy, but, as practice shows, it is possible. Euro-windows have a number of advantages, but the price of the finished structure is often quite high. This is especially noticeable if you plan to install plastic windows in a house with window openings of non-standard sizes. In this regard, many people are thinking about making plastic windows with their own hands.