How to choose a leveling kit?
The problem of choosing a leveling kit faces many surveyors. At first glance, it seems that assembling a leveling kit is very simple: a level, a tripod and a staff. However, before purchasing this or that equipment, it is necessary to analyze the tasks for which it will be used. After all, not in all cases a high-precision level and Invar rods are required, which means you don’t always need to pay more. Also, when buying a level for a construction site, you should not rush and buy the device using the first link found on the Internet. Let's try to figure out what is needed for high-quality leveling and how to choose the optimal kit.
Mistakes that are made when using an optical level
For beginners starting to work with a level for the first time, it is important to take into account some features:
- It is important to ensure the safety of the device. Although it is protected by various types of coatings, it is sensitive to shocks and shocks. In order to completely eliminate device errors, you should make sure that all fasteners and parts are in working order and function properly.
- Don't miss the chance to use additional tripods and mounts. This will allow you to preserve the device even in the event of a sudden gust of wind.
- You should not completely trust the data provided in the instructions. It is worth checking the capabilities of the device yourself. If you are not buying a new device, it is better to have it verified at a specialized institution.
- Do not forget that when working with a level, you definitely need a partner.
- And when installing the rail, it must be positioned exactly on the surface to avoid distortions. Even if it is a ravine or hole, the ruler should rest against the bottom.
- Do not allow the device to overheat. This may affect the accuracy of measurements.
Scope of application of the level
It is used in work related to the need to determine a strictly horizontal or vertical surface. It is most often used by professional builders and installers in the construction of industrial buildings, residential buildings, communication buildings, shopping centers, and repairmen in the process of finishing premises, surveyors when exploring the territory. Using a laser level, it is much easier and faster to take measurements necessary for technical inventory of premises.
Leveling in construction
The level is used at all stages of construction:
- when exploring an area for geodetic surveying;
- for leveling the landscape;
- when laying a pit;
- construction of the foundation;
- at the design stage;
- when laying communication networks;
- during the construction of roads and structures.
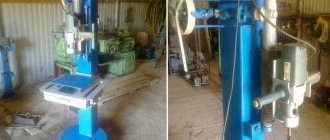
A strong, properly laid foundation is the basis, the basis of a building or structure. To take careful measurements, use a reliable measuring device, a level. When constructing walls, partitions, windows, roofs, it is necessary to maintain strict verticality and perpendicularity. The strength of the structure and, ultimately, the safety of the people who will be there depend on this. There are state standards, compliance with which is strictly controlled. During the construction of a facility, in order not to deviate from the project, it is necessary to take measurements more often. A level will help with all these tasks.
Level under repair
Before starting repair work, it is necessary to take many measurements to identify differences in floors, walls, and partitions. A modern level will make your work much easier. Here are some uses:
- for leveling floors. To take measurements, it is enough to place the device on a hill and measure the distance from the base of the floor to the horizontal beam. You can put dots directly on the wall. It would be a good idea to mark them on the floor plan.
- when laying tiles. It is important to maintain precise horizontal lines. After all, a deviation of the horizontal seam by one millimeter can ruin the entire work;
- when gluing wallpaper. It is very important to do it smoothly and beautifully. You can use a beam instead of the long-invented plumb line;
- To assess the collapse of walls, a level with its vertical beam is an excellent assistant. It is necessary to take several measurements from the wall to the vertical beam.
How to work with a laser type level?
The device is also fixed using a tripod or special holders. After making sure that the installation is secure, you can begin work activities. After pressing a special button, a beam is sent to the target surface. Lines can be projected horizontally or vertically, and some models also provide the possibility of cross-radiation. After this, the device automatically takes readings from the prepared staff with divisions. If you plan to mark over long distances, then you cannot do without a special receiver that will separately record the position of the beam. How to learn to work with a level supplemented with such a device? Basic operations are also taken over by automation. The operator only needs to monitor the readings on the display of the receiver, which can record the position of points at distances of the order of 80-100 m. At the moment the beam is registered, the device will give an appropriate signal and display the received information on the screen, which is recorded in the log.
Varieties
A leveling rod is always a rectangular device. A scale is placed on the plane. The scale division price is established by official standards for each device and type of measurement. Modern staffs can be designed for analog or digital levels . The second option involves reading a BAR standard barcode.
A folding leveling staff is most often made of wood. A typical solution is folding in the center. The length of the individual sections is approximately 1.5 m. The folding mechanism in wooden models is very reliable and has no backlash.
In addition, the dielectric properties of wood are valued, allowing for quieter work near wiring, transformers and high-voltage power lines.
Telescopic slats have become quite widespread . They are made mainly from light substances (aluminum alloys or even plastic). The advantages of such a solution are obvious for surveyors and other people who need to take more than one measurement and walk more than one kilometer per day. The telescopic design is equipped with a round level, thanks to which it is placed strictly vertically. Some models reach from 3 to 5 m in length, while after folding the length decreases to 1.5 m.
How to choose a level?
When choosing a household laser level, there is no point in spending money on an expensive device, since even budget models will allow you to mark inside rooms of any size.
For this purpose, the minimum beam length will be sufficient.
In addition, the smaller the room, the smaller the angular errors will be.
It is enough to inspect the case for damage, and also check the laser level with a bubble analogue.
When choosing semi-professional models, as well as instruments for professional construction and geodetic activities, important parameters that you should pay attention to will be:
• Number of rays. To the standard two rays that build lines vertically and horizontally, several additional ones are added. As a rule, they are located on the sides of the device.
• Glow range. If this parameter, which is indicated by the manufacturer, is 30 meters, the rays will shine over long distances. But it should be remembered that when the specified range threshold is exceeded, their thickness increases, which leads to a decrease in the accuracy of the marks.
• Availability of a self-leveling system. This will save time on precise positioning of the device relative to the horizon.
• Beam scanning angle. It’s good if this parameter is 110° - 130°.
• Batteries. The simpler they are, the better. Ideally, the device will require two or three AAA batteries to operate. A rechargeable battery is also a good option.
Some models are supplied with protective laser glasses.
They not only protect the eyes from the effects of radiation from devices, but in them the beam itself is better visible in any weather.
For comfortable work, you also need a tripod, especially in cases where the device needs to be raised to a certain height.
To fix the level in various places, a “clothespin” type mount is required.
A more convenient option would be one with a universal magnetic mount.
A device with a rich set of components will cost more, but if you buy accessories separately, their cost will be even higher.
• The professional level is equipped with additional adjustments.
In particular, models with mini-tripods, which are located directly in the body, have smooth aiming screws, which allow you to configure the device as correctly as possible.
Among other things, levels must have reliable protection from dust and other external factors.
The degree of protection can be determined by the markings.
IP54 is considered standard - a moisture-resistant device that is suitable for working in the rain and on a dusty construction site.
To protect against falling, levels must have a shockproof housing and damper pads.
Some models are equipped with internal shock absorbers that protect electronic components from damage.
Classification of optical levels
Depending on the class, the device is used for a certain type of work.
Class I – geodetic purpose
These are high-precision instruments with a minimum permissible error, used to draw up estimates and plans for construction work. Used by experts, surveyors and researchers to obtain the most accurate data possible.
Class II - have passed strict testing in accordance with GOST standards
These devices have a minimum error of 2-3 mm, which is slightly more than first class levels.
Allows you to make accurate measurements not only at close range.
The devices are easy to move around the construction site.
III class – technical version
Optical levels of this class are equipped with a compensator or level; their technical characteristics are similar to devices of the second class.
Reviews of optical type models
The main audience of users of such levels are professional builders and surveyors who clearly understand the principles of the work process. According to them, optical devices, if used correctly, can provide accuracy with an error of 0.2 mm. But their main advantage lies in the flexibility of organizing the measurement procedure. The operator can make subtle adjustments during the procedure depending on operating conditions. For example, how to work with a level at a construction site if the weather interferes or there are other types of interference? It is the manual adjustment process, adjusted for certain circumstances, that will be more profitable in such situations. The user can move the device without being distracted by software settings, quickly recording data.
3.4. Working with a level at the station
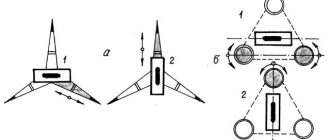
The tripod is installed at the station. The level is secured to a tripod using a screw. Using a circular level, using lifting screws, the axis of rotation of the level is set to a vertical position. To do this, the lifting screws are brought to the same height, then all three lifting screws bring the round level bubble to the zero point and rotate the device 180°. If the bubble remains at the zero point, then the axis of rotation of the level is brought to a vertical position. Otherwise, adjustment must be performed in the following sequence. For half of the deflection arc, the bubble is brought to the zero point using corrective screws of a round level, having previously loosened the locking screw, and for the second half - with lifting screws.
After setting the axis of rotation of the level to a vertical position, the telescope is aimed at the staff, using the sight with the front sight, fastening and aiming screws. By rotating the diopter ring of the eyepiece, the image of the reticle is adjusted; by turning the ratchet, a clear image of the staff is obtained. Before counting along the staff, use an elevator screw to set the sighting beam of the level to a horizontal position, aligning the image of the quarters of the bubble of the cylindrical level in the field of view of the pipe. They should be equal in length and form one oval in the upper part (see Fig. 28, b).