The issue of wastewater disposal in a country house can be solved in several ways. A powerful factory-made aerobic septic tank is often a redundant option. If there is little waste, a simple cesspool with drainage at the bottom can handle it. It can be made from tires or concrete rings, but a drainage pit made of monolithic concrete will last the longest, which will cost the least if you install it yourself. Let's take a closer look at how to concrete a cesspool.
Features of the cesspool design ↑
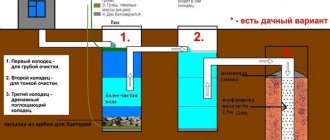
The cesspool has been known to private homeowners in Russia for more than a century. The effectiveness of this treatment plant has been tested for years, and the internal structure is extremely simple. A classic cesspool is a reservoir in the ground with a filter bottom.
You can make a concrete septic tank yourself
The wastewater entering the cesspool from monolithic concrete is clarified with the help of anaerobic microorganisms, and then drained through sand and gravel drainage into the ground. Solid fractions remain inside, which by definition do not rot, and silty deposits formed as a result of the activity of bacteria. Bottom filtration guarantees a sufficiently high level of sewage water purification and discharge of purified water into the soil. But gradually such a container fills with sediment. Sooner or later it will have to be cleaned or closed, and a new one made next to it. On the one hand, a cesspool made of monolithic concrete is cheap to manufacture and maintain, but on the other hand, it is not able to cope with large volumes of waste from the home sewerage system. The water-absorbing characteristics of the soil are finite; in an hour it can only absorb a certain volume of water, and the rest remains in the cesspool, which, if sewage is re-discharged, can lead to the pit overflowing.
Advice! A cesspool is capable of disposing of a limited volume of wastewater at a time. This cleaning method is best used in dachas where there is not much wastewater.
Dimensions of two-chamber concrete cesspools
To increase power, the cesspool can be divided into two chambers. In the first, water will be clarified, and in the second, it will be drained into the soil.
Does it make sense to strengthen a collapsing drain hole ↑
Before you begin to strengthen the cesspool, you need to find out the cause of the collapse. If the ravine was formed as a result of karst phenomena, then it is better not to think about repairing the cesspool at all. There is no point in fighting nature. We need to look for a new place for a toilet and a full-fledged septic tank.
The only way to strengthen a tire rack is by completely replacing them.
In other cases, it is necessary to assess the degree of collapse and how costly it will be to strengthen the walls. It is often better to fill in the existing cesspool and dig a new one nearby. Renovating is often more difficult than building from scratch.
Installation of a cesspool made of monolithic concrete ↑
A two-chamber treatment plant is much more efficient than a single-chamber one. Moreover, the installation technology in both cases is identical:
- They dig a pit of the required size.
- Arranging the formwork.
- Concrete is poured.
- Waterproof.
- They make a lid.
- Organize ventilation.
- Insulate.
- They bury the structure.
If two chambers are planned, then the first one will have to be concreted hermetically; it will be made with monolithic walls and bottom. And in the second case, instead of a reinforced concrete slab, drainage is made of gravel and sand at the bottom.
Scheme of a concrete cesspool of two chambers
Advice! The partition between the sections can be made of brick or blocks, but the easiest way is to make it from monolithic concrete, like the rest of the structure.
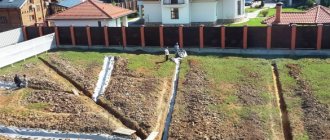
Excavation of soil for a wastewater treatment plant ↑
Before you start concreting a cesspool, you need to dig a pit under it. It is better to work by hand with a shovel. An excavator will be faster, but the edges of the well will then be uneven, and you will have to do the formwork both from the inside and from the outside. Otherwise, only the formwork structure inside is enough; on the other hand, the concrete solution will be held in place by the ground. In the section with drainage, the pit should be 20–30 cm deeper. The bottom of the pit is leveled and compacted. Then a gravel-sand cushion 15–20 cm thick is poured onto the bottom, and 35–50 cm thick in place of the drainage filter.
Forming formwork for filling with concrete ↑
The pit is lined with geotextile from the inside, allowing water to pass towards the ground to reduce the impact of soil moisture on the concrete structure. Then, along its perimeter and in the place of the partition, a reinforcing frame is formed from steel or fiberglass rods.
Important! After pouring, the reinforcement must be completely hidden by concrete; the release of stiffening elements from the monolith is unacceptable, otherwise they will begin to corrode and will not last long.
Formwork for a cesspool made of monolithic concrete can be made from:
- boards;
- metal shields;
- laminated plywood.
In this case, a removable structure is made; after the concrete solution has hardened, it will have to be removed.
Formwork for concreting a cesspool is made with spacer inserts
The walls of the monolithic cesspool are made 15–20 cm thick. Spacers are laid between the embedded panels inside the pit so that the concrete mass does not compress the formwork. Mortgages are installed at the point where the sewer pipe enters and overflows.
Pouring concrete mortar and backfilling the structure with soil ↑
Concrete can be poured half a meter in height or the entire formwork at once. The second method is faster, but you will have to order the solution ready-made in a concrete mixer. It will be difficult to mix such a volume with your own hands at once. To prevent bubbles from forming inside the walls, the concrete mixture in the formwork should be compacted. It will take up to a couple of weeks to harden. The top floor of a monolithic cesspool is best made from the same concrete. To do this, corners are laid on the walls of the cesspool in increments of 30–40 cm, and flat slate is placed between them. Next, reinforcement is attached on top of the resulting structure, and then concrete is poured.
Hatches and a ventilation pipe are inserted into the sump ceiling
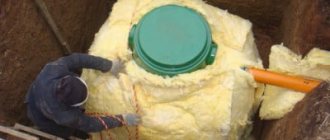
Important! All concrete surfaces inside and outside the tank should be coated with bitumen mastic to protect them as much as possible from moisture.
Before filling, a ventilation pipe and a plastic or metal hatch are inserted into the cover of the treatment plant. At this point, the concreting of the cesspool is almost complete. In cold regions, the cesspool is insulated on top with polystyrene foam, but in most cases it is enough to simply cover the concrete with a layer of soil 30–50 cm thick on top.
Construction methods
When choosing, you need to focus on the terrain conditions and the capabilities of the owner. The main requirement for the material used to make wastewater pits is to prevent wastewater from entering the environment. The material used to construct the drainage pit must withstand the effects of an aggressive environment, which is sewerage. For this reason, it is not advisable to use metal or wood to construct a cesspool.
Concrete ring pits
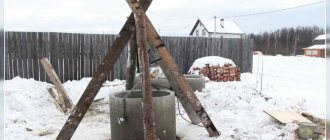
The most labor-intensive and difficult option would be using concrete rings. For one pit, 2-3 rings are usually enough. The ring size is 1 m by 1.5 m and can hold up to 1.5 square meters. m. Construction of concrete rings consists of the following stages:
- A hole is dug, the dimensions of which are 80 cm larger than the diameter of the rings used. The bottom of the hole must be compacted. After which the bottom must be filled with concrete. To simplify, you can use a ring with an existing bottom.
- 7 days after pouring the bottom with concrete, concrete rings are installed. The joints of the rings must be secured with cement and waterproofed with liquid glass.
- The void that appears between the outer side of the rings and the walls of the pit must be filled with the remaining soil. If the temperature where the tank is installed is quite low in winter, then it is necessary to insulate the walls of the structure. Pipe laying must be done to a depth exceeding the freezing point of the soil.
- The last concrete ring must be covered with a reinforced concrete slab with a hole for the cover. It is imperative to arrange ventilation to remove methane and sulfur gas from the reservoir.
- A cover is installed on the floor slab. It will prevent the smell from spreading from the pit. Soil is poured onto the top of the entire structure to the level of the lid.
Brick pit
The advantages of using brick to make a sewage tank include durability and the ability to repair the structure.
Manufacturing consists of the following stages:
- You need to calculate the amount of material that will be needed for manufacturing. For correct calculations, it is necessary to prepare a plan in advance. You need to count the number of bricks and the number of rows. You need to divide the height of the wall by the height of the brick. It is important to remember to take into account the cement thickness of 6 mm. When building a tank, a solution of cement and sand in a ratio of 1 to 4 is used to connect bricks.
- The next step is to dig a pit of any shape. It is important not to forget to immediately prepare a trench for laying sewer pipes to a depth of 55 cm. The bottom must be filled with cement mortar to a depth of 10 cm. The brick walls are plastered and covered with bitumen mastic. The pit is covered from above with a reinforced concrete screed. After drying, the screed must be covered with any waterproofing material and covered with soil.
Car tires
The main advantage of this cesspool option is the long service life and low cost of the material used for manufacturing. Such a structure can be used for over 3 decades. To make it easier to lay the tires and to avoid accumulation of waste, it is necessary to trim the tires from the end. The process of arranging a tire pit consists of the following steps:
- The diameter of the hole is determined. You need to focus on the tire size.
- A hole is dug. If you dig yourself, the process may take several days.
- The bottom is being arranged. A hole is made at the bottom of the pit for drainage. With the help of a pipe installed in this hole, sediment will be retained.
- The bottom of the pit is filled with crushed stone to a depth of 15 cm and 85 cm of sand on top.
- The tires are installed on top of each other and secured. It is necessary to make a hole in the top side of the tire for the drain pipe.
- The joints between tires and pipes must be treated with sealant.
- The outer sides of the tires are filled with soil.
- The resulting hole must be closed from above. Boards work well as a cover. It would be a good idea to protect the cover of the boards with roofing felt.
Video: how to concrete a cesspool yourself ↑
Making a cesspool from monolithic concrete is not difficult. It is enough to dig a pit, install formwork and reinforcing frame in it. The solution can be ordered ready-made or prepared independently. The main thing is not to forget about waterproofing after pouring. It is possible to cope with all the work on constructing such a cesspool even alone. But, before concreting a cesspool, you should wisely select a place for it in the local area, in consultation with an expert in this field.
Cleaning the cesspool before repair ↑
If only the edge of the cesspool has crumbled, then it can be strengthened without removing sewage. In the event of a serious collapse, the cesspool will have to be cleaned without fail. Working in close proximity to fecal matter is not only unpleasant, but also dangerous to health.
You can clean the drains from the drainage pit of a country toilet or home:
- calling the vacuum cleaners;
- using a special pump;
- manually with a bucket and shovel.
Manual cleaning of the drainage pit is an unpleasant task
The first option is the fastest, but you will have to pay a lot for calling a suction pump. When using the other two methods, you need to prepare a container for the pumped-out sewage in advance, and also find out where it should be taken out.
It’s better not to skimp and invite specialists than to “immerse yourself” in sewer drains, especially if you have to strengthen the cesspool of a country toilet. This is by no means water from the washing machine and washbasin; you will have to pump out unattractive feces that do not smell like violets.
Advice! When calling vacuum cleaners, it is worth considering that they charge for the application, and not for the volume pumped out. The pit in the country toilet is small in size; ordering a car with a large barrel will not be economical.
Construction of a country toilet with a cesspool
When cleaning the cesspool yourself, you should take care of protective equipment: gloves, a gas mask and a rubber suit. Only after wearing all this can you safely begin the process of pumping out sewage.
Which option should I choose?
Here you need to focus on the standards calculated by SanPiN. According to sanitary rules and regulations, one consumer spends 150-200 liters of water per day for various needs. Sewage pits are divided into leaky and sealed structures. It is up to the owners to decide which design to choose. Much depends on the soil on the site, on the amount of wastewater per day, on the desire to “donate” this or that amount for comfort.
- If the daily water consumption is less than 1 m3, then it is possible to construct a simple sewer pit that does not have a bottom. It will not require pumping, because part of the water will be discharged into the ground, and will be further purified thanks to soil filtration. However, the SES may prohibit the creation of such a structure. The reason is the dangerous proximity of aquifers.
- When the daily liquid consumption exceeds 1 m3, the only logical solution would be to manufacture (purchase) a septic tank with several sections. In this case, it is extremely important to correctly determine the volume of the structure. It is necessary to give at least 3 days for high-quality processing. Therefore, the first chamber must not only hold a three-day volume of water, but also have a reserve of at least 30%.
A large number of plumbing or household appliances that consume water, their frequent use greatly influences the final figure. The biggest “spenders” include the bath, shower, washing machine and dishwasher.
Formwork and concrete pouring
The formwork for pouring concrete into the drainage pit is usually made of wood, or permanent formwork made from blocks is possible. For reinforcement, reinforcement is used, it can be old, it can be rusty - it doesn’t matter. But pouring concrete is more complicated. It seems to many people that the profession of a concrete mason is a mere trifle, but this is not so, of course. If you do not have experience pouring concrete yourself, then at this stage it is better to call specialists. At least so that they help you or advise (show) how to fill the hole correctly.
The bottom of the pit is filled with a layer of mortar of 15 centimeters. The proportions needed are as follows: cement m-400 - 1 part, sand - 4 parts and filler - 4 parts. As a filler, you can take crushed stone with a fraction of 1-3 cm.
Formwork for walls should be made so that their width is at least 15 centimeters. It is better to pour in 3 batches so as not to create excessive load on the formwork.
Location – sanitary restrictions
Some homeowners believe that they can do whatever they want on their property, and they are deeply mistaken. Sanitary services do not sleep - they require strict compliance with the rules and regulations in force in the state, regardless of the type of property.
The location of the drainage pit in a private house is also strictly regulated: the standards stipulate the minimum permissible distances from the wastewater storage tank to engineering structures, residential buildings and site boundaries:
- to the water conduit (central) – 10 meters;
- to the underground gas pipeline – 5 meters;
- to the drinking well: 20 meters - on clay soils, 30 m - on loams, 50 m - on sandstones and sandy loams;
- to a residential building (own and neighboring) - 10-12 meters;
- to the fence (site boundary) – 1 meter.
The maximum depth of the drainage pit is also regulated: it should not exceed 3 m, if the groundwater level allows it. These restrictions are contained in SanPiN 42-128-4690-88 and SNiP 30-02-97.
Important: Homeowners should be aware that failure to comply with sanitary requirements may not only result in a fine; if harm is caused to the health of others, a criminal case may be filed.
In addition, when making a drainage hole at the dacha with your own hands, it must be located on the site in such a way that it is possible to organize unhindered access to it for special equipment at the time of pumping out.
Advice: Practice shows that it is better to place the drainage pit at a distance of at least 15 meters from the windows of residential premises.