How to install eyelets: tools and materials
How to install eyelets with your own hands?
Eyelets (or blocks) are a part (bushing) that is installed in holes in fabric, leather and even paper. Thus, this hole is strengthened and it serves for threading various laces or braid for much longer. In addition, eyelets also have a decorative effect: they are available in different colors and shapes, sometimes they are additionally decorated with rhinestones. Eyelets are made of metal and plastic. Metal eyelets are most often used for working with fabrics and leather, while plastic ones are used when working with paper and cardboard. Each eyelet consists of two parts: the bushing itself and a washer around which the edges of the bushing are clamped during installation.
The grommet size is usually calculated by the internal diameter, i.e. hole diameter. The holes in the material should correspond to this size (or 1-2 mm less for elastic fabrics) and the size of the matrix for installation. The height of the eyelet (height of the leg) is also important. For strong fixation, the height of the legs should be 1-2 mm greater than the thickness of the material.
Large eyelets (above in the photo), fixed with clips, are usually used when sewing light curtains and textile accessories. They consist of two parts: one part has “antennae” - clamps that can be straightened with simple pliers and a hammer.
How to install grommets using a tool?
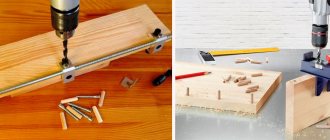
To install most eyelets, you will definitely need a tool, which can be either manual or semi-automatic. If you rarely use eyelets and small round eyelets are enough for you, then a hand tool will be quite sufficient. You will need a punch to make a hole in the material and a matrix, which is inserted into the eyelet hole and using a hammer to flare (bend and press) the edge of the eyelet around the flat washer.
You can also purchase special pliers for installing eyelets in sewing accessories stores. The kit usually also includes punches of several sizes.
If you often sew bags or shoes, or constantly use eyelets of different sizes or shapes for decoration, we recommend purchasing a small press for installing them.
In such a press you can insert dies for eyelets, as well as various punches, as well as dies for installing buttons.
Be sure to strengthen the product before installing eyelets or installing them on material folded in several layers.
So, let's see how to install grommets yourself!
Marking and preparing holes
Before installing fasteners, you should mark the product. The eyelets should be installed at intervals to prevent sagging of the material between them. Having placed the inserted grommet in the right place, circle it (the sleeve along the outer edge or the ring along the inner edge).
You may also be interested in: Ceiling double-row cornice - selection and installation
Then the holes are prepared. If their diameter is small, the holes can be pierced with an awl. Sometimes a hole punch is used for piercing. To prepare larger holes, punches are used. If there is no suitable tool, you can use a specially made homemade one. To do this, you need to select a tube of a suitable diameter and sharpen one of its edges. The hole should be such that the grommet bushing is inserted tightly, but does not cause tears or deformation of the material. It is convenient to punch holes on a piece of thin rubber or linoleum.
If the holes need to be large, make a cross-shaped cut with scissors and then cut out the excess material. The bushings should be inserted from the front side, and the rings should be put on from the back. The installation of plastic fasteners ends here.
Video of installing plastic eyelets with your own hands:
Installing eyelets with clips
On the skin
Press the eyelet half against the skin in the desired location.
Using pressure marks as a guide, cut a hole. Also cut out an additional piece of leather for reinforcement.
Glue the additional piece, aligning the holes.
Insert the main part of the eyelet from the front side.
Place the second part of the eyelet on the wrong side and release the clamps. Tap gently with a hammer.
On fabric
Reinforce the grommet location with adhesive material (or fold the fabric in several layers or reinforce several layers for additional thickness). Press down on the grommet to create a hole impression.
Carefully cut out all holes following pressure marks.
Fold all layers of fabric, pin around the hole and insert the main part of the eyelet from the right side.
Place the second part of the eyelet on the wrong side.
Release the clamps. Tap gently with a hammer.
Who invented the product?
Every person who wonders how to install grommets at home is interested in knowing where this product came from. There is no way to know for sure in what century the fortification was first used. But there is an industry of application: for sailing. The sails required strengthening of the edges so that the rigging of the entire vessel could be threaded through them.
Historically, the grommet came from sailing, where it is still used today as the main way to reinforce holes
Interesting. Rigging refers to all the elements of a ship that are used to control the sails.
The first rivets looked very simple. The edges of the sail, made of special fabric (cotton, etc.), were stitched with several ties of thick thread. The stitching methods were different: their choice largely depended on the required strength and durability of the structure. After the complete mastery of this technology, as well as at the dawn of the metallurgical industry, metal rings began to be used for rivets. The entire process of fastening them was reduced to manual installation, since at that time there was no specialized tool that would allow you to quickly and easily install a rivet. People made do with improvised means.
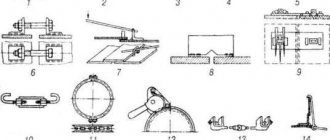
Various devices can be used to flare the edge of the grommet.
So why don't we learn from the experience of our ancestors? Next, a separate section of the article describes in detail how to install a grommet at home, without using a specialized tool.
Installing eyelets using pliers
Strengthen the grommet installation site with adhesive material (fold fabric or leather in several layers). Place a punch of the required size in the pliers and make a hole.
Insert the main part of the eyelet from the front side.
Install the grommet dies into the pliers. Place the second part of the grommet (washer) on the wrong side.
Place the grommet on the die in the pliers and gently press it down, spreading the sleeve around the flat washer.
Press installation
Strengthen the grommet installation site with adhesive material (fold fabric or leather in several layers). Place a punch of the required size in the press and make a hole.
Insert the main part of the eyelet from the front side.
Install the grommet dies into the press. Place the second part of the eyelet on the wrong side. Place the grommet on the die in the press and press the lever smoothly but firmly, releasing the sleeve around the flat washer.