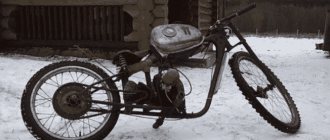
DIY chainsaw snow blower
No matter how many different types of equipment are created by professional designers, there will always be folk craftsmen who, from scrap materials, aged mechanisms and unnecessary equipment, are able to create real masterpieces that not only work, but work very well. A homemade snow blower made from a chainsaw is a bright representative of functional modifications.
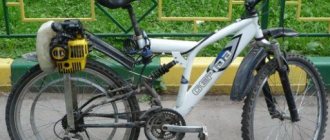
Do-it-yourself snowblower from a chainsaw
An example of a homemade snowplow based on a URAL chainsaw
We will tell you how you can make a homemade snow blower with your own hands from a Ural chainsaw. The layout of this unit is very good. Its design provides a high-quality transmission that protects the saw from damage.
And the inertial clutch allows you to protect the insides of the saw from damage by external objects. So, if a foreign body gets inside, the saw immediately turns off, which allows you to clean it and avoid breakdowns. A snow blower made from a chainsaw with your own hands does not require complex parts; when constructing it, you will not need to spend hours turning complex mechanisms or buying them.
For production you will need:
- chainsaw "Ural", it acts as a donor;
- sheet metal 2 millimeters thick, necessary for the manufacture of blades and paddles;
- stainless steel sheet 1 mm thick;
- pair of bearings for 48;
- arcs and crossbars (20x20), can be taken from an old greenhouse;
- consumables: nuts, washers, bolts;
- sprockets and chains from old Soviet motorcycles;
- Rubber handles for easy operation of the snow blower.
As can be seen from the list above, homemade products do not require the purchase of new materials; it is quite enough to rummage around in the garage or go to the nearest flea market.
This is interesting: Wood carving with a chainsaw - what is carving
Principles for designing a chainsaw snow blower
Making your own snow blower means cheaply constructing a useful snow clearing device for specific needs. Based on functionality, electric models are not mobile enough, so for periodic snow cleaning, a non-self-propelled snow blower made from a chainsaw, designed with your own hands, is quite suitable.
What saws are used when constructing a snow blower with your own hands?
Since old Soviet chainsaws have excellent working traction, which is what is required for a snow blower, the Druzhba chainsaw is the best option. In terms of performance, the saw is, of course, weaker than modern versions, but its engine power is quite enough for a snow blower. Any old chainsaw with a good engine can also be used.
The chainsaw will only need a motor, which should be improved for our task, namely, replacing the drive sprocket with a small sprocket, which can be found in old motorcycles.
Tools and Skills for Making a Chainsaw Snow Blower
To work, you will need a set of plumbing tools, a welding machine, an angle grinder and, of course, golden hands and enthusiasm. Some operations, for example, stretching rings into a spiral when making a screw, will require considerable physical strength.
Parts and components
If you think about it, every equipment owner will always have the means at hand to create a snow blower from a chainsaw. And the power plant of the Druzhba chain saw is most often used as a motor. Based on the fundamental design of the snow blower, you should prepare the necessary spare parts from which you can make the main structural elements: body, snow drain, auger, frame.
These units can be made using metal profiles, aluminum and iron pipes, bearings, shafts, and pieces of sheet metal.
The order of work when manufacturing a snow blower
To construct a snow blower from a chainsaw with your own hands, you need to prepare drawings. There is nothing complicated here. The general diagram of the machine can be seen in the photo. The most difficult part will be the process of creating the auger, but this still needs to be achieved. When making a snowplow from a chainsaw, the dimensions of the bucket and auger are calculated so that they capture snow cover 50 cm wide and 40 cm high. If the power of the motor from Druzhba or the Urals allows, the dimensions of the structure can be increased.
So, let's get acquainted with how to make a snow blower from an old but working chainsaw:
- The first step when making a snow blower from a Ural or Druzhba chainsaw is to check the motor itself for functionality. If the engine starts easily and runs stably, it must be freed from the tire, handle and other mechanisms unnecessary for the snow blower.
- The ladle is welded from a metal sheet. First, a strip 50 cm wide is bent in a semicircle, and then the side shelves are welded. The inside diameter of the bucket should be 2 cm larger than the dimensions of the auger. The optimal dimensions are: the diameter of the rotor disk knives is 28 cm, the diameter of the bucket is 30 cm.
- A hole with a diameter of 150 mm is cut in the top center of the bucket. A pipe for the ejection hose is welded here. If the screw design is improved with a fan, then another hole is cut into the back of the housing. The rotor casing with the impeller will be secured here.
- The auger shaft for a snow blower can be made with your own hands from a piece of round metal pipe with a diameter of 20 mm. The blades are welded in the center. They will throw out snow. I weld trunnions to the pipe on both sides. Bearings No. 305 are mounted on them. On the drive side, the trunnion is made longer. An asterisk is placed on it. In a combined auger-rotor design, a gearbox is installed instead of blades, as shown in the photo. It transmits torque from the screw to the fan. To avoid jamming of the bearings on the auger, they should only be installed in a closed type. The plugs will prevent sand and dirt from entering.
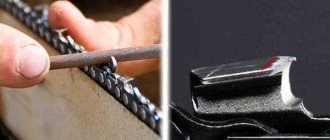
- Disc knives are cut from steel sheet. First, the rings are cut out, cut on the side anywhere, and then stretched to the sides. The resulting spiral half-rings are welded onto the shaft in turns towards the blades. It’s easier to leave the edge of the knife even, but such an auger is unlikely to overcome the ice build-up. Here you can try to cut a jagged edge that can easily cope with compacted snow, and also cut through a thin ice crust.
- You can equip homemade snow blowers with an auger with rubber blades. They are often cut out of car tires with a jigsaw. But this design can only cope with loose snow.
- To install the auger inside the bucket, bearing hubs are bolted to the side shelves. It is important to find the center exactly, otherwise the drum will wobble and the knives will cling to the bucket body.
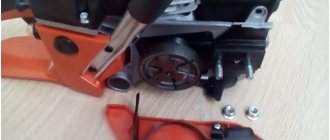
- When the previously made bucket design is equipped with an auger, the time comes to think about attaching a chainsaw engine to the snow blower. Here you will need to weld the frame on which all the elements of the snow blower will be attached.
- The photo shows a diagram of a simple frame. It is welded from a metal corner. The optimal size of the structure is 48x70 cm. A jumper is placed in the middle, and two longitudinal elements are attached to it, fitting them to the fastening elements of the chainsaw motor.
- Any pair of wheels is suitable for driving a snow blower. It can be connected by a drive to a chainsaw motor to create a self-propelled machine. The disadvantage of this design is poor maneuverability in deep snow. It's easier to use wooden runners instead of wheels. The skis move easily on snow and do not fall through.
- When the assembly of the frame with the chassis is completed, a bucket with an auger is attached to it. Behind it they install the engine, removed with their own hands from a chainsaw. The pulleys of the working shaft of the motor and the auger are connected by a belt. If sprockets are selected, then put on the chain.
The entire assembled mechanism of the snow blower must be turned by hand. The auger should rotate easily, and the knives and drive parts should not cling to the frame and bucket elements. After receiving a positive result, the assembly of the snow blower is completed. All that remains is to attach the fuel tank to the frame, make control handles, and cover all the working mechanisms with a galvanized casing.
The video shows a snow blower powered by a Ural chainsaw motor:
At the end comes the most exciting moment - starting the engine. If no mistakes were made during assembly, the auger will begin to rotate as soon as the motor starts running. The operator just has to put a sleeve with a guide visor on the outlet of the bucket and can try to clear the snow.
Useful tips
As the experience of the craftsmen shows, the reliability and strength of all connections and fastenings is very important. Since a chainsaw snow blower is subject to certain vibrations during operation, it is most advisable to install lock nuts and make all fastenings with engraver washers. To avoid unwinding, the protruding parts of the bolts on the auger are cut off and riveted.
Some owners work without drawings, but most recommendations still state the need for preliminary calculations, compliance with certain proven dimensions and proportions, otherwise the design of a chainsaw snow blower may turn out to be inoperable after assembly.
Advantages of a homemade chainsaw snow blower
- When creating a snow blower from a chainsaw with your own hands, the main gain, of course, is the cost of the snow blower. Even if you had to buy a motor from a saw specifically, the savings will be considerable.
- Another positive point is the functionality, which is in no way inferior to ready-made models of equipment. Some craftsmen create units that even surpass factory models in technical parameters.
- All the necessary parts and components can be guaranteed to be found in the garage among all sorts of metal waste and remnants that no one uses.
Disadvantages of a homemade snow blower
- The assembled model is a non-self-propelled machine; for clearing large areas of snow, manual movement of the unit can be difficult.
- Compared to factory versions of snowplows, homemade ones have fewer technical capabilities and limited engine life. If you equip the equipment with a new engine, the unit will operate longer and more reliably, but the savings in this case will be less.
Assembling a snow blower
A homemade snow removal design includes several key components. Among them:
- engine;
- wheelbase;
- tank;
- cardan shaft;
- bearings;
- leading star.
First you need to ensure a strong fastening of the structure . The motor should be placed strictly in the center to prevent uneven snow scooping or distortions. It is supplemented with a gas tank, which for convenience is attached to the steering support using a bolted connection. You can take a throttle handle with a cable from an old motorcycle, which will allow you to easily control the engine throttle.
In order for the snow removal device to work, you will need to weld the frame. There is no need to use complex drawings for this; everything is much simpler than it might seem.
The bucket will require square pipes with parameters 20 by 20 by 1.7 mm. Based on them, you need to assemble a frame, then cover it with galvanized steel so that the bucket does not rust or rot in the future. The steel must have a thickness of 5 mm to avoid mechanical damage. The metal sheets are attached to the frame with aluminum rivets. To make the structure easier to use, you need to weld a metal plate to the bucket, which will allow it to move easier in the snow. The plate should have a size of up to 60 cm in width and up to 4 cm in length, respectively. It is better to cover it with polyethylene: then snow will not stick to it.
Shaft design
The shaft is one of the key elements in the design of a harvesting machine. It consists of a pipe base to which screws are welded.
For the shaft you will need to take:
- steel pipe;
- a driven star welded to it;
- bearings for mounting inside the screw pipe;
- wing rotors and two rotor blades;
- screws;
- blade wings;
- two support corners.
The cardan shaft is a rotor to which augers are welded parallel to each other and point in different directions. First you need to take a steel pipe, at the ends of which bearings will be installed. For this purpose, a trunnion is welded to the end of the pipe, and then closed-type bearings are mounted on it.
Then you need to install an additional star , which will transmit torque from the motor to the shaft. The elements will be connected by a chain; it can be taken from an old motorcycle. Such a star must have 33 teeth, observing a pitch of 12.7, and it is secured with special bolts. To ensure that the circuit and other parts of the system are not subject to negative external influences, it is recommended to provide a housing for the structure.
Once the star and bearings are installed, snow clearing blades are welded to the shaft. You will need 6 steel strips located on each side of the shaft.
Augers are manufactured in different ways. They can be solid and can be ordered or made yourself. The easiest way is to cut the steel into “horseshoes,” which makes it easier for the auger to attach to the pipe. In terms of strength, the design will be practically no different from the factory one. To improve the performance of the machine, it is necessary to provide teeth for the auger blades. You can cut them with a grinder. The blades are then attached to the wings using M6 bolts. All bolts will need to be unscrewed; accordingly, the ends of their connections must be riveted.
The finished rotor should have two duralumin blades based on steel 2 mm thick. Instead of steel, you can use stainless steel, which will be more durable.
The blades are placed symmetrically, thanks to which they will be reliably protected from mechanical influences. After installation, the structure should look balanced and symmetrical. To connect the gearbox and transmission sprocket during engine improvements, it will be necessary to replace the gearbox drive sprocket with a 17-tooth design in a pitch of 12.7. It is placed on the cardan shaft at the end of the second bend. When working with a wheelbase, you need to take into account that it must have an axle with a pair of bearings; rollers or axles are placed on them. They are welded onto the ends of pipes.
The wheels can be equipped with built-in bearings, in which case replacing or repairing them is much easier and faster. The axle and wheels are secured using M10 bolts.
The final touch to assembling the machine is installing the snow guide. A sleeve is welded to the bucket; after assembly, the snow will come out through it. If your snow blower engine is rated at 7 horsepower or less, it may fail during heavy snowfalls.
Auger, auger body, drive
Let's move on to the working parts of the Ural snow blower, namely the auger. It is made from a piece of pipe of small diameter. You can also use any shafts up to 80-850 mm long. An important condition is the selection of bearings for the shaft. This length of the shaft is needed to provide its drive, which will be located outside the housing.
Next, you need to cut 4 circles with an outer diameter of 300 mm from sheet metal 2-3 mm thick. Holes with a diameter of 220-230 mm are cut in these circles. Next, the existing disks are cut on one side and at the cut site the disk is stretched, forming something like a coil of a spring. This must be done with all 4 blanks.
The prepared screw bands are welded on one side to the blades, on the other side spacers are attached to the shaft, to which the other ends of the bands are welded. The ribbons need to be positioned so that their turns move toward the center. That is, on both sides of the blades there should be two tapes installed in parallel and with their turns directed towards the center. Moreover, this entire structure should not exceed 700 mm in length; the rest of the shaft will go under the drive.
Photo of the auger mechanism of a homemade snow blower
Let's move on to the body. It is made from round sidewalls, which in diameter should exceed the auger by about 50-70 mm. Next, a sheet of metal 1-1.5 mm thick is taken. It bends along the circumference of the sidewalls and is welded to them, forming a semicircle. Holes are made in the center of the sides into which the finished auger is inserted. From the outside of the sidewalls, bearings are put on the shaft, pressed against the sidewalls and secured, while the position of the shaft is centered. To secure the bearings to the sidewalls, you can make races, or simply weld them to the sidewalls with external races, but then the structure will not be dismountable.
Features of designs with different motors
Chainsaws of various manufacturers and models are equipped with motors with different characteristics. For the most efficient operation, when assembling a homemade snow blower, these features must be taken into account. For example, the Druzhba and Ural chainsaws stand out among other models due to their high engine power, which causes vibration and noise during operation.
Vibration can be avoided by installing a thick piece of rubber gasket between the engine and the frame.
In addition to installing a gasket on the housing, you can equip the engine with a muffler. To do this, the cavity inside a solid metal pipe must be filled with a rubber gasket, and the entire resulting structure must be attached to the motor with bolts or by welding. This will reduce the noise level during constant operation of the device. In addition, high operating power comes with high structural loads. To prevent early failure of a snow blower based on Druzhba and Ural chainsaws, you will need to equip it with a high-strength chain.
The increased reserve of torque and thrust of the engines of devices of the Ural and Druzhba brands allows, if desired, to increase the volume of the bucket and the power of the auger, thereby increasing the overall productivity of the unit. The motor from a Stihl brand household chainsaw is not very powerful. Thanks to this, a snow blower based on it will have a relatively small size and increased maneuverability. The dimensions of the bucket for such a device should not exceed 50 cm in height and 60 cm in width. A device assembled in this way can remove snowdrifts up to half a meter high from both dry and sticky snow.
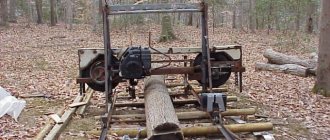
Other uses for chainsaws
The Ural chainsaw and other brands can also be used for homemade production of other useful devices. For example:
- lawnmowers;
- sawmills;
- water pump.
The key requirement for a particular device that is planned to be manufactured is that it must have a small-sized, powerful engine. Armed with simple tools from your home workshop, you can make useful devices to make housework easier - in particular, tools for clearing snow in winter.
Advantages and disadvantages
Before you begin assembly, it is important to understand why it makes sense to choose a homemade snow blower.
First, let's look at the advantages of a homemade snow blower.
- Compared to buying a factory model, assembling a homemade snow blower will cost much less.
- All materials and tools that may be required in the process, with the exception of the gasoline engine, are readily available. Metal sheets, pipes of the required diameter and other parts, the list of which is given below, can be purchased at any spare parts market, or even simply found in your garage or workshop.
- The dimensions of a snow blower assembled on the basis of a chainsaw are smaller than those purchased in a store. Such a device is able to cope with snow removal in the most inaccessible places.
The main disadvantages of a self-assembled snow blower include its low power.
Here, however, it is worth remembering that the subject of this article is creating a snow blower for personal use (for example, on a personal plot). To achieve industrial capacity, other resources and schemes will be required.
Creating a Snow Blower Frame and Auger
To make a snow blower from a chainsaw, you first need to make a frame and an auger. The operation of the entire structure depends on the strength of the frame, since other systems are welded to it. It is necessary to use pipes of the same width.
Two pipes will become parts of the frame, they represent skis. The pipes at the front must be cut at an angle and the holes closed by welding. 2 sections of the pipe are welded lengthwise, the remaining 2 parts are installed transversely on the frame. Transverse blanks are placed on the rear parts of the frame, since they will serve as a mounting location for the motor. One pipe is mounted at the back, and the other at a distance of 200 mm. Between pipes - 700 mm.
Two pipes are installed on the bottom of the apparatus. The engine is taken from a chainsaw and modified. Instead of the standard sprocket on which the chain is held, a small sprocket is installed and taken from the motorcycle. The element is welded, but first it must be adjusted.
After creating the frame, the auger is made. First, take a narrow pipe 800 mm long. This length is needed to install the drive, which is located in front of the housing. You need to take screws to mount the shaft.
Then 4 circles are made from the sheet. Their diameter is 300 mm. Holes with a diameter of 240 mm are made in the circles. An incision is made into the circles, with the help of which a coil is made from them. After the cuts, the circles are bent in the form of coils according to the principle of a spring.
Find the center of the shaft. In this case, the distance for the drive is taken into account. 2 plates 140x160 mm are welded to the shaft. Then they fix it on one side of the tape.
Then spacers are placed on the shaft. The back of the plates is attached to them. You need to make sure that all 4 parts are directed towards the center of the auger. They must be parallel to each other.
The device must be 700 mm long for mounting the shaft, and the rest is for mounting the drive. After this, the body is made. The main part is made from round sidewalls. They should be 70 mm larger than the auger. A hole is made in the sidewalls and the auger is welded. Then a sleeve of the apparatus is formed from a pipe with a diameter of 150 mm and a length of 100 mm.
This is interesting: Chainsaw Stihl 180: malfunctions and repairs