Do-it-yourself homemade gas generator - design features
Quite often there are problems with the supply of electricity in settlements remote from the city, including dachas. Therefore, many owners are beginning to think about alternative methods for home use. One of these is a device for converting and storing electricity - a gas generator. It’s not difficult to make it with your own hands. Different resources are used for processing. This can be energy from the sun, wind, water, etc. The option is considered profitable, in addition, it is based on a simple principle of operation. Comparing the properties of hand-made models with factory ones, some miscalculations are noted. But even the most primitive homemade generator can help out in a situation of complete lack of electricity. And in terms of cost, it can significantly save the family budget.
Device
The operating principle of a gasoline generator is based on the conversion of energy obtained from the combustion of gasoline into electrical energy . Components of a gas generator:
- Gas engine;
- Electric motor 127, 220 or 380 V;
- Fuel tank;
- Starter;
- Capacitors;
- Electrical circuit breakers and switches;
- Voltmeter;
- Sockets for connecting electrical appliances.
Industrial models are equipped with additional functions that allow you to control all operating parameters. ATS (automatic input of backup power in emergency situations) is especially convenient. The entire device is mounted on a convenient rigid frame equipped with wheels and handles for transportation. The factory casing is much more beautiful and stronger than the homemade one. Below is a drawing showing all the parts of a gasoline generator.
For those who are well versed in electrical engineering and know how to work with their hands, making a gas generator with your own hands
is not difficult .
Generator operating principle
The operation of a gasoline generator to generate electricity is based on the phenomena of electromagnetic induction, which were studied in a school physics course. The bottom line is that a conductor passes through an electromagnetic cloud and receives an impulse, which is subsequently processed into a constant current. All operations follow one another:
- One of the components of the generator is the engine. Its task is to generate electricity by burning fuel, most often gasoline or diesel fuel.
- The burned fuel produces combustion products, that is, gas, under the pressure of which the crankshaft begins to rotate.
- The purpose of the crankshaft is to transmit an impulse to the driven shaft, which provides a certain amount of electrical energy at the output.
The overall picture is clear, but it is necessary to understand that a positive result is guaranteed only if the calculations and connections of the main structural parts are carried out correctly.
Generators come in different capacities. The consumption of fuel resources is also different. But, regardless of the listed parameters, two components are fundamental: the rotor and the stator. The armature is used to create electromagnetic fields , which is why it consists of magnets equidistant from the core. The purpose of the stator is to drive the rotor and regulate the state of electromagnetic fields.
Depending on how the rotor rotates, generators are of synchronous and asynchronous types. Synchronous ones are considered more capricious, as they are susceptible to voltage changes. They also differ in the complexity of their design. Asynchronous electric generators are advantageous in this regard. They have a fairly solid list of technical characteristics.
Principle of operation
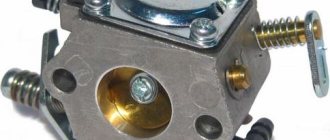
In inexpensive industrial gas generators, frequency and voltage adjustment is performed in two stages. The first stage is mechanical. The principle of its operation is based on the fact that as the electrical load increases, the engine speed drops. The engine speed sensor is mechanically connected to the carburetor throttle valve, so any change in speed is compensated by adjusting the throttle position automatically. The second stage of adjustment is carried out electronically. The figure above shows the circuit diagram of a typical inexpensive gas generator.
The operating principle of electronic speed stabilization is based on the dependence of the capacitor resistance on the current frequency. The diagram shows a stabilizing winding (L3) loaded onto a capacitor (C1). When operating at rated load, the output voltage is 220 V with a frequency of 50 Hz. Since the frequency of the output voltage directly depends on the number of revolutions per second, a change in the rotation speed of the generator rotor causes an unambiguous change in the voltage frequency on all windings of the generator.
The resistance of a capacitor depends on the frequency of the applied voltage. The higher the frequency, the lower the resistance. As a result, the current through the stabilizing winding varies depending on the load on the generator. As the load decreases, the number of revolutions increases, respectively, the frequency increases and the resistance of the capacitor decreases. The current through the winding (L3) increases and its braking value on the generator rotor increases. Thus, the rotation speed is adjusted continuously and instantly while the generator is running.
Electrical stabilization operates over a small range of changes, so the main adjustment function is assigned to the mechanical regulator. Here the range of adjustments is much wider, but at the expense of reaction speed. The internal combustion engine has inertia, and the change in its speed is slightly delayed when adjusting the throttle valve (this characteristic of the engine is called throttle response). Sudden load surges can cause the control system to oscillate.
Such a regulation system is difficult to make on your own, and an electronic one requires modification of the generator. The advantage of such a control circuit is the production of sinusoidal voltage with minimal distortion of the signal shape.
More complex generators are made using a double conversion inverter circuit (Fig. below).
Inverter Gasoline Generator
The alternating voltage of the generator is supplied to the rectifier, and then to the transistor converter, the output of which is a stabilized voltage of the required value. The presence of a rectifier removes restrictions on the stability of the generator frequency, and the transistor converter generates voltages regardless of the load size. The disadvantage of inverter generators is their high cost and distortion of the output voltage waveform.
DIY gas generator assembly
To create electric generators for 220 with your own hands at home for use in domestic conditions, you need to perform a number of measures. To begin with, a diagram is drawn up and, according to it, the parts and assembly order are determined.
List of main parts
To assemble a 220 V electric generator with your own hands, you need to select in advance all the main parts that it consists of.
- It is very rare to find a 220 volt generator without an engine. You can assemble it yourself. But in this case, the whole process will take quite a lot of time. To shorten the generator manufacturing procedure, the engine can be borrowed from failed equipment. The best options are engines from washing machines, pumping stations, walk-behind tractors, and chainsaws. For more powerful ones, you can remove the car engine.
- Electric starter. It is advisable to use a finished part that has a winding.
- Electrical wires and insulating tape.
- To achieve stable power supply, it is necessary to use transformer or rectifier structures. This is relevant in cases where the result is electricity with different powers. Using a transformer you can increase or decrease the power.
Assembly principle
After all the components have been found and prepared, they proceed directly to assembling a homemade 220 V alternating current generator. The principle consists of several stages .
- Initially, it is necessary to calculate the power of a homemade power plant. To do this, the engine is connected to the mains and the number of rotations is determined. A special device called a tachometer will help you perform the calculations. The obtained result must be increased by 10%, which is allocated to load compensation. It can prevent the engine from overheating during operation.
- At the next stage, capacitors are selected. In this case, it is necessary to take into account the power for which the generator is designed. Special tables, which are found in all regulatory documents, SNiPs and GOSTs, can help in this process.
- An important point is grounding. Since we are dealing with electricity, its absence can lead to a traumatic situation. In addition, without grounding, the operating time of the device is significantly reduced.
Pros and cons of homemade generators
Undoubtedly, a factory-assembled generator has a significant advantage over home-made ones. But, nevertheless, it is worth talking about what positive and negative aspects are noted in devices made at home.
The advantages of homemade 220 V alternating current generators include:
- A high opinion of yourself, your loved one, which is very important for many.
- A device designed independently is not only used, but also proud of.
- The financial issue is not in last place - the savings are obvious.
- Possibility to make an electric generator according to the stated requirements.
In addition to all the achievements listed, there are also negative factors that cannot ensure uninterrupted operation of the generator. The reason for this may be frequent breakdowns caused by the following:
- impossibility of arranging hermetically sealed connections between parts;
- incorrect calculation of power consumption can damage the generator or reduce its performance;
- lack of certain experience.
For beginners, you can try your hand at making a homemade 12-volt gas generator. The principle of the device is similar.
As you can see, do-it-yourself 220 power generators are a good alternative to conventional power supply. It will become a lifesaver in case of an emergency lack of electricity, and will help save money if it is necessary to carry out construction work using electrical appliances. If you do not have the slightest understanding of handling electricity, then you should not take risks and start constructing a generator yourself without the help of specialists.
When the master gets bored: DIY chainsaw crafts
author
Dmitry Melekhin 4.2k Views Opinions
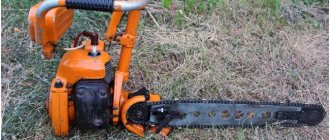
Today, many residents of the private sector have old saws with internal combustion engines, such as “Ural” or “Druzhba”, gathering dust in their closets. This is not surprising, because progress does not stand still; modern equipment is much lighter and more convenient to use. Today the editors of Seti.guru have prepared a review for those who know how and love to give seemingly old things a second life. The material will tell you what homemade products you can make from a chainsaw with your own hands, how to do it and what you will need for the work. Along the way, it’s worth looking at ways to make your own equipment in short step-by-step photo and video instructions.
Economical generator from a chainsaw and a scooter generator
The essence of the homemade product was to create the most compact and economical generator, which can be easily transported in the side case of a motorcycle and used in conjunction with solar panels in cloudy weather.
The basis was an incomplete chainsaw and a generator from a Chinese 150 cc scooter with a 139JMB motor with an 8-pole stator (preferably an 11-pole 3-phase from a 152 or 157 motor, it is more powerful) and a standard relay-regulator for it. All this was available
Materials and tools.
Electronic measuring head for 30V and 10 amperes Generator and relay regulator. Duralumin plates. Aluminum round blanks (waste) M8 studs, nuts, etc. Lathe, milling and drilling machines. Reamer Ф12mm, drills, shank, depth gauge. Bulgarian
Step 2. The mounting flange was removed from the generator rotor
Step 3 A new flange was machined with milled grooves for the legs of the cross clutch nut, and a reamer was deployed after preliminary drilling with a landing diameter of Ø12mm on the shaft. Also, the diameter of the flange neck entering the rotor bell was machined to match the diameter of the hole in the stator to facilitate alignment and marking for mounting it on the side panel. (after installing the stator board on the panel, the journal diameter was machined by 2 mm to create a gap). The legs of the cross nut were shortened to the size of the flange neck. All this was assembled and installed on the motor.
Step 3. Making the panel racks and the panel itself, as well as an intermediate block for the stator board. Layout and assembly of the board with installation of the relay and all other components.
Racks are machined from various leftovers and unnecessary parts, the only nuance is that the height of all racks is different, measured and calculated for each separately, and the lower ends of the two racks in outer diameter should correspond as much as possible to the shock absorber sockets
Step 4 Making a support plate with damping legs from the shock absorbers of the chainsaw itself.
Step 5. Connecting the wiring and installing the measuring head, making the tank and gas screw. The tank is made from electrolyte packaging that came with the battery. It has the original fuel line with a chainsaw filter built into it, although the hose had to be extended, and this made it possible to connect any other tank of any capacity. For this reason, the tank has not yet been attached to the support. I adjusted the gas with a spring-loaded screw through a washer which I hooked onto the original slightly bent rod.
What to do if you want to save money?
Today, the domestic market for such equipment is very wide. You can buy any generator model, even one that can provide electricity to a tiny village. Store shelves are full of units of different brands, cost, power and durability.
However, such equipment is really very expensive in terms of its cost in stores. That's why I asked myself: is it possible to make an electric generator with your own hands at home, and how to do it?
As it turned out, it is possible, and I will tell you in detail how to do this from an old Ural or Druzhba chainsaw further, and also provide drawings.
Why are so many homemade conversions made from chainsaws? The fact is that this unit can perform the functions of a universal drive through the use of various types of attachments. This property is taken as the basis for almost every homemade chainsaw unit.
Homemade chainsaws: what can be made from a chainsaw
Nowadays it is quite common to see certain products in various applications. In this article we will review what homemade products you can make from a chainsaw with your own hands.
Take that same plastic bottle. Wherever it was used, probably every summer resident found a use for this bottle in his own way.
Or read articles on our website. Every second one begins with making a homemade product from what was at hand. In other words, there would be a desire, but our people would not lack ingenuity.
But the chainsaw has long been used for purposes other than its intended purpose. It is used to cut out fairytale castles, statues, ice slides, and sculptures from solid logs. The chainsaw has become a truly folk instrument.
The main components of a chainsaw are a gas engine and a chain bar. By using these units separately, you can make homemade chainsaws.
Pros and cons of homemade electric generators
If you have the talent to create different equipment with your hands from available tools, then you can easily turn an ordinary chainsaw into a truly multifunctional equipment.
Practice shows that a generator made from an old chainsaw, made independently, is an excellent option for private households. The advantages of a self-assembled electric generator were appreciated by many owners of suburban areas where there is no centralized power supply. Namely:
- Tightness, so such a unit can be used in almost all positions, without the risk of damage or rapid wear of the equipment;
- The opportunity to realize your own talent as a designer and technician, to demonstrate to others your ingenuity and resourcefulness;
- Affordable cost and minimum material costs compared to a factory device, the purchase of which will cost a decent amount of money. This kind of smart saving will make your friends and loved ones fertilize;
- Easy control and trouble-free operation of the device in a summer cottage or private farm;
- High productivity and reliability of operation, provided that the instructions for performing the work and the assembly diagram of the unit are followed. It will provide electricity to a house located in an area remote from power grids, as well as household appliances in it.
Now, let's talk about the disadvantages of such a 220 W device. There is only one: the complex nature of assembling equipment with your own hands. If you do not have the appropriate skills and knowledge, it will be quite difficult for you to cope without the advice of an experienced master.
Interesting DIY chainsaw crafts
Reading time: 8 minutes No time?
We will send the material to you by e-mail
Remember the famous film with the brutal Mel Gibson? In a post-apocalyptic world, people fight for water, fighting with incredible equipment and using homemade mechanics to survive. You can bet that most of this was powered by gasoline engines, since they are the only fully autonomous equipment. And in the real world, this tool is in the arsenal of almost every summer resident. If you have a chainsaw, you will not be lost in any situation. In this material, the editors of the online magazine HomeMyHome.ru have prepared for you a review of homemade chainsaws. With your own hands, using simple devices, you can make many useful devices for the household on the basis of “Druzhba” or “Ural”.
Don’t rush to get rid of the “old lady” chainsaw, you will still need it!
Second life of an old chainsaw
I will also emphasize that my story will relate to the option with maximum efficiency. After all, it is irrational to make a device with your own hands to provide two lamps.
A homemade electric generator can provide electricity to a standard-sized private cottage. You can create it yourself. The best option for this purpose is the engine from a Shtil chainsaw, since it is quite simple to design and make a device based on it yourself. Moreover, these old saws are very common and inexpensive.
Where can I get a generator?
To create an electric generator at home, you need an old generator. The best option would be a used generator from a Kamaz truck or any other agricultural unit.
The advantage of the car model is that it provides stable voltage.
Naturally, you should not count on a unit power of 1.7 kW, as is the case with factory generators. However, for several household appliances, a couple of light bulbs in the house should have enough power from a homemade electric generator.
You will also need a converter. Such equipment is very common, so finding it will not be difficult for you.
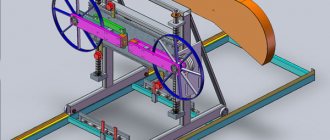
How to connect a generator and a chainsaw with your own hands?
The connection of the generator and chainsaw into a single structure is carried out through the use of a specially selected replacement unit. If such urgency arises, it is simply connected to a saw or quickly disassembled. This means that such an electric generator will be mobile.
Mounting can be done in several ways:
- using a special bracket that can be assembled with your own hands;
- using a saw bar.
If we are talking about connecting with your own hands, then I advise you to make it with a belt. The fact is that the chain version will generate an excessive amount of noise during operation. In addition, sometimes it will require high-quality lubrication. The belt must be selected so that the device is located as close as possible to the chainsaw.
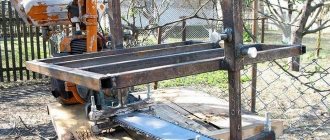
Features of creating homemade products from a Ural chainsaw
Such saws are more suitable for powerful units - a sawmill, for example. However, despite the high power, it is clearly not worth installing a Ural engine on a bicycle to improve driving performance. The fact is that the increased power is compensated by strong vibration, which can lead to the chain falling off while driving. And this is fraught with trouble.
“Ural 2 electron” - this can still be found on the shelves of Russian stores today
About other parameters of an electric generator from a chainsaw
The output of a homemade electric generator will need to be connected to a battery that is suitable for the unit in terms of capacity. I recommend using a special device (ammeter) to clearly determine this parameter.
The battery should also be attached to the voltage converter, which I talked about earlier.
Also consider having a voltmeter in the generator design. Indeed, for a number of reasons, an unexpected malfunction in the operation of the device may occur, which can lead to wear and tear of the device.
How to use an electric generator in practice?
A self-made electric generator does not provide for engine speed control. That is why you will have to select the speed yourself, so that the engine produces a characteristic “growl”. But remember that this step will slightly increase fuel consumption when operating the device.
And in order to somehow facilitate the operation of the equipment, you need a battery of current capacity. I mentioned this earlier. At times of peak load, it is the battery that will take on most of the load, thereby preventing the equipment from breaking down. Therefore, we will achieve a certain stability, which will have a positive effect on the output voltage, as well as on the operation of the device and its durability as a whole.