Planing equipment is an essential component of a complete woodworking process. Factory-made products are quite expensive, so a homemade jointing machine is quite suitable for home needs.
The purpose of this tool is to longitudinally level a workpiece made of wood or chipboard (materials painted or containing glue can dull the cutting elements of the equipment). After planing on a jointer, the processed side of the workpiece becomes smooth and even, which is necessary for subsequent calibration on a thicknesser or milling.
Advantages of jointing machines
The woodworking industry uses a large number of different equipment. A wood jointer is also often used. This equipment is characterized by a certain set of advantages:
- it is used to perform a large number of operations;
- On the market, jointing machines are offered at an affordable price. The cheapest one can be purchased for RUR 10,000.
Using this equipment you can process massive timber. It is also suitable for processing parts of future chairs and tables.
If we talk about the purpose of this unit, then the main one is the preparation of a wooden blank for subsequent high-precision processing.
More specifically, jointing machines are used to perform curvilinear planing of the future part. It is carried out along the edges or plane. This equipment is also used when performing chamfering operations on products at an angle.
Difference from surface planer
Thicknesser and jointer machines are used for processing wood products and other soft materials. The differences between these tools are as follows:
- Thicknesser must be used for finishing workpieces.
- The quality of the cut when working with a jointer depends on the skills of the operator; when working with a thickness planer - on the technical characteristics of the equipment.
- To align the 4 sides of a block using a jointer, a side rip fence is required.
- When working with a jointer, it is necessary to adjust the depth of penetration of the cutting elements into the surface being processed.
In industry, jointing and thicknessing machines are used together. The jointer sets the geometry of the wooden parts, the surface planer calibrates the processed workpiece by thickness.
Equipment characteristics
If you decide to purchase a wood jointing machine for your workshop, then when choosing this equipment, you need to take the following points into account.
Width of table and workpieces
According to such criteria as the width of the table and workpieces, this equipment is divided into the following types:
- lightweight - devices of this group have a milling width of 250 mm;
- medium - this equipment has a milling width of 400 mm;
- heavy - their parameter is 630 mm.
Number of knives
Planing equipment is also divided by the number of knives. On the shaft on which the knives are fixed, their number can vary from 3 to 4. If the number of knives on the machine is less, then it cannot be classified as professional equipment.
Cleanliness of production
The cleanliness of the processing is influenced by such factors as the speed of rotation of the knife shaft. On the market, consumers are offered models of jointing units in which this parameter varies in the range from 4700 to 5000 rpm. with the power of the installed electric motor from 5 to 5.5 kW. Note that this cleanliness is the most common among this type of woodworking equipment. If the performance of the device you have chosen is below the minimum, then such a machine also cannot be classified as professional equipment.
Wood planer: principle of operation, shaft, guides, knives
Household and industrial jointers are widely used for wood processing. Just like turning, circular and milling machines, jointers are mandatory equipment for carpentry shops. They are easy to use and reliable. Working with homemade jointers requires accuracy and some skills.
Scope of application and purpose
Industrial and home-made planing equipment is used for one-sided processing of flat surfaces of wood products. The main area of application of the machines is furniture and woodworking production. Perpendicular surfaces are planed on them, chamfers are selected at the desired angle from the sidewalls. Precision processing is important when assembling furniture; jointing equipment allows you to obtain a part of a given size. Planing mechanisms are often used at home in domestic workshops.
A jointing machine does not allow you to plan thickness to size, or make parts with parallel surfaces!
Classification of jointing machines
Depending on the number of planing devices, planing machines can be double-sided or single-sided. All planing devices are divided into categories according to the width of the planing surface, the length of the work table and the rotation speed of the knife shaft.
According to the processed width of the workpiece, mechanisms are distinguished:
- by 40 cm;
- by 50 - 52 cm;
- at 60 - 63 cm.
Compact homemade units for the home have a smaller processing width.
According to the length of the working surface, two groups of devices are distinguished:
- with a length of less than 250 cm;
- with a length from 250 to 300 cm.
Larger workpieces can be processed on long tables. The quality of jointing also improves.
According to the frequency of torsion of the working shaft, machines are divided into two categories:
- 4700 - 4800 rpm;
- 5000 rpm.
Industrial motors can operate at speeds up to 12,000 rpm.
The device of a jointing machine
bed with attached blade shaft
The design consists of the main elements:
- working surface;
- bed;
- guide;
- knife shaft;
- circular fence.
The working surface of the planer consists of two plates: back and front. The level of the back plate coincides with the level of the top point of the cutter blades. The front level is set lower to the extent that the material is removed during processing. Typically the level difference is no more than 1.5 millimeters. This is enough to qualitatively process the surface of the part in two steps.
The plates are made of cast iron, and to make the table more stable, stiffening ribs are provided. The edges of the slabs are covered with steel plates that protect them from destruction. They are also chip breakers.
The knife shaft is located between two plates; cutters are attached to the shaft. For high-quality processing, it is necessary to select the same cutters. As a rule, single-edged knives are used that can be sharpened. Double-edged cutters, when severely dull, are thrown away and replaced with new ones; they cannot be sharpened. As a rule, machines for household workshops are equipped with cutters made of tool high-speed steel. To work with dense types of wood or pressed boards, carbide-tipped cutters are used.
The guide is fixed with bolts in the provided holes. The ruler can move in the transverse direction depending on the size of the part.
A circular fence is installed on the front of the slab; it fits tightly to the guide due to the spring. The fence covers the knife shaft. The movement from the motor to the blade shaft is transmitted through a belt drive.
The optimal size of wooden parts for processing on a jointer is from 100 to 150 cm. Too long parts hang down and create inconvenience when working at home, while short ones are dangerous.
Setting and selecting mode
mechanism for changing the distance between the knife shaft and the edge of the table
Before starting work, you need to calculate the thickness of the material being planed and the speed of movement of the workpiece (for equipment with an automatic feeder). The size of the layer depends on the initial state of the tree and is determined experimentally. To do this, several (no more than five) workpieces are processed. If untreated areas remain on the surface, the slab is lowered slightly. If the workpiece is warped by more than 2.5 mm, processing is carried out in two stages.
When the height of the slabs is set, measure the gap between the edge of the cutters and the jaws of the slabs, which should be from 2 to 3 millimeters. To determine the gap, a calibrated plate is used, which should be inserted into the gap easily, but without gaps. If the gap exceeds 3 mm, the part becomes covered with tears; if the gap is less than 2 mm, the cutter is destroyed.
In addition to setting the slabs in height, it is also necessary to determine the location of the guide. When processing wooden blocks, the gap between the ruler and the left edge of the knife shaft should be slightly larger than the width of the block. Gradually, the knives become dull and the guide moves to the right, involving other parts of the cutters in the work. The ruler moves across the tabletop on a rack and pinion device driven by a flywheel. To make a corner chamfer on an edge, the guide is installed using a template or square and secured with a screw.
Automatic feeders regulate the feeding of parts without stoppers, with low pressure. When processing edges, they are placed parallel to the ruler.
The correct settings of planing equipment are determined experimentally. Allowed errors are:
- on the plane no more than 0.15 millimeters per meter;
- perpendicularly - no more than 0.1 millimeter per 10 cm.
Operating principle of a jointer
An important element in wood jointing machines is the knife shaft.
The cutting knives are directly attached to it. The shaft itself is mounted on the equipment frame. The back of the table is stationary and is mounted at the level of the circumference of the knife blades. The front part is installed in height to the thickness of the layer of wood removed from the workpiece. When the shaft with knives begins to rotate, the workpiece being processed is fed towards it. This can happen using automatic feeders or manually . If automatic workpiece feeding is used, then in this case the following is ensured:
- high operator safety;
- supply of parts at optimal speed.
At the request of the customer, many models of modern jointing machines are equipped with such mechanisms. However, some of them have a built-in conveyor feed.
The cutting process is not very difficult with such equipment. Passing along the bottom of the part, the blades make its surface even. In one pass, the design of the unit is able to process only one surface. True, there are models on the market that can process both parts of the workpiece in one pass.
What is a thickness planer
In order to make blanks of the same thickness with maximum accuracy, thicknessing machines are used. The knife shaft in this device is located not at the bottom, but at the top. The workpiece is fed across the work table either manually, or it is fed onto the knives using special rollers.
The described machine levels the top of the board, making it parallel to the bottom. It follows from this that in order for the workpieces to be even and of the same thickness, they must first be leveled from the bottom side on a jointer. After this, you can level it from the top side using a surface planer.
There are both small, low-power models suitable for the home workshop, as well as complex, multifunctional and powerful industrial machines. The latter are often multifunctional. For example, there are planer-thicknesser machines on which you can level both sides of lumber and adjust all the parts to the desired thickness.
Setting up the device
Before you start using the machine, you should configure it.
It involves sharpening knives. In addition, they must be correctly installed in the knife shaft. During operation of this equipment, knives are used that have a chamfer and a sharpening angle of 40 degrees. Such knives are sharpened using special knife sharpening equipment. The radius of curvature of the cutting edge should be no more than 6-8 microns. As for the straightness of the knife length per 100 mm, it should not exceed 0.0025 mm.
Before installing the knives into the shaft, the front and rear tables should be lowered. When the blades are installed, it is quite acceptable for them to protrude beyond the edge of the chipbreaker by 2 mm, and of the shaft - no more than 2 mm. An important point is to control the parallelism of the knives . Special equipment is used for this. The difference should not exceed 0.1 mm per length of 1000 mm. The indicator device is used for more accurate installation of knives.
Next, they move on to setting up the tables, guide ruler and feed mechanisms. When all this is done, the machine starts in idle mode. If any deviations are detected in its operation, then it is adjusted.
Thicknesser from an electric planer
A thickness planer is a woodworking equipment that is used to plan even planes of lumber until the desired thickness is achieved. In this case, only pre-prepared (coated) boards or beams are processed.
Preparation of materials and working tools
There are quite a lot of different options for creating structures that allow you to convert an electric planer into thicknessing equipment. To make a relatively simple homemade machine at home, you will need the following tools and materials:
- screwdriver with a set of bits;
- carpenter's square or corner;
- tape measure or simple ruler;
- screwdrivers with different tips;
- spanners;
- electric plane;
- jigsaw or hand saw for wood;
- plywood with a sheet thickness of 1.5 cm;
- long screws with coarse threads (4 pieces);
- bicycle chain and four drive sprockets for it;
- wooden blocks (2.5 by 2.5 cm) and planks (1.5 × 1.5 cm);
- nuts with M14 thread;
- washers of suitable sizes;
- screws 25 by 100 mm.
Manufacturing algorithm
Drawings and diagrams will help to simplify the process of creating a thicknessing tool from an electric planer, but it is easier to do it from photographs. The equipment is manufactured in the following sequence.
- A rectangular fragment is cut out of a sheet of plywood, having a length of 50 cm and a width of 40 cm.
- It is used to assemble stands for an electric plane mounted on a working platform from pieces of plywood, which are secured to each other with self-tapping screws or self-tapping screws.
- They create a working platform for installing an electric planer on it. To do this, use a jigsaw to cut an opening in the prepared rectangular piece of plywood in the shape of the power tool being used (as shown in the photo below).
- Using special clamps, which often come with an electric planer, as well as screws, fix this tool to the working platform.
- A drive mechanism is mounted on the base using screws, which will ensure its raising and lowering. Threaded screws with asterisks are installed at the corners of the platform.
- Using screws, install the platform base onto the stand made for it.
- In a convenient place, the thicknesser position control handle is attached to the long screw using nuts and washers.
- Install a measuring bar (ruler segment) and an index arrow.
- The created device is configured and tested.
The created structure is installed on a flat surface. To fix it to a workbench or table, you will need to use suitable fasteners.
When assembling the machine with your own hands, you should fix the cable supplying the power tool so that it does not interfere with operation, and the wire is not accidentally damaged. To securely fix the electric planer itself on the work site, it is recommended to use bolts and nuts.
The measuring ruler is a mandatory structural element of the homemade surface planer being created. With its help, the thickness of the lumber that is planned to be processed is determined. A piece of plastic, wooden or metal ruler 8 cm long is suitable as a bar. You can also make a pointer arrow from similar materials.
Types of jointing machines and their applications
The entire variety of wood jointing machines offered on the market is usually divided into two types:
- one-sided;
- double sided
It was said earlier that most models of this equipment, when used, are able to process only one surface in one pass. But due to their design features, double-sided units can process two adjacent parts - the face and the edge.
Single-sided machines are used for jointing boards and timber.
The peculiarity of this equipment is that the workpiece is fed manually. Double sided jointers have more options .
Using this equipment, it is possible to carry out operations for selecting grooves and joints. On these machines, manufacturers install an automatic feeder roller. Single-sided machines can process workpieces up to 1.5 m long. Only one operator can work on such equipment. The workpieces are fed at a speed of 10 m/min. If a double-sided jointer is used, then two workers can operate it.
Schematic diagram of the operation of a thickness planer
Why make a thickness planer with your own hands?
The scheme of work should be clear to most home craftsmen even without visualization, but for ease of understanding the tasks of making a surface planer yourself, it will not be superfluous.
There are two motivations for making any equipment yourself:
- desire for self-realization;
- desire for savings.
All the rest follow from those listed. And you can save a lot of things:
- first of all, money due to the abolition of auxiliary functions, which can be completely dispensed with in a home workshop;
- in the second - electricity by reducing the number of electric drives;
- thirdly, space in the workshop due to optimization and adjustment of dimensions.
If we talk about a full-fledged thickness planer, then, based on the three-dimensional drawing located below, its components can be reduced to the following list:
- electric drive from an electric motor with a power of 1.5 - 2.5 kW on a two-knife drum rotating at a speed of 5 - 10 thousand rpm;
- manual chain adjustment of the work table level;
- manual chain coupled feeding of the workpiece by two lingering pressure rollers.
But you yourself decide on the concept of your surface planer. Let's look at 3 approaches to implementing the idea of making your own thickness planer.
Manufacturers
Planing machines of high quality and varying prices are currently offered on the market by a large number of manufacturers.
Not only foreign equipment, but also products of domestic companies have high characteristics. Products produced by the Kirov plant are well represented on the market, and their prices are affordable for many consumers. Among foreign companies, we will highlight such as GRIGGIO, Stomana. The prices for this equipment are very affordable. The choice of a jointing machine for a consumer is limited only by his financial capabilities. Moreover, even if you have a small budget for purchasing this machine, you will be able to choose high-quality and at the same time quite functional equipment for woodworking.
If we talk about the market leader in jointing equipment, then the SF-400A model is currently such. The price of this installation is 100,000 rubles.
Step-by-step production of a planing machine and thickness planer based on it
The Interskol-110 electric planer is used as the initial sample. The working width of the workpiece being processed will be 110 mm.
To plan boards and bars, you need to set the plane with the soles up.
For the manufacture of the body, plywood 15 mm thick is used. Using circular equipment, blanks are cut out: sidewalls and supporting surface.
There are protection covers on the sides of the plane. To install the tool, they must be temporarily removed. Grooves will be cut into the sidewalls for installing an electric planer.
By applying the tool, determine its position relative to the sidewalls. This is the most crucial moment. How well the marking is done depends on the quality of future wooden parts.
When the base is determined, the position of the casing is marked. Its outline is outlined for further cutting.
A jigsaw is used to cut out a hole. You have to drill holes and install a file in them. For work, use plywood saws with fine teeth.
The casing is used locally. If the need arises, the hole is modified.
By analogy, markings were made for the second sidewall. A shaped hole is cut out for another casing and a pipe for connecting a vacuum cleaner.
The second casing is being tried on.
Two sidewalls allow you to fix the plane in a certain position. All that remains is to install a support platform, which will ensure the rigidity of the entire structure.
After assembly, a support for planing parts is obtained. It can be used for jointing blanks for furniture production.
Production performance check. The boards are jointed by moving the boards along the surfaces of the front and back areas. However, this design allows you to modify the equipment and turn it into a thickness planer. Then the craftsman will have the opportunity to grind the workpieces to a given thickness.
A small attachment, its movement occurs along the grooves. By setting the position of the attachment, you can set the desired planing size on the surface planer.
Reismus is ready. A machine was obtained from an electric planer, the cost of which is an order of magnitude higher.
Operation of the jointer
When choosing jointing equipment, attention should first of all be paid to the diameter of the knife shaft.
The larger the diameter of the knife shaft, the higher the peripheral cutting speed will be provided when using the equipment. This makes it possible to obtain a high quality processed surface of workpieces. Many craftsmen, when using this equipment to solve production problems, choose a combined jointing machine. Its use allows you to perform several operations simultaneously. For example, it can be used to plan the remaining edge on both the front and back surfaces at the same time. This functionality saves time when performing an operation.
If you need a machine for home use, then you can purchase this equipment at low cost. Homemade machines are inexpensive. Typically, the price of models for household use on the market varies from 15,000 to 20,000 rubles. If you need equipment for industrial use, you will have to spend much more . The price tag for such machines varies from 150 to 200 thousand rubles. The cost of a particular machine largely depends on the manufacturer, as well as its configuration.
Types of jointing equipment
Homemade equipment for long planing of wood can be made using different starting tools:
- Knife shafts - they are produced by separate factories as consumer goods. Three or four knives are installed on them, located at an angle of 90 or 120 ⁰. The working length of the shafts can range from 250 to 650 mm.
- Electric planers are a ready-made tool equipped with devices for setting, removing chips, turning on and off. For mounting on a table, there is a support frame that can easily be adapted for a small machine in a home workshop.
- Hand milling machines are power tools that provide high quality surface finishes. The productivity of the cutter is lower than that of the planing cutter. However, when processing wood, scuffing is practically eliminated. For hard wood, the use of this type of device is indispensable.
Some craftsmen create small jointing machines that have small overall dimensions and weight. They can be transported to the site. Already on site, the equipment is installed on trestles. Then the required amount of work is completed.
Industrial installations are quite heavy; they use cast iron or duralumin casting. For homemade designs, they use rolled metal or wood.
Selecting a machine design
When choosing, you need to consider that the following options are available:
- A mobile jointer can be installed in any desired location, but it is lightweight and less stable. The stationary one cannot be moved, but it is heavier and more stable compared to the mobile one.
- They may have different functionality. The simplest is the jointer. It is possible to provide a circular saw. It is very difficult to make more functional options yourself.
- The working part of a jointer can be made using an electric plane or a rotating shaft with blades.
The design of the jointing machine includes the following parts:
- The bed, which is the basis of the structure.
- Rotating planer knife. It is used to process wooden parts.
- Serving and receiving tables. The movement of wood occurs from the first to the second. Between them there is a rotating drum, whose upper edge comes into contact with the workpiece being processed.
- The rotation of the shaft with blades is carried out using a motor connected to it using a tightly tensioned belt.
- On the working surface there is a wooden stop installed perpendicular to the plane of the table. It is necessary as a guiding element when moving the workpiece.
The motor can be installed separately. It is easier to use an electric planer for processing, which is installed between the serving and receiving tables. In this case, the existing motor is used for rotation.
Manufacturing
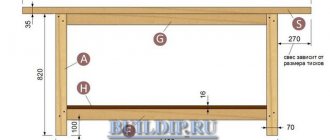
We make the bed
The base for the machine is the bed. You can do it yourself, taking into account the following points:
- A metal profile is most suitable for creating a homemade jointer bed. It is lightweight and easy to dismantle.
- When creating a drawing, you should take into account that the structure must distribute the load and be stable.
- All elements must be firmly fixed. The mechanism installed on the bed, taking into account the material being processed, exerts a significant load.
- The elements are fastened together by welding or threaded connections. If you need a homemade jointer to be mobile and transported if necessary, then you need to choose a threaded connection. Welding is more reliable, but the structure will not be dismountable.
It is worth considering that the jointer must be installed level. Therefore, when connecting all elements, the level is strictly maintained.
Installation of the blade shaft
A homemade jointer, like the industrial version, has a drum with knives on the surface, which, when rotated, removes wood from the surface of the workpiece. The installation features of this element include:
- The drum is a mechanism that consists of two bearings, a blade and a central shaft to which rotation is transmitted.
- It is almost impossible to make blades with your own hands, since this requires a lathe and a vertical milling machine.
- The drum is installed on the frame through bearings that have special fastenings.
- The mechanism with blades must be firmly attached to the base, since it is on this unit that the entire load is concentrated.
- A belt pulley must be installed at the end of the output shaft. At the same time, you can make it yourself. The profile of this element should be selected to match the belt profile.
Many drawings have a diagram in which the blades are mounted on an axis in the central part of the bed.
Table
The design has two tables, which are located on opposite sides of the drum. The complexity of their manufacture lies in the fact that the fastening mechanism must rigidly fix the surface. A do-it-yourself jointing machine must have a smooth table surface. This is due to the fact that the wood will be fed under strong pressure. If strong friction occurs between the table and the workpiece, processing becomes significantly more difficult.
In addition, one should take into account the fact that the table must be leveled relative to the drum with blades. In this case, the height must be adjusted, for which a special mechanism is installed. You can create a similar adjustment mechanism with your own hands by using a threaded connection.
Another important point is that the table should have a width and length according to what kind of workpieces will be served. You can also make a collapsible mechanism with your own hands.
Motor Drive Installation
The rotation of the cutting tool comes from an electric motor. When considering recommendations for installing an electric motor, consider the following points:
- It is quite important to choose the right type of electric motor and its power. A homemade planer can remove a fairly large layer of material in one pass. For domestic use, an electric motor with a power of more than 1 kW is suitable. Recently, models powered by 220 V have become very popular.
- The machine will work correctly if the electric motor pulley is in the same plane as the drum pulley. This is quite difficult to do; you need to use measuring tools and a level.
- It is important to choose the correct pulley diameters. The difference in diameters makes it possible to reduce the number of output revolutions, which significantly increases traction force.
- The belt must be well tensioned. It is worth considering that they are produced according to established standards and have a certain length. Therefore, the distance between the pulleys is carefully measured.
- It is recommended to create a seat on a homemade jointer for the electric motor with the ability to adjust its position. This will allow the belt to be tensioned when its length has increased due to wear.
Particular attention is paid to the safety of a homemade jointer. The electric motor of the machine must be grounded not through the frame, since under certain circumstances electric shock may occur.
Hard stop
The last structural element, which you can also create with your own hands, is a hard stop. It is necessary to maintain the linear movement of the workpiece along the table. To do this, the craftsman also exerts a transverse force while feeding the workpiece in the longitudinal direction. The emphasis is installed on the far edge of the table; you can make it with your own hands from an ordinary piece of wood, for which it is enough to improve the quality of the surface for a minimum degree of roughness.
In conclusion, we note that a homemade jointer is made as safe as possible, since it has a large number of rotating elements. To do this, you can create a special casing from wood or plastic that will cover the electric motor, rollers and belt. You also need to pay attention to the fact that a homemade jointer must have a rigid installation.