What is a caisson?
In autumn-winter, autonomous water supply systems require special protection, which can be provided by special systems - caissons. These are volumetric insulated tanks located at a certain depth in the ground. It is the insulation of their walls that ensures the uninterrupted operation of the entire downhole mechanism (read about how to choose the right equipment for a well with a caisson).
With his help:
- protect hydraulic accumulators with automation devices;
- provide convenient access for maintenance and repairs;
- prevent the harmful effects of precipitation.
Today there are different types of such installations.
What is a caisson and why is it needed:
Comparative table of caissons "Aqualux"
For comparison, we took models of the same volume, made from different materials:
| Option | Wall material | Wall thickness (mm) | Life time | Price, rub) |
| "Aqualux+ 1" | steel | 4 | up to 30 years old | 29 000 ₽ |
| "Aqualux Zinc 1" | Cink Steel | 4 | up to 40 years old | 31 800 ₽ |
| "Aqualux Plast 1" | plastic | 6 | from 50 years old | 42 000 ₽ |
You can see that metal tanks are cheaper than plastic ones. But their service life is shorter. Choose the type of caisson, taking into account the service life of the well and the budget for the work.
Types of caissons
The most popular systems are:
- Made of plastic.
- Brick.
- Concrete.
- Metal.
The construction of a caisson for a well can be made in different formations (circle, square, etc.).
The plastic version is characterized by a long service life, low weight and high performance characteristics. Such a system has an attractive price compared to analogues, but it is almost impossible to manufacture it yourself. The plastic version can be purchased ready-made!
Brick, as the base of the walls of a building, just like concrete (reinforced concrete), can be installed by the homeowner himself. Brick buildings are stable and inexpensive. It is only important for a brick structure to observe all the subtleties of the masonry, so that the product does not develop cracks ahead of time, through which moisture will penetrate inside.
Metal reinforcement is the top rating of materials for the construction of borehole caissons. It is advisable to use aluminum alloys or stainless steel. The advantages of these devices are:
- flexibility (no cracks form);
- strength (not afraid of mechanical loads).
Metal systems should be made of rolled steel, the thickness of which is about 3 mm. The finished structural elements are welded together and then painted. It is advisable to protect the internal surfaces of the building with an anti-corrosion coating. Thanks to this, such a caisson in a well can last for decades. Naturally, metal options will have the highest cost.
Maintenance and repair of caisson tanks
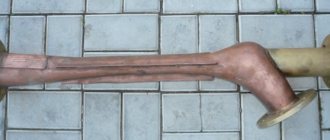
As a rule, concrete, brick or plastic coffered structures do not have any special maintenance problems. However, a caisson made of sheet metal may, over time, lose its tightness, especially at welds and pipeline inlets.
Caisson repair
Such fistulas can be repaired by welding. However, its use is complicated by the possible high humidity of the nearby soil. In this case, it is necessary to use welding technologies in a humid environment. If you do not have such skills, then you will have to dismantle the equipment and remove the caisson tank out.
Design and features of pits for wells
The caisson device is designed to ensure positive temperatures inside the structure. Thermally insulated hatch covers and doors can be additionally used. It is advisable to provide ventilation inside the borehole caisson, providing for the installation of outlet openings. Installation near the outlet cover equipped with a ball valve is allowed. This can be used in the future as a water column.
When constructing a caisson, you should take into account the diameter of the pressure tank, as well as the height and width of the equipment subsequently installed. It is these characteristics that influence the location of the casing pipe entry in order to ensure convenient entry.
Choosing a plastic caisson for a well
When determining the design of a shelter for a well, the volume of the pressure tank and the area where the pumping equipment will be located should be taken into account. These indicators determine at what distance from the walls of the housing the hole for the casing should be placed. Based on this, you can calculate how much distance still needs to be added for ease of maintenance of the installed equipment.
Main criteria for choosing a plastic caisson:
- Conventional mark of the depth of soil freezing in the construction region, the indicators of which determine the height of the structure, since the bottom of the tank must be located below the designated level.
- The temperature regime of the region, the indicators of which affect the presence of insulation in the lid and upper part of the case.
- The height of the horizon of the underground source. If there is groundwater at the camera installation site, then it is better to choose a shelter with additional stiffeners, anchor loops and a loading skirt.
- Purpose of the caisson and the volume of placed equipment.
- Safety, durability, ease of use.
Small containers from 0.7 to 1.0 m are suitable for summer cottages and are used exclusively for installing a pump. Reservoirs measuring 1.0-2.5 m are designed to accommodate pumping stations, control automation, and storage tanks in their area.
Brick building
A reliable caisson is laid out of brick with your own hands. The described option does not require large investments in insulation, and its degree of hardness and durability is not inferior to analogues. Do-it-yourself caisson for a well is placed on the surface, where spring floods with groundwater do not flood the 3-meter height. If this parameter “does not work,” then there is a high probability of flooding of the entire system.
What materials and tools will be required?
To carry out the relevant work in the well, the following equipment is required:
- welding;
- concrete mixer;
- hacksaw with grinder;
- several types of shovels;
- tape measure with a building level;
- construction wheelbarrow;
- tamping;
- container for solution;
- trowel.
The brick structure in the well can be made of any height and width, it is important to stock up on the required amount:
- waterproofing material;
- bricks;
- large crushed stone;
- "M400" (cement);
- sand;
- boards;
- beams
You should also plaster the interior walls, so you should buy everything you need for these actions.
How to make a concrete caisson for a well yourself:
Preparatory work
First you need to decide on the type of bottom of the structure for the well. It can be crafted like this:
- crushed stone backfill;
- shallow slab foundation;
- sand-cement screed.
Next, the required boundaries are marked with pegs with a stretched cord and a pit is dug near the well.
Step-by-step instruction
If you plan to fill or screed inside the well caisson, you should pour a strip foundation. Its width should be greater than the size of the brickwork so that the walls stand on it freely. The work algorithm is as follows:
- Digging a trench to a depth of 50 cm.
- Filling it 15 cm with sand with parallel tamping.
- Filling the remaining space with crushed stone (brick fragments) followed by filling with a sand-cement composition or concrete.
- As soon as the foundation is dry, start laying.
- Laying waterproofing.
- Laying the corners of a structure in a well using a plumb line and a building level.
- Laying out walls of the required height (pipeline level).
- Installation of plastic or metal cases between bricks (under cables with pipes).
- Treatment with waterproofing compound and plastering of walls.
- Filling the caisson bottom with crushed stone or other material.
- Manufacturing a caisson floor slab by laying beams or boards with metal corners (channels) on the upper walls.
- Fastening the hatch structure with the ventilation duct.
- Cover the top of the installation with plastic film or iron sheets.
Reinforcement of the installation is done using a mesh installed from the base to a height of 50 mm. The walls of the building must be insulated using moisture-resistant materials. Next, the entire structure is poured with concrete.
As soon as the filling composition has dried, they begin installing the sheathing and then concreting it. It is possible to make the head of the tank from brick. Finally, the caisson is covered with earth to the ground level with the obligatory installation of a hatch. Then all the necessary equipment is lowered inside.
Construction of a concrete caisson structure
Concrete caisson is made by making formwork and pouring concrete mixture. The sequence of actions is as follows:
- First, formwork is constructed from boards, plywood or chipboard. To facilitate its removal, the surface is treated with mining or other oily composition. The configuration of the structure and dimensions are selected depending on the size and quantity of equipment. In this case, it is necessary to leave a free space of 10-20 cm wide around the perimeter of the chamber for insulating backfill.
- To ensure the rigidity of the structure, reinforcement is installed into the formwork before pouring concrete.
- Concrete is poured into the formwork in one go. This will ensure good adhesion, integrity and durability of the structure.
- During the week while the concrete is hardening, the surface of the chamber must be moistened and protected from precipitation and sunlight by covering it with film. After this, the formwork can be removed.
- When the walls of the structure gain full strength (after 28 days), the roof can be poured.
To make a monolithic reinforced concrete floor with a hatch (roof), do the following:
An example of a reinforced concrete caisson made from finished rings
- The lower supporting surface of the formwork is installed above the walls. At the same time, it is worthwhile to provide openings for a manhole and a ventilation pipe. They can be made using metal sections of pipes 20-25 cm high. The formwork is laid on bars attached to the inside of the walls. In this case, it is necessary to make an indent downwards by the thickness of the formwork boards, this will allow the poured slab to lie directly on the walls of the structure.
- Along the perimeter, the formwork is carried out using boards 20-25 cm high. The boards are fastened together in the corners and attached to the outer surface of the walls.
- Waterproofing is spread on top of the formwork boards, overlapping the side walls. It will protect against leakage of the solution and ensure a smooth surface. To protect the waterproofing from adhesion to concrete, its surface is lubricated with oil or polish.
- When the formwork is ready, reinforcement is performed. For this, two layers of reinforcing mesh are used from a bar with a diameter of 5-8 mm with a cell size of 10x10 or 15x15 cm. There should be a distance of 5-7 cm between the two layers of reinforcement. To maintain this gap, reinforcing bars 10-15 cm long are used.
- Filling is done in one go.
- Then the surface of the slab is covered with film and wetted three times a day for a week. All this time, the monolithic slab must be protected from sunlight, rain and debris.
When the concrete work is completed, waterproofing material is laid on the outer surface of the walls and roof. When laying, an overlap of adjacent strips is made by 7-12 cm. Then the gaps between the walls of the structure and the soil are filled. Thanks to the backfill, the waterproofing will be firmly pressed against the walls of the chamber, so additional fastening will not be needed.
Attention: it is necessary to ensure that at the time of backfilling, soil and the backfill itself do not get between the wall and the waterproofing.
Construction and arrangement of concrete structures
You can make a caisson protection in your suburban area from either metal or concrete. Not everyone knows how to make a caisson for a well with their own hands, but this material will help you figure it out! Concrete installation can be done using:
- reinforced concrete rings for a well;
- monolithic reinforced concrete.
At the initial stage, the need to concreting the bottom is determined, doing this at ground level.
Select the required dimensional characteristics, determining the location of additional equipment and the hydraulic accumulator. A simple pit measuring 1x1m is quite enough for full-fledged work. A caisson for a brick well is made with your own hands according to the peculiarities of the rise of groundwater in the spring. This also applies to reinforced concrete buildings.
Required materials and tools
A caisson made of brick, as well as reinforced concrete, is made using:
- cut pipes;
- "400-M" (cement);
- hatch;
- large crushed stone;
- waterproofing materials;
- clean sand;
- fittings;
- timber (boards).
In addition to materials, special tools are also required. If prefabricated reinforced concrete rings will be used in the manufacture of a concrete structure, a crane may be needed to lift them.
Work with monolithic concrete is carried out in several stages.
Preparatory work
First, they determine the location for future construction work, clearing it of any rubbish found there. Then they mark the digging site and begin digging a hole near the casing. They dig at least 2 m deep.
To prevent the walls of the structure from collapsing, waterproofing material or geotextiles are placed on them. If there is no need for concrete work at the base of the borehole caisson, it is backfilled with crushed stone or sand to a height of fifteen centimeters, followed by compaction.
Instructions for the progress of work
It is advisable to install the reinforcement belt at a distance of 8 cm from the side surfaces of the pit. Then fencing is made using available lumber. The construction of sliding formwork will help solve problems with a lack of boards. As pouring progresses, wooden structures are raised to a new height until the concrete has completely set. Before pouring concrete, it is recommended to cover the entire formwork with polyethylene.
Concrete is prepared from a cement-sand mixture with the addition of crushed stone. As soon as it dries, holes are made in the sides of the structure for canisters (sleeves), where cables with water pipes will then be installed. The tightness of the holes is achieved by sealing the holes with a cement-sand composition.
At the next stage, the construction of the floor formwork begins. The arrangement of the caisson neck is made in the form of a wooden shield with a hatch opening. You should also provide ventilation with a summer speaker. The finished structure is placed on the walls. Then they begin to install the side elements with laying the reinforcing mesh.
It is advisable to cover the sides and floor of the formwork with polyethylene, followed by concreting.
Next comes the insulation of the structure followed by installation of the necessary equipment.
Plot
6 votes
+
Vote for!
—
Vote against!
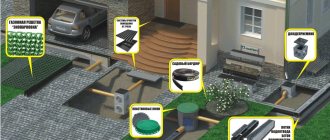
To organize an autonomous water supply for a private house or summer cottage, it is not enough to simply drill a well. It will be necessary to create a comprehensive infrastructure for the maintenance and operation of the water intake system. One of the important elements is the caisson - a device that protects the wellhead from the negative effects of external factors. You can buy a caisson container or make it yourself.
- The need to install a caisson for a well
- Caisson design: main components and principle of operation
- Types of caisson tanks for wells
- Making a caisson for a well with your own hands
- Preparing the site for the caisson
- Do-it-yourself concrete caisson for a well
- Self-installation of a brick caisson
- DIY installation of a metal caisson for a well
- Installation of plastic caisson
- Do-it-yourself well construction without a caisson: the feasibility of the method
The need to install a caisson for a well
Most wells are used to provide water to homes year-round. However, for this it is necessary to ensure positive temperature indicators for the head of the structure. Uninterrupted operation of the well in winter and summer is possible by installing a caisson.
A caisson is a sealed container deepened into the ground in which equipment for a well is located. The caisson protects the main technical components from freezing and the negative impact of environmental factors.
If the water intake is carried out close to the house, then you can place the battery and hydraulic accumulator in the basement of the room. In cases where the well is located far enough, protection of the pumping equipment, filter unit, pressure gauge, automation, wellhead and pipes is required.
Thus, the caisson solves a number of operational issues:
- protection of the network and equipment from exposure to sub-zero temperatures;
- preventing rain and snow from getting inside the hydraulic device;
- installation of a set of equipment for the functioning of the well;
- possibility of connecting the pressure line to the water supply network.
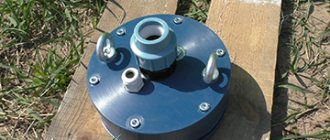
Caisson design: main components and principle of operation
The caisson has a simple design. The container is made of various waterproof materials that ensure tightness. In order to maintain a temperature above 0°C in the caisson, it is installed in non-freezing (lower) layers of soil. A hatch is brought to the surface through which you can freely get inside the caisson. The top cover must be thermally insulated.
Often the door for opening the hatch is made in the form of a double structure: the first cover is placed at ground level, and the second is 20-30 cm higher.
The caisson is additionally equipped with:
- outlets (barrels, sleeves or nipples) for the water supply and well neck, as well as the supply cable;
- ventilation system;
- reserve outlet with a ball valve for using water for economic purposes, for example, irrigating a site in the summer.
The average dimensions of the caisson are 2 m deep and 1-1.5 m wide.
The following requirements are put forward for caissons:
- strength and resistance of the caisson roof/walls to external influences;
- the presence of a hatch/door in the container providing access to the water supply system and the well itself;
- the minimum size of the caisson in which the equipment will be located is 1.5 * 1.5 m;
- The diameter of the protective tank should be sufficient to accommodate a set of equipment and carry out well maintenance.
Types of caisson tanks for wells
All types of caissons are classified according to two main criteria: material of manufacture and shape.
The characteristics of the equipment are largely determined by the material of construction.
Plastic caissons are lightweight, easy to install and resistant to high humidity. An additional plus is the excellent tightness of the container. The disadvantage of a plastic caisson is its relatively low structural rigidity. Arranging a concrete casing will help minimize this disadvantage.
Concrete caisson is characterized by high strength and durability. The main disadvantage of such structures is the complexity of installation work. When installing a caisson made of concrete rings, you will have to hire lifting equipment and pay for their services.
The brick caisson is made using the bricklaying method. To make such structures reliable, a protective layer is required to ensure tightness. You can build a caisson from remnants or scraps of bricks left over after building a garage or house. This will save you money on buying new material.
The metal caisson is made of stainless steel, structural steel or aluminum alloys. The body has good strength, resists mechanical loads, and at the same time, thanks to its flexibility, prevents the appearance of cracks. The thickness of metal caissons is at least 3 mm. A prerequisite for long-term operation is the application of a high-quality anti-corrosion coating.
Based on their form, protective structures are divided into several types:
- square caissons are made of metal sheets, plastic, concrete or brick tanks;
- round pits - usually plastic models or caissons made of concrete rings;
- Rectangular-shaped tanks are used when it is necessary to install additional equipment (filters, expansion tanks, etc.).
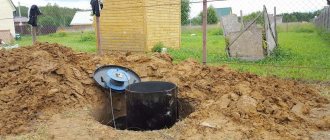
Making a caisson for a well with your own hands
Installing a caisson for a well with your own hands is slightly different for each of the described types of tanks. However, when creating any type of caisson tank, it is necessary to carry out a number of preparatory excavation activities.
Preparing the site for the caisson
- Dig a hole around the well. The pit should be located so that the pipes are located away from the center - this will simplify the placement of equipment and maintenance of the device. The diameter of the well for the caisson should be 30-40 cm larger than the dimensions of the built-in protective tank.
- The depth of the pit depends on the type of caisson being installed. When installing a factory container made of metal or plastic, the depth of the trench is slightly greater than the height of the caisson - the tank should protrude 15 cm above ground level. When arranging brick and concrete wells, the hole should be deepened - the position of the hatch should be at ground level.
- Dig a trench from the house to the caisson to lay the electrical cable and water supply. The depth of the trenches is 0.5-2 m. The exact value depends on the level of soil freezing.
- A casing sleeve must be welded to the outlet of the bypass pipe. The installation of this element is due to the fact that the casing and caisson are made of different materials. During spring floods, the load on the joint increases and can cause a crack to appear. The sleeve is fixed using a double weld. It is optimal if the exit of the casing pipe is located at a height of 30-50 cm from the bottom of the caisson.
- Cover the walls of the pit with a waterproofing layer. Cover the bottom with crushed stone - layer thickness 15 cm.
Do-it-yourself caisson for a brick well: video
Do-it-yourself concrete caisson for a well
To create a pit made of monolithic concrete, you will need the following materials:
- cement grade M-400 and higher;
- crushed stone fraction about 30 mm;
- timber and boards for formwork;
- reinforcing mesh;
- river sand;
- Luke;
- waterproofing material.
Tools for work:
- welding machine;
- concrete mixer;
- perforator;
- Bulgarian;
- bayonet shovel;
- buckets, tape measure, building level and thrombus;
- nails and hammer.
The procedure for making a concrete caisson:
- Step back 70-80 cm from the side walls of the pit and install the reinforcing mesh to the full height of the caisson. If the structure is filled with concrete gradually, then the reinforcement is installed to a certain level, the step is 30*30 cm.
- Various lumber is suitable for making fencing; as an option, you can install “sliding” formwork. Install shields 40-50 cm high along the perimeter of the pit. As the concrete mixture is poured, after the concrete mixture has completely dried, the boards move upward. Using this type of formwork will allow you to significantly save on material, but will prolong the entire process of creating a caisson.
- Cover the formwork with polyethylene film.
- Prepare concrete in the following proportion: 1 part cement, 5 crushed stone and 3 sand. Pour the prepared formwork.
- Wait until the concrete has completely set and use a hammer drill to make holes for installing the sleeves necessary for the cable outlets and water main.
- Treat the gaps between the walls of the caisson and the liners with cement-sand mortar.
- Fill the bottom of the tank with sand screed or concrete.
- Erect formwork for the ceiling. Provide a hole in the wooden panel for the summer heater, ventilation and a hatch. Install the side walls of the formwork and lay the reinforcing mesh. Cover the bottom and sides of the wooden board with plastic wrap. Fill with concrete.
- Make a caisson head. Dismantle the wooden frame and install a metal frame.
- Reinforce the neck, install the formwork and fill it with a cement-sand mixture.
- The caisson walls should be treated with waterproofing material and thermally insulated with waterproof insulation.
Self-installation of a brick caisson
To make a brick caisson for a well with your own hands, you need to prepare:
- crushed stone with a fraction of up to 25 mm;
- cement M-400;
- sand;
- waterproofing;
- wooden beams or metal reinforcement to create a ceiling;
- brick.
The tools you will need are the same as when constructing a concrete pit.
Algorithm for performing construction work:
- The bottom of the caisson can be made in the form of crushed stone backfill, cement-sand screed or slab foundation.
- For a tank with backfill or screed, create a strip foundation. The width of the base should be slightly greater than the thickness of the brickwork. Dig a trench 50 cm deep along the perimeter of the pit. Place a sand cushion (10-15 cm) and compact it.
- Fill the trench with concrete or fill it with coarse crushed stone, pieces of brick, and then fill it with sand-cement mortar.
- Leave the foundation until completely hardened.
- Lay a layer of waterproofing on the base.
- Start laying bricks from the corner of the caisson. Carefully fill the seams with mortar, ensuring that the tank is erected evenly.
- Drive the walls up to the level of the pipeline, install special cases between the bricks and continue laying.
- When the caisson is completely made of brick, the walls are plastered and treated with liquid waterproofing.
- Fill the bottom of the pit with crushed stone and compact it. Alternatively, you can make a concrete screed (15 cm thick) or a cement-sand screed (no more than 5 cm).
- Manufacturing of floor slabs:
- place beams and boards on the top of the created brick well;
- fix the ventilation duct, pipe casing and hatch;
- lay down plastic film;
- install reinforcing mesh;
- insulate the upper part of the caisson with polystyrene foam;
- fill the structure with concrete.
- After the floor slab has hardened, make a caisson head measuring 0.5 * 0.5 m.
- Install the hatch, lower the ladder into the tank and install the equipment.
DIY installation of a metal caisson for a well
A popular solution is to form a caisson tank from metal. You can purchase a ready-made housing and install it in a prepared pit or assemble the container yourself. But for this you need to have some welding skills.
Important! The seam is a potential source of corrosion. Therefore, during manufacturing it is necessary to avoid a large number of seams. The best option is to create a cylindrical caisson from a metal sheet.
The sequence of welding and installation work when manufacturing a metal well caisson by hand:
- Cut out the hatch and the base of the caisson from metal. Make a hole in the bottom for installing the casing pipe.
- Weld the column sleeve. The welding seam must be performed on both sides.
- Cut out the main part from a metal sheet, the height of which will be equal to the size of the walls of the tank.
- Make holes at the location of the cable and pipeline.
- Sew the side seams, connecting the body to the bottom.
- Mount the caisson cover, providing an opening for the head.
- Attach the cover to the pit head.
- Weld steel rod loops to the side walls for installing slings.
- Welding seams should be cleaned, primed, painted and treated with an anti-corrosion compound.
- Insulate the caisson with non-hygroscopic thermal insulation material.
- Install the metal container using a crane.
Installation of plastic caisson
Features of installing a plastic well caisson by hand:
- a plastic tank is installed on wooden beams, after which the casing pipe is installed;
- It is better to place pipelines and cables in plastic pipes;
- the hydraulic accumulator, automation, pump and other equipment must be located from the walls of the caisson at a distance of 5-10 cm;
- It is advisable to additionally strengthen the plastic caisson in the pit with reinforcement and concrete screed;
- It is recommended to install a concrete pad for the installation of a plastic tank.
Installing a plastic well caisson by hand: photo
Important! The flexibility of plastic has some operational advantages over a metal body. Even if the polymer tank “leads” a little, the tightness of the caisson will not be compromised.
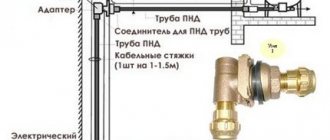
Do-it-yourself well construction without a caisson: using an adapter
An alternative way to provide your home with year-round water supply from a well is to install an adapter.
The adapter is a threadless device for removing pipes from the well below the soil freezing level. The equipment consists of two parts:
- the first part is fixed to the casing and acts as a sealed water supply outlet unit that supplies water to the house;
- the second part is removable, fixed with the first element on the “dovetail”; this part is installed on the pipe connected to the pump.
Fitting a well with an adapter has some advantages:
- ease of installation, compactness - there is no need to erect bulky structures such as a caisson;
- low cost - purchasing an adapter will cost less than building another protective tank;
- the ability to hide the well completely underground.
Adapter installation: video
How to make a metal caisson with your own hands
A caisson with metal walls is the most expensive structure, especially if the thickness of the steel plate is 3mm. In this case, the design can be made in various formations:
- rectangle;
- square;
- circle.
Such systems should be made according to pre-made drawings.
Photo gallery “Design drawings”
Materials and tools
A metal well system should be made using various types of pipes:
- Neck pipe (length – 40 cm, hole Ø 60 cm).
- Steel tube (length – 200 cm, Ø125 cm).
Necessary materials:
- pipe sleeves for casing;
- rolled metal sheets (thickness from 3 to 5 mm);
- pipe cuttings;
- thermal insulation material;
- rods or fittings (Ø1cm);
- anti-corrosion compounds;
- welding;
- timber beams;
- Bulgarian;
- electric drill with drills.
A sealed bottom can be made using a gas cutter or gas cutter. The same tools will be useful for installing a round tank.
Preparatory work
The algorithm for carrying out initial work is as follows:
- Marking with digging a pit, leveling the bottom to the desired level.
- Trimming the casing pipe to a 50-centimeter height.
- Preparation of metal elements of the caisson while simultaneously cleaning them from rust.
When working on the manufacture of a steel structure for wells, it is recommended to use a welding machine that can ensure the tightness of the entire chamber.
Manufacturing instructions
First, the hatch and caisson base are made. We install the hatch later, but for now we cut out a hole of the required size for casing. The following is the sequence of work:
- Installation using a double-sided weld of the main column-sleeve.
- Preparation according to the dimensions of the metal walls.
- Cutting holes in the sides for further installation of barrels (sleeves) into which cable glands or a pipeline will be inserted.
- Installation of the floor and sides of the structure for the well.
- Installation of a cover with a head.
- Welding of the neck, ventilation devices and pencil case.
- Welding to the walls of the installation is carried out.
- Attaching a hatch or cover to the head.
Welding on the sides of the metal hinges of the lift is allowed.
It is advisable to treat the welded joints on the outside and inside with a special liquid protection before pouring the ceiling.
A crane is used to install the metal frame at its permanent location. Then the casing pipe is welded with the pencil case. Next, the connection areas between the cable and the pipeline are sealed, and then the entire structure is covered with soil.
The process of manufacturing a metal caisson for a well:
Installation Features
The installation process is almost the same for any type of protective boxes, but there are certain nuances. The hole for the caisson is dug at least 50 cm larger than the structure being installed. This allows you to accurately level the product and adjust the alignment of the pipes. This will also help to insulate the walls or secure them if it is a plastic caisson device.
The well casing is cut to the height of the structure floor. Sand is poured into the bottom of the hole in a layer of 25-35 cm and watered to compact it. A reinforced concrete slab is laid on top.
Attention! You can pre-install fasteners for the caisson on the slab. But there is a big risk of making a mistake. Therefore, it is best to first put the product in place, and then make holes for fastening. Today there are many expanding fastening methods, so there will be no problems with the choice.
During the installation of any caisson, it is imperative to follow the technological process Source burenie-m.ru
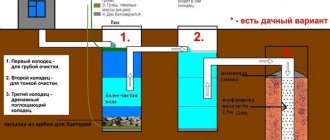
Disadvantages of a caisson made of concrete rings
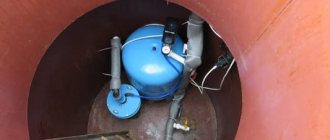
We do not recommend using the option with reinforced concrete rings. There is one popular misconception associated with the installation of rings. It is believed that they are not destroyed by water, and the structure can last up to 100 years. But actually it is not.
Although concrete is indeed a durable material, it is not suitable for well improvement. The rings will gradually deteriorate after installation. But this is not the main drawback of the scheme.
The main problem is that the pipe insertion into the well cannot be made completely sealed. Water will constantly accumulate inside the lower ring.
Microcracks will form in the surface of the concrete, through which water will enter the well. Sooner or later it will penetrate the wellhead and mix with drinking water. This will lead to contamination of the source. Concrete rings are difficult to repair: leaks will occur with a certain frequency.
Buden is interested: The correct distance from the well to the house according to the standards.
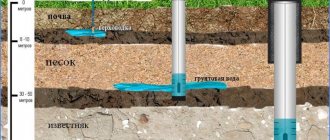
Figure 5: What are you drinking? Groundwater inside the caisson entered the well.