A handmade craft is filled with the incredible positive energy of the master, his mood and good thoughts. This means that a home refrigerator magnet, made with your own hands, will become an emitter of warmth, kindness and positivity. They make it funny for a friend, for parents - with words of gratitude, for a loved one - with a declaration of love.
But not everyone knows how to make a refrigerator magnet with their own hands at home. It’s easy to make, the main thing is to have the desire and follow some rules.
How to make a magnet with your own hands
First, you need to come up with a theme and idea for the future magnet. Next, decide on the choice of magnet holder:
- ferrite - a hard magnet, round or square, will last 10 years, suitable for products made of light materials;
- vinyl – soft, produced in the form of a flexible plate on which a thin layer of glue is applied; used for small weight crafts;
- neodymium - withstands loads, does not lose its properties for decades, suitable for crafts with filling.
In order for the product to hold well, the adhesion force of the magnet must be 2-2.5 times the weight of the souvenir. It is not necessary to buy a magnet; you can use an old one.
Required tools:
- brushes for glue and paints;
- glue intended for gluing plastic and wood;
- scissors.
Additionally, you may need a glue gun, a knife, and a measuring tape. If you need to sew parts onto a craft, you will need a needle and thread.
Armed with the necessary tools, they get to work. Then everything depends only on the imagination of the master: you can make an exclusive thing from any available material. You can work in any direction, knowing the basics of making crafts.
Advice! Crafts made in the same style look better.
"Live" magnet made from cork
Make a hole in the wine cork with a knife, being careful not to damage the walls. A magnet is glued to the cork.
When the glue has dried, dry soil is poured into the hole and a small shoot of the plant or its seed is planted and watered.
Hang the magnet on the refrigerator on the sunny side. When there is not enough space for the plant, transplant it into a pot, and a new seedling is planted in its place.
Advice! Lately, growing microgreens has become fashionable. It is convenient to germinate wheat, lentils and barley in a cork.
Flower bouquet
In a craft store they buy flowers, leaves, curly branches and make a composition:
- Option 1. A frame for a future basket is cut out of a small calendar. Corrugated cardboard is glued onto it and painted with acrylic paint. A bouquet is created on the basket by attaching decorations. Foamiran is glued to the back side, and magnetic vinyl is placed on it.
- Option 2. Instead of a basket, a tree trunk is cut out of cardboard, painted with acrylic paint and varnished. The crown of the tree is decorated with flowers and leaves. When the glue dries, glue a strip of magnet onto the craft. If the bouquet turns out to be heavy, use a ferrite or neodymium magnet.
Flowers are also made independently. Using stamps, cut out petals and leaves from polymer clay or salt dough. After drying, the dough products are painted and varnished. Polymer clay is selected according to the desired color.
From polymer clay
To make such souvenirs you need polymer clay, rolled out with a rolling pin.
What you generally need:
- a device like a rolling pin;
- polymer-based clay;
- magnetic tape;
- baking dish;
- stamps;
- paper with fine abrasive grains;
- ink and pad for it;
- glue
- glue gun.
The rolled out clay plate should be approximately five millimeters thick.
- Do-it-yourself drawings on T-shirts - step-by-step instructions, necessary materials, advice from craftswomen. 120 photo ideas on how to make a print on a T-shirt
DIY gift baskets are a universal gift for any occasion! 80 photo ideas for decorating baskets: romantic, formal, children's, Italian, Brazilian, for movie fans
A DIY gift for your loved one: for Birthday, New Year, Valentine's Day, anniversary. 110 photo ideas for original and fun gifts that will surprise your loved one
Using stamps, apply various patterns to the clay plate in a scattered order, but so that they do not overlap each other. Next, color with ink in your favorite colors.
Then, using baking molds, cut clay into pieces of various shapes. Then, taking into account the properties of the clay, bake them in the oven or leave them to dry.
Magnets from caps and discs
CDs that are no longer needed will find a second life as decoration. A picture with a still life is glued to the surface of the disk, and a vinyl magnet is glued to the back side. You can paint the disc yourself. To do this, clean the surface with sandpaper, paint and draw.
Tin lids and crown caps are excellent materials for decoration. A photograph, landscape, words are inserted inside the lid. A magnet is glued to the back side, and the lid is varnished or painted.
If you glue the lid with the convex part up, first drawing cute faces on the surface, they will amuse others with their cool appearance.
Making your own magnet
To do this, it is enough to find a metal bar made of steel or other ferroalloy; you can use the composite core of the transformer, and then make a winding. Wind several turns of copper winding wire around the core. For safety, it is worth including a fuse in the circuit. How to make a powerful magnet? To do this, you need to increase the current strength in the winding; the higher it is, the greater the magnetic force of the device.
When the device is connected to the network and electricity is supplied to the winding, the device will attract metal, that is, in fact, it is a real electromagnet, albeit of a somewhat simplified design.
In the modern world, magnetic field energy is widely used. Both in industry, radio electronics and electrical engineering, and for domestic purposes. Dozens of different devices have been created to generate a magnetic field, and the natural properties of minerals are also used.
The most widely used permanent magnet is the neodymium magnet. Its use and widespread use is due to both its cost and excellent technical characteristics. Its disadvantages are: a tendency to corrosion and fear of high temperatures. For this reason, in difficult operating conditions, other types are used that do not have these limitations.
Magnetic bags
A nice bag is made from thick fabric, filled with filling for volume, and tied with a ribbon. There is no need to glue the magnet to the bag; it is placed inside. The outer side is decorated with applique, beads, or a coin is glued on. This refrigerator magnet can be used as a talisman or to attract wealth.
"Coffee" magnets
There are countless ideas for creating a magnet from coffee beans and it’s easy to make. The basis is fabric, paper, wood or polymer. Cut out the desired part and glue coffee beans onto it.
As an option, they make an animal figurine, a heart model, or a photo frame.
Master class on creating the simplest “coffee” magnet:
- A heart template is cut out of cardboard. If made from plain paper, several layers are glued together.
- Glue the magnet in the center of the figure.
- Wrap the heart in fabric, gluing its edges.
- The product is tightly covered with coffee beans and covered with a layer of varnish.
The original “coffee” magnet is decorated with a bow and a beautiful souvenir is ready. For a friend who can't imagine a morning without a cup of coffee, this would be a great gift.
HOW TO MAKE A MAGNET?
Radio Mir 2006 No. 9
It is known that a noticeable influence of the magnetic field is observed only in iron-containing materials. But these materials also differ and are divided into soft magnetic and hard magnetic. Their main difference is the ability to maintain magnetization after the end of the magnetic field. In addition to iron and its alloys, ferrites made from iron dioxide powder with various additives (barium, cobalt, strontium, etc.) by hot pressing under high pressure have magnetic properties.
The cores of transformers and chokes are made from soft magnetic ferrites, and hard magnetic ferrites are used to make permanent anisotropic magnets.
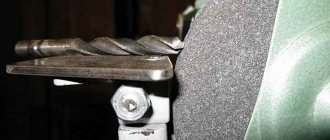
At home, you can make good permanent magnets from alloy steels. Without going into the intricacies of the range of steel grades, we can say that hardening steels are suitable for production. There are always old needle files, files, hacksaw blades, etc. at hand. The selected material must first be “released”, heated to red heat, and then slowly cooled. After making the magnet blank, it is hardened - heated to a light red heat and sharply cooled in cold water. The stronger the hardening, the better the magnet will be.
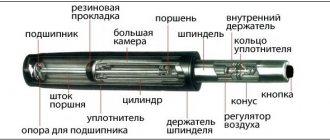
The magnetization process can be carried out using a simple installation consisting of an inductor and a fuse. The coil is wound on a frame of such diameter that a magnet blank can fit inside. For example, to make a coil I used a frame from imported solder (h=40 mm, D=50 mm, d=22 mm).
The coil is wound with PEV-2 wire with a diameter of 2 mm and contains about 500 turns. It is mounted on the base and connected to the network through a fuse and a switch. The workpiece is placed inside the coil, a fuse is installed and the switch is closed. The fuse burns out immediately, but during this time the workpiece has time to be magnetized.
For the fuse, you can use thin copper wire. For safety, it must be placed in a glass tube from a burnt-out fuse and covered with clean quartz sand (to reliably extinguish the discharge).
The blowout current of a wire fuse Ipp can be approximately calculated using the empirical formula:
Ipp = (d-0.005)/K where d is wire diameter, mm (up to 0.2 mm);
K is a constant coefficient (for copper K = 0.034). From this formula it follows that the diameter of the wire for the fuse
d = K*Ipp+0.005.
The installation in the proposed version makes it possible to obtain permanent magnets with a strength of up to 200 mT, which is quite sufficient for use in structures containing magnetic field transducer microcircuits (MFTs).
The same installation can be used to demagnetize a radio installation tool by turning on the coil through a step-down transformer with an output voltage of no more than 6 V. Power is supplied to the coil when it is located at a distance of at least 1 m from the demagnetized tool, it is taken in the hand, brought to the tool and slowly removed, describing expanding circles.
When working with the induction coil when connected to the network (220 V), follow the safety regulations.
I. SEMENOV, Dubna, Moscow region.
Wooden magnets
After your baby enjoys the ice cream, there is no need to throw away the stick. Once you have a few of them together, you can make a nice little house.
Sequence of making a house:
- Cut out the desired piece of cardboard. It is better to take cardboard, which is used in scrapbooking. If this is not the case, take regular cardboard, cover it with colored paper and paint it with paints.
- The roof, body and pipe are cut out separately.
- Cut out a window of any shape.
- Glue all parts of the house onto a paper base and paint it several times.
- A fence is constructed from wooden sticks and glued to the body of the house.
Finally, decorate the façade of the house to your liking and glue a magnet to the back side.
You can make a simpler wooden magnet. An image of any silhouette is applied to a piece of wood of any shape through a stencil. A black lacquered silhouette will look interesting against a light wood background.
How to make cool refrigerator magnets with your own hands
When creating cool magnets, the main condition is observed - they must be positive, amuse others and lift their spirits.
In a craft store they buy a small figurine, insert a funny inscription into its hands, attach it to a magnet and hang it on the refrigerator. You can sew the figurine yourself by cutting out the parts and filling them with cotton wool. It is not necessary to adhere to anatomical proportions; the funnier it is, the better.
This set of grannies will bring a smile to everyone who sees them. Each figure is given a facial expression according to their imagination. They are made from salt dough, painted and varnished. A “flock” of grannies is glued onto a flat surface, and a magnet is attached to the back. They can be hung in any order, then a magnet is attached to each grandmother.
Textile
There is also the option of making refrigerator magnets with your own hands from fabric, for example, felt.
To do this you need:
- magnetic elements;
- needle;
- scraps of fabric;
- thread of the desired color.
You need to take a piece of fabric and cut a circle out of it, three times the diameter of the magnet.
Next, you need to sew a kind of case for the magnet from it. This is done as follows: fold the edge of the fabric and stitch it. Place a magnet into the resulting case and carefully squeeze the fabric with a thread.
Tie a knot at the end of the thread and trim off the excess.
Such magnets look great, and the fabric cover protects the refrigerator from mechanical damage in the form of cracks. The cover is also convenient because you can replace it at any time without much effort.
Magnetic board for refrigerator
Some people not only want, but don’t even know what it is – a magnetic board. Moreover, they don’t know how to make a magnetic board for the refrigerator with their own hands.
A magnetic board on a refrigerator is a stylish fashion accessory that will not only complement the interior, but also has practical value. They write messages to each other, reminders, wishes on it. It becomes an indispensable element in the house, since family members communicate through it without being able to be together often. This board is also suitable as a gift.
It’s easy to do and the work won’t take much time. You can choose any template for the board - from a classic rectangle to the most bizarre patterns.
For production you will need:
- a large sheet of thick paper (whatman paper will do);
- vinyl-based magnet (it is sold by the meter in printing houses or advertising companies);
- transparent plastic (sold in the same place as the magnet).
Draw and cut out the desired template on a sheet of Whatman paper and paste it onto a vinyl magnet. If a human or animal figure is cut out, draw eyes, nose, and mouth with a marker. If necessary, paint in the desired color. Plastic is glued onto the paper; it is better to do this with tape along the edges of the figure.
That's the whole simple process. The finished board is hung on the refrigerator, written on it with markers, and erased with a regular flannel cloth. To erase records, a special sponge is sold that is attached to a magnet.
You can also make a world map board and hang all the magnets you purchase on your travels on it.
Making decorative magnets has many advantages:
- there is where to use your “golden” hands;
- joint creativity brings the family closer together;
- allows you to make changes to the interior at any time, you can do it every day.
The main thing is that the process is exciting, there is freedom for imagination and you can feel like a real designer.
DIY FRIDGE MAGNETS | PHOTOMAGNETS
Watch this video on YouTube
Magnet basket/DIY gift/March 8/Basket Magnet/DIY
Watch this video on YouTube
Do you want to understand better than others?
- Do-it-yourself magnets: how to decorate a household refrigerator - Refrigerator magnets are one of the most common ways to diversify the appearance and add personality to kitchen appliances. The souvenir shops offer a large…
- Is it possible to hang magnets on a household refrigerator? Many people, when traveling to other cities, buy magnets with images of various attractions or their photographs. Such souvenirs became widespread due to...
- How to keep lemons fresh at home - Thanks to the piquant taste of lemon and the presence of many beneficial micronutrients in its composition, it is a common ingredient in various dishes and drinks. Many even grow...
- How to prepare beets for the winter at home - Freezing is perhaps the most rewarding way to prepare vegetables for the winter. Firstly, it is very simple and quick (as opposed to conservation, which involves standing at the stove for a long time)….
- 13 unusual but effective ways to remove stickers from a refrigerator - Removing stickers from a new refrigerator is not as easy as it seems at first glance. Sometimes it takes a lot of effort to get rid of glue. We will share with you...
Where to start - tips for beginners
Think about what material is easier for you to work with. Needlewomen use their talents: the ability to sew or sculpt. Use good materials and tools. Otherwise, dull scissors or bad varnish will ruin the mood and quality of the product.
Fabric magnets: master class
An interesting effect can be achieved by decorating the refrigerator with fabric that matches the decor of the kitchen. Needed:
- textile;
- threads with needles;
- glue;
- scissors;
- magnets;
- to choose from: beads, pieces of leather, wooden parts (you can use coffee sticks).
A round or square magnet is covered with fabric and secured with thread or glue.
A frame is made from sticks, leather or beads on the front side using glue.
For country style, burlap and wood are used. If you need a laconic decoration, take a material with fine weaving.
Magnetic clothespins (master class)
A quick and budget-friendly decoration option.
Take a clothespin. A magnet is attached to one side, the reverse part is decorated as desired. Can:
- Paint in the same or different colors.
- Draw a picture.
- Attach beads, children's toys or small decorative elements (flowers, figurines).
Magnets made from glass droplets (master class)
A universal option. The glass base makes any photo look elegant.
What is this decoration made from:
- round magnets – diameter 13-17 mm;
- glass hemispheres of the same diameter or 2-3 mm larger in size;
- colorless silicone or glue;
- decor: photos, pictures, drawings.
Paste the drawing onto the magnet https://mirmagnitov.ru/product/magnitnye-nakleyki-5kh9-sm-50-sht-/.
Magnets for crafts
only verified
with quality guarantee
buy
Spread the glue evenly on top, press the glass and remove excess droplets. Glass hemispheres magnify the image located underneath them. Result: the photo will be enlarged many times over.
Master class: polymer clay magnets
The material gives a huge range of choice - even beginners can make a refrigerator magnet. Subsequent painting will hide sculpting flaws.
Needed:
- Polymer clay.
- Baking dish.
- Magnets.
- Glue gun or colorless silicone.
- Gouache.
- Thin brushes.
- Dye.
- Scissors.
Make oval-shaped blanks from polymer clay and attach a magnet. Bake in the oven at 180°C. Paint with light paint. Apply an abstract or geometric design. The basis can be a ready-made magnet with a hook https://mirmagnitov.ru/product/magnitnoye-kryeplyeniye-s-kryuchkom-ye25-m5/, onto which flowers and polymer clay figures are glued.
Magnets for crafts
only verified
with quality guarantee
buy
DIY “live” magnets
Succulent lovers, plant flowers on your refrigerator. Master class, what will be useful:
- bottle caps made of natural material;
- Earth;
- sharp knife with a thin blade;
- glue gun;
- screwdriver;
- succulents or small plants.
Use the end of a Phillips screwdriver to make a small opening. Use a sharp thin knife to enlarge the hole to its maximum depth.
Glue a magnet to the side. Before doing this, remove a thin chamfer to ensure a tight fit of the elements. Fill with soil and plant small succulents, cacti or plants.
For six months such a “florist” will be enough. Then, you should replace the grown plant with a new one.
Don't worry about the plug being drilled through. The bottom hole will ensure soil drainage.
Wooden elements: three DIY options
Environmentally friendly material is often used in decoration. Let's consider several magnet options:
| Materials | Sequence of work | |
| Branches with branches | Small saw, jigsaw, magnets, glue, paint, drill with drill bit diameter 8 mm. |
|
| Straight branches | Saw, magnets (neodymium), paint, photo, sandpaper. |
|
| Wooden parts of different shapes | Photo, fabric, small decorative elements. |
|
Get ideas by looking at photos of homemade wooden refrigerator magnets.
Cardboard + decorative paper: DIY magnet using papier-mâché technique
The papier-mâché technique is applicable to cardboard, paper, photos, and pictures from magazines. To make it, prepare:
- Sharp scissors.
- Magnetic paper https://mirmagnitov.ru/product/magnitnaya-bumaga-a4-matovaya-upakovka-10-listov/.
- Photos, old magazines or colored paper.
- Glue.
- Thin cardboard (without perforation).
- Decorative paint.
Cut a base of the same size from cardboard. Cut paper, magazines, photos into small pieces. Glue it onto the cardboard in a chaotic order (make 2-3 layers). Cut the rest to shape. Once completely dry, glue on the vinyl craft magnets.
How to take your own photo on a vinyl magnet
Choose a vinyl magnet. Print a photo: a family photo of the landscape you like, to the size on a printer, or order it from a photo workshop. Stick it on, if you didn’t get the size right, cut it off. Apply varnish and leave until completely dry - the photomagnet is ready.
If the refrigerator is exposed to sunlight, you should use matte paper that does not produce glare.
Caps to help make magnets
Plastic or metal bottle caps are transformed into original decor. In addition to covers, you need:
- magnets;
- glue gun;
- pictures from a magazine printed on a printer.
Place a magnet on the top, and place a photo or picture on the inside.
The result is a three-dimensional frame.
Important: for good attachment, use vinyl (bending), neodymium (strong holding) or standard ferrite magnets.