Comparison of the main characteristics of welding pencils from different manufacturers
There are welding pencils with completely different characteristics.
Each individual manufacturer brings something special to the product: Oxal. These products boast high efficiency in the absence of any sources of electricity. To get started, all you need is a lighter or any other open flame. Repairs to restore the functionality of materials can be carried out regardless of the ambient temperature.
Nanopike. The welding pencil of this production is famous for its relatively low cost. It is even suitable for repairing heat-resistant plastic and enamel cookware. One rod can be used many times, since the material consumption is very economical.
Welding pencil Extreme. This version of the pencil is also used to restore metals and enamel. Pencil welding "Extremal" in quality gives more than half the strength of conventional contact welding.
Thanks to this universal tool, you can carry out emergency repairs even when you do not have the most necessary materials at hand. With its help, you can not only solder the resulting crack, but also cut the material. You just need to select the required brand of product with the required properties. Thermal pencil is capable of repairing the following surfaces:
- steel;
- cast iron;
- iron;
- brass;
- copper;
- ceramics;
- slate;
- heat-resistant plastic;
- bronze;
- stainless steel and other similar materials.
Advantages and disadvantages of thermal solder
Based on the opinions of welding pencil users, it is possible to systematize its advantages and disadvantages identified during the work process.
Advantages of thermal solder:
- budget cost;
- small dimensions, which allows you to move the device without problems;
- ignition from a lighter, matches;
- high-quality sealing;
- temperature resistance;
- quick repair of damaged products;
- there is no need for a specially equipped place for such work;
- no need for electrical power;
- high productivity and efficiency;
- no need for special skills;
- versatility in working with various materials.
Disadvantages of the device:
- radiation of sufficiently strong fire;
- unpleasant odor after use;
- unacceptable for large volumes of welding work.
Almost all users are unanimous on only one thing: repairs using a welding pencil should be partial or temporary.
What you need to make pencil welding
So, to make welding from a simple pencil with your own hands, you will need a step-down transformer. The voltage output is no more than 27 V, and the power should vary from 50 to 60 Watts. You can also use a source in which the voltage can be adjusted.
The second tool is a simple pencil. More precisely, the lead, for which the pencil must be carefully divided into two components by gluing. When choosing a welding pencil, you need to consider two points:
- It is important to take a simple pencil, since it consists of graphite, which conducts electricity. This graphite is not found in colored pencils. Instead, white clay is used, and the color is given by a dye or a special pigment.
- The second condition is that the harder the pencil lead, the more clay it contains. Therefore, you need to choose a soft one, which, by the way, is always written on the pencil itself in the form of an abbreviation mark (divided into Russian and English types):
- M (B) – the softest. Can be found with numbers from 2B to 9B;
- TM (HB) – hard-soft;
- T (H) – hard;
- 2T (2H) – the hardest. Similar to B, it is found with numbers from 2H to 9H, where the higher the number, the harder it is.
If there is no letter designation, you can test the hardness and softness of the pencil experimentally. The harder it is, the duller its shade. And, conversely, the softer it is, the richer the black color.
The last two components of welding are wires and an alligator clip.
DIY making
Pencils are freely sold in general construction and specialized welding stores. In addition, they can be made independently.
To begin with, you will need carbon steel alloy wire. The electrode rod is excellent for manual electric welding. The flux coating needs to be removed from it.
Electrodes for manual welding
The composition for its own coating contains:
- one part of aluminum sawdust;
- three parts iron oxide;
- The binder is moment glue or other strong glue.
The preparation of the composition is carried out in a strong and stable container made of glass or clay. The electrode rod (or pieces of wire cut into 15 cm pieces) is dipped into the mixture and layers of the composition are wound onto it by rotating around the axis of the rod.
One end is left clean - it will act as a handle. The other will have the lighter mixture applied to it. It is prepared in a separate container in the following proportion:
- 1 part bertholet salt;
- 2 parts aluminum crushed to sawdust.
After thorough mixing and adding the same glue until a thick viscous mass is formed, small balls are rolled out of it, which are placed on the end of the pencil intended for ignition. Drying time - up to half an hour (or as indicated in the instructions for the glue).
Our welding pencil is ready, we can begin testing and welding training.
Invention of the pencil
Ultimately, these technologies led to the birth of the idea of a compact welding tool in the shape of a pencil rod.
However, when bringing the idea to life, the “pioneers” faced failure. The fact is that when the mixture cools quickly in the weld pool after the pencil stops burning, the slag and metal mix and the material becomes brittle.
READ MORE: Active and passive subwoofer: what is the difference, which one to choose and which is better for the car?
As a result, mixtures based on aluminum thermite did not give a positive result both in the professional environment and in the literature, the “pencil” model was recognized as “not feasible” and for a long time no one dealt with this issue until a professor, Doctor of Technical Sciences appeared, Academician Lebedev Vladimir Georgievich.
Having accidentally become acquainted with the idea, he first calculated a mathematical model, and then implemented a chemical one, based on copper thermite, in which the metal-slag pair is separated in the process of forming a solder-alloy.
Open publications by V.G. Lebedev in Russian publications became the basis for the creation of several welding tools present on the Russian market.
Welding pencils Shkval and Oksal are produced in St. Petersburg and are used for welding, soldering and cutting without the use of any special gas welding or electric welding equipment.
Autonomous mobile welding – pencil SK-1, Moscow
Welding with graphite electrode.
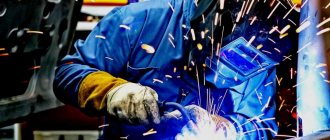
Copper is easily welded with a carbon electrode. But the process is very unstable: a porous seam easily appears. It is not clear what happens with metallurgy, but the hardness of the weld is somewhat higher than the hardness of the tempered copper nearby. Sometimes it is possible to obtain a seam without pores, but it is difficult to find conditions under which the process is stable. A well-sharpened electrode more or less allows you to control the arc, but it burns, and then the arc begins to travel both along the electrode and on the metal. So the electrode has to be sharpened periodically with a file. The electrodes from the battery do not last long, since they burn out not only in the arc, but also on the side along the generatrix of the cylinder - after all, heating also occurs 1-2 cm from the arc itself. However, they are enough for small jobs. It is much better to use copper-plated carbon electrodes. These were previously used in film projectors (arc lamp), but now they are easy to buy by searching on the Internet. Due to the copper jacket, the electrode burns out much more slowly. So, for a hundred meters of butt weld on M1 copper with a thickness of 1 mm, about 10-12 of them are required. Now about the fluxes. For copper they are unnecessary and even harmful. In the arc, the carbon of the electrode evaporates and oxidizes first to CO and then to CO2, that is, you have a clear reduction zone, as in gas welding. Through the mask you can clearly see how, as the arc approaches, the weld area is cleaned to a copper shine. The use of fluxes can only lead to difficulties with controlling the arc (it begins to wander) due to their insulating properties and changes in the composition of the gas and its flow in the arc. This is exactly the same as the use of fluxes complicates soldering if the joint is heated in argon. Working with a carbon electrode is also interesting because if you want to pause the heating of the bath, then instead of removing the electrode, you just need to dip the end of the electrode into the bath. The arc will go out, and pure Joule heat at the point of contact has significantly less power. This wonderful effect allows you to “prop” the end of the electrode into a bath that is ready to fall onto your mask when making a ceiling seam (and a ceiling seam on copper in argon is almost unthinkable, but it’s easy to do with coal. In the same manner, you can literally “push” the end of the additive into the bath . Carbon does not stick to copper and you restore the welding process by simply removing the end of the electrode from the bath again. In addition, working with a carbon electrode is much more productive than welding copper in argon. And if you are not very concerned about the quality of the weld (for example, when welding sculptures from sheet metal) , then this method is much more convenient than working in argon.The anti-corrosion properties of copper are preserved, since they are determined by the oxidation of the copper surface, which subsequently protects the metal.
All that has been said is not chatter, but the author’s personal experience in welding hundreds of meters of copper sheets under construction site conditions.
Yes, and don’t even think about cooking steel with coal - carburization; Soldering is possible, but the result is not that good.
How to make a thermite pencil with your own hands
The design of a thermite pencil is quite simple, and for its manufacture you will need the following materials:
- Carbon steel wire. The diameter of the wire should be from 2 to 3 mm, here everything largely depends on the thickness of the metal that will need to be welded with a thermite pencil. Therefore, the thicker the metal needs to be welded, the thicker the steel wire should be;
- Glue;
- Aluminum sawdust (fine fraction, no more than 0.5 mm);
- Iron oxide.
Sawdust of scale and aluminum is used to make thermite pencil coating. These components are mixed with glue. To seed the thermite pencil, which will help ignite it, you will need berthollet salt and aluminum filings.
Let's take a closer look at how you can make a thermite pencil for welding with your own hands:
- First you need to cut the steel wire into pieces 30-35 cm long;
- Next, you need to mix aluminum filings with iron scale into the glue. The proportions are as follows: 24% aluminum filings and 76% iron scale;
- Then the resulting mixture of sawdust, scale and aluminum should be applied to the wire;
- Give the coating time to dry sufficiently.
The seed at the end of the thermite stick looks like a match head. To make it, you need to mix bertholite salt (1 part) with aluminum filings (0.5 parts) into glue. After this, you need to dip the tip of the pencil into the mixture and let it dry for a while. The seed at the end of the thermite stick is needed to initiate the combustion process.
It goes without saying that even though a thermite stick is not an electric welder, when it burns, it still emits ultraviolet radiation that is harmful to the eyes, dangerous gases and high temperatures. Therefore, we must not forget about our own safety measures when working with this kind of thing.
Be sure to use a reliable holder during welding work, thick leggings, as well as an eye and face mask that would protect against ultraviolet radiation. If you pick up “bunnies” from welding with a thermite pencil, you can seriously harm your eyes.
How to work
When working with such welding, as with conventional welding, it is necessary to follow standard safety precautions. Of course, you should work on a fire-resistant surface, for example, tile, stone, brick, and so on.
Having connected everything, we touch the surface to be soldered. The arc does not ignite immediately, but the lead smokes - this is normal. We begin to weld, adhering to the only rule: we periodically break the arc. This must be done so that the lead does not overheat and cools down. Once the lead turns red, it will break.
The most interesting thing is that such a welding machine can not only weld metal surfaces. They can cut metal by slightly increasing the current and temperature, and this can be achieved by reducing the length of the electrode. Also, by either touching or tearing off the electrode, an inscription can be made on the metal surface. Agree, such a simple and convenient method of welding cannot be discounted, right?
Classification of mixtures
There are several main areas of application of thermites: thermal effects and detonator effect, pyrotechnic effects, metal welding. In accordance with this, there are several main thermite compositions:
- Traditional or ferroaluminum. The formula and composition of thermite are simple. It is a mixture of aluminum powder or sawdust with iron scale (iron oxide Fe3O4). The percentage is 75% iron scale and 25% aluminum. To slow down the combustion process, aluminum filings can be used. If a fast combustion rate is required, use powder. Often in practice, the combustion rate is selected experimentally using different ratios of aluminum powder and aluminum filings. This mixture is used to weld iron structures.
- Pyrotechnic mixture. This composition includes potassium chlorate as an oxidizing agent, sulfur as a combustible element and strontium carbonate as a catalyst for the process. The fundamental difference between a pyrotechnic mixture and a traditional one is its relatively low combustion temperature, but at the same time a very bright flame. Such mixtures are not used for direct thermal exposure.
- Copper mixture. It consists of 70% copper oxide, almost equal shares of copper powder and aluminum powder (10-12%) and ferromanganese - about 8%. This composition is characterized by the highest combustion temperature - about 2021 degrees, which, in turn, contributes to the formation of very reliable welds. It is mainly used for welding steel main gas pipelines.
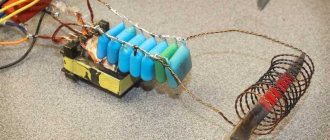
DIY mini usb soldering iron from pencil lead
Hello to all DIYers and those interested. In this article I will tell you how to construct a mini USB soldering iron from pencil lead and other available materials.
with your own hands
.
The property of graphite to conduct electric current has been used for a long time, for example, graphite brushes are used in electric motors. The lead of a modern pencil has low resistance and enough current can pass through it to light a light bulb. When making pencils, dry graphite powder is mixed with clay and water. The more clay, the harder the pencil; the more graphite, the softer the lead. Once the mixture is formed into a dough-like paste, it is passed through a molding press, producing thin sticky ropes. They are straightened, cut to size, dried and sent to the kiln for firing. Wooden blanks from cedar or pine are cut in half lengthwise and a groove is cut out for the stylus. Both halves with the lead are then glued together. The boards are cut into pencils, their outer side is polished. This is how a pencil and its lead are made. And so, the electrical resistivity of graphite is 13 (Ohm*mm2) / m at normal temperature (20 degrees). Well, enough theory, it’s time to move on to making the soldering iron itself. To make a soldering iron I needed:
Equipment and tools: 1) Drill, 2) Glue gun and hot glue, 3) Stationery knife, 4) Insulating tape, 5) Scissors, 6) Pliers.
Materials: 1) Wooden board, 2) Pen with a push button, 3) Pencil, 4) USB cable from phone charging.
First, take a wooden plank and cut it with a sharp stationery knife.
It is necessary to cut the board so that it becomes round in shape with a diameter that fits into a pen.
On one side, drill a hole with a drill equal to the diameter of a pencil lead.
We begin to strip the insulation from the USB cable with a utility knife.
We take the handle and free it from unnecessary parts.
The spring from the handle must be left. We will still need it.
We put our USB cable into the handle.
It's time to cut off the extra wires: green and white. We do not cut off black and red.
We push our wooden blank into the hole of the handle. The workpiece should have a hole on the outside, not inside the handle.
Now you need to strip the remaining wires of insulation.
Now we need a pencil lead. To do this, take the pencil itself.
Cut off a small part of the pencil.
Now, carefully, cutting with a stationery knife, we take out the pencil lead itself.
We push the resulting stylus into the hole of the wooden blank. The main thing is not to break the lead, so this process must be performed carefully.
We wrap the red wire around the stylus.
Next, take the spring from the handle, which we have put aside for later.
We bend its end with pliers, as shown in the photo.
We thread the spring onto the pencil lead and glue it onto the wooden part with a glue gun.
We wind the black wire around the spring and insulate it with hot glue.
For greater strength, we wrap our structure with electrical tape.
Well, that's all, the mini USB soldering iron is ready. The design, of course, was not very powerful, but it is possible to solder thin, small wires. And that's all for me. Thank you all very much for your attention! Good luck to everyone and bye!
READ MORE: Rating of the best mini ovens, electric ovens with convention 2021
Become the author of the site, publish your own articles, descriptions of homemade products and pay for the text.
More details here
.
How to do
To begin with, we make improvised terminals from wire, into which a graphite rod will then be fixed. One wire should be connected to these terminals, the second to the alligator clip. We solder both wires to the transformer.
In some cases, instead of a step-down transformer and separate wires, you can use a USB cable. To do this, we strip the cable of insulation, cut off two wires - green and white, but leave the red and black. Next, we wrap a red wire onto the stylus, and a black wire onto the spring from the machine handle on one side. We bend the second end of this spring and put it on the stylus. We isolate the resulting structure, leaving part of the stylus for work.
How to use the product
An individual feature of the use of this welding material is the possibility of its use in welding even on an unprepared surface. The pencil contains special oxidizing fluxes. which are capable of self-cleaning surfaces. Still, it is worth noting that cleaned and prepared parts are easier to weld and have a more reliable connection.
- The instructions for use are quite simple and consist of the following steps:
- Set fire to a pencil, you will not see a bright flame, it will slowly melt;
- Gently “smear” the softened end over the surface to be welded;
- The thermite welding process begins, the mixture will periodically emit sparks, and active interaction of fluxes with the metal is observed;
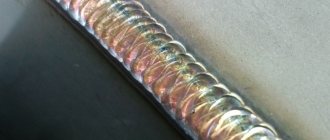
- The welding is completed, the hardened and cooled joint can be cleaned with a wire brush or sandpaper.
Attention! As a safety precaution, you should use pliers or other clamps. It is a good idea to wear safety glasses and gloves to avoid burns to your eyes or skin.
Welding Pencil Manufacturers
There is a wide variety of welding pencils on the welding products market, but you need to buy only from trusted suppliers who produce certified products, which is documented. Such products include the following brands.
- Extra ration. This soldering pen is reusable and has an unlimited service life. It is made using special technology and ensures adhesion to any surface made of plastic, ceramics, metal, in different planes. The manufacturer promises the consumer up to 30 rations with one pencil.
- Nanopike. This is a reliable tool for repairing holes and cracks in cars, plumbing, and household appliances. The manufacturer recommends that before sealing, wipe the damaged area with a rag and clean it with a knife or sandpaper. Light the welding pencil and transfer the molten mass to the soldering site. After burning the molten mass for 15-20 seconds, distribute it over the damaged surface. The renovation is complete. The soldering hardens in 15 minutes, and its complete hardening will occur in 1.5 hours. The manufacturer provides a one-year warranty on soldering. Recommended for working not only with various types of metals, but also with non-metallic surfaces.
- Extreme. This model is a universal thermal solder. Strong soldering is guaranteed due to the use by the manufacturer of tin, lead, as well as aluminum powder and magnesium in the composition of the combustible substance. In addition to metals, the substance contains flux and soldering acid. The scope of application of the pencil is varied. Soldering can be carried out in different planes.
Operating principle
The pencil consists of a compressed mixture of aluminum and iron oxide. When such a material ignites, a large amount of heat is released (exothermic reaction). From a chemical point of view, there is a reduction reaction of Fe from the oxide with the participation of Al. When molecular bonds in the oxide are broken, a release of thermal energy is generated.
The temperature of the reagents rises to such an extent that the reduced iron immediately passes into the liquid phase state, or simply melts. This molten metal penetrates and fills holes, crevices and cracks in the parts being joined or repaired.
Oxygen atoms released from the oxide molecules react with aluminum to form aluminum oxide. It plays the role of a flux, preventing re-oxidation of the melt and areas of the product heated to the plasticity temperature.
The welding pencil contains all the necessary components for welding:
- filler metal to form the weld material;
- flux that protects the weld pool from oxygen and nitrogen in the air;
- source of thermal energy for melting metal.
The chemical composition of pencils may vary. Instead of aluminum, magnesium can be used as a reducing agent. The reducing metal is selected depending on what alloys the specific pencil model is intended for welding.
In pencils intended for welding work on thick parts, a metal rod is inserted in the middle - its metal will be used to form the suture material.
READ MORE: Holes for socket boxes. Simple Secrets.
Safety precautions
When working with a pencil, you must strictly follow safety precautions to avoid getting burns on your body.
- Do not work near flammable liquids or materials.
- The place where welding work is carried out must be provided with fire extinguishing equipment.
- Before welding, you must wear thick gloves, safety glasses or a welding helmet, as well as special clothing.
- Keep the lit thermal solder at a distance from you using pliers or other devices.
- If it is necessary to seal a container after fuels and lubricants, it must be thoroughly rinsed and dried before welding.
- Do not work near electrical wiring that is not de-energized.
- Since the combustion of a dry combustible substance inside a pencil produces smoke, it is not advisable to inhale its vapors.
- When welding fistulas and cracks in batteries and pipes, you must first drain the water.
- After welding work, you need to check that there is no smoldering or fire around.
Varieties
Manufacturers throw many brands and models of welding sticks into the market. Not all of them are made with sufficient quality; for some, even the chemical composition remains unclear.
It is better not to experiment and stick to products from manufacturers that have proven themselves over many years:
- Thermal pencil for Extrapike welding. Suitable for repairing and welding deep cracks and through holes in steel, aluminum, alloys, and enameled products. Carries out tinning of surfaces, restoration of the enamel layer. The shelf life is practically unlimited, the consumption during operation is quite high.
- Universal pencil Nanopayk. Manufactured using magnesium as a reducing agent. Can work with any metals and alloys. Noticeably more expensive.
- Extreme. With its help, you can repair metal parts, both with and without enamel coating. Affordable. The manufacturer claims that the strength of the weld reaches 70% of that of a weld made by electric welding.
What metals can it work with?
Due to their versatility, welding pencils can be used for welding materials such as:
- structural steel alloys;
- galvanized sheet metal;
- cast iron;
- aluminum alloys;
- copper alloys: bronze, brass, etc. ;
- stainless and high-alloy alloys;
- heat-resistant plastics.
Minor repairs with a thermal pencil
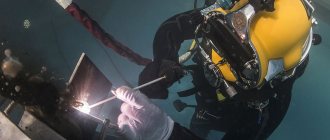
Industrial pencils of a special composition are also used for welding other metals, as well as for welding work under water, in a vacuum and other extreme conditions.
Advantages of the invention
Thermal welding pencil has a number of advantages that make it indispensable in some situations:
- ease of adaptation;
- autonomy (no electricity or fuel required);
- compactness (fits into any pocket of clothing or backpack);
- allows you to carry out welding work in hard-to-reach places (under the car, between battery registers);
- a temperature of 2900 degrees ensures the melting of most metals;
- stable combustion, which is difficult to stop, which makes it suitable for welding even on a wet surface;
- versatility of the product, applicable to work on different materials;
- ease of use as described on the packaging.
Areas of application
Thermite pencil is commonly used to join both vertical, inclined and horizontal surfaces in various parts. Work can be carried out at any ambient temperature, in any weather conditions. It can be used in the following situations:
- repair and installation work in emergency situations;
- prompt correction of breakdowns in cars, water, railway and other
- vehicles;
- soldering of copper wires;
- repair of radiators and pipelines in heating systems;
- sealing cracks and chips of cast iron and bronze products;
- correction of shortcomings in the operation of agricultural machinery in the field;
- cutting materials in hard-to-reach places.
Pencil welding is widely used in welding railway rails - thermite compacted in certain portions is used for welding. The work is performed by a team of two to three people. Thermite welding of rails has proven itself well compared to resistance welding: it does not require sophisticated expensive equipment, a large number of workers and long interruptions in train traffic.
As can be seen from the above comparison, the product has significantly high efficiency, however, it is still not recommended for permanent connection of materials. It is recommended to use a pencil for temporary connections only. Subsequently, it is still necessary to carry out repairs in its classical sense.
A welding stick, or thermite stick, is an easy-to-use tool for welding metal parts. It does not require any additional equipment, like electric and gas welding, and fits in your pocket. There is also no need for lengthy training - any home craftsman can use the pencil. It can be used in camping conditions, in heat and cold, rain and wind.
Scope of application of welding pencil
On a hike or fishing, in any field conditions, while traveling by car - anywhere and for any occasion: be it a leak in an iron boat or a bumper coming off, building a canopy or a tripod for a fire. The listing would take too much space, so let's stop there.
Our gadget is also indispensable for domestic work in the country: repairing a metal gate, straightening a fence, welding a canopy, etc. Repairing leaking radiators at the height of the heating season will also be done quickly and efficiently.
Technology of use
The process of using a welding pencil is quite simple and can be done by any home craftsman. The sequence of operations is as follows:
- Prepare the surface thoroughly by cleaning it with a wire brush or abrasive paper to remove rust, old paint residue and other contaminants.
- Degrease with gasoline, white spirit or other solvent.
- Remove the packaging from the pencil. Move the metal cover to the other end of the rod - we will hold it by it.
- Don’t forget to wear welder’s goggles (or mask) and thick canvas (split) gloves.
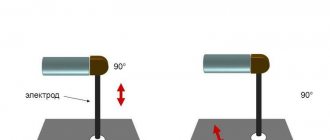
- Use a match or lighter to heat and set the end of the rod on fire.
- Bring the burning end to the starting point of the weld and press it to the surface of the part. Guide the rod along the seam line, holding in one place for at least 3 seconds, so that the welded edges have time to warm up to the melting temperature.
- Welding is carried out without hesitation, if with the right hand, then from right to left. If the welding speed is too high, the welding gap will fill with slag, but not enough melt will get into it to make a reliable connection.
At the end of the welding work, the stub of the rod must be placed on concrete, the ground (without dry grass) and thrown into a bucket of water.
You might be interested in:
- What to give your husband: 50 gifts for the dearest person
- Everything You Need to Know About Eyeliners: A Very Detailed Guide | Salt
- Oppo Realme X50 Pro vs Realme X50 comparison: which is better? | NR
- Welding from a pencil – Sam-Sdelay.RU – Do it yourself!