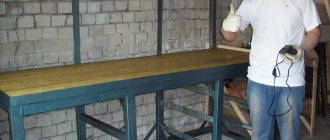
Carpentry workbench frame
Take smooth pine boards without large knots with a cross-section of 50x150 mm. Dry the raw lumber: the lower the moisture content of the boards, the less likely the structure will warp. The carpentry workbench in question is designed for comfortable work by a craftsman with a height of 170–180 cm. To change the height of the structure, make the legs higher or lower.
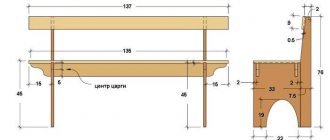
Drawing of a carpentry workbench (front view).
Workbench drawing (side view).
Table 1 - list of frame parts
| № | Name | Finish dimensions, mm | Material | Quantity | ||
| thickness | width | length | ||||
| A | Leg detail | 46 | 70 | 820 | pine | 4 |
| B | Lower spacer | 46 | 70 | 100 | pine | 4 |
| C | Upper spacer | 46 | 70 | 680 | pine | 4 |
| D | Cross leg | 46 | 70 | 366 | pine | 2 |
| E | Cover cross member | 46 | 70 | 458 | pine | 2 |
| F | Longitudinal leg | 46 | 70 | 1400 | pine | 2 |
| G | Longitudinal drawer | 46 | 70 | 1308 | pine | 2 |
| H | Bottom shelf | 16 | 504 | 1258 | Chipboard, MDF | 1 |
| I | Table top spacer | 50 | 50 | 366 | pine | 2 |
All elements of the base of the carpentry workbench are paired, so mark two parts of the same length on a 150 mm wide board at once.
Saw all the wooden pieces to length, with the exception of the spacers: it’s easier to cut the short ones already planed, and the long ones should be sawed off later “in place.”
Measure the width of the board, subtract the thickness of your circular saw blade and divide the result in half. Set the calculated size on the measuring scale and make sure that the saw blade is perpendicular. Unfold the boards exactly in the middle.
Board cutting diagram.
Sharpen the parts and sand them with medium-grit sandpaper.
File the bottom spacers and sand the ends. After cleaning the surfaces from dust, apply glue to the small leg and to the end of the leg.
Squeeze the parts together with a clamp, wipe off the squeezed out glue and drill holes with a countersink drill.
Fasten the workpieces with 6.0x70 screws. Prepare the remaining legs of the woodworking bench frame.
Bevel the bottom ends to reduce the likelihood of the wood splitting when the workbench moves.
Prepare the joints connecting the legs with the longitudinal legs for gluing. Fasten the parts with screws, setting a right angle.
Screw all four legs into place.
Place the frame halves and longitudinal drawers on the floor, measure the length of the upper spacers.
File the parts and secure them with glue and screws.
Assemble the top frame of the woodworking bench on a flat surface. Fasten the bars with wood glue and 6.0x80 mm screws, drilling guide holes for them.
Assemble the lower frame of the workbench, using clamps and auxiliary boards for convenience.
Replace the top frame and level the entire structure. Connect the frame parts with screws.
Cut out the bottom shelf from sheet material 16 mm thick and secure it to the bars
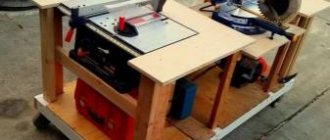
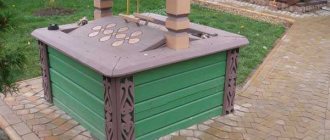
DIY mobile (portable) workbench on wheels
This is one of the most convenient models for working in different places of a home or site.
- A special feature is the presence of wheels on the bottom plane. Unauthorized movements of a homemade workbench can be stopped by blocking the wheels and installing a wedge.
- Drawers located on the right (for right-handers, left-handers can place them on the left) and a perforated plywood holder on the back of the cabinet with drawers provide ample space for storing small items and tools;
- The open compartment on the left (or right) accommodates tall, narrow equipment such as a drill press.
- A roller mounted on the edge of the tabletop simplifies the processing of long materials.
- A multi-socket outlet allows you to connect several different power tools at the same time.
Important: the tabletop is THREE-LAYER, which ensures its necessary strength and rigidity. The top and bottom layers are made of smooth plywood, the middle layer is made of boards.
In the drawings below with the dimensions of a do-it-yourself carpentry workbench, the parts are indicated as follows:
- A and B – front and side surfaces of the lower part with two stiffeners;
- C – the base of the table, at the same time the lid of the lower drawer;
- AA, BB, SS, DD, LL, FF and EE - respectively the side (AA and SS), front (BB and DD), bottom parts of the drawers (LL) and their slightly different facades from the front panels (FF and EE);
- D – right and left sides of the block with drawers;
- at the back, the block with drawers is closed with a perforated panel K with a reinforcing frame along the contour of vertical J and horizontal H strips;
- At the top, the cabinet is reinforced on three sides with T and R strips, on the second there are latches installed that lock the rotating part of the table in the desired position. Similar details complement the left block;
- the right block includes the KK roller, its supporting strip with a shaped upper part JJ and the intermediate strip GG, which fills the space between the side of the table D and the JJ strip, ensuring the position of the roller exactly on the edge of the tabletop;
- E and V are the sides of the left cabinet of the workbench. Please note they are different lengths;
- F and Q are the upper and lower planes of the left pedestal. Part F occupies the entire space from the leftmost side of the table to the cabinet with drawers located on the right;
- The sidewalls of the cabinets facing the inside of the table are fastened to part F with corners L on screws;
- the side parts of the tabletops consist of solid G panels;
- the central rotating part of a home-made wooden workbench is a layered structure of two N panels and P strips filling the space between them. A gap is left between the strips for the axis of rotation - a threaded rod;
- The front and rear ends of the rotating tabletop are secured by S strips with mating latches for locking and convenient handles.
Parts not listed are reinforcing strips and inserts. The dimensions of all elements are shown in the table below.
Table 1. List of materials and elements.
| Position | Quantity | |
| Plywood | 18…20 mm 1.2x2.5 m | 3 |
| 25 mm 1.2x2.5 m | 3 | |
| 25 mm 0.9x2.5 m | 4 | |
| 8 mm 0.2x2.5 m | 2 | |
| Perforated plywood | 8 mm 1.2x1.2 m | 1 |
| Plywood | 8 mm 1.2x1.2 m | 1 |
| Threaded rod (solid thread stud) | M20 180…200 mm | 1 |
| 20 mm washers | 4 things. | |
| Locknuts for M20 | 2 pcs. | |
| Latches with mating parts | 4 things. | |
| Handles for turning tabletops and drawers | 4 pcs.+4 pcs. | |
| Furniture wheels with a flat support for fastening | 4 things. | |
| Screws/screws for wood M8…M24 | 0.5 kg | |
| Screws/screws for wood M50 | 0.5 kg | |
Sequencing
When assembling a workbench made of wood for your garage with your own hands, you should follow the specified sequence of actions. The main part of the connections is made using screws; it is advisable to pre-drill holes for them in the plywood with a drill ½…1/3 smaller than the thread diameter of the fastener. During the assembly process, all corners are checked for correct shape using a construction square.
- Cut out the material. It is better to do this with a circular saw and then sand the ends - this will provide smooth surfaces for joining and will simplify the work.
- Assembling the base - the base plate for the side cabinets with drawers and open area and the stiffening ribs for it. First, a frame with stiffeners is assembled, then a plate is attached to it. M50 fasteners are used.
- Assemble the side cabinets. Important: perforated plywood on the rear planes must be attached to the frame. For the left cabinet, the outer support plane is longer than the inner one and is attached not to the base plate, but to its frame. This provides greater structural rigidity.
- Mount the cabinets on the base plate. Their lower planes are fastened with M20...M24 screws, the inner sidewalls - with corners.
- On the inner sides of the mounted cabinets, clearly define the middle and cut holes for installing the rotary axis. The holes should be U-shaped, their center at a distance of 22 mm from the bottom plane of the upper parts of the cabinets.
- Place the threaded rod in place so that it passes through all four vertical posts and protrudes from the outer sides of the workbench by 40...50 mm. Secure the ends with locknuts and washers, without tightening the fasteners yet.
- Using screws or clamps, install temporary support strips for the rotating tabletop and fit it to the mounted axis. Align the bottom layer of the tabletop horizontally and along the edges of the table.
- Using glue and screws, connect the three layers of the rotary table top. Leave enough distance between the middle layer slats for free rotation of the axis. After assembly, the temporary support strips are removed and the tabletop is checked to ensure that it rotates correctly and easily. Its upper plane, when turned to any side, should be flush with the side parts of the tabletops on the cabinets.
- Mount reinforcing slats on the side surfaces of the tabletops - stationary and rotary - and install latches and handles.
- Mount the drawer guides in the right cabinet, using temporary wooden panel inserts for convenience. If desired, instead of wooden guides, you can use factory-made full or partial extension systems.
- Assemble the boxes using glue and screws. The dimensions of the facades are determined “on site”. For ease of extension, there should be a gap of 1...3 mm between the facades.
- Install the movable bar for the guide roller in a convenient place. There may be more than one such video, depending on the specifics of the work. To make it possible to raise and lower the roller, a slot is made in the outer bar for part of the length and a clamping screw (wing nut) is installed.
- Mount the roller on the top of the movable bar using a U-shaped holder with holes or slots in the sides for the roller axis.
- The last stage of work is the installation of electrical equipment. When placing it, you should consider balance and not load only one corner or one side of the table. The set screws must extend at least 2/3 of the thickness of the rotary table top or through the entire table top on the side cabinets.
This is what a finished, hand-made wooden workbench will look like in the process of rotating the table top with the equipment attached.
To protect the plywood from moisture and improve its appearance (especially if used material is used or it got dirty during the creation of the workbench), it is advisable to prime and/or paint the parts before final assembly.
Workbench table top for carpentry work
Use sheets of MDF, chipboard or plywood 16–20 mm thick for the workbench cover. Glue the slabs in two layers and get a tabletop 32–40 mm thick.
Drawing and arrangement of the workbench cover: 1 – edge strips (birch, maple); 2 – working surface (hard fiberboard); 3 – load-bearing board (chipboard, plywood or MDF).
For the countertop, you can take sheets of chipboard left over from unnecessary furniture. For example, the walls of a wardrobe will do. Take them as a base and add small pieces so that the carpentry workbench lid measures 670x1940 mm.
Place narrow slabs toward the back wall and toward the center of the workbench. Place large sheets in the top layer of the countertop. Glue the cut pieces together.
Fasten the sheets with self-tapping screws, deepening them into the countersunk holes. Trim the edges with a hand-held circular saw 20mm from the edge.
Align the tabletop with the frame and secure with screws.
Sharpen slats for edge trims. Saw off the 45° bevels and cut the planks to length. Place a piece of fiberboard on the lid of the workbench, add a flat panel on top and secure it all with clamps.
This makes it easier to attach the pads. Align the ends with the edges of the tabletop and press the rail against the panel - the top plane will be flush with the workbench lid. Holding the bar with one hand, drill pilot holes and secure the parts with screws.
Move the device to the other side and install the remaining pads. Sand the slats with a sander.
Drill a hole in the corner of the slab so that the fiberboard can be easily pushed out of its recess when replacing it.
Clean the surfaces from dust and cover the wooden parts of the frame with stain. Place the fiberboard in the recess of the lid. If you are using pieces of material, secure them with double-sided tape. Place a carpenter's vice on your workbench.
Wood or metal?
First of all, before you start creating your own workbench, you should think about what material it will be made of. A wooden base will be appropriate if the intended working area does not take up much space.
The ideal option for the countertop would be laminated chipboard or pressed plywood . For a stationary sample, a combination of planed wooden boards and metal is suitable.
Advice : an old unnecessary table or a high-quality door made of solid canvas will also work well as a base.
It is not advisable to make a workbench from metal ; a wooden lid and frame with metal sheathing would be an acceptable compromise.
It is best to use not one or two vices, but as many as possible. Some help secure long boards without much effort, while others are suitable for fastening small parts.
Boxes for storing tools in a carpentry table
When filling the space under the cover of a carpentry workbench, use a modular principle. It’s easier to make individual blocks and more convenient to change them later when you need space for a new tool. There will be a certain waste of material, but the weight of the workbench will increase and its stability will be enough to work with power tools.
Scheme of organization of storage places: 1 – full extension drawer; 2 – spacious plywood box; 3 – chipboard container; 4 – wide box; 5 – compartment for a portable tool box; 6 – space for cases and workpieces.
Universal machine height
Universal machines are an intermediate option between carpentry and metalworking. It is convenient for the garage, taking into account the minimal space for additional furniture. These tables are made of metal. They have a widened and elongated shape and can be adjusted.
Product with adjustment for standing work
Since the machine is universal, it is mainly equipped with mechanisms for changing the height of the tabletop. This is convenient, as you can adjust the height for different types of work relative to the equipment on the table.
Use boxes from old furniture
Select suitable sized drawers from an unnecessary desk or chest of drawers.
Label the wooden elements and carefully separate them. Clean the glue from the spikes and eyes.
Trim the planks to width, removing worn corners and cracked grooves. If the original bottom of the box is flimsy, prepare thicker plywood or fiberboard. Make new grooves on a circular saw.
Assemble the box “dry”, adjust the parts if necessary. Clean the surfaces and glue the structure. Use mounting angles to accurately assemble right angles.
Once the glue has dried, sand the corners and sides of the box, securing it in place for ease of work.
Prepare guide strips and calculate the dimensions of the module.
Calculation of a block for three drawers
File the bottom, top and side panels. Screw the guide rails with screws.
Assemble the panels into a module and test the movement of the drawers. Place the block inside the workbench with supports underneath it.
Drill pilot holes, countersink and tighten the screws. Attach the chipboard to the top beams and to the legs of the workbench.
Install front covers on the drawers. Having marked the location of the housing, secure it with one screw. Insert the drawer into place and adjust the position of the panel. Carefully remove the drawer and tighten the remaining screws.
Secure the remaining linings - the module with wide drawers is ready.
Peculiarities
A carpentry workbench is a stable and reliable device in the form of a work table, the purpose of which is to perform carpentry work.
Any carpentry workbench is equipped with a set of additional devices that are necessary for fixing parts during processing.
The parameters of the workbench depend on the expected weight and dimensions of the wooden workpieces being processed, as well as on the dimensions and availability of free space in the room. In addition to full-sized structures, there are also compact options that can be used for use at home or in the country.
The set of works that are performed on a carpentry workbench is carried out using electric or manual tools. The load on the workbench can be very significant, so it is made using strong and thick timber from especially durable wood species: beech, oak, hornbeam.
A countertop surface made of soft wood, such as spruce, pine or linden, will quickly deteriorate, especially with intensive use of such equipment, which will entail additional costs for periodic resurfacing.
A carpenter's workbench has several elements that are basic to this design: a base, a tabletop and additional fasteners. The tabletop must be strong, and you can check this this way: place several small objects on the workbench, and then hit the surface of the workbench with a carpenter's hammer - objects lying on the tabletop should not bounce during this action.
Traditionally, the workbench tabletop is made so that it does not have excessive elasticity - for this, several wooden blocks are glued together in a vertical position, while the total thickness should be from 6 to 8 cm. Sometimes the tabletop is made of two panels, between which a longitudinal gap is left. This modification makes it possible to process parts and cut them without resting on the edge of the workbench, but by fixing the workpiece by supporting it on the tabletop over its entire area.
The base for a carpentry workbench looks like two frame supports that are connected using two drawers. The supporting part must have good rigidity and strength; its constituent elements fit into each other according to the tenon-groove connection principle, which are held together with wood glue. The drawers, in turn, pass through through holes and are secured using driven wedges - occasionally wedges need to be added, as the wood dries out and loses its original volume, and the table also becomes loose from large and regular loads.
In terms of additional devices, carpentry tables differ from metalwork models, which lies in the fact that the pressing parts are made not of steel, but of wood. Metal vices are not suitable for processing wooden workpieces, as they leave dents on the surface of the product.
Typically, a workbench is equipped with a pair of vices located on the surface of the tabletop. Various stops are inserted into the corresponding slots on the table and are used only when necessary, and the rest of the time they are stored in a separate box. The good thing about a tool tray is that nothing gets lost or falls off the workbench during work.
Carpentry table compartment for portable box
The middle module is made to the full height of the bench to enhance the rigidity of the carpentry workbench. For the body, take 16 mm thick chipboard and cut out two sides, a bottom and a lid.
Middle module housing: 1 – frame diagram; 2 – side wall; 3 – lower and upper panels.
Attach the guide strips to the sides, assemble the frame with screws and install it close to the right block.
Prepare the parts for the drawer.
Drawings of box elements: 1 – long wall; 2 – short wall; 3 – bottom; 4 – front pad; 5 – rail.
Use a circular saw to select grooves in the walls, which can be done with a regular disk. Set the cutting depth to 6 mm and the width to 8 mm. Run all four parts through. Move the saw fence 2 mm and make a test cut. Check the groove and adjust the stop if necessary. Run the rest of the workpieces.
Assemble the module and install slats at the bottom that protect the edges of the chipboard from chipping and provide a “smoother” operation.
Secure the front panel with screws and place the drawer in place.
Purpose and structure of the workbench
Externally, the workbench is necessarily a stable and massive work table for the manufacture, repair and processing of products of various shapes and sizes. The dimensions of the workbench itself are directly related to the ability to produce workpieces of various sizes. Moreover, this work can be carried out either manually (with a hacksaw, hammer, brace and many other devices) or mechanized using electrical equipment.
A typical woodworking table layout looks like this:
- The working surface of the workbench is made of durable, solid boards, the thickness of which should be more than 60 mm. To reduce periodic replacement due to rapid wear, the surface is made of hardwood (oak, beech, hornbeam). The workbench cover can be made from separate dry boards, pre-impregnated with drying oil.
- A vice is attached to the front panel of the workbench, which serves to hold the workpiece in a stable and secure position. On a workbench with a linear dimension of more than one meter, it is possible to install two vices. At the same time, large vices are often made in wood and are used to secure large workpieces, while the manufacture of smaller vices is permissible in a steel version.
- The workbench supports are made of soft wood (linden, pine, spruce). At the same time, to increase the stability of the entire structure, the supports must be connected to each other by longitudinal strips.
- In the space under the workbench, it is necessary to provide for the installation of tightly fixed or drawers and shelves for storing working tools.
Holes specially drilled in the front part of the cover serve as an excellent device for securing a variety of clamps, wedges and other types of fasteners for large workpieces. For fittings and fastening of small parts, it is planned to make recesses in the rear part of the working surface of the workbench. Sometimes, due to the complexity of making such fastening recesses, wooden slats are installed around the perimeter.
Types of carpentry workbenches
There are three main types of carpentry tables:
- Mobile. Such a workbench is most often made by hand for small rooms (garage, barn, outbuilding). The main purpose of such a desktop is to perform certain operations with small parts. Its relatively light weight allows you to move the entire structure to a place convenient for work. The use of a small number of auxiliary tools - such as a vice, electric drill, emery - allows you to effectively use a mobile workbench for even small and medium-sized plumbing work.
- Stationary. A distinctive feature of this type of device is its massiveness, which prevents the possibility of installing a workbench in small garages or workshops. These work tables are used more often for sawing dimensional boards, logs, timber during the construction of a house or various outbuildings. The use of such a workbench is impractical after completion of construction.
- Prefabricated workbench. The manufacture of such a workbench is carried out using a bolted connection, which makes it possible to modify and modify the workbench at any time, depending on the tasks being solved. The disadvantage of such equipment is the complexity of its assembly, as well as the need to periodically tighten the bolted connection, which can weaken under the influence of vibrating mechanisms installed on the workbench.
How to make modules with convenient drawers
The design of the housings of these modules is identical to the previous designs. The retractable container placed on roller guides is made taking into account the installation gap, so its width will be 26 mm less than the internal size of the case (for common guides with a thickness of 12 mm).
Module structure and box parts: 1 – assembly diagram; 2 – back and front walls; 3 – front panel; 4 – bottom; 5 – side walls.
Before assembling the case, secure the restrictive wooden slats and metal guides to the sides.
Installation diagram of guides on the walls of the housing.
Secure the finished module under the workbench lid.
To install the drawer rails, unclip the latches and pull out the small rails.
Fasten the parts to the walls. Determine the required distance from the edge to the guide yourself based on the specific design and the 10 mm gap between the wall of the box and the top panel of the frame.
Pull out the middle rails all the way.
Insert both rails at the same time, holding the middle rails with your fingers. If the drawer is too tight, take it out and try again.
Replace the front trim.
Height of metalwork table
Product sizes are selected individually. In this case, the parameters of the room also matter.
Compact product
In small workshops they prefer to use a workbench due to its small dimensions.
In order not to make changes to the location later, it is installed in accordance with GOST requirements and must correspond to the standard height.
The following must be taken into account:
- The table is placed perpendicular to the window or source of daylight so that the lighting is directed to the left side of the master.
- The distance between the central parts of the vice located on the table is 90 cm.
- Machines designed for standing work are installed on the foundation, firmly fixing them. They must have protection and local lighting.
- To work with metal parts, it is necessary to use a protective metal mesh.
- The width is from 80 to 90 cm, the length is from 120 to 150 cm. These parameters should be taken into account when positioning, since free access must be observed. A distance of 40–50 cm is required around the table on the working side.
- The standard workbench height is determined once and does not require changes. Taking into account the physiological characteristics of the support of the spine by a muscular corset, the height is calculated using the formula: human height (cm) – 110 (average optimal load on the upper axis of the spine) = optimal distance of the top of the tabletop from the floor.
- If the distance does not correspond to height, it is changed using a footrest. Standard sizes: 5–15 cm from the floor.
- To make products in a sitting position, a corner footrest 40x40 cm with a corner height of 24 cm is used.
- The height of the chair should be equal to the distance from the foot in the shoe to the corner of the popliteal notch. For a person of average height, it is 45–47 cm. The back of the chair should be 35 cm high for optimal skeletal support. These parameters are important for a jewelry workshop, since you have to sit while working.
- The air temperature in the room where the workbench is located should be in the range of 16–17 degrees.
Wooden workbench
Schools and specialized educational institutions adhere to the same rules when teaching children in a professional direction. Since the bench machine does not require working with large parts, changing the height for different types of work is not required.
How to make a carpentry workbench drawer from plywood
Saw the box body blanks from 10mm plywood, and for the bottom take a 5mm thick sheet.
Scheme of cutting parts for two plywood boxes: 1 – front panel; 2 – rear liner; 3 – side wall; 4 – front liner.
Sand the workpieces with a grinder.
Make grooves for the plywood bottom in the side walls, back and front liner. Remove burrs with sandpaper.
Glue and screw together the parts of the front and back walls.
Apply glue to the joints and into the groove.
Assemble the structure using angles and clamps.
Fasten the parts with screws, drilling guide holes.
Assemble the second plywood box with your own hands.
Install a panel on the back wall of the carpentry workbench designed to increase the rigidity of the structure and to accommodate hand tools.
Cover the drawers and cut ends of the particle boards with finishing compound.
Connect power to your homemade workbench and start filling the containers with tools.
Installing a vice on a bench
A vice is an indispensable attribute of a mechanic's workbench. It is not recommended to attach a clamping tool that weighs several tens of kilograms to the tabletop itself. It is best to place a metal gasket 1 cm thick between the metal of the table and the tool. You need to drill holes in the gasket for the anchor bolts. Then, in the same places, drill holes of the same size in the tabletop. The entire structure is fastened with anchor bolts.
Covering the workbench with plywood and installing a vice
Covering the workbench with plywood and installing a vice
Covering the workbench with plywood and installing a vice
Vise
Types and their structure
A professional wooden workbench is a universal and multifunctional working tool for carpenters and carpenters. Design options for a carpentry workbench can be different and depend on the functionality of those tasks that are determined by the technological processes of processing workpieces.
Stationary
This is a classic type of carpentry machine that is constantly located in one room and does not involve any movement during its use. A simple workbench makes it possible to work with parts of various sizes and weights. As a rule, this is a massive and durable structure, consisting of main parts and having additional equipment - screws, clamps, stops that secure parts.
The stationary workbench can be equipped at the discretion of the master. For example, a jigsaw, milling machine, emery, or drilling device can be installed in it. This 4-in-1 station wagon is convenient because the craftsman has everything he needs at hand, which means his productivity increases.
The table top of stationary workbenches is made of inlaid wood or made of solid wood. It is not recommended to use particle boards for a workbench, as such a coating will be short-lived. According to professionals, the most convenient tabletop length is 2 m, and its width is 70 cm. This size makes it convenient to process both large and small workpieces.
For the frame of the structure, a beam is used, the cross-section of which must be at least 10x10 cm. The thickness of the collets must have a cross-section of 5-6 cm or more. The connecting points are made with a tenon or dowel connection, and also use bolts and screws.
The stops, like the jaws of the vice, are made of durable wood; a metal stop is not used, as it will deform the workpieces, leaving dents on them.
Mobile
There is also a compact, portable type of woodworking bench. It is used when there is not enough free space to work. The length of a mobile workbench is usually no more than 1 m, and the width can be up to 80 cm. Such dimensions allow you to move the workbench from place to place; its weight is on average 25-30 kg.
The compact device is convenient because it can be used to process small parts, perform various repair work, and do wood carving.
Prefabricated
This type of carpentry equipment consists of separate modules, which can be replaced if necessary, since the collapsible design of the workbench has bolted connections. Prefabricated models are used to perform various methods of processing workpieces, and they are also indispensable where free space is limited.
Most often, prefabricated carpentry workbenches have removable tabletops and a frame base equipped with a folding mechanism. A workbench can become a workplace for one or two people at once. The design of the workbench allows it to be moved over certain distances or moved within the workshop.
For prefabricated models, the tabletops are often made on special hinges, thanks to which it can be tilted, and the legs of the frame will fold under the folding part. Prefabricated workbenches are used to work with workpieces that are small in size and weight. The supporting frame of such structures is much smaller in size than that of stationary massive analogues. The tabletop for a prefabricated model workbench can be made not only from solid wood, but also from plywood or chipboard, since such workbenches are not expected to bear a large load.
Operating rules
In order for the carpenter's table to last a long time and to work at it safely, it is important to follow the basic operating rules:
- All table parts must be firmly secured. If they start to wobble, they need to be tightened or secured. Any unsteady position can result in serious injury. It will not be very pleasant if the saw or jigsaw comes off the part at the most inopportune moment.
- All items for work should also be held well on the table. This will make the work more accurate.
- The device must be protected from moisture. Wooden boards will warp and crack with sudden changes in humidity. If there is high humidity, mold may grow here.
- When working with heavy objects, you need to evenly distribute the load on the tabletop.
Making a carpentry workbench yourself is not a quick task, but it is exciting, because you need to take into account not only your needs, but also the ergonomics of the entire workspace.
Proper assembly of this device and its correct operation will bring joy from carpentry work, which will give inspiration for creativity.
Configuration and storage space
A locksmith must have a lot of tools at hand, which is why workbenches are equipped with storage areas. According to the type of configuration and location of storage places, metalworking workbenches can be divided into:
- without pedestals . There is no storage space under the countertop, the maximum is an open shelf. Such workbenches take up minimal space and are suitable for garages;
- single pedestal . The storage space is located on one side only, under the table. This could be a large drawer with a swinging door, several drawers of the same or different sizes, or a cabinet with a drawer. The remaining space under the table is either empty or used to organize an open shelf. Single-pedestal workbenches are great for spaces with limited space. They allow you to store a sufficient amount of tools, but at the same time remain compact;
- A two-pedestal workbench involves placing storage spaces on both sides under the worktop. The layout may vary. Drawers and cabinets are most often used; carousel-type drawers are less common;
- A three-pedestal workbench is comparable in size to a two-pedestal workbench, but instead of free space there is another part for storing things. If there are a lot of tools, and it is important that it always remains literally at hand, then pay attention to such models.
Read also: Rotary table for jig boring machine 2a450
Drawers can be equipped with trays to conveniently store hardware. Instead of special trays, you can use good old jars, which have long been installed in all garages in the country and do an excellent job of sorting and storing small fasteners.
It is important to pay attention to the design of the drawers. They must extend completely to provide access to the most distant corners. In addition, the guides must be strong enough to support the possible weight of the tool.
Additional storage space can be created using a perforated screen. It is enough to simply hang shelves, holders, hooks and other devices for storing tools on it. You can also attach a lamp to the screen. All screwdrivers, pliers, keys and other little things will be before your eyes. If necessary, the shelves can be easily rearranged and the storage system can be modified.
Required tools and materials
Consider a traditional wooden model of a workbench for carpentry. To make a carpenter's workbench, you will need:
- edged boards from dry seasoned pine. Thickness - 50 mm, width - 140-180 mm;
- circular saw, jigsaw;
- manual electric milling machine with a set of cutting tools;
- electric drill with a set of drills;
- hand saw, miter box;
- hammer, chisel;
- measuring instrument - ruler, square, tape measure;
- wood glue (“Moment-joiner” PVA, etc.);
- clamps or clamps with a long reach for gluing panels;
- screws, bolts with nuts and washers.
The listed materials and tools can be supplemented with other components or devices, depending on the complexity of the project and the skills of the master.
Requirements for a workbench in the garage: dimensions of the structure
In order not to lose sight of anything important, you must make a preliminary plan for the manufacture and assembly of a workbench with your own hands; a drawing with dimensions is one of its main points. This takes into account the area of the garage and the size of the vehicle.
On average, the length of a workbench in a garage is about 1.5-2 m
The length of the table depends on the amount of free space in the garage, as well as on the intended types of work. On average, this figure is about 1.5-2 m. When choosing the width for a future workbench, you need to take into account the nature of the placement of tools and other objects around the table. Shelves on the wall must be freely accessible. For this reason, it is undesirable to make a tabletop more than 60 cm wide, otherwise you will not be able to reach the necessary tools with your hand. If the workbench is located in the center of the room, then the width of its working surface can be increased.
The height of the bench is selected individually. The dimensions of a desktop differ significantly from the dimensions of a dining table. They are calculated taking into account the height of the master, as well as the position in which he is used to working. The standard figure is 80 cm. However, working at such a table in a standing position will be inconvenient. To prevent your back from getting tired, it is recommended to increase the height to 100 cm.
There is an effective way to accurately determine the optimal height of the workbench. To do this, you need to take a position in which it will be comfortable to rest your elbows on the table while standing. All that remains is to measure the distance from the elbows to the floor.
Helpful advice! If the design of the workbench is designed for work in a standing position, it is necessary to provide a wooden stand for the chair in case you want to sit at the table.
The standard height of a table in a garage is 80 cm
On one side of the workbench a power tool is installed. This edge of the tabletop should protrude beyond the frame by about 20-30 cm. If the work surface is made of wood, it should be protected with a metal sheet. Stainless steel with a thickness of 1.5-2 mm is best suited for these purposes. Although a regular steel sheet 1.5 mm thick will be cheaper.
What will be useful?
At home, it is easier (to assemble a metal structure you will need a welding machine and skills) to assemble a structure from wood - beech, hornbeam or oak. They are considered the most durable and wear-resistant.
Oak, hornbeam or beech are used for up to 10 years. Pine or linden is used for support.
It is better to make the tabletop from beech, hornbeam, oak. These are the most stable and wear-resistant materials
In order to assemble a mechanic with your own hands, you will need:
- plywood 2 centimeters thick, measuring 2.5 by 1.5 meters. The smoother the sheet, the more attractive the working area looks;
- solid wood 5-6 centimeters thick, 1.5 meters long, 0.75 meters wide;
- 4 beams 1 meter high, 10 centimeters wide, 10 centimeters long;
- 8 bars 70 centimeters high, 6 centimeters wide, 6 centimeters long;
- two-meter board for shelves.
Equipment:
- drill;
- saw;
- clamps;
- quick-drying glue;
- level;
- bolts and nuts;
- self-tapping screws;
- square
In some cases, a tarlap may be useful. This is an indispensable tool for holding objects.
Installation location
When choosing a location for a workbench, there are several nuances to consider that can make the installation process easier.
- You need to choose a part of the garage that is very well lit and has access to sockets. It is best if natural light falls either directly or from the left side.
- The length of the working surface should be such that large parts can be placed without problems.
- The width should not exceed 60 centimeters - in order to easily reach the opposite side of the tabletop.
- The height of the stand should be such that it is as comfortable as possible to work at the workbench.
- The workbench should be located in such a way as not to impede the entry of the car into the garage and ensure the free opening of the door.
- It is necessary to design the placement of equipment so that you can safely work on it without driving the car out of the garage.
Assembling the drawer and crossbars
The next step is to assemble the crossbars and the box.
Assembling the crossbars is an equally important operation for the stability of the carpentry workbench. This assembly is also best done with two people. First, install both legs so that the distance between the outer sides is equal to the length of the crossbar D40_1, namely 700 mm. Place two D40_1 crossbars on the lower supports and mark with a pencil the places where the C4.5 self-tapping screws (90 mm long) will be screwed in later, as indicated by the green dots. Then drill holes with a diameter of 4 mm in the blanks D40_1 in the marked places. Lubricate the contacting surfaces with glue. Remember that the glue drying time is no more than 15 minutes. Try to meet this time when assembling at this stage. Reinstall them on the lower crossbars and attach them to the legs with C4.5 self-tapping screws. Do not tighten it all the way so that you can adjust the geometry of the entire structure.
Carefully turn the resulting structure 180 degrees (upside down) and repeat all the above operations, only for the other part of the legs. After this, return the structure to its original position, check the geometry with a square to ensure compliance with 90 degrees in all planes. And only after that tighten the screws “all the way”.
Having assembled the workbench frame, you can proceed to assembling the box, which also acts as a structural structural element and, if necessary, reduces the fulcrum to increase the stability of the workbench on the surface. For these purposes, you can put an unnecessary car battery in the box. This will increase the stability of the entire workbench structure.
The box is assembled on a normally standing workbench. B1 bars are screwed to the bottom boards D40_1 from the inside using C3.5 self-tapping screws (red). The bars rest on the lower crossbar connecting the legs of the workbench. Parts numbered D20_1 in the required quantity are placed on the bars, having previously lubricated the contacting surfaces with glue. One of the outer parts is cut lengthwise to the required width.
Boards numbered D20_1 are also installed at the ends of the box, attaching them to the box with glue and self-tapping screws C3.5. Finally, a layout is installed on the bottom of the box (a decorative detail designed to hide uneven cuts of individual elements). The layout is also installed with glue.