In houses where people live for a long time, high-quality and functional heating devices must operate continuously. This will help ensure a comfortable and stable temperature in the house, around the clock.
For this purpose, furnaces with optimal heat capacity are usually used. They release heat from occasional fires for as long as possible. In addition, a variety of boilers are widely used, which constantly heat the air or the coolant used. This applies to residential premises and buildings.
Those that belong to the non-residential category are heated a little differently. Due to the fact that heat is needed here only sometimes, it needs to be obtained as quickly as possible and with simultaneous small material costs. Such premises include objects such as greenhouses, various trailers, sheds, and small houses. For them, the best option would be an effective potbelly stove with a water circuit, made by yourself and working in mining
How to do it yourself?
Manufacturing options:
Rectangular oven
It is a metal box; you can independently weld the structure from steel sheets. For a rectangular potbelly stove, an old car tank or box will do just fine.
Typically, this form is chosen when it is necessary to cook food on the stove.
On the spacious platform you can place 2 large pans or containers for heating water at once.
The manufacturing principle is simple: doors are built to cover the ashpit and combustion chamber, a hole is made for the chimney, combustion products must leave the room in a timely manner, otherwise you can inhale carbon monoxide.
From a gas cylinder
The most common type of potbelly stove. The cylinders have thick walls, making the stove durable, mobile, and fireproof.
First, a drawing is drawn and markings are made. The combustion chamber door will be located in the center of the cylinder. The blower is in the same plane, only 10–12 cm lower.
Instructions:
- We take a grinder , cut out both doors, and draw a closed line between them.
- We cut the cylinder into 2 parts along the line
- at the bottom - a vent.
- We install the grille and weld both parts again.
- For the valve we make a hole with a radius of 10 cm.
- To extract , we insert a hole into the pipe and weld the objects together by welding.
- A simple stove from a cylinder is ready, you can use it, add fuel and check its operation.
For cooking on the top of the stove, the design is slightly different:
- is cut off .
- Rods are inserted and welded inside
- A hole for the pipe is cut out at the top side You can heat and cook food at the same time.
- The hole is welded , the valve is screwed in, and a comfortable handle is adjusted.
- You can also make a stove from a pipe The barrel or pipe must be selected according to its diameter.
- At the bottom of the pipe barrel , cut 2 holes for the firebox and ash pan.
- Make the doors.
- Frame holes with metal strips.
- Under the combustion door, at a distance of 10 - 12 cm inside the barrel, weld brackets in the corners, the grate will rest on them, pre-weld it from any fittings.
When making a stove from a pipe, weld the bottom, as well as the part on top:
- Weld 4 legs to the bottom
- on the surface , weld a pipe to it, this will be a chimney.
- Weld the hinges to the previously cut holes and install the doors. Also, mark and attach a hook so that the doors lock tightly.
- For the aesthetics of the structure, treat all welding seams, clean them 10. Paint the outside of the device with heat-resistant paint. Whatever the factory product, you can sell it or successfully use it yourself.
Working furnace
The option is distinguished by a specific odor that oil waste will emit during fuel combustion, even in the presence of an exhaust hood.
Instructions:
- To make this model , select sheet material with a thickness of at least 4 mm, a chimney pipe, and individual small structural elements.
- Make precise markings of all elements on the sheet, having previously drawn a drawing.
- Cut all the elements with a grinder and clean the edges of the parts. Drill round holes in the pipe.
- At the top of the tank , cut a hole for the pipe, offset from the center to the left.
- Offset to the right on the circle, drill a hole for the connecting pipe.
- You get 2 circles , weld them to the pipe; the thickness of the upper tank will depend on its length.
- Similarly, decorate the part of the stove from below , but now cut a hole right in the center of the marked circle.
- Cut a second hole nearby and attach the sliding cover to it.
- Weld 4 legs to the bottom plane.
- Clean the seams after welding , paint the surface with paint that is resistant to high temperatures.
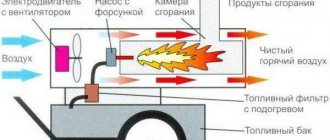
- Connect the chimney to the stove. The waste will be poured into the lower part of the tank; after the paper is ignited, the sliding lid closes and the waste begins to burn. Oxygen will penetrate through the holes, and the waste will burn intensely.
Potbelly stove for mining - simple and cheap
This is exactly the option that is not suitable for use in premises where people live. The explanation is simple: when burning, waste oil emits a specific smell, even if there is a good exhaust system.
Sketch of a potbelly stove operating on oil waste
For manufacturing, you will need sheet metal 4-5 mm thick , from which all the necessary parts will be cut. A pipe is also needed for the manufacture of some elements of the potbelly stove and chimney.
The presented diagram clearly shows all the dimensions of the parts that need to be prepared.
Drawing with dimensions
- All elements are accurately marked on the metal sheet and cut out using a grinder. All edges of the parts are carefully cleaned.
- Round holes are drilled in a prepared pipe of the required height. It will connect the upper and lower containers of the potbelly stove.
- In the upper plane of the upper tank, in the place indicated according to the diagram, a hole of the required diameter is cut. It is offset from the center to the left side and will be intended for the chimney pipe. On the bottom wall, the hole is offset to the right side of the circle, and the connecting pipe will enter it.
- Two circles are welded to a section of pipe that will determine the thickness of the upper tank.
- The lower part of the stove is made in the same way. Only the hole for the pipe to enter is cut in the center of the circle. In addition, another one is cut out, which will serve as a neck for filling the stove. A sliding cover is attached to it.
- Three or four legs are welded onto the lower solid plane.
- For rigidity, the upper tank is connected to the lower one with metal brackets.
- To ensure that the stove is beautiful and does not rust, all welds are thoroughly cleaned, and then all surfaces are painted with protective heat-resistant paint.
- The last step in the work is connecting the stove to the chimney.
This is what should happen
Such a furnace works as follows: waste is poured into the lower tank, then using a splinter or rolled paper, it is ignited through the hole. The sliding cover on the hole is closed after the waste inside the tank ignites. Oxygen entering through holes in the pipe that connects the two tanks contributes to intense combustion. Hot air passing through the top of the stove heats it to a high temperature, so you can easily heat a kettle on its surface. Since there is always spent fuel in the garage, there will never be any problems refueling the potbelly stove.
Advantages and disadvantages of using potbelly stoves
By analogy with any other heating devices, potbelly stoves also have certain pros and cons in their operation.
Among the positive properties, the following can be noted:
- use of an unlimited range of solid fuels - firewood, sawdust, coal, wood chips, briquettes, pellets, peat, etc. In some cases, even recycled motor oil is used as fuel;
- the ability to make a potbelly stove with your own hands (see drawings below) practically from scrap materials;
- compact size of the oven, which allows it to be placed even in a small room;
- there is no need to install a chimney, foundation and platform.
Negative characteristics include:
- the need to protect against combustion objects falling out of the firebox - embers, sparks, etc.;
- strong and rapid heating of the oven walls, which increases the risk of injury to others;
- high fuel consumption - it is rational to use such a stove only for short-term heating.
We recommend reading: DIY garage heating
The process of making a potbelly stove
When all the materials have been collected and a suitable scheme has been found, then it’s time to start collecting. The process consists of several stages.
The combustion chamber occupies the largest area of the structure (250x250 mm), since this is where firewood is loaded. The larger the bottom area, the more convenient it will be to stack firewood.
Ash pan - not all models have it. Air supply can also be provided by making holes in the door. Ash can be removed directly from the firebox, and if an ash pan is installed, there is no need to weld it, just screw it in.
Grate – separates the combustion chamber and the ash pan. The distance between the bars of the grill should not be 1 cm. It is installed on the corners.
Making a potbelly stove from a can
An old metal can or barrel can be an excellent option for building a potbelly stove.
This is facilitated by the optimal shape (there is no need to boil sheet iron) and sufficient volume. The main task of the master is to form the openings of the ash pit and firebox, as well as the high-quality organization of the exhaust system.
Note!
How to seal a stove so it doesn’t crack from the heat, what solution: review of the most effective methods + instructions
Why the bottom of the battery is cold and the top is hot - let's look at the reasons. Review of recommendations on what to do and how to fix it
How to insulate a dog house for the winter with your own hands and inexpensively - step-by-step instructions with photos and descriptions of all stages
Types of furnace designs
Structurally, a potbelly stove is a rectangular or oval container equipped with a firebox with a door, an ash pan and an elbow for removing smoke (similar to a chimney).
The preferred material is stainless steel or cast iron. Cast iron accepts any type of fuel, but is fragile - sudden cooling of the potbelly stove body is prohibited.
On an industrial scale, potbelly stoves are divided into the following categories:
- oven with hob;
- pyrolysis;
- equipped with a heat transfer-increasing casing.
The main feature of a potbelly stove is that in most cases it is made in a handicraft way, using metal boxes, cans and other suitable containers. Next, we will tell and show how to make potbelly stoves with your own hands - drawings, photos, videos
Furnaces differ from each other in the following categories:
- material of manufacture - cast iron, steel, brick;
- functionality - with a hob, heaters and gas generators;
- type of fuel – solid and liquid.
Classic oven
A stove made of metal sheet is a traditional option that fully reveals the characteristics of a potbelly stove.
Photo 1 Classic stove-stove
Manufacturing process
Necessary materials:
- metal sheet 4 mm;
- fittings with a diameter of 10-15 mm for the grate;
- corners;
- pipe (diameter according to the diagram);
- Bulgarian;
- welding.
Video 1 An example of making a beautiful potbelly stove with your own hands
Use a grinder to cut out all the body parts from a sheet of metal according to the drawing.
Photo 2 Cutting the metal sheet of the potbelly stove body
On the back and side walls, hot weld the corners, on which you will then lay the grate and another sheet (in the drawing), which will hold the bricks.
Photo 3 Cutting the metal of the back wall of the stove-stove
A properly made grate will help increase the burning time of firewood. If it is not a solid steel sheet, but a stacked grate made of reinforcement (up to 15 cm in diameter), the smoldering fuel itself will suck in the necessary air, making combustion more complete and lasting.
Next, cut out 2 doors (for the firebox and ash pan) and put them on the hinges. On the top part, cut a hole for the pipe, to which you weld a sleeve 200 mm high. After this, you weld or put on a pipe to the sleeve, the bending angle of which is 450.
The technology of the most efficient potbelly stove was presented by V. Loginov. The material used is a metal sheet, grate bars are reinforcement, hot welding is used to connect parts, and pneumatic scissors or a grinder are used for cutting.
Photo 4 The most efficient potbelly stove, drawing by designer V. Loginov
To increase heat transfer, it is necessary to ensure a certain resistance coefficient of the chimney.
How to determine the diameter of a chimney pipe
Calculate the volume of the combustion chamber (liter) in relation to the pipe diameter (mm) in the ratio 1:2.7. For example, if the volume of the firebox is for furnace gas, resistance must be created. From thermal engineering calculations, the volume of the combustion chamber in liters should be 2.7 times smaller in digital terms than the pipe diameter in millimeters. For example, if the firebox volume is 70 liters, then the pipe diameter will be 182 mm.
Potbelly stove made from a milk can
The second most popular material for making a potbelly stove after metal sheet is a milk can. This is easily explained, since the airtight case is almost ready, and everything else can be done with your own hands literally within a couple of hours.
Photo 5 Drawing of a stove-stove made from a milk can
Manufacturing process
- Punch through with a chisel or cut out a crescent-shaped slot under the neck. This future is blowing
- At the bottom of the can, cut a hole for the pipe, where the sleeve will be inserted and the chimney pipe will be put on.
- It is better to make the grate in such a potbelly stove serpentine or made of reinforcement, but it is necessary to carefully insert it into the can so that there is no need to cut additional holes.
- The dimensions of the potbelly stove made from a can are in the drawing. The finished structure should be placed on legs or made of brick.
The longer the chimney, the less heat loss will be.
Potbelly stove from a gas cylinder
An excellent material is a gas cylinder, which also fully ensures the tightness of the structure and its safe use.
Photo 6 Sketch diagram of a potbelly stove made from a gas cylinder
Materials and tools:
- waste gas cylinder;
- metal sheet 4 mm;
- pipe (diameter see above);
- fittings for a set of gratings;
- corners;
- combustion door;
- Bulgarian
- welding.
- To begin, knock off the top rim with the tap and cut out a crescent-shaped hole for the blower on the bottom of the cylinder
- Weld a pipe to the bottom of the cylinder where the sleeve will be inserted and the chimney pipe will be put on.
- It is better to make the grate in such a potbelly stove made from fittings; in this case, there will be a natural intake of air and the fuel will burn almost completely.
- The dimensions of the potbelly stove made from a cylinder are in the photo. The finished structure should be placed on legs or made of brick.
Video 2 An example of making a potbelly stove from a gas cylinder at home
The potbelly stove has survived a variety of times and has proven that it is the most reliable and simple way to heat small spaces. Despite the relative simplicity of the design, during its manufacture it is necessary to observe certain proportions in order to increase the burning time of the filling and, accordingly, the efficiency of the furnace.
Basic models of homemade potbelly stoves
According to its principles, a potbelly stove is practically no different from models of a special solid fuel device. This is a certain type of very simple stove in the fireplace category. There are also special models that are equipped with hobs and special bath devices.
Material used to make the stove Often, a potbelly stove is made of high-quality steel, but in some cases cast iron can be used. For different types of metal, elements made of natural stone are often used. If cast iron is used, then you should count on low heat capacity parameters; it is very difficult to find and it is not easy to cook. Many people prefer steel for this very reason; it is much easier to work with. Moreover, the thicker the material, the longer it will last. If you plan to make a device for rare use, for example, for emergencies with a heating system, then make it from simple iron with a thickness of 1 mm. In the process of making a stove, all factory fittings may well be used. This applies to elements such as grates, the necessary doors, burners and valves. Many craftsmen make them with their own hands using steel.
Shape and material for the body If you want to make a potbelly stove using drawings or photos, you must use the method of cutting a metal sheet.
- In addition, the following elements are used:
- Molding profiles;
- Square shaped pipe;
- Special corners;
- Fittings;
- Rod.
All this is required to make the furnace body rectangular in shape. Due to the presence of special planes, the case will have ideal ergonomic properties. In other words, the potbelly stove will be as stable as possible, it will be easy to process and cover. The stove can be easily and simply docked with a wide variety of structures, objects and parts.
Various metal cabinets and boxes can be used as a base. Often these are cylindrical elements, for example, large-diameter pipes, cans, gas cylinders.
In the process of making a stove with your own hands, you will definitely need to use welding. If the metal is not very thick, the oven can be made using bolts, screws and a drill. Regardless of the chosen model, it is important to use drawings as the basis for production, because Despite its relative simplicity, certain instructions for implementing the heating device must be followed.
How can you improve your potbelly stove?
An ordinary potbelly stove has a lot of positive qualities, but also has many significant disadvantages. It is unable to accumulate heat and heats the room while the fire is burning. Requires continuous fuel supply, on average every 30-40 minutes.
In addition, a large amount of heat escapes through the chimney into the atmosphere, bringing no benefit. That is why work on improving the potbelly stove is ongoing.
The standard design of a potbelly stove has many modernized designs that allow:
- save fuel;
- increase the efficiency of the stove;
- increase heat capacity;
- reduce the frequency of fuel filling.
The most common methods for increasing the efficiency of a potbelly stove are creating a slow burning mode, a gas afterburning system, and installing heat-resistant lining of the internal walls.
You can also improve the quality performance of the stove by increasing the heat transfer area using welded pipes and an installed fan that will drive air flows through them.
The industrial model of such a potbelly stove is called “Buleryan”, but besides it, there are many different designs made by handicraft. We recommend watching a detailed master class on making a homemade Buleryan stove.
You can increase the heat transfer time if you line the stove with brickwork. Such a potbelly stove will heat up more slowly, but will also give off heat longer, maintaining the temperature in the room for some time after the fire has died down.
Are you interested in brickwork? On our website we have a detailed guide to laying a stove with your own hands with diagrams and drawings.
Option #1 – stove with increased fuel load
This model is designed to increase efficiency and continuous burning time. The basis is taken as a horizontal rectangular potbelly stove on massive, stable legs and complemented with a cassette made of a blind sealed cylinder. Such design additions significantly increase its efficiency.
How to make a long-burning potbelly stove?
To ensure that the potbelly stove radiates heat for as long as possible without adding another portion of firewood and does not burn out quickly, you can make a long-burning stove, the fuel will not burn, but will smolder, the heating process without adding firewood can be extended for several hours.
Making a stove for long burning is somewhat different from the usual design.
The best cylinder for the stove is:
- Cut off the top of it , this will be the lid of the stove.
- Make a hole at the top and side of the stove, this will be the hood.
- Make a hole in the center so that you can easily insert the balloon.
- Weld a pipe to the cut hole of the pancake, slightly longer than the cylinder. The pipe will serve as a blower, and oxygen will flow into the furnace, and the fuel will not smolder and not burn.
- Cut off part of the cylinder in the center, insert a pipe into the hole as a blower. The operating principle of a long-burning potbelly stove is to create pressure inside the chamber. After the firewood ignites, a heavy metal circle plunges inside and begins to put pressure on the fuel, creating pressure on it, the fuel begins to lack oxygen and slowly smolder. The smoke, going upward, comes out through the chimney, the room will not be smoky.
Advantages and disadvantages of potbelly stoves
A potbelly stove for a summer house is an ideal option. If only because you don’t need to spend money on an expensive fireplace, gas boiler and other heating equipment. Let's look at the main advantages of this stove:
Fireclay lining allows you to significantly increase the heat capacity of the furnace. However, you will have to pay for this by losing your aesthetic appearance.
- Affordable price. Buying an inexpensive potbelly stove for your summer house is more than possible. Prices on the market start at 5,000 rubles. You can find out how much this or that model costs in specialized stores. But the simplest samples are very cheap;
- The high heat capacity of cast iron allows you to accumulate and evenly release heat into heated rooms;
- Wood-burning cast iron stoves for summer cottages are presented in a huge variety of models for every taste and color. For example, there are rectangular and barrel-shaped ovens on sale, simple and well designed, with a solid door or with a glass door;
- Possibility of cooking - for this you need a mini potbelly stove with a hob;
- Availability of long-burning models - they allow you to reduce the number of approaches for laying the next portion of logs;
- Simple design – provides exceptional ease of operation. If you follow all the rules of use, a potbelly stove type stove will last for decades;
- Ease of installation and dismantling - longer fiddling with the chimney pipe;
- Decent thermal power - cast iron stoves can produce up to 10 kW of heat, which allows you to heat large rooms;
- Cast iron stoves are not capricious - the simplicity of their design affects them. Therefore, your dacha will always be warm and comfortable.
There are also some disadvantages:
- Solid weight - cast iron stoves are very heavy, which is due to the large weight of cast iron. In addition, some models contain fireclay bricks, which further increases the weight;
- You cannot heat more than one room. Of course, there are also very powerful cast iron stoves, but the heat will not be able to effectively spread throughout all the rooms of your dacha;
- Not the highest efficiency - it is about 70%. The problem is partially solved with the help of pyrolysis combustion schemes, but even in this case the maximum efficiency indicator is unlikely to rise above 80-85%.
Types of cast iron potbelly stoves
A cast iron potbelly stove for a country house is the simplest option for heating a country house. But when you start choosing a stove, your eyes start to widen. There are dozens and hundreds of types of cast iron stoves on sale. Therefore, now we will try to understand all this diversity.
Differences in shape and design
Cast iron stoves for country houses are made in a variety of form factors. For example, they can be rectangular or barrel-shaped. Some units have casings that are elongated horizontally, while others are elongated vertically. The choice of the appropriate option is carried out depending on the operating conditions - if there is free space, you can get by with the horizontal option. If there is little space in the dacha, it is better to take a closer look at a vertical unit.
There are also design differences. We have already said that cast iron stoves are extremely simple. But many people don’t like this simplicity. Designer stoves with beautiful bodies with monograms and drawings were created especially for such people. They look really impressive, so they will become a worthy decoration of your interior.
Loading door
People often go to their dacha to relax - they want to take a break from the bustle of the city and be in silence. Therefore, they pay special attention to the arrangement of their country houses. In order to make your country house interior more interesting and cozy, you can decorate it with a cast iron stove-stove with a fireplace door. In most cases, the doors are made blind - they serve exclusively for loading fuel. In some models they play not only the main, but also a decorative role.
When choosing a cast iron stove with a fireplace door, make sure that it is equipped with a “clean glass” system. Otherwise, you will have to constantly clean the glass in your furnace from soot.
Hob
When setting up their dacha, people often build one-room houses, without kitchen facilities. Cooking food in such conditions is difficult. But if you buy a cast iron stove with a hob, the problem will be solved - at least during the heating season, when it is cold outside. You can put a kettle or a pot of soup here, you can even cook something in a frying pan.
A hob is an excellent addition to cast iron stoves. But you need to be careful. The thing is that if you accidentally spill cold water on cast iron, the stove may burst. When heated, cast iron becomes more brittle, so strong impacts and sudden temperature changes lead to its destruction.
Pyrolysis ovens
A cast iron stove for a summer residence can operate using pyrolysis technology. This scheme allows you to slightly increase heat transfer and efficiency. Firewood here burns in an oxygen-poor atmosphere, releasing pyrolysis products, which are burned in the afterburner. The design of such cast iron potbelly stoves is more complex, but it allows increasing efficiency by about 5-10%. An additional advantage is the increase in the burning time of a cast iron stove.
Long-term combustion in cast iron stoves such as potbelly stoves is also achieved in another way - using large combustion chambers. The larger the chamber, the more firewood it can hold. And 10-12 kg of firewood will obviously burn longer than the unfortunate 1.5-2 kg. Thanks to this, the operation of the stoves is greatly facilitated - this is most important at night, when you want to sleep and not have to deal with adding firewood.
The main stages of making a potbelly stove
1. All the details are marked on a sheet of metal: 6 steel rectangles for the walls of the oven, 1 rectangle for creating a smoke reflector, plates for the grate and latch for the door. 2. Cut
sheet metal can be found at any metal depot. The guillotine, unlike the grinder, allows you to cut (chop) it more accurately. In this case, there will be no need to straighten the sheets. 3. The furnace body is made in the form of a rectangle. Their sides are joined together at an angle of 90° and welded together.
Welding the box
4. To avoid mistakes, the furnace box is first only tacked by welding in several places, and only then, after checking its horizontal and vertical positions, its seams are welded.
Important!
All connections in the body are thoroughly welded;
To check the seams
for leaks, you can coat the joints with chalk or kerosene.
5. Welding seams are cleaned with a wire brush. 6. The internal space of the potbelly stove is divided into three parts: the firebox, the smoke circulation chamber and the ash pan. To separate the firebox from the ash pan, a grate is laid between them, on which the fuel will be placed. To do this, at a height of 10-15 cm from the bottom of the stove, 5x5 cm corners
, on which the grille will be located.
Advice.
It is better to make the grate from 2-3 detachable parts. Otherwise, when replacing a burnt grate, it will be difficult to remove it from the firebox.
7. The grate is welded from thick steel rods or strips 30 mm wide. They are attached to 2 stiffeners - rods with a diameter of 20 mm. Since the grates burn out over time, it is better to make such a grate removable.
Manufacturing of grate
8. At a distance of 15 cm from the top of the box, two strong rods are welded, on which one or two removable reflectors
– thick-walled sheets of metal that will delay the flow of hot gases and send them for afterburning. However, they should not completely block the oven. To allow hot smoke to enter the chimney, an indent of about 8 cm is made from the front (for the first sheet) and back of the stove.
Diagram of the passage of gases in a simple potbelly stove and stove with an installed reflector
9. Next, the upper part of the box is welded, and then a hole for the pipe
.
Pipe hole
10. The front part of the stove with holes cut in it for the firebox doors and ash pan is welded last. 11. The size of the firebox door must be sufficient to allow fuel to be added and grates to be changed without effort. The hole for the ash pan is made a little smaller. 12. The hinges are welded first to the door, and then to the body of the potbelly stove. They can be bought ready-made or welded from two tubes of different diameters. Door handles can be made from a strip of metal or rod.
Welding the door
Important!
When attaching the doors, you should
fit them to the body
as tightly as possible; To do this, they are straightened (leveled) and cleaned with an emery wheel. The wedge latches that close the doors are fitted to the body as tightly as possible.
13. You can cook food or heat water on such a stove. To do this, a hole of the required diameter is cut in the upper part of the box. Stove burner
, which will be inserted into this hole, can be purchased at any hardware store.
14. For ease of use, the structure is installed on legs
or a welded pipe stand.
15. The chimney pipe is connected to the stove using a sleeve
.
16. To insert a damper
to regulate the smoke output, two holes are drilled in the pipe. A metal rod is inserted into the holes and bent at 90°. A metal “penny” is attached to it in the center of the pipe - a gate, the diameter of which should be slightly less than the diameter of the pipe itself by 3-4 mm.
Gate valve for adjusting smoke output
Installation safety rules
Any homemade heating device is designed to heat the room, making it more comfortable, but at the same time, such devices are far from safe and are fraught with ignition and fire.
When installing the structure, it is very important to follow safety rules:
- The stove must be installed on a surface that is resistant to fire, otherwise the floor may burn out. To do this, it is good to lay bricks and tiles on the floor.
- The walls of the stove should not overheat too much; for this purpose, special plasterboard or other non-flammable material is used in production.
- Highly flammable materials should not be placed near the firebox; they may catch fire.
- Take care of ventilation in the room where the potbelly stove will be located. Carbon monoxide must escape outside in a timely manner and not accumulate inside the room.
- only high-quality, fire-resistant material in production
Making a potbelly stove step by step from sheet iron
The most practical way to make stoves is to assemble a structure from sheet iron.
The material is quite durable, easy to process, and if properly treated with an anti-corrosion compound, it can perform its functions for a long time.
Adviсe
- If there are panel or wood walls in the house, install the stove at a distance of 1 meter from them.
- Be sure to install the chimney, preferably from one section.
- When running a pipe through a wall, install a brick thermal barrier. Do not use concrete for these purposes; it crumbles quickly.
- For a garage, a potbelly stove for working out is better suited, so don’t rush to throw away your car rims.
- Do not place the oven near flammable materials.
- the section of the pipe just above the roof from non-flammable material, so the stove will cool much more slowly.
- Think carefully about the ventilation system; there should be no burning in the room.
- Lay the floor and walls near the structure with bricks or facing material, the stove is a fire hazard. The same applies to the chimney, the distance to the walls and ceiling should be at least 1.2 meters.
- Place a metal fence around the device for safety reasons .
- the grate from cast iron grates in a set, so they will be easier to pull out of the firebox.
- Install all parts of the chimney only at the top of the structure; they must withstand high temperatures of over 300 degrees.
- Treat the seams after welding with a durable and high-quality sealant.
- Do not clean the pipe with a brush or metal objects; the pipe walls can quickly become leaky.
- When installing a chimney , make an anti-rain canopy so that rain moisture will not get inside the pipe.
Potbelly stove from a gas cylinder
The used gas cylinder is very suitable for the stove. This is an almost ready-made form for a potbelly stove, which requires minimal modifications.
The upper part of the cylinder, where the tap is located, is cut off, and a plug is welded in its place. A square cutout is made in the bottom of the cylinder - this will be the firebox. The cut piece must be turned into the firebox doors. To do this, it is scalded with metal and a handle is attached to it for opening. Subsequently, you will need to weld metal hinges to the hole on which the door will fit. It is better to install the door leaf itself at the very end, when the potbelly stove is completely ready.
In order for air to enter the firebox, several holes are drilled in the bottom of the cylinder. They will provide traction and serve as grate bars. To prevent burnt firewood from falling to the floor, a metal box - an ash pan - is welded to the bottom of the cylinder. It can be made from thinner sheet metal. The ash pan is also equipped with doors.
After this, legs from a metal corner or pipe scraps are attached to the cylinder. There will be a smoke exhaust pipe at the back of the stove. To do this, you need to cut a round hole in the upper part that matches the diameter of the pipe and weld it there. On top you can arrange an impromptu cooking stove. It can be made from a metal grid or fittings by welding the frame to the top of the cylinder.
This potbelly stove is an excellent option for heating a summer house, garage or change house. It is versatile and does not take up much space in the room.
Ready-made potbelly stoves
There are no problems where to buy a potbelly stove - they are sold in a huge number of specialized stores. Manufacturers offer a large range of different sizes and types.
Modern devices have a very pleasant and aesthetic appearance and fit perfectly into the rustic traditional style.
This design at the dacha guarantees not only warmth, but also a fairly comfortable room environment in which all household members will feel good.
The fireproof glass door practically turns an ordinary potbelly stove into a classic fireplace.
You can choose the appropriate model from numerous photos of potbelly stoves on the Internet.