Basic techniques for working with the machine
A machine is a thing that requires wood processing skills. It is enough to install the cutter at the wrong angle and the workpiece can easily be damaged, and in especially severe cases, you can be injured. And the choice of workpiece matters.
Which wood is best?
You can often find recommendations to first work with soft wood species (linden, poplar, etc.). Such types of wood can be recommended if you plan to make something decorative that will not take a serious load during operation. But for more or less serious products, you need harder wood, for example, it is better to make wooden turned legs for a table from oak; pine is also suitable, but not linden, aspen or poplar.
Separately, it is worth focusing on the quality of the workpiece - the wood must be intact, without any hint of defects
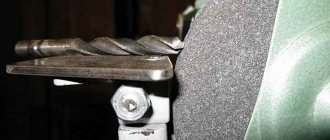
It is also advisable to exclude from work those pieces of wood that have knots, and no matter how firmly they sit in the mass, when rotating at high speed, such a knot can fly out at high speed and even safety glasses can fail
Such a knot is guaranteed to fly out during processing
The same can be downloaded regarding cracks. After all, it is not known exactly how deep it goes and how the workpiece will behave. It is likely that during processing it will simply crack at the most crucial moment.
It is also advisable to remove the bark before processing. If you leave it, there will simply be more debris in the workplace, and besides, the bark is fragile, which makes it easy to make mistakes when marking the workpiece.
How to operate the machine
A person has at his disposal several bodies of rotation (ball, cone, sphere and cylinder), by combining which he creates his creation on a machine. This is quite enough; the same turned wooden balusters, as a rule, use only a cylindrical surface, only the radius changes smoothly.
The operating instructions will look something like this:
It is undesirable to fix a 4-corner workpiece in the machine. Even at low speeds, impacts on the instruments will be sensitive. It is best to roughly trim the corners with an ax and achieve a shape that is at least vaguely reminiscent of a cylindrical one;
It is advisable to trim the rib
When installing, it is important that the workpiece does not touch the machine itself. To do this, it is simply turned by hand a full turn; Removal of chips must be carried out carefully, in several passes with light pressure on the cutter
It is important to maintain the correct grip - the right hand rests on the handle, and the left hand securely presses the metal part of it to the tool rest. It needs to be tilted slightly as it rotates (angle up to 30ᵒ);
Procedure for turning
- rough processing is carried out until the allowance is 2-3 mm. After this, you can proceed to finishing processing by changing the cutter;
- if it is necessary to select a cavity, then this is done before external processing with constant monitoring of the wall thickness;
- After giving the desired shape, the finished product is cut off with a cutting tool and polished.
Cavity sampling
The final stage can be considered impregnation with protective compounds. This achieves 2 goals - to reveal the texture and protect the wood. For example, turned wooden benches will be exposed to rain, snow, and subzero temperatures, so impregnation with antiseptics will not be superfluous.
What can be made?
An experienced craftsman can use a lathe to produce a huge number of items, ranging from simple slats to exquisite pieces of furniture.
Salad bowls
Depending on the size of the workpiece, you can make deeper salad bowls or flat ones. In any case, the work requires patience and fixing the workpiece at one end.
Boxes
These products require more skill from the turner. But the result can be a real work of art.
Furniture legs
Here the master's imagination is limitless
By combining different decorative elements, you can make truly graceful legs that will attract everyone's attention and admiration.
Toys
Dolls, bears, and, of course, nesting dolls - all this in the hands of an experienced turner can be obtained from a simple wooden block.
Cups
A wooden cup is suitable as a reward for the winner and will decorate the shelf of any sideboard. Additionally, you can burn a memorial inscription.
Vases
Wooden vases made on a lathe are distinguished by a variety of shapes and decorations. Flowers always look much more beautiful in them, and the atmosphere is closer to natural.
Wood turning
Most crafts require processing by turning. To make a craft on a lathe in the shape of a vase, plate or glass - objects that have the transverse shape of a circle, the workpiece must be secured in a special chuck of the machine. To fasten long parts, a trident is used, which presses them in with the center of the tailstock.
By moving the chisel along the axis of rotation, the part will be sharpened. This type of turning is called longitudinal. If the homemade product is small, it can be secured with screws to a faceplate or flat disk.
First, you need to mark the workpiece for screws, and then drill a blind hole, the depth of which is equal to the screw-in length of the screw. You can also poke a hole with an awl. To determine the location of the screws, the workpiece must be attached to the plank washer and through the holes that are located on the reverse side, outline the places for the screws.
When processing a flat part on a faceplate, it is necessary to prepare a chisel and, by moving it perpendicularly, grind the workpiece in a frontal or end-to-face manner.
The cutting part of lathes, called the blade, is wedge-shaped. The front and back surfaces form a cutting edge at the intersection. Turning wooden products may involve cutting off part of the workpiece, marking the centers of rotation, inspecting the condition of the workpiece and giving it the desired cylindrical shape.
Using all the possibilities provided by a lathe, you can achieve the ideal barrel-shaped shape of the desired product with your own hands. You can’t do without turning when making furniture handles and legs.
How to hold a chisel correctly when working
Correct holding of the tool
During operation, the tool must be held on the tool rest bracket with your left hand, using the entire palm. The tool can only be pressed from above using your thumb. It is strictly forbidden for anyone else to touch the support bracket: this can lead to injury. In addition, in this case it will be impossible to move the tool along the workpiece.
The workpiece must be secured in the spindles as securely as possible. Otherwise, the blank may fly out of the machine, which may result in injury to the worker. That is why it is forbidden to machine workpieces with cracks at the ends on a lathe.
Benefits of wood
Wood, as a material for creativity, has the following advantages:
- Easy to create homemade products.
- Unique texture.
- Availability.
- Environmental Safety.
- Special energy.
- Relatively low cost.
- Practicality.
- Aesthetics.
In addition, wood has the ability to retain heat. So, wooden objects are pleasant to touch.
- What are reception desks and reception desks for?
- How modern technologies fight bacteria and pollution.
Geology of the site
Thus, we found out that the design of wooden crafts can be very different. To decorate a dacha, both deliberately rough products and finely crafted items are appropriate.
But it's better to choose one style and stick to it. It is also necessary to remember that the size of garden decor and its quantity must correspond to the area of the site.
Subtleties of choice
If working with wood is just a pleasant hobby and you don’t have a whole workshop with a full arsenal of all the tools at your disposal, then the choice of machine is critically important
There are a number of parameters, paying attention to which, the likelihood of an unsuccessful choice will decrease significantly
What to look for when choosing
Most often, very compact devices, tabletop lathes, are purchased to satisfy the creative itch. Of course, in terms of accuracy and engine power, they cannot be compared with powerful industrial analogues, but the price of such devices is reasonable.
When choosing, you should pay attention to such machine parameters as:
maximum permissible dimensions of the workpiece being processed. The documentation for the machine must indicate the turning diameter (the maximum size of the workpiece in the transverse direction) and the length of the bed (the maximum permissible length of the workpiece);
A compact lathe will not be able to process a long workpiece
- power - roughly speaking, the more powerful the device, the better, but with increasing power, the dimensions of the machine also increase. So you need to find a middle ground;
- the material from which the bed is made, as well as the material of the frame. From the point of view of stability, models with a steel frame and a cast iron frame can be considered optimal. True, the weight of such machines is quite large, so if you plan to frequently relocate it, then it is better to choose a lighter model;
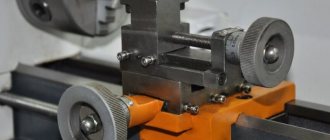
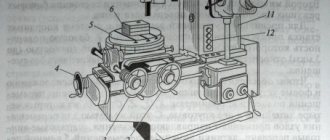
Basic elements of an industrial machine
As for the device, the key elements of a lathe include:
- cutter holder – allows you to securely fix the cutter and move it in 2 directions during operation (along the workpiece and in the transverse direction);
- headstock - in conventional machines it is located on the left (if the turner is right-handed). It consists of elements such as a drive mechanism and a spindle, the center of which rotates during operation, causing the workpiece to rotate.
From left to right: headstock, tool holder, tailstock
What kind of cutters will you need?
Even in order to make such a simple element as turned legs for a wooden table, you will need several different types of cutters.
It is advisable that an amateur turner have in his arsenal:
semicircular cutters - they will be needed for rough processing, for example, in order to turn a workpiece in the form of a parallelepiped into a cylindrical one. Also, semicircular cutters can be used for finishing, small-width cutters (no more than 20 mm) can be used to create decorative grooves in the workpiece, and wide models (up to 50 mm) are used for processing large concave surfaces;
Cutting part shape
- a flat cutter can be used for chamfering and processing curves. The cutting part has a 2-sided sharpening and forms an angle of up to 70ᵒ with the side edge;
- to process internal surfaces (such products as turned wooden vases cannot be made without this), you will need shaped cutters;
- hook-shaped cutters can also be used.
If a suitable cutter is not at hand, you can always make it yourself from an old file or an ordinary wood chisel. An error of a couple of degrees when sharpening will not seriously affect the result of the work.
Set of cutters
Sometimes you have to manually modify purchased cutters. For example, when it is necessary to make a slot in a workpiece, when using a conventional cutter, the side internal parts are quite rough. This can be fixed quite simply - just sharpen the sides of the cutter.
Wood turning
Most crafts require processing by turning. To make a craft on a lathe in the shape of a vase, plate or glass - objects that have the transverse shape of a circle, the workpiece must be secured in a special chuck of the machine. To fasten long parts, a trident is used, which presses them in with the center of the tailstock.
By moving the chisel along the axis of rotation, the part will be sharpened. This type of turning is called longitudinal. If the homemade product is small, it can be secured with screws to a faceplate or flat disk.
First, you need to mark the workpiece for screws, and then drill a blind hole, the depth of which is equal to the screw-in length of the screw. You can also poke a hole with an awl. To determine the location of the screws, the workpiece must be attached to the plank washer and through the holes that are located on the reverse side, outline the places for the screws.
Read also: Wood dryer from a container
When processing a flat part on a faceplate, it is necessary to prepare a chisel and, by moving it perpendicularly, grind the workpiece in a frontal or end-to-face manner.
The cutting part of lathes, called the blade, is wedge-shaped. The front and back surfaces form a cutting edge at the intersection. Turning wooden products may involve cutting off part of the workpiece, marking the centers of rotation, inspecting the condition of the workpiece and giving it the desired cylindrical shape.
Using all the possibilities provided by a lathe, you can achieve the ideal barrel-shaped shape of the desired product with your own hands. You can’t do without turning when making furniture handles and legs.
Purpose and characteristics of a lathe
Modern manufacturers offer turning equipment capable of performing many machining operations. Depending on their list, the purpose of the unit is determined. The main characteristics of wood processing machines include:
- installed engine power;
- weight of the entire machine;
- dimensions;
- list of acceptable cutting tools;
- number of possible processing operations;
- maximum size of the workpiece;
- Availability of automation and software control tools.
Each type of machine provides a specific industry. If it is necessary to produce a large number of similar parts from wood, their production is entrusted to specialized automatic lathes and machines with numerical control.
Types of machines
Wood turning technology involves the use of devices of various modifications:
- universal machines. They can be used to peel the workpiece, cut it, turn it, grind it, drill it, and apply thread. Due to their versatility, such machines are in high demand.
- screw lathes are designed for processing workpieces in the form of a cone, as well as applying threads
- turning and milling machines are designed for making grooves in wooden objects, as well as processing them
- A benchtop turning tool performs the functions of a conventional machine, but has smaller dimensions, power and fewer functions. Such machines are suitable for getting acquainted with the craft and gaining initial skills.
Types of turning equipment
Despite the variety of joinery products, all turning operations can be implemented using the following types of units:
- milling;
- turning;
- thicknesser;
- sawing
Milling is used for cutting out profiles and relief elements. To obtain the required shape and specified relief size, a milling cutter of a specific size is used.
A wood lathe allows you to carry out the entire range of turning, cutting recesses, grinding and polishing operations.
A sawing machine is necessary for carrying out work related to the preliminary preparation of flat wooden blanks. Sawing can be done along the installed beam or across it while maintaining the texture of the wood.
All woodworking (including turning) units are divided into three categories:
- industrial (used at large woodworking enterprises, furniture factories);
- semi-professional (used in organizations performing work in small quantities);
- household or desktop (used for individual work in home workshops).
The main differences are performance and weight and size characteristics.
Wooden souvenirs - homemade crafts
Craftsmen use scrap materials that cost pennies to create artistic products of the highest level. Do you want to see how a real miracle is born from resin and wood? Then look at the step-by-step photos! Such crafts delight and motivate you to create your own unique masterpieces.
First, the carpenter turns a cone-shaped blank from a log.
Then he breaks off part of the piece of wood so that an uneven cut of a peculiar shape remains. Using a plastic cup and tape, he creates a container for pouring. Mix epoxy resin, hardener, polishing varnish, add a little Easter egg dye and pour the mixture into the mold.
When the epoxy glue hardens, the workpiece is sharpened on the same lathe, giving it the shape of a Christmas tree.
After processing with sandpaper and polishes, the craft takes on a finished look and glows a little in the dark, conveying the beauty of broken wood and hardened resin.
Would you like to meet a master who creates incredible paintings from tree bark? An elderly artist collects everything that lies under her feet in the park. Then, in his home workshop, he collects his artistic masterpieces practically from garbage for sale.
Read also: How to attach a TV bracket to the wall
For retired grandmothers, working with wood is a wonderful creative activity; it is very useful for physical and psychological health and replenishing the wallet.
Another experienced craftsman in years works with birch bark. This natural material has a special texture and unique pattern. A diligent craftsman works painstakingly, putting his soul into creative crafts.
First, he soaks the bark in hot water under a lid, then holds it under pressure, and finally sticks it on the base and treats it with a special compound.
The result is wonderful birch tiles that can be used to decorate walls and be included in furniture assembly. As the Russian proverb says, the need for invention is cunning.
This is for sure, people who are not spoiled by big money create beauty from what Mother Nature generously gives.
I would like to please my dear readers and show a wonderful video with jewelry wood carvings. The art is called “Woodcarving”, and masters working in this technique are found in all countries of the world. Have you ever seen how wonderful wooden gifts made by experienced carvers are? If you haven’t seen it, then look with all your eyes and be amazed at the beauty of the created souvenirs.
To make the article full of examples, I collected photos of creative furniture, useful garden items that were created from unnecessary boxes. Look, choose ideas for your office, home or cottage!
I am sure that every reader of this article has a desire to make something out of wood with their own hands. Go for it! Tomorrow, collect twigs and dry twigs from the park and create a small artistic miracle. Write about the results in the comments, and also click on the social network buttons and share links with friends.
I look forward to seeing you again on the informative pages of the blog! Come in, you're always welcome!
What can be done?
A lathe is a tool not only for making construction workpieces. It is often used to create various souvenirs and decorative items: boxes, vases, chess, candlesticks, wooden toys and much more.
Vase
In addition to the machine, you will need other tools: chisel, ruler, compass, hacksaw, axe, plane. Considering the variety of forms that vases can take, these products can be quite simple or complex.
Let's look at a simple example:
- the workpiece, finished along the length and at the ends, is installed on the machine;
- the top layer of wood is removed and given the intended shape: oval, straight, etc.
- using a drill, a hole is made in the center of the free end with a depth less than the length of the vase;
- the cavity of the product is cut out with a “jamb” cutter;
- the product is polished, the bottom is finished manually;
- varnish coating.
Turned chess
Small wooden blanks with a cross-sectional diameter of 50–60 mm are suitable for making chess.
On one side of the workpiece, a smaller cross-section is needed - this end will fix the workpiece on the machine.
- the free end of the workpiece is trimmed with a cutter and pressed against the tailstock;
- a layer of wood is removed to give it a round shape;
- at the discretion of the master, the shape of the figure itself is turned;
- grinding, the figure is cut off from the fixed part;
- coated with varnish/paint.
Important! The fixed part must be machined to a rounded shape, since installing a tetrahedral workpiece in the chuck will create additional load on the cutter!
Making a box
The box is a fairly simple product to make. As a base, you can use a cylinder-shaped workpiece.
The main difficulty here is the lid, which must be flush with the edges of the box body and fit into the grooves of the walls in order to close tightly.
- we fix the workpiece on the machine and use a semicircular cutter to give it a clearer shape;
- using a straight narrow cutter we form the inner cavity of the box;
- Using a triangular cutter, we bring the resulting niche to the walls of the body;
- Using a straight wide cutter, we form the bottom of the product and the groove for the lid;
- sand, apply varnish and wax.
The lid is made from a similar blank, only thinner. It goes through the same steps as the body, and the formation of the outer and inner sides, which can be straight or convex, is carried out with a straight wide cutter.
DIY wooden products from different types of wood
Even more amazing things made of wood are made entirely by hand, without a lathe. Thus, it has become popular to create a wooden case for everyday things: a flash drive, a computer mouse.
There is even a concept model of a phone made entirely of wood and with touch-sensitive buttons.
Animal figurines
Such art depends entirely only on the level of skill of the manufacturer and his imagination. Linden is better suited for such products.
This rock does not form cracks and is easy to process. But they also work with other breeds. For production you will need:
- a chisel with a rounded and triangular end to create appropriate shapes;
- a blunt knife and a knife with a beveled blade.
Before you immediately start working with wood, it is better to sketch on paper what the future product will look like. Often the drawing is transferred with tracing paper to the workpiece, and in order to avoid mistakes, before working with metal tools, an outline is drawn on the figure with a pencil.
Crafts-souvenirs
Various handmade wood products look great as small gifts and souvenirs. These can be kitchen utensils: spoons, spatulas. Various keychains, badges, entire paintings and much more.
What you can make from wood with your own hands
Watch, be surprised and be inspired to create your own exclusive masterpieces!
A real Russian fairy tale will live on any garden plot if you use a birch log for work. Funny people, a donkey with a cart, a train, bunnies made from saw cuts will be a reason for a cheerful smile and a joyful summer mood.
The backyard of your dacha will become much more cozy if you put unusual garden furniture there. For example, chairs hollowed out from a whole log or cute benches for flower seedlings.
You can place stumps with pillows throughout the area, which will serve as comfortable chairs, and if you light them, they will become multi-colored fireflies at night.
Creative wood products bring a touch of naturalness to the home environment. They cut everything out of a shapeless piece of wood: original shelves, clocks, vases, candlesticks.
Pictures made from saw cuts and wooden installations acquire a special flavor, and rugs, coasters and coffee tables look like welcome guests from the forest.
The masters don’t forget about the holidays! For the New Year, people put together fragrant pine trees, plan wooden toys, and decorate their homes with unusual magical crafts.
Do you like simple wooden products? I'm sure yes! It is impossible to remain indifferent to such natural beauty. Do you want to create unique crafts from wood with your own hands? Then read the article to the end, study detailed master classes and take ideas into service.
You can cut a soup bowl out of wood material, or you can build a real ship and go on a long voyage.
Now in 1 minute I will teach you, dear readers, to distinguish between types of wooden products:
- Lathes. It is clear that these are objects made on a lathe. The device, which is simple in design, allows you to give ideal shapes to wooden stumps. Turners use a machine to cut out dishes, vases, balusters for stairs and even magnificent sculptures.
- Carpentry. In workshops, skilled craftsmen create carpentry useful for everyday life from simple boards or logs. From carpenters you can order furniture, a curved staircase, a gazebo for a summer house, doors, a cozy booth for your beloved dog.
- Exclusive. And the third category, which unites non-standard handcrafts. If you don’t have any sawing machines at home or in the garage, but only have imagination and the desire to create, you can still create beautiful wooden products with your own hands.
Let me show you an example of how an experienced carpenter makes a luxurious table on wheels. And what does he collect it from? Believe it or not, from unnecessary boxes.
Pallets are wooden containers for transporting heavy loads. They are in great demand among craftsmen.
In half an hour, functional interior items are assembled from soulless boxes, and a visual master class will show how they do this.
Have you seen how home craftsmen assemble a mini-lathe from scrap materials? This is interesting! Watch a short video that will demonstrate the assembly of a miracle unit from simple parts in 30 minutes.
Wooden carpentry for sale
Masters in whose hands ordinary boards or hemp take on an ideal shape are highly respected in society. In Soviet times, during labor lessons, all boys were required to learn how to make a stool.
And now, starting from the 5th grade, the subject “Technology” instills in children basic everyday skills. If a guy has a passion for carpentry, then he will definitely find tools, unnecessary boards at home and put together a birdhouse, a feeder for little feathered friends.
Note to parents! A carpenter is an artist and a sculptor rolled into one.
If a child develops an aptitude for carpentry from childhood, there is no need to prepare him for medical school. A good carpenter is a person with natural talent who can create useful things and earn a living as a practicing surgeon.
See what modern carpenters look like. Almost like famous actors or rock stars, and the work they do can be compared to high art. It is noticeable that these guys make good money in real life, and on their YouTube channel their master classes collect millions of views.
Read also: Connecting a light sensor via a switch
Which wood products for sale are in high demand?
The list is quite extensive and is compiled according to popularity:
- frames, doors, stairs;
- Furniture for home and office;
- hedges, fences, garden gazebos;
- small household items - rolling pins, boards, mops, coasters;
- children's toys and board games (chess, backgammon);
- dishes;
- souvenirs;
- musical instruments;
- icons.
Most carpentry products are made to order, and the income of experienced carpenters is 100-150% of the invested funds. The production of molded products (items made from boards, timber, lining) for sale has more advantages than disadvantages.
A carpenter needs a large room, technical equipment, and high-quality materials for work. The production process is dusty and unhealthy. But the pleasure and financial benefits that the master receives from creativity more than cover the technical difficulties.
Let's see how real masters work? Let's! A top-class carpenter creates simple, fashionable and comfortable furniture from solid wood. When you look at step-by-step photos of the creative process, think about how much the master will earn when he sells such a chair.
And now I suggest you relax and admire the work of a real artist. Watching a skilled carpenter work is pleasant, educational and interesting!
It is especially useful to watch such videos for teenagers who are at a crossroads and are in search of themselves.
Purpose of the machine and what can be done with it
A lathe is a device for making wooden products in the shape of bodies of revolution. With its help, you can sharpen the material, cut it, and also sand it with sandpaper. The machining process itself is a combination of two types of motion: rotational and translational. The machine directly rotates the workpiece itself, and the turner manually, using a chisel, regulates the pressure on the workpiece to obtain the desired shape.
And it’s not only construction blanks that can be turned on a machine. It all depends on the imagination and qualifications of the master. These can be souvenirs and decorative items. For example, a beautifully made beech wine glass or unusual apple tree spoons will be a worthy decoration for any kitchen. In the hands of an experienced craftsman, any log will become a masterpiece!
Metal turning products to order
If you have a need to manufacture metal parts, then you should not continue looking for a contractor. Consider that you have already found it in us. We are aimed at long-term and mutually beneficial cooperation with you. is located in Moscow, but we will be happy to fulfill orders from other regions.
We are always in touch
We perform with high quality and on time
We work all over Russia
CNC equipment
Our specialization is not only turning, but also drilling holes with subsequent countersinking and reaming, milling, and metalworking. We produce metal bushings, rods, hardware and other rotating bodies.
Turning is divided into the following main types:
- Grinding of external surfaces (cylindrical, conical, shaped) with a cutter, thread cutting.
- Boring. This includes machining internal blind and through holes.
- Trimming (trimming) and cutting.
- Cutting threads in holes with a cutter or tap.
Our workshop has the necessary equipment: universal screw-cutting lathes, semi-automatic machines, modular machines with adjustable units. We strive to reduce the cost of production; in the end, products produced on a metal lathe are not too expensive. The most profitable manufacturing technology is being developed, combining affordable cost and high quality.
Preparation of the workpiece
The selection of a workpiece begins with its inspection: it should not have the wood defects described in § 2 (see Fig. 3). The most suitable wood for processing is dry, knot-free hardwood: birch, linden, maple, etc.
After this, a block of square cross-section is planed from the workpiece with an allowance of 8...10 mm in diameter and 40...60 mm in length. Then an octagon is marked at the ends of the workpiece and the octagon is planed with a plane in the same way as when processing cylindrical surfaces with hand tools (see § 7). In this way, the workpiece is given a shape close to cylindrical. This makes it easier to process on the machine, regardless of the method of fastening it (see Fig. 23).
Making the Steering Wheel as an interior item with a secret, part 2
- home
- Master Classes from “Master Class Direction” by tag: turning
A new project on Rubankov TV from the Moscow Rubankov Carpentry School. Uncle Vanya, the head of the workshop, started an interesting design project for the interior with a real steering wheel, see the details for yourself) In the video we will do a lot of planing, sawing, gluing, turning on lathes and much more. Enjoy watching and see you at our craft school courses.
The steering wheel, like an interior item with a secret, part 2
1:09 Japanese drills - https://goo.gl/yr7JR2 4:25 Sorby turning cutters - https://goo.gl/QuXyth 5:33 PETROGRAD awl - https://goo.gl/Zn74YX 7:00 Drills Japanese - https://goo.gl/yr7JR2 8:11 Hegner jigsaw https://goo.gl/5mwLWx 10:03 Borma Holzfabre stain https://goo.gl/VRyUJR 14:09 piher quick clamps - https: //goo.gl/vuLi6x 15:15 Japanese saws, abutment saws - https://goo.gl/Dkx4F5 13:25 Glue brush - https://goo.gl/yRqPg6
DIY helm Part 1 - https://rubankov.ru/workshop/master_classes/delaem-shturval-kak-predmet-interera-s-sekretom-chast-1/
How to make wood turning tools yourself
Homemade wood turning tools are something of a talisman for craftsmen. Therefore, they prefer to make working tools with their own hands rather than purchase them in a regular store. Although the purchased ones fully meet their requirements, technical characteristics and safe work practices.
Homemade cutters
Making reyer and meisel yourself is not difficult. To make them with your own hands, the most suitable material would be files and rasps that have already “outlived” their usefulness. This decommissioned tool has the required dimensions, strength, material quality, and steel grade. Using a sharpening machine, the file is given the required shape in terms of the blade and shank. Then a machined handle with a fastening ring is stuffed. And that’s it, the tool for making wood turning products is ready.
To make wood turning tools, you can use, in addition to files and rasps, car springs or reinforcement bars as materials. They have the necessary hardness. But after making the tool with your own hands, you need to be extremely careful. Its tests must be carried out on soft wood (linden, poplar), after which the blade must be inspected for chips and cracks. And only after such a check can turning tools made by yourself be used when working with harder wood (birch, oak, beech).
Video about homemade cutters
When making cutting tools yourself, you need to remember:
- The shorter the working part, the more difficult and inconvenient it is to hold it while turning. The length of the body should provide full grip with the hand, plus support on the armrest, plus the distance from the armrest to the workpiece, plus margin for wear and sharpening. Therefore, the initial length of the working part should be at least 20 cm, but a size exceeding 40 cm will cause inconvenience in work. The optimal length should be 20 – 30 cm;
- The shorter the shank, the greater the possibility that it can be torn out of the handle. Therefore, when a cutting tool is made from files or rasps, the shanks are lengthened by 1.5 - 2 times;
- The thinner and narrower the working part of the tool, the greater the likelihood of it being damaged by the workpiece during the turning process. Therefore, at the initial stages of processing, when the workpiece does not yet have an absolute cylindrical shape and runout on the blade occurs, as well as at large diameters, when the cutting force is of great importance, it is necessary to use cutters with sufficient thickness.
- wood turning tools must have a handle no shorter than 25 cm. If it is much smaller, then during the turning process it will be difficult to hold the tool in your hands, not to mention the quality of the work performed.
We make pendants with our own hands from metal using a machine
If you have access to a metal lathe, then try making such beautiful pendants with your own hands.
As a child, I collected all kinds of semi-precious stones and other things like them. There was this pearl in my treasure box I made a pendant out of it as a Valentine's Day gift for my wife.
Making pendants with your own hands
Before making the pearl pendant, I experimented with different pieces of iron.
Step 1: Initial Polishing
To start, I cut a piece of 12mm tubing.
You can buy such a tube in a store. 1.50 m for 60 rubles. I put it in the lathe and polished it first with 200, then 800 and 2000 sandpaper.
Doing this will make it easier to polish at the end.
Step 2. Cut
The pearl is attached inside a metal trench. I measured the pearl and it was about 6.5mm.
First I labeled the tube. I made a cut along this mark with a pipe cutter. I then used a carbide drill bit to cut the groove.
I widened the groove with a file.
Step 3. Improve the ring
After I cut the ring, I filed down all the rough edges.
Safety first: Use extreme caution when operating a lathe.
Step 4. Open the ring
I cut the ring with tin snips. Then I flattened it a little with a hammer. Do not beat it too hard so as not to spoil it.
I formed the letter U from a metal strip. I did this using a vice and a metal pin with a diameter of 0.63 mm. See photos.
I pressed the ends of the strip together, but they weren't pressed tightly together yet. I heated them on the fire until they were hot. Then he placed them in water. After this, the structure remained closed.
The last two photos are “before” and “after” heating.
Then I drilled a hole for the chain. I used a diamond blade to sand down the edges.
Step 7: Polishing and Installation
To quickly polish I made an improvised grinding machine. I covered the drill bit with sandpaper and inserted it into the drill press.
To process the inside, I also used a drill, but a smaller one.
To insert the pearl, I placed a flathead screwdriver between the two ends of the loop, widened the gap, inserted the pearl, and removed the screwdriver.
I then hung the pendant on a chain and placed it in the box.
DIY - How to make a TRIDENT from A4 paper with your own hands?
Instructions on how to make a trident from A4 paper. Required materials: 11 sheets of A4 paper, glue, scissors. Approximate time to create 1 paper craft: twenty-six minutes. Reference: A trident is a bladed weapon consisting of a single shaft and a tip of three sharp teeth. It was often used in close combat as a piercing weapon, and thanks to its design, it could easily disarm your enemy. It was especially widely used during the Roman Empire in gladiator battles. They were worn by retiarii, this is a special type of gladiator warrior, literally translated, it sounds like “a fighter with a net”, their weapons consisted of a trident and a net, their armor consisted of one shoulder pad that covered the shoulder or the left side of the chest. gladiator The tactics of the retiarii was to throw their net at the enemy, if he was lucky enough to do this, then he would attack him with his trident. In Greco-Roman culture, it was a symbol of lightning, and was the weapon of the most important Greek god Zeus (Jupiter). Also, the trident is a symbol of power over the seas and oceans and the entire water element. It was a permanent personal attribute of the ancient Greek god Poseidon (Neptune). In Christianity, the trident is a symbol of the Trinity. But it has gained fame as a satanic weapon; it is with it that the devils torment sinners in hell. In Hinduism, it is already a weapon of the Hindu god Shiva; it was often depicted as a mark on the foreheads of his followers. In other cultures• It is a sign of the Maserati company.• It was a personal sign (tamga) of the great Genghis Khan. • The trident is a symbol of the princes of the times of Kievan Rus. Today, the Trident is the coat of arms of Ukraine.• Also depicted on the flag of the Crimean Tatars and Barbados. ——————Weapons made of paper: https://www.youtube.com/playlist?list... Subscribe to the YouTube channel “Origami and crafts from A4 paper”: https://www.youtube.com/channel/UCQRY ... Link to this video: https://www.youtube.com/watch?v=FzTWh... And most importantly, remember that every origami you make with your own hands ennobles you a little, and the folding process itself teaches attentiveness and patience. Thank you for watching our DIY video. Just don’t forget to rate this video about a paper trident later!))) The composition “BTS Prolog” belongs to the performer Kevin MacLeod. License: Creative Commons Attribution (https://creativecommons.org/licenses/…).Original version: https://freepd.com/Unclassified/BTS%20….Artist: https://incompetech.com/Composition “Faceoff” » belongs to the artist Kevin MacLeod. License: Creative Commons Attribution (https://creativecommons.org/licenses/…).Original version: https://incompetech.com/music/royalty-….Artist: https://incompetech.com/
Read also: Grounding a shield on a wooden pole
Crafts on a wood lathe: photos, videos and drawings
Wooden crafts and dishes are very beautiful and many still use them in everyday life. Since ancient times, craftsmen have been turning such dishes. To show all the beauty of the wood, it was processed not along the grain, but across it. At the same time, the wood pattern stood out expressively.
The article will discuss several master classes on making crafts on a lathe.
Wooden vase on a lathe
Tools:
- A lathe, or a homemade one.
- Various cutters, you can make them yourself. Photos and videos of the manufacturing technology of such can be easily found on the Internet.
- Plane.
- Hacksaw.
- Compasses, rulers.
- Axe, saw.
- Drill, drill bits.
- Sanding cloths, files, chisel.
- Oil, non-toxic varnish, brushes.
Manufacturing process:
- Saw off the log to a length of about 20 cm. Split it into two halves.
- Go over the wood at the split site with a plane.
- Then you should measure the center of the circle and draw a circle.
- At the next stage, saw off the corners and ends of the workpiece (45° angle).
- Drill a hole at the point marked by the center of the circle, 10 mm deep, 5 mm in diameter.
- Secure the workpiece in the machine.
- Using a jamb cutter, carve out a cavity in the workpiece. Without touching the technological rod.
- Treat the outside of the craft and give it a cup shape.
- Completely clean the cavity of the product.
- Sand the wood externally and internally.
- The product is removed, there will be no more work on the machine. The bottom of the vase is processed.
- The rod is cut off and the cut area is sanded.
- Coat the outside of the vase with wood varnish, and wipe the inside with sunflower oil.
Nowadays, craftsmen publish a lot of photos and videos about wood carving, so choosing the type and shape of the product is not difficult.
https://www..com/watch?v=knemzdYI9mc
Wooden salt shaker box
Materials and tools:
- Acacia tree.
- The cutters are homemade from ordinary files.
- Hacksaw.
- Sandpaper.
- Wax, varnish.
MORE ABOUT: Pattern of a cute owl from felt
Stages of making a salt shaker on a lathe:
- Take a cylindrical piece of wood and attach it to a lathe. Why is acacia wood preferred? Because its wood has a decorative light green tint, and after sanding it gives off a mother-of-pearl appearance. Look at photos of other types of wood, maybe you like darker shades.
- First, round the block of wood by removing the edges with a semicircular cutter.
- Then, using a jamb cutter, make a smoother rounding and make indentations for the decorative bands of the salt shaker.
- Cut off both sides of the recesses to create bulges and round the edges.
- The next step is to cut out the inside of the box. Using a straight narrow cutter, make a recess without sudden movements, going deeper in steps. Approach this process diligently, it’s good if you watch a video of such work.
- Using a triangular cutter, moving center - edge, smoothly expand the cavity to the very bottom.
- Using a wide straight cutter, level the bottom and make a groove for the lid.
- Sand the bottom and walls of the craft with sandpaper.
- Use a hacksaw to cut the product from the machine. You can do this when the machine is turned on, by moving the hacksaw away from you towards the part. Before finishing, stop the machine and cut the workpiece.
- To finish, coat the top of the salt shaker box with varnish and the inside with wax.
Making a lid for a salt shaker box
Materials and tools:
- Acacia tree.
- The cutters are homemade from ordinary files.
- Hacksaw.
- Sandpaper.
- Wax, varnish.
Stages of work:
- The technology for making a domed lid is presented here, but you can learn how to sharpen other types of lids from photos and videos of various craftsmen. So, the lid should be adjusted to the size of the salt shaker.
- The inside of the lid is formed using a semicircular cutter.
- Then form the outer part of the lid and handle.
- Clean the lid with sandpaper and open it with varnish.
Wood crafts are not very complicated, but they require practice and precision of movements; watch photos and videos of master classes by other masters and you will be able to discover new techniques and styles.
MORE ABOUT: Corrugated paper flowers: roses, tulips, carnations
https://www..com/watch?v=bS5BjRHCBis
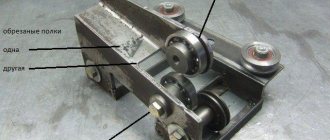
Do-it-yourself steady rest for a lathe
Steady rests are created in accordance with GOST 21190-75, 15760-79 and others, depending on the model and type. Each machine has its own models, so if you are going to make a steady rest for a lathe with your own hands, then you should take into account the physical dimensions, features of the arrangement of parts and other important factors of the equipment so that there is complete compatibility.
Types of possible homemade lunettes
A homemade steady rest for a lathe does not limit its creator in production by practically anything other than size. Thus the wide variety found in this case can easily be explained. The following distinctive features can be immediately identified:
- Wooden body. Often homemade lunettes are made of wood. Wooden parts include only the body, while the clamps and parts close to them often contain metal components. This design is more lightweight and mobile, and wood is also more affordable.
- Small wheels. The fixing parts are often not rollers or cams, but some wheels from another type of equipment. These can be wheels from roller skates, carts, wheelbarrows and other things that have a smooth round surface. The effectiveness of these devices turns out to be quite high, no matter how it might seem at the very beginning, the main thing is to select really high-quality and reliable materials that can withstand such a load.
- Metal lunettes. There are also devices that are assembled from various metal items that others would consider waste or scrap metal. These can be long metal plates, rods and other important components.
photo: wooden steady rest for a lathe
photo: rest with wheels for a lathe
Advantages and disadvantages
A homemade steady rest for a metal lathe has a number of quite significant advantages. Firstly, it is low cost, since no factory product will cost so cheap. You can independently make a device of any given size that would fit your machine. Often such steady rests turn out to be lighter and more convenient to use. They are easy to repair and have a lot of parts that can be replaced with improvised means.
The disadvantages include a low degree of reliability, since they are less strong and resistant to vibrations than factory ones. When manufacturing, you need to strictly adhere to the dimensions, which is not always possible to achieve. Sometimes there are no basic things to make a component of a product.
Technical requirements for making a homemade steady rest
The primary requirement in this case is full compliance with the dimensions of the machine; for example, you need to accurately observe the dimensions of the steady rest for the 1I611P lathe so that it matches this model. Also reliable fastening systems, since breaking the steady rest during processing can have a lot of negative consequences. Even when made from wood, it is recommended to make the main inserts from metal. Of course, the reliability of cast products will not come close, but it is better to focus on strong materials designed for heavy loads.
Necessary materials and tools for manufacturing
- An arc is two bent metal or wooden arcs, which, when connected, would form a circle, or initially any circle of the required size, which would be useful in further work.
- Screw system – The classic method uses a screw system that adjusts the position of the clamps.
- Rollers or cams - in order to ensure reliable fixation.
- Base for the lower part of the lunette.
- Fastening bolt.
- Bending equipment for preparing parts.
- Drilling machine.
Work order
A homemade steady rest for the 1I611P lathe is made according to the drawings of the original equipment. The first step is to make the main circle on which the clamps will be located. It must correspond to exact dimensions, in particular the internal diameter, since there are no requirements for a larger external shape. Cams with rollers, which are located from each other at a distance of 120 degrees, are machined into it, or attached to the side. They must also have the same size and reliable fastening, which can be done by bolts or welding, the main thing is to be able to move and adjust the distance. Manual welding extruders RSE-1 and RSE-3 can be selected at https://usanu.ru/.
After this, a base is created on which the device is fixed. This lower part must not only coincide with the manufactured circle, but also be installed normally on the machine. When assembled, it must be strictly perpendicular to the previous part.
Examination
The steady rest is first checked by taking measurements, which may require an electronic protractor and other measuring instruments. When everything is verified, you need to install the steady rest on the machine and check it in operation, starting with minimum speeds. In this way, by gradually increasing the speed, you can safely check the operating condition of the steady.
Read also: Connection diagram for legrand two-key switch
Popular publications:
The basis for heat preservationBefore you properly insulate the floor in a wooden house, you need to study the diagram...
How to make a window sill: materials and methods Before starting work on the manufacture of a window sill, you must carefully take the dimensions...
Plastic or wood? Plastic window with wooden window sill We definitely recommend one or another type of material for manufacturing...
Forms and materials for making window sills There are several forms of wooden window sills: • traditional or straight; • having the appearance of an arc...
Lathes have been operating for many decades as the most reliable way to process and artistically decorate any homemade product made of wood or metal. Electrical processing gives the product an elegant and completely finished look. Crafts should have a smooth surface and smooth shaped transitions.
To make wooden crafts with your own hands, soft wood species are used, such as:
Products required for hardwood are made primarily from oak or birch. For beauty and picturesqueness, various decorative elements, tinting or paint can be applied to crafts.
To make crafts with your own hands, you don’t have to be a turner or carpenter by profession and be able to make professional drawings. With a lathe at your disposal, you can learn a lot at home.
Safety precautions
The work will be enjoyable and will not cause injury only if the turner knows and follows safety rules.
Work is performed only in protective clothing. Long hair must be tied back and there should be no hanging jewelry on clothing.
The machine must be reliably grounded. Turning equipment must undergo regular inspections.
Before turning on the machine, you need to check that the workpiece is securely fastened. Under no circumstances should objects be passed through a running machine.
In addition to the written rules, there is one more, unwritten one - do not be afraid of the machine, it is just a tool. If you adhere to this rule and work hard, you can easily become a real professional turner. A little effort, faith in the result and any detail that comes out from under the cutter will become a real creation of a master.