Perforated corner for plaster
Home renovation is a desire for beauty and comfort. And it’s not scary if the walls are not level or there are differences in plane. The main thing is that it is visually smooth and beautiful. How to achieve this?
Few people know that the secret to the visual beauty of walls lies in a straight, clear edging. This concept refers to the following areas of application of plasters and putties:
All these places (edges) must correspond to the intended design. Straight should be straight, oval should be oval. The former plasterer-painter achieved acceptable quality with almost his bare hands. But modern accessories simplify and speed up the process.
In fact, all of them are perforated corners for plaster. There are only two varieties of it - straight and arched, and there are many more subspecies. They are used almost everywhere where plaster mixtures with putty are used.
Right angle.
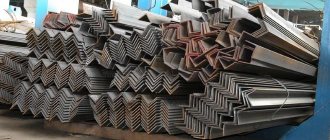
A right perforated angle can be used for internal and external corners. It can be of different widths, as well as aluminum, galvanized or plastic (polyvinyl chloride). In general, there is no difference. You can’t say that one is better or worse. But galvanized corner is more rigid than others. Especially the wider one. Therefore, it is convenient to use it as a plaster beacon.
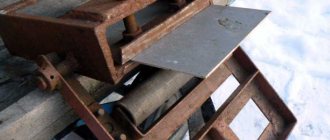
Tip: Use good, sharp tin snips to cut the corner, as the bent edges will get in the way. On the other hand, plastic products can be cut perfectly with a regular stationery knife. If you don’t have a knife, scissors, or grinder at hand, then you can simply break the perforated angle. Uneven edges can be easily straightened with pliers, a hammer or just your fingers.
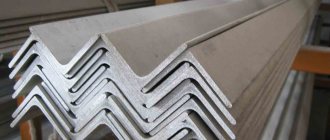
Any straight corner for plastering corners is a V-shaped profile. Its sides (shelves) have many holes throughout their entire plane - perforation. The top of the corner stands out, that is, it sticks out relative to the shelves by approximately 1 mm. Moreover, at the inner corners it sticks out inward, and at the outer corners it sticks out. Perforation is needed for reliable fastening, the top is like a guide for a spatula.
Tip: In order to cut a dozen perforated corners of the same length, you can fold them one into one, then, after measuring with a tape measure, cut off the entire pack, say, with a grinder. And 2-3 pieces will be cut through by metal scissors.
The purpose of the perforated corner and how to install it
Depending on the task at hand, this finishing accessory can be installed in two ways: on a curved corner and on a leveled one.
What is a straight perforated corner
A straight perforated corner is a metal or plastic corner trim that is secured with plaster or putty, thereby giving the wall a smooth appearance and making its corners stronger.
It can be external and internal, as well as different in width and strength. For example, a wide galvanized corner is much stronger; it is also used as a beacon for plaster.
- It is better to take scissors for trimming corners with a plier-shaped type, they are very strong and sharp. With ordinary scissors, you will simply damage the edges of the corner, and the work will be lengthy and inconvenient.
- If it is a plastic corner, then large sewing scissors will do; sometimes you can cut it with a construction knife, but then the edges will have to be leveled using pliers or a hammer.
- The right corner looks like two long rulers folded in half, and on each edge there are round holes - this is a perforation with its own top.
The top of the inner corners is directed inward, and the outer corners are directed outward.
The perforation is for fastening, and the apex is for direction; the craftsmen orient themselves towards the apex and guide the spatula along it.
If you have a lot of work to do, where you need to cut a lot of corners, then do the following best: put them in a row, measure them, lift them to a height and cut them with a grinder. This will make working quickly and conveniently, and you won’t have to align the corners. Metal corners can be cut with pliers three at a time, this is faster.
The corner is a beacon.
In the first case, the product will serve as a plaster beacon. To install it, a plaster mixture is applied to the base corner. By the way, it is more convenient to work with gypsum plaster than with cement plaster. It should not be applied along the entire length of the edging, but in such flat cakes - for the convenience of adjusting the angle along the plane and level. This adjustment is made using a building level and a plaster rule.
Tip: If you add a handful of cement or any cement mixture to gypsum plaster, the plaster beacon will set in a matter of minutes. You can continue working immediately. Where perpendicular planes intersect, it is advisable to cut the overlapping corners at 45 degrees to avoid overlap.
It should be noted that the internal perforation angle is extremely inconvenient to use as a beacon for plaster. It is only suitable to emphasize the straightness of the edging.
In walk-through areas where external corners may be subject to more intense mechanical loads, it is recommended to install a corner with a mesh under the plaster. Fiberglass plaster mesh, firmly connected to a plastic or metal corner, serves as a means of reinforcing the corner.
This type of perforated corner is used precisely as a beacon. After all, it is almost impossible to hide the mesh under a layer of finishing putty, since about 5 mm of plaster must be applied on top of it
Advice: If you want to reinforce a regular perforated corner, you can cover its shelves with a sickle mesh, covering the wall. Strips of non-woven fabric or fiberglass are also perfect for this purpose. The same putty can be used as glue.
Corner - protective cover.
If the wall, along with all its corners, is already well-plastered, then the purpose of the perforated corner will be to protect the corner from mechanical damage and emphasize a straight line.
The technology for its installation is basically the same as the first option. Only the layer of the solution used should be minimal, the consistency of the mixture should be more liquid.
To achieve this goal, a plastic or aluminum corner for plaster is ideal. In addition, it is not at all necessary to fix it with a plaster mixture or putty. After all, the base is already straight, which means that the corner should be pressed tightly against the base, hugging it.
Such installation is possible using small screws, nails or staples. You just need to make sure that the corner itself and its shelves are not deformed in the process.
Tip: Often, protruding screws and nails interfere with puttying with their heads. To avoid this, they can be removed after the corner has set.
In addition, installation of a perforated corner with a minimum layer of mortar is necessary, as a rule, when finishing gypsum plasterboard structures.
Of course, provided that they are assembled with more or less high quality. In this case, a self-adhesive perforated corner is perfect - it has strips of glue on the inner sides of the shelves, which are activated by ordinary water. If there is a need to join corners, it must be done using the same materials: plastic ones are connected to plastic ones, etc.
The fact is that different corners for plaster may differ in size, which will affect during finishing.
Fastening the plaster corner
Arched corner
It is not enough to choose a high-quality product for framing corners made of metal or plastic; the main task is its installation. There are certain nuances and postulates that every professional finisher recommends following. These include:
- there should be a strong wall at an angle;
- the corner must be primed, just like the walls;
- the corner is set according to special beacons mounted according to the level;
- the corner should be installed in such a way that the solution penetrates into all perforations;
- the verticality of the installed product should be controlled using a level;
- in extreme cases, when the layer of finishing material is too thin, it is allowed to use additional mechanical fastening, which can be dowels with plastic sleeves and self-tapping screws;
- plastering work on the corner element is carried out last;
- there are special tools for decorating a corner and removing excess mortar from the surface of a plastic or metal product;
- Grouting the corner should be done on both sides alternately, while the product itself should not protrude outward.
If, when comparing the corner trim with the wall surface, you see that the mortar or gypsum composition is not enough to recess the corner, you should use some kind of leveling compound or sealant for these purposes.
To summarize the material presented, it is worth saying that a plaster corner is an indispensable assistant for the owner of an apartment or house who is trying to do the finishing work in his premises for the first time.
By making the right choice of product and performing high-quality installation in accordance with the recommendations, you can be sure that the corners in the room will be even.
Plastering slopes.
Slopes on windows, doors and other openings are especially important places, since a person looking there automatically compares them with a window or door. That is, with straight lines. This means that no deviations are allowed - deviations from the lines of the window or door. As for matching the level, the windows can easily be slightly blocked.
Therefore, slopes are plastered mainly according to level. It is recommended to use a corner for plastering slopes. And, again, as a plaster beacon. If the slopes were mounted from gypsum fiber board or gypsum board, and not of very high quality, then a perforated corner will help eliminate all the shortcomings.
By the way, before installing gypsum plasterboard or sandwich panels on slopes, the basic brick slope, according to technology, must be covered with plaster. The perforated corner installed at the same time will help to correctly align the sheet of drywall.
Installation of perforated corners
Expert builder Viktor Petrovich says:
So we came to the kitchen. Now we will install perforated plastic and PVC corners. To begin with, we clean everything here so that there are no build-ups, remove dust, prime, install corners and plaster the slope.
Now you will need to quietly remove everything and clean it. So we cleaned the slopes. Now we will prime the slopes with a primer: we use Aquastop primer concentrate, dilute it with water and apply a coating. It is inconvenient to prime here with a roller, since the slope is small, so we take a brush or brush.
For those who have not watched the previous videos, I will explain that this niche is for a TV, that is, we will mount a TV here. Here we will have two sockets: two of them will be low-current and two power, that is, analog twisted pair and 220 sockets.
Arched corner.
Everything is clear with the finishing of right angles. How are various arches, multi-level ceilings and other figured structures brought to perfection? After all, neither the plaster rule, nor the building level, nor even a straight perforated angle will help here.
For this purpose, a slightly modified perforated corner for plaster is used - arched. Firstly, such a corner is always plastic. Secondly, one of its shelves is cut crosswise into petals. This solution allows this accessory to be so flexible that it can follow the shape of almost any smooth curves.
Tip: When installing arched corners under plaster, you need to remember that you cannot adjust them with a level or rule. This is done exclusively visually, by eye. Help from another person and good lighting will be a good help. Before installing the corner, you need to compress it a little so that the petals do not stick out from the plaster.
The arched corner, depending on the manufacturer, can be hard or soft.
Hard is usually more expensive. But, when finishing large-scale structures with smooth shapes, it is indispensable. The fact is that his desire to straighten ensures the ideal roundness of the lines and the absence of “angularities”. But attempts to use such a corner on small decorative elements with sharp bends will lead to its fractures, which cannot be corrected.
A soft arched perforated corner for plaster allows you to finish sharper turns, for example, arches with a small radius of a circle and other curves. However, the lack of rigidity in the profile of such a corner threatens the appearance of bumps and depressions on the lines being processed. To avoid this problem, it is recommended to install soft arched corners using a plaster mixture.
With this method of fastening, firstly, there remains a chance to correct visual defects during plastering. Secondly, screws and other fasteners will not pull the bend lines towards themselves. To make the arched corners look smoother, they should be mounted slightly under tension.
Dimensions and type of perforated corners
Perforated corners are usually available in standard sizes and configurations, namely:
- Corner flange width. Can vary over a wide range from 4mm to 65mm. Typically, to form corners, products with shelves of 21-25 mm are chosen.
- Profile thickness. Can range from 1 to 4 mm. The “golden mean” is considered to be corners of 2 mm thickness. They have a sufficient margin of safety, good load-bearing capacity and optimal cost. Products with increased thickness are used in the construction of facilities with more severe operating conditions; the price of such elements is higher.
- Length. There are corners 2.5 long; 3.0; 3.5; 4.0 meters. The choice of size directly depends on the height of the walls. It is not recommended to buy “with a large margin” in order to avoid getting unnecessary trimmings. For most modern apartments and houses, corners with a length of 3000 mm are sufficient.
- Perforation (holes). Serves to secure the product to the wall using hardened plaster mortar. Corners with 1-, 2- and 3-row perforation, as well as combined ones, are available. The hole diameter can be the same or different. Typically it ranges from 9 to 25 mm. Also on sale are products with quadrangular (non-standard) holes.
Corners - savings or waste?
An accessory such as a corner for plastering slopes or any other perforation angle has a low cost: the price of a regular aluminum perforation angle is only about 40 rubles. The plastic one costs about the same. Galvanized - a little more expensive, 60 rubles. But you can buy rigid arched or straight reinforced corners for about 150-200 rubles.
And if, initially, we are talking about decorating an entire house, then you will have to order more than a dozen of these corners. Docking them is not always appropriate, so quite a lot can go into waste. Accordingly, the costs will be considerable.
But the protection for the corner that the described device provides also costs a lot. Not to mention speeding up the process of applying plaster or the visual effect. In addition, by replacing plaster beacons with corners, you can really save money on this.
Tip: Many people, far from finishing work, confuse a perforated corner with a regular finishing corner. Their main difference is that the second option is exclusively a finishing element. If the question arises of how to attach a plastic corner to decorative plaster, it can be solved with the help of liquid nails. By the way, finishing angles are also different.
When undertaking a large-scale renovation, you must definitely consider purchasing perforated corners. Trying to do without them will definitely backfire. It is better for the master to decide which corners to purchase, because he guarantees the quality.
Source
How to use a corner to create a protective pad
Let's consider three options for using a corner as a protective element for wall corners.
The first is when the walls in the room are already plastered, leveled and everything is ready for repair.
- If the walls are prepared for finishing work, then you just need to secure the corners with ordinary putty, as described above. Without fixing the corner too much. We only need it to maintain an even appearance and begin gluing or painting the walls.
The second, for example, when the repair has already been done, but the corner is damaged and needs to be strengthened. Or, if there is no repair and it is not planned, but the corners need to be tightened, etc.
- Here it is worth taking precise measurements, initially plastering the wall near the corner and the corner itself, and then using gypsum plaster and cement to make a corner for the lighthouse.
The third option is when you need to secure and align the corners of an arch, box, or partition.
- In this case, ordinary plaster is sufficient, but sometimes, in cases where it is necessary, a mesh is used to strengthen the corners.
Such actions are necessary to align and strengthen the corners.
For thin items or hard-to-reach corners, you can use construction adhesive.
There are also self-adhesive corners on sale, but they are used only for such corners as, for example, an arch made of durable plasterboard, boxes in the wall, etc.
To join corners, it is necessary to select identical corners and suitable sizes.
Plastic corners are perfect for residential premises, where necessary. But, for example, for office, shop and other non-residential premises, where there is a lot of traffic and activity, it is better to use aluminum corners.
Slopes using a corner
Making slopes yourself is very difficult if you are not a professional craftsman, but it is possible. Keep in mind that attention always falls on the slopes, and they must be strong, perfectly level, and smooth. The future condition of the window also depends on how the slopes are made. If putty is applied incorrectly, the window may begin to fog up, cracks may appear, and there will be a draft from the window.
Initially, you need to thoroughly putty the entire window and prepare it for working with the corners. It is necessary to constantly measure the slopes and measure them with a construction ruler to ensure that they do not have unevenness. The same applies to door slopes. Then proceed to the corners, here the lighthouse technology is used. You need to securely fasten the corners, and at the same time very evenly. Because the inside will be without finishing materials. In order for the angle to be very even, you need to slowly apply the mixture, stroke by stroke, 10 cm at a time and immediately level it with a spatula.
Advice. Prepare two spatulas, new ones, so that there are no stuck or dried mixtures, paint, etc. on them. With their help it will be easier to make a perfectly even angle. Having leveled, immediately apply two spatulas on both sides, pressing them tightly, and hold for about 20-30 seconds. Actions for every 10 cm should not take more than 1.5 minutes, otherwise the mixture will dry out and you will not have time to trim the lines between strokes!
Or buy a spatula like this.
Having completed everything, wait until the corner dries. Then check with a clean hand by lightly rubbing it and then using a ruler. If small unevenness or roughness is found, then do not panic, you will just have to work a little more. Take the grout (sandpaper) and, without being too zealous, slowly, in a circular motion, like a mechanical device, rub out the defects from top to bottom. And so on both sides, then measure again. Then you can walk a little with a roller dipped in plaster. As a result, the slope is painted inside with a special paint, preferably with a roller.
Application for arches
It is not so difficult to work with arches where right angles are present. Here you just need to reinforce the opening so that it is durable and has an attractive appearance. For such work, arched corners are used; they fit together easily, and it is not difficult to plaster them.
An arched corner doesn't look the same as a perforated corner, it's a little different.
Arched corners are made of plastic. There are leaf-shaped slits on the lines. Therefore, they are easy to select to match the required arch shape.
Standing in a store, you will be faced with the question of which corner to buy, soft or hard. If the arch is large, then it is better to take a solid corner. For a small arch, for example, in an apartment, a soft corner is suitable.
Before you start installing the corners, squeeze it so that later the leaves do not stick out through the putty. It is difficult to work with an arch alone; it is better to bring an assistant.
When you start working on the corner, you will notice that it bends back to make the puttying process easier; you can secure it with buttons. This will allow you to complete the job faster and smoother.
If the corners of the arch are very curved, then it is better to use a soft corner. In this case, you can use self-tapping screws that will securely fix the corner and in the future it will definitely not fall off. You just have to choose the right screws and fasten them more tightly so that they don’t show through the corner.
Fastening an arched plaster corner with self-tapping screws.
How to install a perforated corner with your own hands
In this material we will look at the process of installing a perforated corner. In particular, we will deal with the questions: how to fix the corner, how to level it, how to finish it. For maximum clarity, the article is supplemented with relevant photographs and videos.
First of all, a few words about what it will take to get the job done. So, in addition to the perforated corner, we will need the following materials and tools:
Regarding the perforated corner. In this case, it all depends on the corner you will be finishing. If work is being done to repair an external corner, in a room where there is the greatest likelihood of damage, it is best to use a plastic corner. Such a room, for example, is a corridor.
Of course, the use of a plastic corner is not a mandatory requirement; rather, it is a recommendation. For finishing, you can equally successfully use both metal and plastic corners. Simply, plastic, in comparison with metal, is more advantageous in terms of durability: they do not wrinkle in the event of fairly strong impacts.
How to choose a protective corner for repair
The protective corner usually causes a lot of controversy and doubt. Craftsmen advise doing the following: if the corner you intend to make is external, that is, its damage is extremely likely, then take a plastic corner from the store. Often these are places such as a corridor or hallway. Why is plastic considered better than metal: everything is simple; in case of accidental impacts or brushes, plastic does not dent like thin metal and is considered more durable because it is less susceptible to deformation. This is especially important if you have children, large dogs, elderly people in your family - all of them can often touch corners by accident and plastic will be much more appropriate here. Although, if you wish, you can use a metal corner - no one forbids doing this.
It is very important to choose a protective corner so that it does not look out of place at this celebration of life - that is, to match the wallpaper, paint or any other wall decoration. It is worth noting that if you use plastic panels, then you can do without a corner at all, using instead a panel cut along the entire length from the reverse side. Run a knife down the middle, cutting the PVC panel from the back side, and it will very easily fold at the desired angle. This way you can easily decorate any protrusion in the room, and it will not stand out. Corners with PVC panels look somewhat official.
You can choose a corner not only to match the painted walls or wallpaper, but also to match the color of installed doors, floors, and baseboards, which is done quite often during renovations. You can also play on this moment with the contrast of shades. The best way would be to pre-order a 3D design of your apartment or house in order to be able to choose colors and see how it will look with the furniture. The picture that we paint in our heads with the help of our imagination is often very different from the harsh reality.
Preparatory work
Now that we’ve sorted out the tools and type of corners, we can move on to the preparatory process. It comes down to priming the plane to be repaired and preparing a gypsum solution.
First of all, we prepare a solution from starting gypsum putty. By the way, to glue the paint corner, you can use not only the starting putty, but also the finishing putty. You can also use various cement-based adhesives, for example, ceramic tile adhesive.
The solution is prepared as follows: take a certain amount of water into a clean container, add the dry mixture to it and stir everything with a mixer. Important: the solution for installing a perforated corner must be quite thick - much thicker than, for example, for puttingtying walls or gluing foam ceiling tiles (Gluing the ceiling with tiles).
So, the mixture is ready, you can start priming. Everything here is simple and quick: using a paint brush, apply primer to the surface to be treated, spreading it evenly. There is no particular point in priming several times - once is enough.
Installation of the perforated corner and its alignment
Using a small spatula, apply a small amount of putty solution to a larger spatula and use it to transfer our glue directly to the corner being repaired. We carry out this work along the entire height of the corner.
Now we lean the perforated corner and gently “press” it. By pressing/pulling certain sections of the corner “by eye” we align its verticality.
Next, take a building level and use it to check the evenness of the installation of the painting corner. If necessary, carefully change its position so as not to damage the corner. Thus, we achieve a perfectly even angle.
Finally, we putty the corner on one side and the other. It is most convenient to do this work after the putty that holds our corner in place has completely dried. You can do this directly during the installation process, the main thing is to do everything as carefully as possible so as not to disturb the correct verticality of the corner.
Finally, the promised video of the entire installation process:
That's all. If you still have any questions regarding the topic of installing a perforated corner, you can ask them in the comment format. Rest assured: you will receive an answer as quickly as possible!
This is interesting:
Source
Can you show us clearly how to install a perforated corner?
A perforated profile (perforated corner) is installed to protect and align external corners.
Most often, such protection is installed on the outer corners of slopes, columns, openings, niches, arches...
Some craftsmen don’t bother fixing the perforated corner dry using a mounting stapler, and then apply putty on top, but I think that this is not entirely correct. The perforated profile, regardless of the material - metal or plastic, primarily serves to protect and strengthen the corner, which means the internal cavity under it should not be empty, but completely filled with strong putty, for example CE 78, FUGENFULLER, UNIFLOTT...
I’ll tell you step by step how I install a perforated profile on the corners of an arched opening. Installing an arched profile on both sides along the thickness of the arch is more complex and has its own nuances, unlike fastening the profile, for example, to a window slope. It is this option with an opening that we will consider.
First, we decide on which side of the opening we need to start installing the protection. To do this, use a plumber's angle to check whether the end of the opening is turned around. As a rule, this is a plasterboard partition and the plasterboarder does not always pay attention to this nuance. We start installation from the corner that protrudes the most (acute corner). If both angles are 90 degrees, it makes no difference which side to start framing from.
So, use a spatula to apply putty to the outer corner of the opening:
We apply putty to both adjacent sides of the corner without gaps, so that there are no voids under the installed perforated corner.
Before installing the profile on the floor, it is advisable to put a lining or wedges of a few millimeters in thickness; in this case, a nylon dowel was at hand (seen in the photo). Such a “trifle” will not allow the bottom end to cling to the profile and will allow you to set it up without any problems.
Carefully install the perforated corner, pressing it into the putty:
Use a spatula to remove excess putty. After this, usually a level is applied to the profile and set in a vertical position with light blows of a rubber hammer.
In our case, the first profile has already been set. Now we have to set the second profile in such a way that the framed end of the opening is not turned around, but has a 90 degree angle.
The difficulty lies in the fact that the installed perforated profile protrudes beyond the plane of the wall by 3 millimeters. If we apply the plumbing angle close to the plane of the wall, we will not get an angle of 90 degrees. To compensate for the thickness of the perforated profile, you can use, for example, cutting a wire of the required thickness:
Pressing the profile with a fitter's angle with such a “device” every 20-30 cm, we install it in the design position. To control the plane, the installed profile can be additionally checked with a level.
On the curved part of the arch we set the profile with the same bench angle with a “device” to maintain a right angle. To fix the arched corner in the design position, you can use self-tapping screws, screwing them into the holes of the individual segments.
After the putty has hardened, unscrew the screws.
To make the plane of the wall near the opening look more or less even, you need to make a “guy” along the installed perforated corners 35-40 centimeters wide:
For convenience, you can first draw a line with a pencil to the width of the spatula used (clearly visible in the photo) in order to know at what width the putty should be applied.
After “bracing” the perimeter of the openings and niches framed by a perforated corner,
You can begin to putty the entire surface of the wall.
Purpose of paint corners for putty
Before applying the finishing coat, perforated aluminum profiles are attached to the corner. They not only help align joints, but also provide surface protection. The length of the metal elements can vary from 2.5 to 3 m, the edges are trimmed to obtain the desired size. After this, the painting corners are attached to the walls (perforations are created for better fixation).
For the manufacture of corner profiles, various materials are used: metal and polymer. The metal group includes perforated products made of steel and aluminum. To protect the product from corrosion, the steel is coated with zinc. The thickness of the strips of metal profiles does not exceed 0.4 mm, they are easy to install, but are only suitable for straight joints (it is impossible to assemble an arch and other shapes using such elements).
Due to their natural plasticity, polymer corners can be used not only for straight but also for rounded joints. In addition, the products are resistant to moisture and are cheaper than other analogues.
Types of painting corners
Perforated corners are often called painting or plaster corners, as they are used during putty/plaster to strengthen the corners before decorative finishing. They serve two purposes:
- They reinforce corners, especially external ones, giving them additional strength and resistance to damage. It is no secret that protruding corners are more likely than flat surfaces to be subject to chips, scratches and other mechanical impacts, for example, when carrying large furniture through a doorway.
- They allow you to quickly and easily create a joint between perpendicular surfaces, making it smooth and clear. This, in turn, makes subsequent finishing easier: gluing wallpaper or tiles in even, not “cluttered” corners is easier, and the result is of better quality.
What are the corners?
Materials for production
First of all, these products differ in the type of raw materials from which they are made. There are three main types:
- Made from galvanized steel. Durable, reliable, corrosion resistant thanks to zinc coating applied on all sides. However, prolonged use in a humid environment may cause rust stains.
Galvanized corner
- Aluminum. Lightweight, durable, non-corrosive. But they are not resistant to close proximity to copper and some other substances.
Aluminum product
- PVC (polyvinyl chloride). The price of these products is the lowest, and their advantages are no less than those of metal corners. First of all, it is absolutely inert to the effects of moisture and aggressive chemicals - plastic corners do not corrode, do not rot, and do not deform.
Materials for making profiles for leveling wall corners
The aluminum paint corner for putty is designed not only to protect the corners of external walls from mechanical damage, but also to improve the geometry of external and internal finishing. Durable material allows these profiles to be used in wet areas, including bathrooms, swimming pools, etc. (aluminum does not deteriorate when exposed to water). The following sizes of aluminum painting corners are available: 2.5, 2.6, 3 m. Sheet metal scissors are used to adjust the length.
Installation of painting putty corners in the room on the slope or corners
Perforated corner for putty
Particular attention is paid to the location of the painting corners when attaching them to slopes. To finish window openings, plastic corners are most often used, because... they are affordable, durable, easy to install, and are fixed over a putty or plaster base. In construction stores, profiles are presented in different sizes, in most cases the angle is at least 90°. The products help hide minor irregularities and other wall defects.
A painting corner with a mesh is often used for facade finishing work. The material is securely fixed in the plaster and protects the surface from chipping.
Arched
To decorate arched openings, flexible perforated profiles are purchased; they are suitable for working with curved and multi-level structures. The arched perforated corner for putty can be hard or soft. A rigid profile is indispensable when working with three-dimensional structures (where there are many smooth shapes and bends), but the price of such an angle is higher.
For finishing small details in the interior (where there are many beautiful transitions, etc.), arched openings with a small radius, it makes sense to use arched corners made of soft materials. The lack of rigidity of these products is fraught with the further formation of pits and nodules that can destroy smooth transitions. To avoid such difficulties, arched corners are installed using gypsum mixtures. In addition, this installation method allows you to correct visual defects during plastering.
Corner configurations
The simplest are standard perforated profiles with a straight configuration. These are devices in a hole that can be external or internal depending on the type of angle for which they are intended. There are also arched products on sale that help decorate curved surfaces. They are widely used in the installation of multi-level gypsum board ceilings.
Most often, arched devices are made of plastic. They are divided into small sections, which allows them to be bent in different directions at any angle. With the help of such products, you can easily finish ceilings or arches even without much experience in the work.
Another popular type of corners are products with a mesh, which is designed for additional adhesion to the wall or ceiling, as well as for better leveling of the surface. They are often used for facade work or finishing walls with insulation. Like perforation, the painting mesh allows the solution to pass through itself and is therefore securely held on the wall.