This page is dedicated to homemade forged hangers. Next, we give the necessary theory, after which instructions and videos will be reviewed.
Special attention should be paid to the arrangement of the hallway (or corridor) , because this small room is the “face” of the house. Regardless of the design and style of the surrounding interior, forged hangers (link to section) perfectly complement the decor. In addition, metal products are reliable, safe to use, long service life, durable, environmentally friendly, original and beautiful design.
DIY floor clothes hanger: examples and options
Home craftsmen and lifehack enthusiasts can build a floor hanger on their own. For example, an old floor lamp can serve as the basis for a new product. To do this, simply remove the wire and remove the lampshade. Thus, we have a ready-made base on a stand. The wire frame of the lampshade will serve as an excellent material for making hooks.
An old, branchy small tree in the garden that has stopped bearing fruit can also be used to create a hanger. To do this, you need to clear the trunk and branches of bark, remove excess branches and twigs, sand the surface, coat it with varnish and fix it to the base. You can leave the natural shade of the wood or paint it the desired color. To add romance, the model should be decorated with artificial leaves and flowers. Children will especially love this accessory. To create a suit-type hanger, you can use an old chair and a trempl without a hook.
In modern construction, remnants of PVC pipes are widely used, including for the manufacture of floor hangers. This design is quite simple to assemble. The parts do not need to be adjusted; they are folded into one product according to the design principle. The connectors are PVC tees and corners. To fix the joints, you can use either special glue or a soldering iron.
Instructions for creating a clothes hanger with your own hands from PVC pipes
Creating a hanger from plastic pipes includes a preparatory stage, at which you need to clearly calculate the number of main and additional parts and select the necessary tools. To build a simple model with three branches you will need:
- PVC pipe with a diameter of 2.5 cm and a length of 180 cm;
- PVC pipe with a diameter of 2 cm and a length of 60 cm;
- corner bends with a diameter of 2.5 cm – 4 pcs.;
- corner bends with a diameter of 2 cm – 3 pcs.;
- tees-connectors with a diameter of 2.5 cm – 6 pcs.;
- PVC adapters from 2.5 to 20 cm – 3 pcs.;
A DIY floor hanger made from pipes is a simple design option that will help keep any room tidy
- plugs – 7 pcs.;
- cap for the top of the stand – 1 pc.;
- felt pads to protect flooring;
- spray paint of the desired color;
- soldering iron for connecting PVC pipes or glue;
- vice;
- hacksaw;
- sandpaper.
To work, you need to prepare a clean surface. Next, markings are applied to the pipes and divided into parts. A piece of 70 cm in size is cut from a long pipe with a diameter of 2.5 cm, another 7 pieces - 10 cm each and 2 pieces. - 20 cm each. From a pipe with a diameter of 2 cm, 3 identical blanks are made - 20 cm each.
To make a PVC floor structure you will need quite a lot of parts
Before assembly, you need to inspect all parts to remove roughness and sharp parts. To do this, you need to sand them with sandpaper. Next, the blanks are distributed into groups. The stand consists of 4 angles, three tees-connectors and 6 tubes with a diameter of 2.5 cm. For the first branch you will need one tee, an adapter from 2.5 to 20 cm, a pipe with a diameter of 2 cm, a length of 20 cm and an angle with a diameter of 2 cm. Holes The branches are closed with special caps.
A floor clothes hanger is an excellent option for helping to maintain order in a hallway or other room. A wide selection of different materials and design options, including additional parts, functions and wheels, will help you decide on a specific model and create a unique interior in accordance with the style of the room. If you wish, you can create an original accessory with your own hands. A hanger will not only help relieve space, but will also become a highlight in the design composition.
Types of floor hangers
The more residents there are in an apartment, the more personal space and space for things is needed. In cold climates, this is exacerbated by the need for seasonal and outerwear. Storing it in drawers on shelves is not always convenient - it wrinkles, becomes moldy, and develops a musty smell.
Before you make a floor hanger with your own hands, you should decide on its type, functionality and design features. They are:
- mobile (mobile) on wheels;
- stationary (on legs, platforms, crosses).
The best way to place trempels is with a DIY floor clothes hanger. There are classic guest models for the hallway - in the form of a stand on a cross, with hooks for outerwear and “horns” for hats, and there are frame stands.
Mobile rectangular structures on wheels are convenient for placing everyday clothes on hangers.
Then the entire weekly wardrobe for the office is prepared on the weekend, and in the morning sets are chosen according to the mood - all the clothes are fresh and ironed in advance.
Clothes hangers on wheels - wooden or metal?
Metal hangers on wheels
Due to the simplicity of the design of metal hangers on wheels, it can be moved around the house. The hanger can be decorated with various decorative elements, which will decorate the home interior. If the room is cluttered with other things or details, then you can simply move the hanger to another room.
The designs of metal hangers can consist not only of a hanger rack, but also be supplemented with drawers and shelves for various accessories. The shelves can be made of metal, wood or other material.
Photos of various models of hanger racks on wheels:
Wooden hangers on wheels
The peak of popularity of wooden hangers occurred in the 20th century, but now they are gaining popularity again; they are often used in hallways and other rooms. The advantage is their decorative functions: they fit perfectly into the interior of a room made in both classical and modernist styles.
Modern industrially produced wooden hangers on wheels come in several types. They differ in purpose, size, appearance and type of wood from which they are made:
Suit hanger - usually of medium height, used for individual use. You can hang your jacket, trousers and other details of a business suit on it. It is intended for one person, so most often these hangers are placed in a bedroom, office or hotel room. The advantage of a hanger is that clothes are wrinkle-free during storage.
The same hanger can be supplemented with a shelf for shoes at the bottom:
- Hangers-racks on wheels - can be used in office spaces or hallways - they are more spacious and designed for the clothes of several people. Despite the existing huge amount of new and modern technologies and materials, floor hangers made from natural wood are still in fashion. Their use in the interior of the house will emphasize classical traditions.
- Children's floor hangers. Regardless of age, all children are very active and mobile all day long, so a place for changing clothes will be necessary in the children's room. And if at the same time the place is mobile, like a mobile hanger on wheels, then changing clothes becomes a fun and quick activity.
The size and height of such a hanger are selected according to the age and height of the child, for example, for a small child, a low “Baby” hanger is suitable, with convenient drawers at the bottom for books, handbags and toys. Children's hangers are always beautifully designed, have bright colors, and wheels make it easy to move such a thing to the right place in the room for the baby.
Children's wooden hanger on wheels
The reliability and stability of the children's hanger is ensured by its body design. It will be convenient that you can approach such a hanger from any side. Hangers are made of wood and coated with polyurethane varnish to avoid scratches during use.
For older children and teenagers' rooms, stand-up models are used that can accommodate more clothes hung on hangers.
Wooden hanger on wheels for girls
There are also small models designed specifically for hanging school uniforms: a dress or trousers on such a hanger will not wrinkle, as they are hung on special crossbars.
Wooden hanger on wheels for school uniform
Which is better: natural solid wood or its analogues made from glue and sawdust
As a rule, parts are made of boards and beams. Chipboard and MDF are inferior to them in decorative qualities.
Composite materials
Chipboards are glued and compressed chips, covered with an outer protective layer that imitates natural materials. It is its properties that determine how the prefabricated elements will look and how long they will last.
MDF is more durable. It is compressed under high pressure from fine sawdust mixed with an adhesive composition.
Coating options
- Lamination - a design is applied to special paper and impregnated with melamine resin, forming a hard, waterproof film. It is attached to the plate using hot pressing.
- Veneering is gluing a thin solid wood plate. After such processing, the workpieces are difficult to distinguish from real birch or ash.
- Laminating - gluing a hard decorative film under pressure. The method is used only for chipboard. The coating is short-lived and, with increased dampness, quickly loses its connection with the base. It is not suitable for making a wooden wall hanger for the hallway with your own hands. The film peels off at the cut points.
- Painting - used only for MDF. Provides a low level of protection, but has good decorative qualities.
The cut of slabs made of glue and sawdust looks very different from the front side. When making parts, the workpieces have to be cut. The ends of the boards and beams do not need to be hidden, but the cut of the particle board must be hidden. It's not just about his appearance. It is vulnerable to moisture and easily crumbles upon impact and friction. MDF is several times harder and more durable, but even the hardest panel will not be able to withstand loads for long without a protective film.
Original ideas and solutions for hangers in the interior
The product is easy to manufacture. The materials can be any objects, just look around. Let's consider several interesting options made from improvised materials:
- You can use old skis or sled runners as a base. All you need to do is paint them, attach hooks to them, and hang them on the wall.
- An original replacement for ordinary hooks would be hammers, chess pieces, wooden hangers cut in half, and unused cutlery items. The principle of creation is identical to hanging shelves. The only difference is that old hammers, with most of the handle cut off, and other listed items will be used as hooks.
- An alternative option is to use bicycle handlebars mounted on round wooden bases or plywood. They can be hung randomly on the wall.
- You can use old doors as a floor structure, adding shelves for shoes.
- Attach cut handles of rolling pins, deer antlers, paint brushes to the wall surface, and hang sling hooks from the ceiling.
Step-by-step instructions on how to make a hanger with your own hands
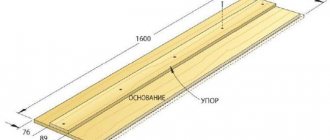
You can make any practical hanger for the hallway with your own hands. Let's look at how to mount a floor tripod that won't take up much space in a small hallway space. This model will require the following materials:
a wooden block with a cross-section of 15x10 cm, about 70 cm long, but more is fashionable. If there is no block, then you can use any metal support, for example, from a large Christmas tree
It is important that it is strong and stable and does not fall under the weight of clothing; wood post. You can purchase a shaped product on the construction market or make it yourself from a block or dry trunk of a small tree
The bark is removed from it and sanded until perfectly smooth; several metal hooks; several pieces of rubber, which should be glued to the crosspiece in places where it comes into contact with the floor to prevent scratching the surface; five-piece board, which will be screwed to the crosspiece to strengthen the structure.
Installation of the product begins with the arrangement of the cross, for this:
- cut the bars into the required lengths, sand them with sandpaper to remove any irregularities;
- connect the elements at right angles exactly in the middle and trace both bars with a pencil;
- Use a chisel to select half of each block, at the marks along the entire width;
- connect the segments, it is desirable that there is no backlash;
- prepare four pieces of board that will be attached to the stand and each leg of the cross to increase the rigidity and stability of the hanger.
Now you can start making the trunk on which the clothes will hang.
- Prepare the timber by sanding it in advance.
- Screw it to the crosspiece with long self-tapping screws from below.
- Attach support jibs to each leg and to the trunk.
- If you plan to place a lot of clothes on the hanger, you should strengthen the top. To do this, a small piece of timber is fixed on each side with a distance of 5-8 cm from the top.
- Now it’s time to start decorating the product: cover it with stain and clear varnish.
- As soon as the tripod hanger is dry, rubber pieces are glued to the crosspiece at the bottom using mounting adhesive, and the required number of hooks are secured at the top.
Experts give several useful recommendations that will greatly facilitate the assembly process:
- Before screwing the self-tapping screw into the wood, make a small recess with a drill. This will allow the fasteners to be screwed in flush, without microcracks appearing on the wood, which may expand during use;
- the diameter of the drill is selected in accordance with the cross-section of the screw head;
- to strengthen the fastening element, the recess is filled with wood glue before screwing in;
- After the rubber bands are glued to the bottom, make sure the structure is stable.
If there is not enough space for a tripod in the hallway, build a simple wall hanger from an edged board, for this:
- Prepare the piece of wood by sanding it smooth.
- Mark with a pencil the places where the hooks are attached - in a line or in a checkerboard pattern.
- Using a drill with a drill of the required diameter, make holes in the places where the marks were placed.
- Decorate the product to your liking. This can be decoupage, painting or staining, it all depends on the interior of the corridor.
- Secure the hooks to the board using bolts and nuts.
- The last step is to attach the finished horizontal wall hanger to the surface - this process is carried out using a hammer drill and dowel nails.
There is another option for making a clothing storage product made from pallets:
The pallet must be disassembled into separate elements, which are cleaned of dust and dirt and treated with sandpaper to a perfectly smooth surface.
- Take two pallets that will serve as a fastening base. Mark them. To do this, lay the lamellas perpendicular to the elements and outline them with a simple pencil.
- On the top of each element, arrange holes for hooks and secure them to pallets.
- Using wood screws of optimal length, screw separate planks onto the 2 main elements, at the same distance from each other.
- Decorate the surface of the hanger with stain or paint.
- Attach the finished product to the wall - the pallet hanger is ready.
Photo of a DIY floor hanger
Read here - DIY laptop stand: ideas for creating simple cooling models of stands for gaming and work laptops (110 photos + video)
Help the site, repost 
0
Wooden floor hanger
This vertically mounted tripod is easy to make using wooden sticks. It looks stylish and unconventional, but does not require any special skills to create. The hanger is great not only for clothes, but also for storing hats, accessories and handbags. The design can be equipped with hooks or secured with a hoop.
Tools and materials
To make a floor hanger you will need:
- Wooden sticks or slats about 190 cm high (easy to find at a hardware store).
- Jute or any other suitable rope. Leather cords or wire will also work.
- Dye. Aerosol works well, but you can use acrylic or just varnish - it depends on the style of the interior.
- Masking tape for two-color decoration.
Step-by-step instruction
Let's get started:
- We paint the supports in suitable colors. When painting in several shades, we use masking tape. If spray paint is used, other surfaces must be protected with film or paper. After drying, it is recommended to varnish the parts so that the wooden hanger lasts longer.
- We tie the parts tightly with rope.
- Carefully move the supports in different directions to create a stable “tripod”. The hanger for the hallway with your own hands is ready. The product takes up quite a lot of space, so it is more convenient to place it in a corner.
Wooden floor hanger
A classic hallway hanger made of wood requires some experience and mastery of the tool. If such experience is not enough, it is suggested that you order blanks from a carpentry shop and assemble them yourself.
Main details:
- tripod or crosspiece;
- vertical carrier base;
- crown (horns and hooks).
The crown can be made single, double or triple, if desired - with rotating elements.
Those who like something unusual will like the idea of a floor hanger in the shape of a tree. To do this, use a real dried trunk with branches extending beautifully to the sides. The excess will have to be cut off, the base painted and placed on a platform or cross.
You can also build a hanger for a children's room in the form of a tree. If there is no suitable material, it is proposed to cut out the base from plywood or laminated chipboard.
Children are usually very happy with this way of hanging clothes, handbags and backpacks. For more interesting ideas, look at the photos in the selection.
What materials are they made from?
A floor hanger is most often made of metal or wood. Both of these materials are strong, ductile, durable and relatively inexpensive. Some parts - plugs, parts of hooks - can be made of plastic.
Most often you can see floor hangers made of metal and wood
Plastic inserts are more often found on lower cost metal hangers. If the elements of the supporting structure are not made of plastic, this is not bad and you can buy such floor hangers without hesitation. If the elements of the supporting structure are made of plastic, it is better to look for another model.
Metal hangers
The largest selection of metal floor hangers. They are usually made from thin-walled round or square pipes. The metal used most often is black, coated with a protective coating. This can be paint (most often powder coating), nickel plating, chrome plating. In recent years, a new protective coating has appeared - plastic film (PVA). This is also a good option, since the film is impermeable to moisture and air. Such products are easy to care for, since the surface is smooth and without pores.
Several models of metal floor hangers
If the floor hanger will be used to place heavy winter clothes, when choosing, pay attention to the thickness of the metal. The minimum in this case is 1 mm
If the thickness of the pipe wall is not indicated in the product description, most likely the wall is very thin and suitable for light clothing. Indirect signs that will confirm your guesses are the weight of the product and the price.
Wooden
Wooden hangers can be carved from solid wood, or they can be prefabricated. The first option is much more expensive. Prefabricated ones are 2-3 times cheaper, but do not differ too much in appearance. The presence of joints in products of normal quality is hardly noticeable, so if you have a limited budget, it is quite possible to purchase economy class products.
There are different types of wooden floor hangers
Wooden floor hangers are well sanded and covered with a protective coating. Usually varnish or oil is used. The varnish creates a protective film on the surface, making it easy to care for such products. Wood oils do not create a protective film, but they protect no worse. When treated with oil, the structure of the wood is clearly visible - all the fibers, the pattern.
Racks and hangers for clothes on hangers made of pipes
Typically, this type takes up enough space and requires installation along a free wall. Before you make a floor hanger with your own hands, you need to decide on the type of support. This is usually an empty frame or shoe rack to which a frame structure made of pipes is attached.
The easiest way is to cut parts from plastic pipes and connect them with corner pieces. All that remains is to securely fasten it to the base - the frame for the trempel is ready.
Tip: To give the floor structure mobility, it is recommended to place it on casters or wheels, which are available in any hardware or furniture store.
If desired, you can give the structure solidity and respectability by covering it with copper, silver or gold-colored spray paint. This method is used to hide unattractive gray or green tints. It is better to leave white pipes in their original form - this is practical.
In exactly the same way, you can assemble a metal floor hanger from pipes with your own hands. Any scraps that do not require painting will do. It is best to use copper or aluminum, which will be suitable for chrome-plated couplings.
- Kitchen chairs: review of the best new products and modern design
Do-it-yourself furniture restoration: restoration ideas, affordable design options and a master class on updating old furniture (120 photos and videos)
How to make a chair with your own hands: a detailed description of production and simple instructions for building it yourself (100 photos + video)
On the floor or on the wall?
What has been said is already enough to make a choice, as long as there is enough floor space. However, let’s finally look at what makes a floor-type hallway hanger so attractive:
- Clothes hung on hangers dry faster and do not stretch; The collar and lining do not tear.
- On a hanger approx. wide. 1.5 m will fit a seasonal set of clothes for the whole family, which will save on closet space and space for it.
- A shoe rack is naturally attached to the floor hanger, which simplifies the work of equipping the hallway and saves its space.
- With the correct dimensions of the hanger, neither the wall from clothes nor the clothes against the wall are damaged.
- The mobility of the hanger does not interfere with rearranging furniture; After moving the hanger, there is no need to seal the mounting holes in the wall.
However, there are different floor hangers, and not all of them are most suitable for residential premises. For example, for order (from the old Russian “order” - office, office, office) floor lamp hangers, pos. 1-4 in Fig., hanging clothes on hangers is inconvenient. Due to the small support area, they are rolly, especially when loaded with wet winter clothes. To emphasize the functional inferiority of the product, such hangers are called hangers, and they are often sold under this name.
Types of floor hangers
The best option is the same theatrical wardrobe frame hanger, pos. 5
If space is generally tight in the hallway, then a wall hanger is still more suitable. Simple wall hanger-sconce, pos. 1 in Fig., is as compact as possible, but no more convenient than an orderly one, except that it won’t fall to one side from the next jacket. Hanger-shelf, pos. 2, will not fall off if attached properly, and hats/caps from it too, but the wall and clothes rub against each other.
Types of wall hangers
Wall hanger-panel, pos. 3, saves the wall, but not clothes. Leather items wear out the most on such hangers. Tanners jokingly advise: how can you tell a sheepskin coat made from full-grain leather from one made from reverse leather? The first one, with everyday use of the panel hanger, loses its appearance in 2 winters, and the second - in half a winter. Considering the cost of genuine leather products, this is no good. Therefore, wall hangers for expensive items are often equipped with soft upholstery, pos. 4. As for wall hangers with openwork panels, pos. 5, then in this case its meaning is only decorative: it does not protect either things or the wall.
Floor hangers with chest and banquette
There are also floor hangers-panels with a stand, for example. in the form of a cabinet, chest or chest, pos. 1 in Fig. on right. This is not the best option: someone will someday put something on the lid, and the clothes being removed from the hanger will knock it onto the floor. Much more practical are floor hangers-panels with a bench, pos. 2. A flower under the seat is a matter of taste for the owners, if only it survives there, but a shoe rack or a chest for accessories for its care is in the drawer of the banquette.
Clothes and keys
Regarding panel hangers, the amateur craftsman has an additional opportunity, namely: to equip such a side panel on the edge farthest from the front door. Perhaps not reaching the bottom, with a bevel or notch. Factory ones don’t do this: the hanger should be designed for clothes to stick out from the side. One sidewall almost does not interfere with this, but it is unknown how the hanger will sit with the buyer, and making right and left hangers is expensive.
What does this add-on provide? A place for a key holder, invisible from the threshold. There, on the side, there may be a dressing table or a cabinet, but the main thing is that the owner’s keys will not catch the eye of a casual visitor, and they are in plain sight, as criminologists say, a serious factor in spontaneous illegal actions, without which, i.e. temptation, a visit from a not entirely trustworthy subject would have turned out well for both the hosts and him. You can, of course, make a luxuriously designed key holder with a secret lock, but this is a lot of work and costs for materials. Otherwise, a simple board with hooks will do. Or just hooks screwed to the side of the outside of the storage section.
Types of hangers in the hallway
The stylish design of the hallway helps create a harmonious atmosphere in the house. A hanger will help you make final adjustments. Depending on its location in the room, the following types are distinguished:
- Floor-standing
. They are products with horizontal or vertical rods. A clothes rack can be made of different materials and designs. - Wall mounted
. They look like crossbars with hooks. They are placed on the wall, which helps save space and at the same time look very organic. A wall-mounted hallway hanger with a shoe rack can additionally be combined with shelves for hats and a mirror. - Ceiling
. Hangers are attached to the ceiling. For products, it is important to limit the weight of the clothing that is planned to be placed on it. - Mobile
. They are portable and removable. Used during short-term reception of guests.
Wall-mounted clothes hanger in the hallway
The most popular type today. A simple model can be represented by individual hooks arranged in different ways or a panel. A wall hanger with a shelf in the hallway will help you fit a lot of clothes and at the same time save space in the room. This is the most successful option for small hallways. It is often complemented by the following accessories: a mirror, shelves, a shoe cabinet or a bench. The hanger is made from different materials. The color of the product is selected in accordance with the style created in the hallway.
The wall hanger in the hallway has the following advantages:
- reasonable cost;
- compactness;
- unpretentiousness;
- model diversity;
- clothes are naturally ventilated.
Among the disadvantages are:
- inability to move the hanger;
- not all models can withstand heavy loads;
- It is recommended to mount it on a solid wall.
The variety of models can be divided into the following groups:
- coat hooks are arranged in one row
; - hooks placed in two rows
; - with additional storage system
; - equipped with top shelf
.
Floor hanger in the hallway
The variety of models of this type is amazing. Based on design features, a floor-mounted clothes hanger in a hallway can be represented by the following options:
- regular hanger
; - "P" design
; - tripod hanger
; - on one support
; - hanger seat
.
Metal or types of wood are often used to make them. Some floor products are presented as wrought iron hangers in the hallway, which are additionally equipped with a lower shelf for placing bags, hooks and baskets for umbrellas, or even a small cabinet for shoes. The advantages of this type include:
- no installation and mobility;
- possibility of placing long items;
- using the top for hats.
A floor hanger for clothes in the hallway also has the following disadvantages:
- bulkiness;
- instability;
- difficult access to things.
Wall hanger
A wall hanger in the hallway is a specific shield, most often made of wood. There are hooks on it.
Drawing of a wall hanger.
You can make it solid or in the form of a lattice. The latter option is more convenient because it uses less material and also weighs less than a solid one.
Progress:
- Two parallel horizontal boards are attached to the wall using dowels.
- After this, attach vertical boards to them, to which you then need to attach hooks.
- The size of the hanger can be varied, it all depends on the size of the hallway. The hanger can be decorated with decorative elements or the surface can be covered with a special solution.
- If desired, a metal corner is installed on top, which will serve as a shelf for hats and caps.
- If the design is provided for the entire length of the wall, then in this case an original bottom shelf for shoes or some things will look relevant.
Wooden floor clothes rack
Wood is preferred by most craftsmen; you can make anything from it, which is why wood is so common in furniture products.
The hanger, shaped like the trunk and branches of a tree, looks very impressive. It is functional, saves space, and is suitable for both large and small rooms. You need to stock up:
- two sheets of plywood measuring 70×170, thickness 18 mm;
- electric jigsaw;
- furniture glue;
- sandpaper;
- pencil.
To get the best look for the finished structure, you need to make a drawing; the drawing should be applied directly to the plywood sheet. To avoid drawing it twice, simply fold 2 pieces of material together and cut them along the contour with a jigsaw. Work slowly because the parts must be the same. You need to make slits in the finished two parts. In one we make it in the middle from top to bottom. The width should be equal to the thickness of the plywood sheet. On the other workpiece it’s exactly the same, only from bottom to top. Sand the cut edges well with sandpaper, lubricate the slots with furniture glue, and place the parts on top of each other. Lock them down. After this, you can paint the finished product and decorate it as you see fit.
For someone who values creativity and bold design solutions, the idea of creating a hanger from a whole tree, or rather a trunk, will seem interesting. To implement your plan, you will have to find a suitable barrel. It should be completely dry, but it would be better if the tree is deciduous, clean it completely of bark and lower branches, leaving only the knots at a distance of a meter from the floor. Once the wood is cleaned and all the branches have been trimmed, you can begin to make the stand. The thicker it is, the more stable the entire structure will be. The shape of the stand can be very different, it all depends on your imagination, and you can attach the stand to it using self-tapping screws.