Today, almost everything can be purchased ready-made. However, there are still people who are interested in the time-tested experience of their grandfathers. So I decided to find out for myself whether it is possible to make sealant with my own hands at home. After all, there were times when the counters were not bursting with a variety of building materials. And tightness has always been necessary. This is what my search led to.
Source glotr.uz
Share
Where is silicone used?
This material is used in almost all spheres of human life - in construction, everyday life, medicine and production. Silicone has earned popularity due to its unique and valuable qualities that are absent from analogues of this substance.
Silicone is capable of reducing and increasing the adhesion process , as well as imparting hydrophobic properties to the target object. This universal material is able to maintain its basic parameters at extremely high, low temperatures and in conditions of high humidity. In addition, silicones have dielectric characteristics, bioinertness, a high degree of elasticity, are durable and environmentally friendly.
On an industrial scale, silicone liquids and emulsions based on them are used as anti-adhesive lubricants for large heavy molds, the production of water-repellent liquids, greases, special oils, shock-absorbing, coolants, coolants, sealants and dielectric compounds. Particularly popular are defoamers made on the basis of silicone mixtures.
This material is used to produce silicone alkides and silicone polyesters for various coatings, which must be particularly durable and resistant. It follows that different types of gaskets, bushings, rings, cuffs, plugs and other parts can be used at temperatures from minus 60°C to plus 200°C.
Another property of silicone is resistance to substances such as ozone, radiation, sea water, ultraviolet radiation, boiling water, alcohol, acid solutions, alkalis, mineral oils, various fuels and electrical discharges.
How to make silicone at home
First way
To prepare silicone rubber (polydiethylsiloxane), you will need liquid glass and ethyl alcohol. Take a plastic container into which the components are poured in equal proportions and carefully mixed with any instrument. When the mixture thickens, you need to knead it into plasticine by kneading it with your hands.
Next, you can sculpt the necessary shapes from the silicone mass, which are left to harden for a while until the product becomes solid.
Second way
Needed:
- 150 g white spirit;
- 1 drop of acrylic paint;
- 3 drops of liquid glycerin;
- 30 g silicone sealant.
To make silicone, you need to immerse the sealant in a container, add paint, glycerin and white spirit. The solution must be mixed until a homogeneous mass is obtained. You can work with this solution for no more than five hours, since after this time it hardens.
Third way
You need to take equal amounts of silicone sealant and potato starch. Stir the mixture for about 10 minutes until the silicone begins to easily come off your hands, then you can begin making the required shape.
Fourth method
Take gelatin and glycerin in equal proportions and mix thoroughly. Then the solution must be heated in a water bath for about 10 minutes, stirring constantly. It is important to prevent the gelatin from boiling, otherwise a strong unpleasant odor may appear.
Fifth method
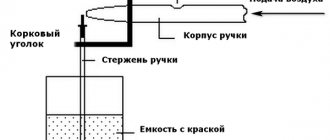
It is used to make silicone for DIY molds. To do this, you need to take a shape slightly larger than the object being copied. A little silicone is poured into the bottom of the mold and left until it hardens - this is the base of the object.
The thickness of the base should be one centimeter or more so that the “house rubber” securely wraps the object on all sides. If the mold comes out thin, then it will quickly tear when removing the prototype or will not hold on at all.
The prototype is then dipped into a container of gelatin to get rid of any air bubbles, and then quickly transferred to the bottom of the mold to stick. Then the mold must be completely filled with silicone. Homemade resin from the fourth method, which hardens very quickly, works well. Immediately after cooling, the mold must be disassembled, an incision made and the prototype carefully removed.
At the last stage, you will need to mix and pour epoxy resin into the mold. It will be difficult to remove a frozen casting, so you will need to completely break the silicone.
What you need to know before casting
To work with silicone you will need a high-quality mold. Experienced fishermen make them themselves, but when taking the first steps in casting, you can order a mold.
Forms come from the following materials:
- Metal. As a rule, metal structures are produced on milling machines, so it is impossible to make them at home. Their main feature is their long service life. The metal practically does not wear out, withstands high temperatures and quickly forms silicone.
- Stone. Like the previous material, stone is durable, but its main problem, again, is heavy production.
- Gypsum. This material is malleable and is used by most anglers who cast. You can make a plaster mold yourself, having several baits of the same type.
- Alabaster. A denser material than gypsum. Alabaster does not crumble and has a long wear life. You can also make a mold for casting from alabaster with your own hands.
- Organic glass. Thanks to its transparent structure, plexiglass has high precision in repeating its shape. At any moment, the fisherman can check whether one or another preparation has been spilled to the end. However, over time the form becomes cloudy.
- Sealant. The lightest form used for homemade products. The material is of medium strength and must be varnished periodically.
Read: Proper storage of silicone baits
There are two types of designs: one-sided and two-sided. The more contours for baits in the mold, the faster the casting goes. The design should also have air ducts through which silicone is poured, evaporation and excess material escape. The walls of the product fit tightly and are often reinforced with additional ties. Thanks to this, the nozzles are complete.
If you know how to cast a mold yourself, you can not copy other people’s baits, but create new ones. This approach gives an advantage over other fishermen, whose choice is limited by the manufacturer’s imagination.
Getting rid of silicone on clothes
Silicone sealants are widely used in repairs and construction. But careless handling of this substance can lead to the formation of persistent stains on the fabric, and to get rid of them you will have to use special cleaners or improvised means.
- Acid-silicone sealant has a characteristic smell of vinegar, and its removal is carried out using a 70% acetic acid solution . When removing a stain from such silicone, you need to take precautions: wear glasses, strong rubber gloves and a respirator, since acetic acid negatively affects the eyes, skin of the hand and the respiratory tract. To clean the stain you need to apply it liberally, leave it for 30 minutes and remove the silicone with a rag.
- Alcohol-based silicone neutral sealant can be easily removed using alcohol-containing liquids . You can take medical, technical, denatured alcohol or vodka and apply it to the dirty area, and then remove the stain with a brush.
- Oxime, amine or amide silicone sealant can be removed using white spirit, benzine, acetone or solvent . The liquid is applied to the sponge, then to the stain and left for 30 minutes until the silicone dissolves. If necessary, the treatment can be repeated. Then wash the fabric as usual with washing powder.
There are also special compositions for cleaning the surface of fabrics from silicone. A remover under the trade name “Penta-840” or ANTISIL is ideal. It is necessary to carefully read the attached instructions before using any product.
In addition, the silicone stain can be cleaned mechanically using a plastic scraper. To do this, the fabric is stretched onto a flat surface and the stain is carefully scraped off. Residues can be removed using one of the methods listed above.
Important! You should only work with silicone sealants in thick cotton clothing, since it will not be possible to remove its residues from delicate items without the help of dry cleaning specialists!
Materials and equipment
Two-component liquid silicone
What exactly and where I bought liquid silicone I described last time.
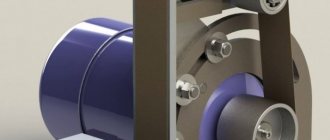
Silicone casting mold
The mold was custom-made for me from aluminum, but for simple and home tasks you can make it yourself from plaster.
I haven’t described this process yet, so that will be a topic for another post. Here is an example of a plaster mold that we made ourselves at the very beginning:
And this is the industrial form:
Mixing container
It is better to use transparent containers with measuring marks. But in order not to spoil the container, I took a shampoo bottle and cut off the top. And since the bottle is not transparent, additional steps were needed to determine the filling level. But these are minor things.
Stirring stick
Silicone consists of two components that need to be mixed together in equal proportions. Chinese chopsticks are great for mixing, which you can grab on the way home from any fast food with rolls.
Funnel
As a rule, casting molds have a small hole for pouring silicone into them. Therefore, a funnel will come in handy, which can be made from glossy paper and secured on top with tape.
Gloves
When working I used regular latex gloves. But any will do, as long as they are comfortable.
Degreaser
The mold into which the silicone will be poured must be cleaned and degreased.
The first time I didn’t do this, the mold ended up with small potholes from hard debris, and in a couple of places the silicone stuck quite strongly to the mold. For cleaning, I used a cleaner purchased at the construction market. Unfortunately, I forgot to take a photo of him. But you can use alcohol or WB.
What else might be useful?
Graphite grease
The silicone supplier sells a special graphite lubricant in spray form. It is applied to the mold before pouring and this guarantees easy removal of the finished silicone part from the mold. But I've managed without it for now.
Vacuum chamber
You can also use a centrifugal or vacuum chamber to remove air bubbles from the silicone. But for my purpose this was not so critical, and there were almost no bubbles.
Removing silicone from work surfaces
Silicone is a product that helps glue surfaces and seal seams. This substance prevents the penetration of air and moisture. Sealants with antibacterial composition are used in bathrooms, cars, construction, aquarium hobbyists, etc. The sealant is not easy to remove from the surface, but it is possible.
The sealant is made on the basis of solvents, which give this composition a pungent odor. In addition to the smell, solvents give silicone elasticity and help it adhere better to surfaces.
Therefore, chemicals that are sold in stores are often used to remove silicone.
But using traditional methods , you can remove silicone from any surface, for which you use white spirit, rags, blades and detergents.
To remove silicone from the work surface, you must first moisten it with white spirit using a rag. After about 60 seconds, the silicone will have a jelly-like consistency and can be easily cleaned with a blade. Then this area should be washed with detergent and wiped dry with a rag.
Silicone can also be removed mechanically, using a knife and pumice. But this option is suitable for surfaces that are not susceptible to scratches and chips.