How to replace a circular saw bearing yourself
03/09/2019 mr.Podshipnik 0 Comment
HOME »
- Power Tools » Replacing a Circular Saw Bearing
»
To find out how to replace a circular bearing on your own, without turning to specialists, read this article. Here I will tell you in detail how to do this.
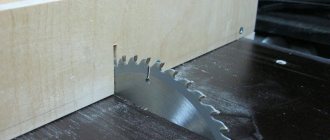
Using such a convenient, practical tool as a circular saw, you can make any wooden blanks with the required length and width. This is a fairly reliable tool, but it also breaks sometimes.
Do-it-yourself shaft for a circular saw without a lathe
And I also ask you all for one piece of advice: on a jointer, one half of the table is blank, and the other is adjustable, the blank half in relation to the knives should be set at what level?
There are many ways, many from the Internet I use myself, but everything is individual to the machine: 1. Level the tables and place a magnet on top; the knife will rise evenly along the plane; all that remains is to tighten the screws; I tried it; there is a drawback when tightening the screws; the key sticks to the screws and interferes with tightening.
A similar option to the first one, but at the bottom of the shaft, 2 holes are drilled at the edges and a spring is inserted into them. knife on top. glass on top, tighten the screws.
3 I have a notebook, here’s a quote from it that might be useful: beer:
Everything is very simple. We take any block (you can use a bead of 30.40 centimes). We make a vertical mark on the side of something and place it on the table. Now we mark this mark on the table and begin to rotate the shaft. The knife approaches the block, touches it, lifts it, drags it some distance, lowers it and moves away. We mark the new position of the mark on the table. And now we do the same with other knives, ensuring that the marks match. Then use the same method to set the other end of the knives. ALL. The method can be modified by introducing different rulers, etc. The good thing about this principle is that it turns fractions of a millimeter into centimeters (as if multiplying them), allowing you to achieve the highest accuracy without any micrometers. Suitable for all planes and very simple. One grandfather showed it to me about 30 years ago, I’ve been using it ever since, thanks to him! Yes, I forgot to add, first we set the maximum planing depth, and then reduce the depth if necessary.
scromniy I also use the same method, and for about 25 years now. Suitable for any machines from industrial jointers to hand planes. Only on the block two notes are initially made with a distance of 5mm. Place the block on the front table so that the first mark is on the edge of the table. We set the table to zero and adjust it so that the knives advance the block to the second mark, i.e. by 5mm. With this adjustment at zero, the knives will “lick” the material. The ruler adjustment works fine. You set it to 2 mm. 2 mm and removes. This method was taught to me by my grandfather, who worked as a carpenter all his life.
In my stationary machine, the knives rest on springs. A sheet of 8 mm glass the width of the knives with ground ends is placed on the back table and pressed by hand, after which the shaft is rotated by the pulley. (The risks of glass laying and maximum blade extension are marked with a marker). The knives rise flush with the table automatically and are then secured with chipbreakers. 2. In a manual jointer (Rebir), the knives are adjusted with screws, which is less convenient; you have to lay flat aluminum. the bar on the back sole and use screws to catch the zero rise of the bar with knives when turning the drum. There is a desire to also seal (caulk?) the springs into the groove, but I still can’t get around to it.
I display my knives with the help of a large magnet, and it’s better if there are two of them, put the magnet on the back plate, loosen the screws of the knife, the knife automatically sticks to the magnet, all you have to do is carefully clamp the knives, that’s all.
Using 2 wooden blocks with magnets glued to them. Place on the table, the outermost magnet hangs over the shaft, loosen the screws and the knife will become magnetized. Tighten the screws. And do the rest. Preparation - 2 blocks, magnets (preferably 3 pieces each) put on a flat surface surface according to the size of the blocks (150-200 mm). It is better to glue with liquid nails, they will choose the gap on the magnets if they are different. Place the block on top. Let dry and use. Enough for a long time!
Why you shouldn’t make your own shaft
The main reason is that manufacturing requires professional precision, and it is better to entrust this matter to a turner. The slightest inaccuracy or deviation in the parameters can lead to breakdown of both the blade itself and the drive.
The shaft is mounted with self-aligning ball bearings. Car hubs are also suitable.
It is better to install a factory disk than to make it yourself from sheet metal, as this can upset the balancing. This is dangerous because it can break during operation, and the fragments will simply fly towards you. 10 savings are not worth the risk.
The classic design provides that the engine is placed below on the frame, and the traction is transmitted to the shaft using a belt drive. A V-belt with automotive pulleys is ideal for it. If you install pulleys of different sizes, then by swapping them you can adjust the speed.
For example, if the drive pulley is wide and the receiving pulley is narrow, then the disk will rotate faster, and if they are swapped, the rotation speed will decrease significantly. Adjusting the speed may be necessary to use different blade shapes or to cut wood of varying degrees of hardness.
It is better not to use a gear transmission in a circular machine. If the disk suddenly jams, the belt will simply begin to slide, which is safe for the engine, but the entire drive will fail along with the gears.
Power is supplied through a switch, which is usually placed on the side at the top of the frame to make it easier to reach by hand. The higher the power, the more dangerous the spark that appears when switching the network, therefore you cannot install a regular push-button station without a contactor.
What type of machine is needed for the socket?
The rating is calculated in the same way as a contactor, rounded up. Every electric motor has “jumps” in the load at the start, so you need a class “C” motor with an average response threshold. It can withstand inrush currents exceeding the rated current by 5-7 times.
Turning without a lathe is REAL!!!
Its value is indicated in the technical specifications on the case or data sheet (if it still exists). If Istart/In. 5, then it is better to take class “D”, otherwise the machine may react to high starting currents as if it were a short circuit.
If the saw operates with a frequency switch or soft starter (without starting currents), then it is advisable to set the class “B”. It has the lowest shutdown threshold and delay before operation.
The installation location depends on the specific application. If this is a home sawmill, and you know for sure that the circular saw will be connected to only one outlet, then you can put the AB on this line in the electrical room. In another case, you can place it directly on the frame near the switch, only in a sealed shield not lower than IP44.
READ Do-It-Yourself Garden Shredder From a Circular Circular
When choosing a machine, consider the operating temperature range, as not all are adapted to the extremely low temperatures in the cold months.
If the circuit breaker protects the network, then the RCD will protect you from dangerous phase leaks onto the frame or housing.
How and how to connect the circular
The power is unlikely to exceed 4 kW, so to connect, take a regular VVG or PVS cable with a cross-section of 1mm2 or 1.5mm2. Calculate the length so that there is 40-50 cm from the engine to the control drive, and about 120-150 cm for the connection cord. 200 cm should be enough.
There is no point in connecting a cord that is too long, as it will cause inconvenience when rearranging. In this case, it is better to take an extension cord. If the circular is to be used indoors, calculate the length so that it is sufficient for the outlet.
The plug must be a three-prong (grounded) type, otherwise leakage from the case to the frame is possible and you risk getting a shock. For outdoor use, choose one with IP44, as it is better protected from moisture and will last longer.
In addition to the plug, the outlet must also be grounded so that in the event of a leak, the current flows safely to the ground.
The connection diagram is as simple as possible: network - control panel (contactor, electrothermal relay, push-button station) - electric motor. The circular saw operates under non-linear load conditions, and in order to last as long as possible, you will need a motor protection relay.
Which “engine” is suitable for a circular machine?
Household circular saws are single-phase, so in this case it is also better to take a 220V motor. The fact is that it is easier to find, and there will be no problems with connection, since single-phase input is available in all houses, but three-phase is not.
If you have a 380 V input, you can also supply a three-phase electric motor. It is more economical and has a longer service life. But to connect it to a single-phase network, you will need phase-shifting and starting capacitors, and there will be significant power losses.
The rating of a single-phase electric motor should be selected based on the diameter of the disk used:
It is better to take with a reserve, from 1 kW, since the 170 mm blade is limited in cutting depth. It is only a third of the diameter. Therefore, with a low-power drive you will not be able to saw logs thicker than 60 mm.
To reduce vibration levels, the electric motor should be placed on a vibration-isolating pad. Vibration-damping material for a car is best suited for this; it is inexpensive and effective.
The classic stationary circular saw comes with a plane for trimming wood and cutting knots. You can make a homemade one by installing the desired shaft. Moreover, it is better to install the factory one; it is easy to find on the Internet.
What is the best material to make a bed from?
Considering that the saw will emit quite noticeable vibration during operation, it is better to make the frame from metal. The tree will quickly become loose and the structure will lose its initial strength.
Shaft for bearing without lathe.
A channel or corners of size from 25×25 mm to 50×50mm are optimal. Thinner ones may not withstand the weight load, while thicker ones will make the structure too weighty, and they are more difficult to connect.
The frame should easily support a weight of 50 kg. On the Internet you can easily find drawings of a homemade frame. Choose any option you like or make it yourself.
It is better to weld structural elements to each other than to connect them with bolts, since systematic vibrations will cause the bolts to unwind.
It is better to make the tabletop from solid wood 30-50 mm thick or sheet metal. Since it is secured with bolts, through holes of the appropriate diameter must first be made on the frame. It is better to take thick threaded bolts with a diameter of 10 mm.
For even cutting, you can make a side stop parallel to the placement of the disk. A wooden block or metal corner is suitable for this. It can be fixed with bolts, so you need to make holes for several positions to adjust the width of the material being cut. You can also fix it with regular clamps.
Having decided on the material and designed the frame, we move on to choosing an engine.
Algorithm for assembling a homemade circular saw
The assembly of a woodworking machine according to the drawing given earlier is carried out in the following sequence:
- a rectangular frame is made from the corners;
- four legs are welded to it at the corners of the required height;
- at a height of about 200 mm from their lower edge, they make a binding from the corners;
- a shaft is mounted on the upper frame;
- fix the driven pulley on one side and the disk on the other;
- a table with a lifting mechanism is made and attached to the frame;
- on the lower frame they make a platform from corners or sheet metal for the electric motor;
- the drive pulley is fixed on the motor shaft;
- put the belt on the pulleys;
- On and off buttons and an electrical panel are mounted on the side panel of the unit;
- using wires of a suitable cross-section, connect the elements of the electrical circuit of the equipment (motor, buttons, protection);
- supply power to the machine from a stationary network.
How to calculate the trigger mechanism
For a motor from 1 kW it is recommended to install a contactor, and for 1.5 kW and above it is simply necessary. Conventional push-button posts are not designed for such a load, and at best they will simply break, and at worst they will lead to a short circuit or other dangerous accident.
The contactor is designed in such a way that, when a low-current signal is applied, it is safe to switch a line with a high load. Based on the fact that its rating is indicated in current (amps), the engine power also needs to be reduced to this parameter.
For single-phase “engines”, the formula I = P/U is used, where P is the rated power (W), and U is the network voltage (V). If you have a 1.5 kW circular saw, it will need a 7A contactor: 1,500W / 220V = 6.8A.
The result obtained is rounded up to the nominal value. In this case, this is 7A. Considering that this denomination is rare, you can take the more popular 9A instead. The main thing is not lower, otherwise it will quickly wear out and fail. Based on detailed parameters, you can select a contactor in the same AxiomPlus, which I mentioned at the beginning.
With a three-phase connection, it is not advisable to use a contactor, since the current is less for the same power. The smallest common rating for 380V is 9A. Based on the formula P = I × U × cosφ, where cosφ is the power factor (default is 1.7), at 9A, the load on the network will be: 9A × 380V × 1.7 = 5,814W (5.8kW).
This is too powerful a drive for a household circular saw. Therefore, if you are going to put the saw on a “three-phase”, a regular push-button station is quite enough.
When choosing a contactor or push-button station, pay attention to the degree of dust and moisture protection. If you are going to keep the saw indoors and only temporarily use it outside, then IP54 is enough. If it will be outdoors for a long time, and there is a possibility of exposure to rain, then take IP65 or higher. This is complete protection against dust pollution and water splashes flying from all sides.
Even if all the electrics are sealed, still cover them from the rain with film. Moisture not only can close the contacts, but also contributes to the occurrence and spread of metal corrosion.
It is better to take a contactor in a housing with a thermal relay that protects the windings on the coil from burning out. Otherwise, you will need a separate electrothermal relay. Usually it comes as an accessory for a contactor, but in a circular machine it is simply necessary.
READ How to Cut a Neodymium Magnet at Home
If the electric motor operates above its power limit or the saw suddenly jams, the temperature of the current-carrying elements begins to rise sharply. The bimetallic plate in the thermal relay is deformed and triggers a mechanism that breaks the circuit. As a result, the voltage disappears in a split second and the coil winding remains intact.
In addition to the adjustment range, electrothermal relays differ in response time. In this case, the optimal delay before operation is up to 3 s, otherwise the winding will have time to burn out. Given the high load, the main thing is to take the appropriate type of wire with sufficient cross-section.
Important details
Diagram of a circular saw.
In the case of the shaft, it is worth using high-quality steel. We are talking about a material that has the numbers 45 in its name, of course. We are talking about steel. In your work, you must be guided by the corresponding GOST, which describes the location of the shafts and seating surfaces. On the saw blade mounting side, the clamping inner sleeve, bearings and the saw blade itself sit on one surface.
As a result of the fact that there are many parts, each of them will have its own fitting size, which is indicated in the drawing. It must be made first in accordance with the dimensions that this tool has. You will have to focus on them when creating the circular shaft. All tolerances and fits must be indicated on the drawing. A caliper is used for accurate measurements. You can also prepare gauges with appropriate sizes in advance. In private home conditions, it is quite difficult to find them, so often everything is limited only to a caliper.
How to connect the motor?
Connecting the motor is the most important stage of work; if you cannot connect the motor from the washing machine correctly, then a circular machine with your own hands. The whole difficulty is not even in the connection, but in achieving stable adjustment of the motor speed; without this, the circular saw will not work normally - the disk will tear the lumber.
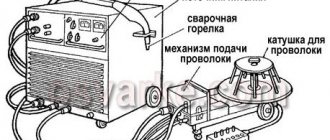
The manufacturer installs a so-called tachometer or speed control sensor on the engine of a washing machine. But the problem is that the operation of this sensor is controlled by the electronic module of the washing machine; you cannot install such a module on a circular machine , so you will have to think about a device that will control the engine speed. Details on how to regulate the engine speed of a washing machine are described in the article of the same name.
Moving parts
Having successfully connected the motor from an automatic washing machine with your own hands, and checked how it picks up and slows down, you can start making our circular machine . The diagram below shows a simplified drawing of a homemade circular saw made using a washing machine engine.
The diagram can be further simplified by starting from the bearing assembly. For household circulars this is quite acceptable.
For now, we will be interested only in the moving elements of the circular, which will bear the main load, namely:
- circular saw shaft;
- automatic washing machine motor shaft;
- drive belt;
- automatic washing machine motor pulley;
- circular saw shaft pulley.
The drive mechanism should operate as follows. The motor from the washing machine drives a shaft with a small pulley pressed onto it. A small pulley is fitted with a drive belt, which transmits speed to a large pulley, which is mounted on a shaft that drives the circular saw. At first glance, everything seems simple, but when you make a circular , a lot of subtle difficulties emerge that have to be resolved.
- The small pulley must be sharpened with your own hands, making 3-4 transverse grooves on it, so that the belt clings to them and does not slip.
- The drive belt does not have to be taken from an automatic washing machine; you can take a similar part from any other equipment, as long as the belt is strong and has serrations.
- On a large pulley, you will have to weld a disc of slightly larger diameter on the edge with your own hands to form a kind of protrusion that will prevent the drive belt from slipping off during operation. On a large pulley, it is not necessary to grind the serrations; the clutch with the belt will be normal without this.
- The shaft on which the circular saw will be held, as well as the nut and washer, must be reliable so that, firstly, the circular saw does not deform at high speeds, and secondly, so that the circular saw does not jump out and cause harm to the person working with the circular saw. . It is better to take a ready-made shaft, washers and a nut from a standard factory circular.
The described mechanism is designed for a three-hundredth disk. There are many skeptics who say that the motor of a washing machine will not pull such a disk, and that at some point it will stop during operation, and the saw will get stuck in the board. Our experts respond to such skeptics as follows.
In the future, do not overload your homemade circular machine with work, and most importantly, do not let the engine run for a long time without load.
We disassemble the circular saw ourselves
In order to successfully repair and replace faulty parts in a circular saw, you will need to disassemble this device. This could be a complete disassembly, or perhaps you can get away with only a partial disassembly.
We will look at what needs to be done to completely disassemble the circular saw.
Here are detailed instructions on how to do this.
1. The screws that adjust the angle and depth, located on top of the base plate (sole), must be unscrewed.
2. The gear shaft contains a locking button. At the same time, press it and unscrew the bolt that holds the saw blade. When you move the protection cover from the bottom, you can remove the circular disk.
3.Next comes the removal of the support sole. In order to do this, you need to remove the fasteners from below.
4.Using two screwdrivers at the same time, remove the rod retaining ring. The sole rotates on it and changes the angle. Using the same screwdriver, you can move the sole away from the body and remove it.
5. Your next action will be to unscrew all the fastening screws, both on the first protective skin and on the second one, which moves. Now you can easily separate the electric saw and the two protection covers.
6.Using an open-end wrench, remove the bolt that holds the riving knife. Now the rod is removed and all its components are disconnected.
7.The saw gearbox is held on by two screws. To remove it, you need to unscrew the screws.
We are done with disassembling the mechanical part.
Below is what you need to do to dismantle the electrical component of this mechanism:
- the engine cover is removed along with all fasteners; You will need to disconnect the electric brushes and motor. To avoid confusion as to where each brush was located, mark the locations using a marker;
- The engine housing assembly and the gearbox assembly must be disconnected, also removing all fasteners;
- Unscrew all fasteners in the handle of the power tool. First, remove the rubber pad using a screwdriver;
- when you remove half of the handle, you will have access to the trigger button.
You have completely completed disassembling the circular saw yourself.
Circular from a washing machine engine
Such a useful thing as a working motor from an automatic washing machine should not be lying around idle in your garage.
Any self-respecting DIYer's hands will itch at the sight of such a promising detail.
In this article we will tell you how to use such an engine to make a very good light and compact circular saw , on which you can easily unroll the fiftieth board or even a 10x10 block.
Attention! Assembling a circular saw with your own hands and its further use can be dangerous! Therefore, do not take on this business if you are not confident in your skills and do not follow safety rules! This article is not a call to action. And remember, all responsibility for what you do lies only with you!
Bed and frame
Having collected the parts for the moving parts of the circular, all we have to do is make a reliable frame and stand for our circular. In principle, for the frame of a household circular saw, you can take the most common material at hand, for example, a piece of thick flat slate. Cutting a rectangle out of it and cutting a hole for a circular saw costs nothing. But we are supporters of capital structures, so we prefer to take a 3 mm thick sheet of metal for the circular frame, and a 30 mm metal corner for the frame.
The figure above clearly shows what elements the frame of a homemade circular saw consists of. In this case, it is also welded with your own hands, only the supports are not a static metal corner, but special homemade stands. The stand is made of two metal pipes of different diameters, which are inserted into each other, so the table frame can be adjusted in height.
Experts insist on a welded frame design for the circular saw, since vibration has a bad effect on static fastenings created with bolts. Although if you don’t have welding, as a last resort, you can make a frame from the corners, fastening them together with bolts and nuts. It is also better to weld the bed to the frame.
So, it is quite possible to make a circular machine from a washing machine engine with your own hands if you have experience in making various homemade products. Try it yourself and perhaps you will gain some experience that you can later share with our readers. Good luck!
How to make a circular saw with your own hands: preparatory stages of work
Before putting an end to the question of the advisability of making a circular saw yourself, you need to get acquainted with several similar devices firsthand and watch videos on the Internet. During observations and inspections, special attention should be paid to the main elements, parts, and methods of fastening. To understand how to make a circular , you need at least theoretical knowledge.
The manufacturing process can be implemented in two ways:
- a set of elements for the future design is available, you just need to complete the assembly;
- The components of the circular must be purchased.
In the case of the latter option, the task becomes somewhat more complicated, since parts and mechanisms are most often purchased in different places, but they must comply with technical and functional characteristics.
READ Do-it-yourself walk-behind tractor on 4 wheels
Scheme for making a circular saw with your own hands
Helpful advice! It is necessary to purchase elements for the future design of the circular only after a detailed installation drawing has been developed.
Without a drawing, it is impossible to take into account the dimensions of the elements and select a complete set. Quite often, this stage (drawing work) is omitted by home craftsmen due to lack of execution skills. There is no need to do this, since it is quite enough to draw a saw. At a minimum, this will allow you to visualize the future unit. Imagining what the end result will be is extremely important.
Only after you have a drawing or sketch and all the necessary elements, you can proceed directly to the assembly process.
Manual circular as the basis of a homemade design
One of the most popular tools on the basis of which homemade saw structures are created at home is a circular saw (hand-held circular saw). This electric mechanism, using a round disk, makes straight cuts on wood materials, as well as on soft and thin metal. The tool is quite simple, it has all the basic elements that allow you to make a circular saw .
The circular saw consists of the following parts:
- electric motor;
- one or two handles;
- protective casing;
A manual circular saw makes straight cuts on wood materials, as well as on soft and thin metal
Manual circular saws stand out from other similar tools due to some technical features. For example, the depth and angle of cutting can be changed directly during work. Plunge-cut saws provide special capabilities. They can make isolated fragmentary cuts of the required size.
The accuracy and quality of sawing with a manual circular saw depend on the number of teeth on the disk and the angle of their sharpening. With a large number of teeth, the quality is higher, but productivity is slightly reduced.
When making a circular saw with your own hands from a hand-held circular saw, you need to pay special attention to the engine power. This is very important if you intend to perform significant amounts of work. The total weight of the saw also matters. Lightweight models are suitable for occasional sawing.
It is permissible to change the depth and angle of the cut directly during operation of the circular saw
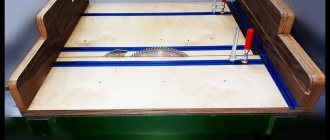
Making a carriage for a circular saw with your own hands
The functionality and quality performance of a stationary circular saw is greatly influenced by the availability of accessories. One of these is the carriage. It’s not difficult to do it at home, but trimming and sawing the material at an angle of 45° will be much easier.
You can make this device for a circular saw from a sheet of plywood as follows:
- plywood is cut out to a size slightly wider than the circular table;
DIY table saw table can be used as a cutting machine
- in the lower part, guide bars are attached to it using glue or screws, the distance between which should be equal to the width of the table;
- In a similar way, using screws or glue, thrust bars are fixed on top.
Using guides, the carriage is fed along the table onto a saw blade, which makes a through cut on the device. The height of the sides, which should be greater than the protruding saw blade, allows you to maintain the integrity and rigidity of the carriage. If the task is to make a cut at an angle of 45°, it is necessary to use an additional bar, which in this device is a removable element. The cut is made by pressing the workpiece against an angled plank.
In order for the plywood surface of the carriage to be easily cleaned of sawing waste, it must be coated with several layers of varnish.
The plywood should be slightly wider than the circular table
What discs should you use for circular saws?
The productivity and quality of work largely depends on the correctly selected disk for a hand-made circular saw made from an angle grinder, a hand saw, or one assembled from separate mechanisms. It should be remembered that there are differences between discs for wood and metal. Even if thin, soft aluminum will be sawed, the appropriate blade must be installed. Metal cutting wheels have finer teeth. There are universal disc options that are suitable for working with both wood and metal.
There are also differences between the discs intended for longitudinal and transverse sawing of wood. Longitudinal sawing is carried out with a cutting attachment with sparse large teeth. But cross-cutting will be of better quality if discs with fine, frequent teeth are used.
As for the material and method of manufacturing disks, they can be monolithic or carbide. Monolithic ones are made from a single piece of high-carbon steel. Such bits are inexpensive, but have a significant drawback: they quickly become dull and require sharpening and re-wiring.
Discs for wood and metal differ
Carbide discs are made of tool steel with cobalt and tungsten brazing. They are more wear-resistant, but the price of such products is much higher.
The outer diameter of the disks for a homemade circular saw is limited by the dimensions of the protective casing. The standard disc thickness is 3.2 mm. There are thinner and thicker saw wheels. Thin ones are used when working with wood of valuable tree species to make a clean cut. For rougher work, thick discs are recommended.
Possible options for small, DIY circular saws
Any stationary circular machine, even a homemade one, requires a fairly spacious workshop. The space should allow not only to install the unit itself, but also to place the workpieces intended for cutting in the desired position. If the task is not to cut large-sized wood, but simply, if necessary, you need to make your own slats or bars for repairing furniture, etc., it would be more rational to acquire a mini table saw.
You can make such a device yourself, using the same principles as when creating stationary machines from an angle grinder or a circular saw. Only the stand will not be a trestle, the support of which is the floor, but a frame on which a small table with a fixed hand tool is installed.
Helpful advice! When making a circular saw of this type, it is important to take into account the overall height of the structure, that is, the plane on which the material intended for sawing will be located. Overestimating or underestimating the level will cause significant inconvenience.
The miniature machine is more functional and safer to use
If you need to create a mini circular saw with your own hands to make very small workpieces (aircraft, ship modeling), you can assemble the tool using a PVC pipe as a body and borrowing an engine from children's toys. It is easy to make a hole for the shaft in such a pipe. You can use a glue gun as a connecting material. Such a circular machine can be powered either from the mains or from a battery. To ensure autonomous operation, it is necessary to provide a special compartment for batteries in the housing.
Sources:
https://strojkarkas.com/oborudovanie/cirkulyarnaya-pila.html https://mashmaster.ru/cirkulyarka-svoimi-rukami/ https://psk-remont.ru/2019/08/11/cirkuljarka-svoimi-rukami -kak-ruvil/
Recommendations for simplifying the assembly process
To regulate belt tension, the electric motor must be installed so that it can be moved. The easiest way to achieve this is by creating larger slots than required for the motor mounting bolts. In this case, the expansion of the holes should be carried out in the direction of belt tension.
If you completely follow the drawing, you will need to make a more complex belt tensioning mechanism. The process will be carried out by pulling up the platform with the electric motor using studs and fixing it with locking bolts in the desired position (in the drawing these structural elements are indicated by the number 10).
The entire design and assembly process can be greatly simplified if you make a circular saw from a circular saw. In this case, there is no need to install a number of parts (motor, disk, shaft, belt, starter). But the capabilities of the created model will be limited by the power of the tool used.
In any case, a homemade circular machine must be grounded. It is also additionally recommended to install a residual current device or differential circuit breaker in the panel. These measures will protect against electric shock if the machine body is energized, for example, due to breakdown of wire insulation. It is better to select components for the electrical part of a circular saw so that they are suitable for repair and easy to maintain. Free access to equipment components will help you easily replace failed parts.
It’s hard to imagine a carpentry workshop without a circular saw, since the most basic and common operation is longitudinal sawing of workpieces. How to make a homemade circular saw will be discussed in this article.