Any craftsman who works with a circular saw knows that it is extremely difficult to make an even cut without a guide bar. The average person solves cutting problems using simple methods - he fixes two plywood strips on the cutting surface with clamps and starts cutting, while the master will make a special guide for himself.
This article will present specific types of guides that you can make with your own hands, as well as provide detailed instructions. With a minimum of carpentry and plumbing skills, tools and simple blanks made of wood or aluminum profiles, you can effectively and cost-effectively make a guide bar for a circular saw on wood.
What is it, types and main functions
The guide bar is a rail with longitudinal perforation into which the saw blade is placed. The rail prevents the saw from deviating left and right, and the longitudinal perforation allows the saw to move smoothly back and forth.
Important! If the tire is assembled correctly, it also helps reduce the amount of chipped wood when the saw touches its surface.
Various designs are available for homemade guides, and they are made from the following materials:
- Plywood.
- Metal corner.
- Aluminum profile.
By design, the tire can be made in the form of:
- Miter box structures.
- Constructions from building regulations.
- External movable carriage on bearings.
Guides must provide the following functions:
- High accuracy and quality of cuts.
- Performing cuts of various geometric configurations.
- Longitudinal and transverse cuts were made.
- Adjusting the depth of cutting with a saw.
- Chamfering and trimming wooden fragments.
- Safety of cutting production.
Edge stop
This is already a rather complex device that requires time and precision in manufacturing. It allows you to cut parallel to the edge of the material being cut. It will be useful to make a drawing of it before starting work so as not to miss the dimensions. Actually, such a stop is included in the circular saw kit, but its short length does not always ensure an even cut. The large size and the desired strength require the base of the stop to be made of plywood with a thickness of at least 15 mm. You can also make a thrust bar from it.
Stages of manufacturing the stop:
- longitudinal grooves for dowels are made at the base;
- hardwood dowels are mounted on a stop bar;
- Another through groove is made between the longitudinal grooves to secure the thrust bar during operation;
- a hole is cut in the base for a circular saw blade;
- On the sides of the base, restrictive strips are placed for installing the circular and clamps are provided to secure it securely.
When installing the stop on the material being processed, the stop bar moves in the grooves of the base to the required distance and is secured through the through slot with a clamping wing screw. In order not to have to worry about the ruler every time, you can attach it (or a piece of tape measure) to the base of the stop along the guide grooves.
The cost of ready-made devices, how much will it cost to make them yourself and what are the benefits?
The guides, which are offered through tool retailers, cost as much as the circular saw itself. There are models of guides for 7 tr ., and there are also for 12 tr. When purchasing, you need to focus on this price range.
If you make the guide yourself, you can save a lot. Independent production will cost an amount barely exceeding 2 tr.
In addition, self-production allows you to make your own engineering modifications and improvements to the design.
Guide bar - what is it?
Before you create such a design yourself, you need to familiarize yourself with its main features.
A guide bar is a special rail that is responsible for sliding the saw forward and backward. At the same time, it limits the movement of the tool and therefore it cannot be directed to the left or right.
This device is used not only to ensure an even cut. It also helps reduce the number of chips in places where the saw came into contact with the wood being cut.
Additional Information! Sometimes guides are included with circular saws from Bosch and Interskol.
Making your own guide from plywood is the most popular option.
For a craftsman who constantly performs work on sawing wood, for example, for a furniture maker, the constant use of a tire is strictly necessary. The quality and speed of production depends on this. Experienced users and craftsmen rarely use factory-made products for cutting; more often they make them themselves.
The prerequisites for making a tire yourself are:
- Desire to save money.
- The need to introduce additions to the design that allow more efficient and multifunctional wood processing.
Necessary materials
To produce a tire from wood you will need the following materials:
- Plywood blanks with a thickness of at least 10 millimeters, the length is chosen arbitrarily according to the length of the future cut, the recommended length is 1.2 meters;
- Wooden blocks 30 x 30 mm.
- Metal strips 3-4 mm high, 8-12 mm wide, the length should be equal to the length of the sole on the circular - 2 pcs.
- Fastening elements – hardware, self-tapping screws.
- Fraser.
- Jigsaw.
- Drill with a drill bit with a diameter of 10 mm.
- Screwdriver with a bit for self-tapping screws.
- Clamps.
How to make a guide for a circular saw
Step-by-step instructions for making a plywood guide
It is very important to be careful in manufacturing and adhere to dimensions, since any inaccuracy or violation of the straightness of the structure will lead to a serious deterioration in the final result, and consequently to a deterioration in the quality of the cut.
Step-by-step instruction:
- We transfer the size of the saw to the plywood and mark it.
- In order for everything to turn out smooth and beautiful, you need to use something hard and smooth; a piece of profile pipe, a square, or a guide for gypsum boards is suitable for this purpose. We fasten it with clamps at the received mark.
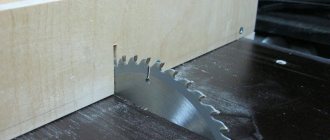
- We retreat 5 cm and make a cut with a router. The height and width of the cut should be the same as those of previously prepared metal plates.
- We retreat another 5 cm, mark and make another cut with a router. To obtain a straight line, we also set the metal profile as a stop.
- We attach the metal guides to the circular saw. The main thing is to do it very smoothly. The protruding parts, beyond the edges of the sole, should be sawed off. It is recommended to grind and polish the working surface, this will make it slide better. And lubricate the grooves in the plywood with wax, this will also give better glide.
- We attach wooden blocks along the edges with glue, and then also tighten them with self-tapping screws.
- For better gliding, cover the working surface of the tire with metal tape. It is very resistant to abrasion.
- That's all, the parallel stop is ready for work.
Another popular material with which you can quickly and easily make a guide for a circular saw is laminate. To do this, we suggest watching a video, the author of which tells and shows in a few minutes how to make a parallel stop from 2 laminate boards in detail, it is very interesting and useful. We recommend.
Adjusting a homemade device
Before starting work, it is necessary to make an adjustment, which consists of selecting the cutting location, as well as the depth of the cut and its length.
There are several useful tips during the adjustment process:
- The device must be positioned evenly in relation to the edges of the material. Distortions are not allowed. To check the straightness of the disk, it is lowered into the cut of the guide.
- After adjusting the tire and disk for straightness, the entire structure is secured with clamps. In some cases, it can be secured to hardware, for which special holes are made in the corners of the tire.
The tire allows you to make cuts at 45 degrees and chamfer edges, but to do this you need to adjust the angle of the circular saw blade.
Work and safety precautions
Since the circular saw itself is considered a very dangerous tool, the improper use of which can lead to serious injury, it is necessary to follow the following safety recommendations:
- When working, you must use PPE - goggles and gloves. It is also prohibited to start working with hanging items of clothing, for example, with unbuttoned sleeves.
- The circular saw starts only after the blade is placed in the guide, but without touching the surface to be processed.
- The tire must be firmly fixed with clamps, since otherwise the kinetic energy of rotation of the saw blade will be transferred to the tire, and it will “fly out”.
- All cuts must be done away from you, and the master himself must stand somewhat to the side, and not in front of the saw.
Operation of plywood tire
In addition to the guide, preparation of the saw for work is required. You need to saw off durable material with dimensions:
- height exceeding the depth of the groove;
- equal in width;
- longer than the sole.
Fastening is carried out with the restriction protruding from under the edges of the sole. To carry out the work, you need to take 2 clamps with two flat bars, but larger in thickness than the part prepared for processing. The ends of the tire are installed on the limiter so that they protrude beyond the tabletop. In areas of contact with wooden blocks, the guide is attached to the base of the table.
On the workpiece to be cut, markings are made along the cutting line. It is placed under the guide, the cutting direction and the working edge are aligned. A circular saw with a fixed limit strip is placed on the guide in such a position that the stop on the sole is aligned with the prepared gap. They saw the part, slightly guiding the part, and at the same time press the tool.
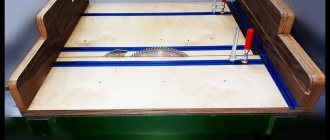
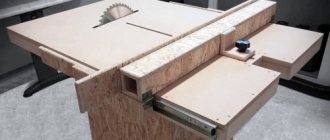
The design has proven in practice the high stability of a high-quality cut. For production, a metal I-beam is taken, which is attached to the lower plane of the workbench. The platform moves along the surface on bearings with the lower edges curved into a profile. The outrigger carriage slides freely thanks to bearings, which, due to tight pressing, relieve the structure from lateral play. The extension guide is held by the sole of the cutting tool.
Parallel angles and pipes are used to make a tire. When the sole moves, the cut is adjusted to size. Thanks to the support platform, which fits tightly to the workpiece, the stability of the cutting depth is not compromised.
The manufacturer of circular saw bars must take into account the working conditions, where the rules of use must comply with:
- the mode of use of the saw - the more often the tool is used, the stronger the raw materials for making the guide should be;
- processing parameters - you need to make sure that the disk completely cuts the thickness of the workpiece;
- technical capabilities of the mechanism.
In addition to the guide, quality cutting is affected by:
- condition of the saw and discs;
- position of the support platform.
Blunt disc teeth leave chips on the material. Tires significantly expand the functions of a circular saw, but poor care of the tool nullifies all the capabilities provided by the manufacturer.
Summary
Article Name
Guide bar for circular saw
Description
DIY guide bar for a circular saw
Author
Sarychev Alexander Viktorovich - forensic construction and technical expert, candidate of technical sciences
Publisher Name
Wikipedia of construction tools
Publisher Logo
- Related Posts
- Rating of miter saws 2021 based on customer reviews
- Rating of sawing machines
- Electric chain saws - rating
« Previous entry
Step-by-step instructions for making an aluminum guide
The only difference from the plywood bus is that aluminum U-shaped profiles are used as slats in this design. They are fixed to the plywood frame-limiter with self-tapping screws and serve to guide the saw blade lengthwise.
Aluminum U-shaped profile
Important! When using an aluminum profile, two fluoroplastic plates can be used as a limiter. It is not necessary to make a backing in the form of plywood, since aluminum itself will strengthen the structure and make it stable.
PTFE limiters
Additional functions
Riving knife
The riving knife prevents the disc from biting during operation; it prevents the material from squeezing the disc after cutting.
For safe and efficient work, there are models that support connecting a vacuum cleaner to the circular saw structure. The main purpose is to clean the workplace. The sawdust is blown away, thereby clearing the cutting site, as well as the air in the room, from wood dust and shavings.
Often, manufacturers do not equip their models with adapters for vacuum cleaners, so in this case you will have to additionally purchase an adapter.
Dust collector
The presence of a dust collector allows you to “accumulate” the resulting sawdust in a special container, thanks to which the cleanliness of the enclosed space is maintained.
Laser pointer
A special laser pointer is usually built into the body of the circular saw. Makes it easier to use and increases cutting accuracy.
Backlight
The presence of backlight makes it possible to use the saw in dimly lit rooms.
The presence of rubber pads on the handle reduces the load on your hands and eliminates the risk of the device slipping.
For your safety, manufacturers come up with various additional functions. For example, the most common problem is start blocking. To start the saw, you need to press two buttons at once.
Required materials and tools
Before you begin manufacturing the structure, you need to familiarize yourself with the list of necessary tools and materials:
- wooden blanks: boards, plywood, laminate;
- wooden bars with a thickness of 10 cm;
- self-tapping screws, screws, bolts or nuts;
- drill with drills;
- screwdrivers or screwdriver.
Additional Information! The above tools must be prepared in advance so that they are at hand while creating the guide.