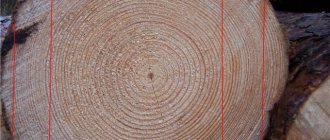
Types of Band Saws
Before assembling a band saw, it is worth studying their types. Experts distinguish the following types of similar devices:
- Toothless band saws: have high productivity and are capable of processing metal products. Their peculiarity is that they have small teeth. Cutting the product occurs due to high heat and friction;
- Serrated band saws: for processing plastic products and wood. The main feature of the cutting blades in such devices is their closed nature;
- Electric spark band saws: used mainly in large factories where huge quantities of wood are processed.
Kinds
Band saws are one of the most popular categories of equipment for metal processing. Using these high-power mechanisms, straight and shaped cuts of various types of workpieces : sheets, round, square and rectangular pipes, rolled profiles.
Band saw machine Vityaz 8L131. Sterbrust Photos
Cutting on tape machines is characterized by high productivity and accuracy, insignificant metal losses, the ability to adjust the cutting angle and process workpieces that are collected in bundles. This is what makes cars popular.
Vertical belt machine SRZ-200-02. Photo Rostanko Plant
A large number of types of belt mechanisms allows performers to choose the optimal solution:
- automatic, semi-automatic and manual;
- vertical and horizontal;
- single- and double-column (rack-mount);
- table and floor;
- with rotary and fixed table;
- with CNC;
- hydraulic.
But this equipment also has an important drawback - it is high cost , which depends on the type of machine. The alternative is simple - making (assembling) the car yourself .
Preparing to assemble the sawmill
Of course, nowadays you can purchase both ready-made materials and an industrial factory band sawmill. But this is often associated with large financial costs. It is more profitable and practical to assemble a band saw using ready-made drawings with your own hands. This is especially true if you have a private house or garage. In this case, a sawmill is justified in domestic conditions.
To assemble your own sawmill you need to have drawings, a cutting blade, some parts and study a little theory. The diagram should reflect the dimensions and materials used.
Selecting Tool Size
The length and width of the saw depend on the corresponding machine parameters. To clarify, you need to use recommendations and instructions for the machine, as well as drawings of a band saw for wood with your own hands.
General recommendations when choosing the best option:
- For longitudinal cutting, wide band saws are used, since they have the most even sawing possible.
- Thin workpieces require thin saws. The thicker the saw and thinner the part, the greater the chance of damaging the workpiece.
- When cutting fillets or figured cutting, the width of the cutting blade should be less than the radius of the fillet. The width of modern saws ranges from 14 to 88 mm. Typically, 35-40 mm is sufficient for most jobs.
Teeth setting value
Tooth pitch is the distance between the sharp edges of the saw. To use the tool correctly and effectively, you must adhere to the following general rules:
- When processing thin material, a saw with large teeth is required. In this case, the tooth pitch must be uniform.
- If the cutting surface is long, then a constant frequent step should be suitable for cutting.
- To cut natural or synthetic blades, blades with variable teeth are needed. When working with a soft structure, such a saw will not clog and the speed of work will increase.
The quality of cutting depends on the alignment of the teeth. The better the wiring, the lower the vibration level and the longer the saw itself will last:
- For working with thin materials or small workpieces, a wavy profile is suitable.
- The standard profile is used for contour cutting or processing of volumetric parts. This profile has an alternating arrangement of cutters in different directions of the blade, with one segment located in the center.
- The teeth, arranged in pairs on both sides, form a variable profile. It is characterized by reduced load on the cutting edge. The unit itself is more expensive, but more durable.
Before purchasing a specific saw, you need to find out whether it is possible to resharpen it and how many cycles the blade material can withstand.
In accordance with the material, there is the following classification of paintings:
- Bimetallic. For working with stainless steel or durable alloys. The tape has increased strength.
- Diamond. This is the processing of stone material and various minerals. Diamond, quartz, marble.
- Carbide. Cutting difficult-to-cut alloys.
- Tool steel strip. An excellent choice when cutting simple materials. This type of canvas is most often used in small workshops or at home.
Tools and materials
Homemade wood band saws are made from the following materials and tools:
- Plywood or chipboard sheet for making the frame and pulley.
- Sheet steel for the saw (or a ready-made sample from the store).
- Channel for support frame.
- Metal corners or slats and wooden blocks.
- Bearings.
- Steel pins for making pulley axles.
- Electric motor.
- Bolts, nuts, screws, washers.
- Flexible rubber.
- Bushings.
- Textolite.
- Durable belt.
- Paint or varnish, brush.
- Saw.
- Keys for bolt heads.
- Tape measure and pencil.
It is advisable to use logs 20 mm thick to increase the reliability of the device.
Tips for using a sawing machine
In order to assemble even the simplest band unit for a mini sawmill, for example, the one described in the article, you will have to spend a certain amount of money on a variety of parts. Even if you have an electric motor on your farm with suitable parameters from old equipment, you still need to buy steel profiles, lumber, pulleys, belts and canvas, and this will also cost a lot. But if you follow all the operating rules, you can very quickly recoup all costs, as well as earn some capital.
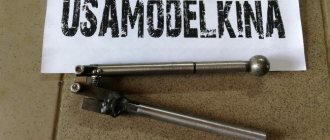
Checking the cutting blade tension with a strain gauge
Here's what experts recommend:
First of all, you should tension the saw blade correctly - this depends on its thickness and width, as well as the grade of steel. But in order to make the tension most optimal, you need to use a special device called a “tensometer” (see photo above). Most likely, you won’t have one, but you can borrow or rent a device to conduct at least one-time testing, and then you can do it “by eye.” Do not hope that the blade can be sawed continuously, for example, from morning until lunch or even until evening - this is not the case. It is best to stop the machine after two to three hours of operation, and then, after removing the saw, hang it in a free state (without tension) for 10-12 hours. This suggests that it doesn't hurt to have several canvases, especially if you have a lot of work to do. If you work with dry workpieces, this does not imply any problems, but when sawing (dissolving) fresh wood, resins are released that clog the teeth, the tape quickly overheats and may even burst. In order to somehow mitigate such a negative factor, they use an improvised lubricant: at positive temperatures it is ordinary water with detergent, and in cold weather it is diesel fuel with oil. At the end of the work, it is necessary to loosen the tension of the canvas to protect against the effects of thermal deformation
Steel expands when heated, therefore, when it cools (read narrows), fingerprints will remain in the places of contact with the pulleys, which will significantly reduce the wear resistance of the saw. Follow the sharpening standards, that is, the teeth should always be sharp and have the same set. Do not forget that any sawing machine is potentially hazardous to health, since careless movement or loss of vigilance due to fatigue can lead to serious injury and there are many examples of this. Therefore, it will be much safer if all moving parts (pulleys, blade) are covered with a protective casing. The installation location of the machine is of great importance for safety reasons.
There should be no obstruction when working with long workpieces, as this could cause the cutting band to break and even cause serious injury. After an injury, the phrase “I didn’t notice” is often heard as a result of insufficient lighting in the work area. Sometimes machines are installed outdoors under a canopy without the proper power of lighting fixtures (they get by with one 60-80 W light bulb), therefore, in this case, they can only work during daylight hours. But it is best to install some kind of reflector, pointing it at the desktop (if it is possible to adjust, then this is even better). Take care to ground the electric motor and connect it through an RCD (residual current device) or at least through a differential circuit breaker - this can protect against injury. The fact is that when an electric shock occurs, a person loses control over the body and the likelihood of limbs getting into the zone of action of the saw blade increases. The platform for the workplace must be dry and hard (concrete screed, asphalt), and if the unit is located on the street, then this platform should be raised at least 3 cm above the ground level so that it is not flooded by streams during heavy rain; When working, place a dielectric rubber mat under your feet.
Homemade band saw - the master explains the structure of the machine
Tips for use
- Tension the saw blade correctly. Exceeding the permissible force reduces the service life of the tool. For control, you can use special devices. The saw should not be in operation for more than two hours, after which it must be dismantled and suspended for a day to relieve residual stress.
- Be sure to use belt lubricant. In warm weather, you can use water with the addition of detergents such as “Gala”, “Fairy”, etc., and in winter - a mixture of kerosene or diesel fuel with motor oil in a 5:1 ratio or lubricant for chainsaw chains.
- After finishing work, be sure to release the tension on the saw. This will prevent fatigue phenomena from forming on its surface and will extend its service life.
- Work only with properly sharpened and set tools. If you have no experience in this area, you can use the services of specialized offices. As a rule, their representatives service more than one sawmill in your area.
- Do not work with freshly cut timber. Let it dry for at least one month. In addition, before work, clean the logs from dirt and sand, and even better, remove the bark.
Band sawmill at home
Wood is the most popular material in construction, which was used by our ancestors. And, it should be noted that he still remains in demand. There are many people who want to build houses from wood rather than from concrete.
Even a non-specialist understands that the construction of such facilities takes a lot of time and is quite expensive. It was in order to achieve savings on these operations that woodworking machines were invented.
Although companies today offer different types of sawmills, each of them is designed to solve one task - logging processing. But everyone does it in their own way.
If you have at your disposal a band sawmill that you can make yourself, then you can not only process wood for personal purposes, but also get additional income from it.
You can agree with interested parties on the production of the required volume of products and easily cope with this task. You will be able to fulfill any order, regardless of whether it is a gazebo or a bathhouse. All you need to do for this is take the workpiece and process it, after which you can use it for its intended purpose.
What can be made on a band sawmill
This question is asked by many craftsmen who have heard well about the popularity of band saws. Let us remind you once again that today such devices are presented in large quantities, but it is no coincidence that the band sawmill is the most popular.
The current situation can be explained by the presence of many advantages of this equipment that are relevant for craftsmen. First of all, a sawmill of this design can process workpieces made from any type of wood, including hardwood and high-resin.
Another feature of the band sawmill is that it can produce a fairly wide range of products:
- Edged and unedged boards.
- Bars.
- Veneer.
- Lafet et al.
If you wish, you can create blanks for their subsequent use in the manufacture of furniture, laminated veneer lumber, panels and other products. Having a band sawmill in your workshop will greatly simplify the wood processing process.
A design of this type is valued by many, including because it allows to minimize the loss of logs to sawdust. Therefore, if you can make a band sawmill with your own hands in compliance with all the rules, you can be sure that after processing the workpieces, no unpleasant waves or stubble will appear on them.
DIY band sawmill: drawings and design
There is no need to rush and immediately move on to the practical part of making a band sawmill with your own hands. First you need to study the design and make a simple drawing. This must also be done if you want to make a disk or tire sawmill.
The design of this equipment is quite clear and simple. Therefore, you can easily add to it the components you need to perform additional operations that you will encounter during your work.
In other words, you have the opportunity to make the simplest version of a sawmill, which provides the ability to manually feed the workpiece. Or you can opt for a more complex version, creating a high-performance device based on an individual drawing, equipped with automation and special sensors that simplify the work of processing workpieces.
The main element of a sawmill, both disk and tire, is a frame with guides. For its manufacture, welded soles are used, in which movable rollers are placed. With any version of the band sawmill, the frame is always U-shaped, and it is made by welding two channels together.
In this case, the drive pulley is welded on one side of the frame in a stationary state, and the second is attached to the other end in a movable position. The installation of the guides is carried out strictly in the center and they themselves are collapsible.
This is definitely something to think about if you plan to transport equipment in the future. In general, making this ribbon structure with your own hands is a rather time-consuming process. However, if you manage to do everything correctly, you will get a very useful assistant in your workshop.
The benefits of making it yourself
The table is made taking into account the fact that the hand tool will be installed and secured on the table, thereby turning into stationary equipment
Constructing the element with your own hands allows you to make the saw most suitable for individual conditions. There will be no difficulties in the process if you carefully study the issue. You can adjust the product to the desired size, distribute everything so that it is convenient for you.
Making a table for a circular saw is within the capabilities of every craftsman.
A handcrafted model will be one of a kind, which makes it unique.
Small table stand for circular saw
What materials are needed for manufacturing?
It should be noted that not the entire structure can be built from available materials. Therefore, before making a band saw, you should collect the necessary parts:
1. Wooden panels, chipboard, MDF or plywood. The saw frame and stand, as well as pulleys, are made from these materials.
2. Sheet steel for the production of a cutting blade or a ready-made part that can be purchased in a store.
3. Channel and steel rod. These parts are used to make the support frame and the axle on which the pulleys will be installed.
4. Sheet rubber. It is used to protect wood.
5. A durable belt that will ensure the rotation of the wheels on the machine.
6. Polyurethane glue for joining some parts.
7. Fastening elements: screws, brackets, bolts, washers and rubber gaskets.
8. Bushings.
9. Electric motor. You should not buy a very expensive model. Just decide how much power the machine should have.
Thus, a band saw can be built with your own hands. Drawings of this design should be made, calculating each step as accurately as possible. Naturally, you can find all the schemes ready-made.
Making a saw with your own hands
Taking into account all the nuances, the size and pitch of the teeth on the cutting element, you can begin to independently assemble a band saw at home. You can save a significant amount of money on this, but you will still need to purchase some parts and materials to assemble a desktop or device that drives the mechanism.
Do-it-yourself assembly of a wood band saw according to the drawings includes the following elements:
- belt pulley;
- cutting element for a band saw;
- V-belt type A710;
- supporting rod;
- guides;
- pulleys;
- electric motor with power selection depending on the volume of work performed;
- belt drive;
- bracket;
- two nuts type M12 (2 pcs.);
- V-belt;
- guide;
- damper;
- supporting rod;
- upper support;
- slider;
- adjusting screw;
- drive for the top belt.
Some parts can be easily replaced with scrap materials that almost anyone has in their garage. Other machine elements require the purchase of production models. For example, it is impossible to assemble an electric motor with your own hands, and equipment from a washing machine or similar equipment will not be suitable due to insufficient power.
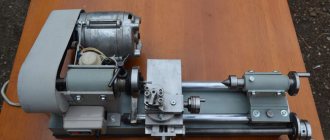
Design and assembly of the machine
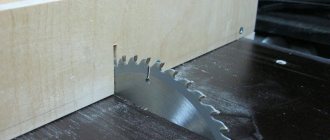
There is nothing difficult about assembling a homemade bandsaw with your own hands. Here you need to study all the nuances and prepare the necessary material. The main part of the carpentry machine is the work table on which wood, metal, stone or synthetics are processed. The design provides for a circular movement of the cutting element, which affects the workpiece and is secured by two pulleys.
How to make a saw?
If you need a saw, but the price quoted by the seller is prohibitive, then it’s time to think about making a tool with your own hands.
A saw designed for metal work will require a more powerful electric motor, such as the Makita models, which will also be useful if you plan to cut thick trees.
In cases where a more powerful tool is required, it is best to make a pendulum frame. Pendulum variations are not only more powerful, but also very effective.
In order for the frame of the device to be stable, it is necessary to use steel rather than wooden corners for its manufacture.
The frame is the base on which all cutting and rotating mechanisms are installed, so make sure that it is strong.
Before you start assembling the saw with your own hands, look at the diagrams with its structure: you can focus, for example, on a machine from Makita, because it is a high-quality and functional device for metal processing.
Each homemade cutting saw must be mounted on some stable surface, usually a table.
It is necessary that it be properly fixed, because if it wobbles, it can not only ruin your workpiece, but also be dangerous for the master.
The tool table must be special, and it is also better to make it yourself. For the bed, you can use an old table from the kitchen, or metal or wooden sawhorses.
The tabletop can be made from metal plates 4 mm wide. You will need two of them to work. Or you can use thick beams that need to be connected with a plywood jumper.
When connecting materials, be sure to leave a gap of at least 10 mm between them.
The most important thing when working is that the edges of the plate are set parallel to each other, otherwise the miter saw will not be able to function correctly.
When attaching the tool to the tabletop, the saw should be in the center of the gap, and sheets should be located on its two sides. You need to make holes in the table into which the saw will be fixed.
After installing it, you need to secure the motor so that the miter saw can operate. If you have made a small saw, the easiest way is to attach it to the motor axle.
Video:
However, the tool is not suitable for cutting thick metal, so if you understand that low power will not be enough for your work, then immediately make a more powerful tool.
You can use a bicycle spindle as a transmission mechanism for a homemade saw. It includes bearings and a shaft, which you will also need in your work.
You can cut the spindle off the bike using a hacksaw. You need to install a sprocket on the bicycle shaft. The best part for this is a part belonging to the D6 or D8 motor.
The circular saw must be attached to the spindle, however, before you do this, you need to decide on the diameter of the device.
The diameter of the bushing must also match the diameter of the other parts so that they all fit tightly together.
A plate with a thickness of at least 5 mm must also be installed on the spindle housing. The sprocket is attached to the shaft, which has a homemade saw.
The sprocket should be 2.5 times the size of the spindle.
The saw chain is put on the body last, after all other parts are correctly installed and secured.
The price of the parts that a cutting saw requires will be much lower than the price of a finished saw, for example, from Makita.
The tools you will need are:
- table;
- several plates;
- several beams and lintels;
- old bicycle spindle;
- bushing for transition;
- star;
- chain;
- shaft.
Some of these tools you probably already have in your garage, while others can be obtained very cheaply.
If you are not confident in your abilities, then it is better to purchase a ready-made tool.
Moreover, the price of some Makita models is quite reasonable, and at the same time they have wide functionality.
Before purchasing a metal cutting saw, research what's on the market and read about the different models of tools.
It is better to choose an already proven device, for example, a Makita saw, which has long proven itself on the market. The price of both circular and pendulum saws is quite affordable for a person with an average income.
Preparing to make a table
First, in the process of producing a table, Honor needs several important points:
- choosing a comfortable free space to install the table;
- indispensable installation of fastening for stationary placement of the tool;
- dimensions of processed materials for their successful placement;
- the type and dimensions of the miter saw itself, which will be installed on the table.
The next step will be to analyze and implement the above points, because the successful production of the table directly depends on this. After studying the instructions for assembling the table, preparing drawings, and suitable building materials, you can safely begin the main part of the entire work.
Features of using the saw
Even after you can make the presented design, you should learn how to use it correctly. For example, try to follow all necessary safety rules. Please note that in some cases the blade may burst, so if you are not sure of the strength of its fastening, then do not be too close to the machine.
Observe the following rules for operating the device:
— The larger the workpiece that needs to be processed, the larger the teeth should be on the saw.
— It is better to use universal cutting belts. In this case, you will not have to change the blade every time you need to process some other material.
— Before making the device, you must choose the place where it will stand. This takes into account the size of the room and the presence of electrical wiring. Naturally, this place should be well ventilated.
— Before work, try to tighten the cutting tape as much as possible. Otherwise, the machine will not only not perform its functions, but will also become hazardous to health.
— The unit should not operate for more than two hours at a time. After this, the tape is removed and left alone for at least a day.
— After long-term operation, the machine must be lubricated. Choose the right substance for your car.
— Correct tooth alignment is required.
That's all the features of making and using a band saw. Please note that this device requires proper care. If you see that it is not working correctly, then it is better to wait until you start using it. Be careful and careful.
Homemade video
The following are video reviews of self-manufacturing of draw machines.
Homemade with a pendulum mechanism, hydraulic cylinder, cutting acceleration
The components of the equipment and its main distinctive characteristics are:
- hydraulic cylinder expansion tank;
- saw feed adjustment;
- belt drive at 3 speeds;
- asynchronous motor operating from a 220V network, power - 0.75 kW;
- worm gear;
- The saw blade guides consist of three 6000RS bearings;
- adjustment of the working area of the web;
- web tension unit;
- adjustment of the inclination of pulleys, diameter 173 mm;
- canvas dimensions 13x0.65x1510 mm;
- counterweight springs;
- pendulum mechanism;
- USP vice, jaw width - 180, height - 120, useful opening - 170 mm..
This is interesting: Where to buy an induction furnace for melting metal.
A demonstration is being made of cutting a cast iron part with a diameter of 130 mm, operating time - 25 minutes, duralumin D16T with a diameter of 60 mm.
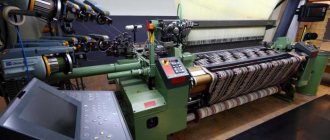
Machine with cutting section up to 250 mm
The video review demonstrates the operation and design of a band saw with a cutting section of up to 250 mm.
The working and accelerated feed of the traverse is realized using a ball screw feed and a stepper motor with a power of 1 kW.
The mechanism is controlled using the control panel.
There are no hydraulics.
Manufacturing a machine with a worm gear
Part 1
Detailed instructions for the manufacture of a metal band saw with the following distinctive properties and design features:
- gearbox 1-30;
- canvas dimensions - 2480x27x0.9 mm;
- dimensions of rollers (bearings) for the blade - 22x8x7 mm;
- engine - 1.1 kW, 1400 rpm;
- pulley diameter - 300 mm;
- maximum diameter of round blanks - 220 mm;
- The angle of inclination of the bed is 50 degrees.
Part 2
Part 3
Perhaps, after watching the videos, you will decide that it is easier to buy a machine. Then you can select sellers in this section. Manufacturers (foreign and Russian) also offer a wide selection of units. By the way, you can purchase equipment on credit and leasing. Companies providing these services are presented here.
If you need components, for example, saws and other components and consumables, you can contact the companies from this list.
Breakdowns of tape machines can be corrected by contacting repair specialists.
To cut non-standard parts, it is recommended to resort to band saw cutting, which is performed by professionals using powerful and timely equipment.
Stages of welding work
cutting
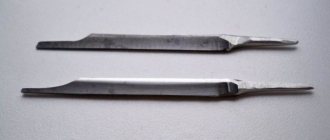
First, the saw blade must be cut to a given length. You can use different tools for cutting. We recommend guillotine shears as they give the most even cut. The cut itself should be located at the top of the teeth. Don't forget to leave about 1-2 millimeters on the cut side for settling.
To achieve an accurate cut, you can use the technique shown in the picture below. After such cutting, the ends of the saw will be smooth and fit perfectly together. And this directly affects the quality of the weld.
Stripping
After cutting, the ends of the saw need to be cleaned. This is standard preparation of metal for welding. Clean the metal from dirt and traces of corrosion. Then degrease with any solvent. For example, acetone. Then clean the edges with an abrasive material. We use sandpaper. Make sure there are no burrs on the edges. Ideally, they should be smooth and even.
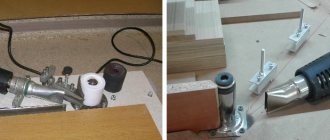
Installing the saw into the clamps
Above, we could already familiarize ourselves with the components that make up a machine for welding band saws. We said that there is a clamping mechanism. This is where the saw blade needs to be installed. The clamp has a movable and a stationary part. Place one end of the blade in the movable one and the other end in the fixed one. There is free space between the clamps. You need to install the canvas so that its joints are exactly in the middle of this space. Naturally, the joint must be smooth and precise.
Welding mode selection
Next you need to select the welding mode. If you have a simple welding machine, then all parameters need to be configured manually. The welding mode is selected based on the size of the saw and its cross-section. The larger the cross-section, the greater the welding current. These are general recommendations.
Typically, the welding machine comes with instructions that describe all welding modes depending on the size of the saw blade.
Also pay attention to the setting of the speed of current pulses. For budget models, it needs to be controlled manually, otherwise the metal will heat up too much
The recommended current supply time is 1-2 seconds. In more expensive devices, this parameter is adjusted automatically.
Welding
Welding for band saws begins with turning on the machine. The machine for welding band saws is launched depending on the model. This can be a separate button or a special handle. After starting, a welding current will be supplied to the ends of the saw, which will melt the metal in the area of the future seam. Current is supplied to the saw through the clamps. After heating the joint, the movable clamp must be moved slightly to form a weld bead. The seam is ready!
Make sure the electrode surface is clean before welding. It is not necessary to clean all the electrodes, just the part that is in contact with the saw blade is enough. If you ignore this rule, the connection will be of poor quality. Contamination will affect the circuit resistance.
Annealing
Next comes annealing. It is necessary because as a result of welding, the metal becomes too hard, which increases its fragility. Annealing helps return the canvas to its original condition. After pressing, the metal becomes plastic again, and its performance characteristics improve.
To perform annealing, you do not need to remove the blade from the clamp. Just set a different current mode. The main thing is to achieve a heating temperature of about 600 degrees. Expensive devices have a separate annealing function. But if you have a simple budget model, then you need to perform a few additional steps.
First of all, keep in mind that in addition to heating, you also need to cool the metal. And it is advisable to perform these operations one by one. Press the current supply button and hold it until the heating temperature appears on the display. Then release and let the metal cool. To ensure that the sheet cools evenly, you can periodically press the button again, preventing the metal from cooling quickly. Cooling time takes on average 5 minutes.
If your device does not have a display indicating the heating temperature, then you can focus on the color of the metal. Typically, the canvas takes on a cherry tint when the required heating temperature is reached. Do not allow the metal to become orange or yellow. Sometimes it is necessary to anneal twice.
Re-stripping
During annealing, visible sagging may form on the canvas. They need to be removed by re-cleaning. Now it is needed not for technical, but for aesthetic purposes. At the same time, you can correct the depressions between the teeth, giving them the correct geometric shape. Repeated cleaning can be done with any abrasive tool. Process the metal so that the joint is practically invisible.
DIY garage press options
Homemade garage presses allow you to process various products and materials under pressure. Structurally, the equipment consists of cylinders. In the garage, such a machine is useful for straightening or fastening various elements, as well as for bending sheets of metal or pressing cardboard.
An example of a homemade press
For private use, a capacity of 10-15 tons is sufficient. Most often, a bottle jack is used with a provided hand pump, which acts as the main structural element.
Here are some interesting options for homemade garage presses:
Option from scrap materials Rails will also come in handy Ready-made purchased model Convenient homemade press