Rules for safe operation of equipment
If used incorrectly, gas cylinder equipment can become a source of a strong explosion or fire.
When performing welding work, you should definitely use personal protective equipment: glasses, gloves, special shoes.
Before starting work, you need to thoroughly inspect the equipment for damage. If the equipment gets dirty, be sure to remove the dirt
You can work with propane cylinders only in well-ventilated areas, and the air temperature should not be below 0 °C.
Absolutely forbidden:
- Work near open flames.
- Keep the cylinder tilted when working.
- Place the vessels in the sun.
- Carry out work without a gearbox.
- Heat the gearbox over an open fire.
In addition, if you smell gas, you must immediately stop working and turn off the valve on the cylinder. We also recommend that you familiarize yourself with the main reasons for the explosion of gas cylinders.
When working without personal protective equipment, you can get burned, not only from an open flame, but also from accidentally touching hot parts.
If the considered homemade burners are not suitable for you, we recommend that you familiarize yourself with other options for making useful homemade products discussed in our articles - a burner made from a blowtorch and a burner for a sauna stove.
Use and storage
The propane cylinder and the flomber itself are sold not connected to each other. You need to remove the plastic cap from the top of the cylinder and screw it into the gun.
The pin of the gun, located in the screwing part, opens the valve mechanism for gas supply. Access is controlled by turning the round switch, so the fuel supply is blocked and opened.
The supply of gas, in the form of a hiss, is clearly audible. The same switch regulates the flame jet; the more you turn it towards the opening, the stronger the pressure will be and vice versa.
The equipment must be stored disassembled. Since when collected, gas can leak out little by little. Otherwise, the valve completely blocks the release of fuel.
When using the burner, it can be held in almost any position, however, it should not be turned down vertically. Never drop the gas cylinder as this may damage the valve.
Recommendations
To make a burner with your own hands, you can refer to videos, of which there are many on the Internet. The masters tell in detail, show, give useful tips and recommendations.
In every case you may encounter various surprises, so you should carefully review them and pay attention, for example:
To make a burner, use refractory metals, because during combustion a flame of more than 1000o C can form. Use a reliable tap that shuts off the gas supply. Pay special attention to the location of the cylinder connection. for the burner, improvised and unexpected materials can be nozzles from: gas burners, a household stove or stove, a car pump, a construction foam gun, and even medical needles. They are made of durable steel and coated with chrome, which gives them sufficient rigidity. The faucet is an ordinary plumbing faucet, and ordinary plumbing pipes with threads are suitable for connecting to the entire structure
There are no high temperatures in this place.
Types of gas soldering irons
Tourist
The most common type of burner, which has low fusible properties, is used for household purposes, as well as in construction, where such a device replaces a construction hair dryer, but is independent of the electrical network. The disadvantage of such burners is an unstable flame, which manifests itself when the device is tilted or turned over during the working process. In more expensive burners, such manipulations do not affect the stability of the fire flow.
This type of torch is not used for soldering. Their main function is to ignite a fire or coals for a barbecue, as well as any heating that requires an open flame. Melting frozen sections of pipes, or warming up diesel engines, as well as disconnecting pipes on tow, heating and removing old paint and many other rough jobs.
Turbocharged soldering irons
Ejector soldering irons have a less broad focus, but their price is higher than tourist ones. Used by craftsmen for processing and manufacturing products from non-ferrous metals. High temperature generation and flame control are well suited for hardening, metal soldering or other thermal applications where consistent high temperatures and a well-defined fire cone are required.
Depending on the specific application, burners and nozzles may differ. A microgas lamp for soldering is used in repair and jewelry making, and given the absence of oxygen supply, it allows delicate work to be performed delicately. The middle class of burners has a flame cone thickness of 3-9 millimeters. This tool works well for melting copper in cable joints, as well as copper or aluminum tubes.
Torches with large nozzles and high power are well suited to industries such as artistic forging, precision bending or iron stamping. This particular tool is used by home craftsmen as a base for gas forges and hardening furnaces made with their own hands. Despite possible periodic flashes of gas in ejector soldering irons, in the core itself, the temperature remains relatively stable. The gas preheating circuit makes the device economical, allows you to quickly reach operating power and more accurately control the temperature.
High temperature gas soldering iron
In this type of gas burner, instead of the usual propane-butane cocktail, MAPP (methyl acetylene propadiene) gas is used as fuel, and the flame temperature reaches 2200-2400˚C. Almost all the energy is concentrated in a stable cone with a pronounced boundary. Used for heating, forging and bending hard steels with a high carbon content, as well as three-dimensional parts. The produced qualities help to withstand the technology of hardening and tempering of metal.
MAPP gas torches are capable of soldering and welding stainless steel without overheating even the thinnest parts. MAPP gas has a low boiling point, which makes it possible to use the burner at a temperature of -20 °C, even without a gas heating circuit.
How to use?
Before you start using the burner, you must carefully read the instructions and recommendations of the manufacturer. A distinctive feature of such equipment is that it can be used exclusively in open areas.
If you need to operate a gasoline burner in an unventilated area, you can turn it on for a short period of time, and then thoroughly ventilate it.
In order to ensure maximum safety when using the device, you must strictly follow the operating instructions. Otherwise, a fire or explosion may occur.
Let's look at the process of using a gasoline burner.
First of all, it is necessary to refuel the equipment with the appropriate fuel. It is best to use high-quality gasoline so that the device does not fail and there are no problems. Under no circumstances should the tank be filled completely; filling 3/4 full will be sufficient. The remaining space is necessary to create pressure during operation. Creating pressure using a special pressure pump, which is usually included with the device. For this, 10 pumpings will be enough. After the necessary pressure has been created, you will need to pour fuel into the tray. Alcohol is considered the ideal option, as it does not produce much soot. After ignition, the burner will heat up the evaporator. The needle valve can now be opened
At this stage, be sure to pay attention to the fuel, which must be gaseous. Be careful that there are no drops here.
If they are detected, the heating process will need to be carried out again. During the work, it is imperative to monitor the torch, increasing or decreasing its power, using a shut-off valve for this. If the operation of the burner cannot boast of stability, or attenuation is constantly observed, then the nozzles should be cleaned with a special needle. After finishing the work, you need to extinguish the torch. To do this, simply close the valve.
In order to ensure the maximum level of safety during operation of the equipment, it is worth adhering to safety regulations.
- Under no circumstances should you continue to use a gasoline burner if a fuel leak is detected.
- It is not recommended to use fuel whose quality properties differ from those recommended by the manufacturer.
- Do not use the burner for a long time. This may cause the cylinder to become very hot and cause it to explode.
- Before starting operation, it is worth checking the integrity of the safety valve each time. If problems are detected, it is better not to turn on the equipment.
- It is better to refrain from using a gasoline burner in an unventilated area.
Technical features of gas burners
- Flame power - this parameter depends on the type of work to be done. In order to desolder electronic components, minimum power is required, but when heating metal for bending or forging, maximum power is required.
- Torch shape - if you use a flame for heat-shrinking work, or flame processing of large areas, a wide torch is used, but for soldering a clearly defined flame in the form of a needle is used.
- Case material - a plastic case is a budget option, unlike a metal one. But when the nozzle is heated to maximum temperatures and used for a long time in this mode, the plastic may melt.
- Flame stability - if the housing angle changes to 45˚ or more, the flame does not go out, but allows you to work in any chosen position.
- Availability of replaceable nozzles - this equipment is mainly relevant for a soldering iron torch. The delivery set includes nozzles that perform a particular task.
- Special requirements - these features are taken into account when choosing a tourist model, namely: the shape of the burner, the stability of the structure, heating a specific volume of liquid in a certain period of time, the presence of wind protection.
Read also: Bolt for thread size 19
Making a gas burner
When starting to make your own device, you need to prepare the tools for the job and select the required material. First of all, choose the material for the handle. There are no strict requirements, so everyone can use their imagination and capabilities. The main requirements for the handle are: its ease of use, so that it does not overheat during operation. Experience shows that it is advisable to use a ready-made handle. For example, a handle from a broken soldering iron, boiler or other household appliance.
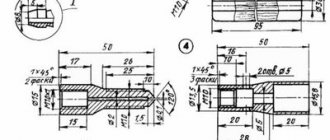
Steel is used to make the supply tube. Choose a steel tube with a diameter of no more than 1 cm and a wall thickness of 2.5 mm. The prepared cutting is inserted into the prepared handle. It needs to be securely fastened there. The mounting method is selected in accordance with your capabilities.
After this, the divider is securely fixed in the housing. A small clearance should be provided for the inner flange. The recommended gap should be approximately 5mm. This gap will provide the necessary slowdown in the speed of gas flow that flows to the igniter. Slowing down will allow you to ignite the burner more reliably.
The nozzle is made of a metal rod. It will provide gas supply to the combustion area. It is made as follows. Using a drill with a diameter of 2 mm, carefully make a blind hole in the nozzle body. Then drill a hole with a 4mm drill. It is necessary to create a jumper. They are carefully riveted and polished.
Gas burner drawing
The end of the manufactured tube is connected to the outlet of the gearbox. A flexible hose is used for connection. The material is selected from the list of approved materials for household gas systems. This may be special rubber or special fabric material. To ensure reliability and fire safety, it is more advisable to use certified material. The hose is put on the tube and secured with a standard clamp.
After completing the assembly of the entire device, you need to set the optimal pressure in the cylinder. Before igniting the burner, you should carefully check the entire gas supply system mixing with air for possible leaks. If they appear, they must be eliminated. Only after all checks can the burner be lit. The burner must provide a burning jet length of up to 50 mm.
A properly assembled burner will serve as a reliable assistant in business for a long time. It will be a tool that will help solve many everyday problems without resorting to the use of expensive tools.
Characteristics of gas burners
Considering that the concept of a gas lamp presupposes several types of devices, their parameters are completely different, and only a small part of the technical capabilities will be similar.
Frequent parameters on which the user's choice is based:
- Battery life on one cylinder
- Is there an air leak?
- Nozzle material and length
- Type of connection and type of cylinder
- Possibility of flame adjustment
- Limit flame temperature
- One-handed operation
- Presence of piezo ignition
Operating principle of the Babington burner
A few words about the history of the invention. The considered method of burning heavy fractions of liquid fuel appeared relatively recently - in the middle of the last century. More precisely, inventor Robert S. Babington (RS Babington) patented his diesel burner in 1969. However, the patent has long expired and now its device is available to everyone interested.
Babington’s invention is fundamentally different in operating principle from traditional oil burners, where a mixture of air and fuel is injected by a nozzle under pressure:
- Exhaust or diesel is supplied from the tank by a low-capacity pump.
- Fuel drips onto the working surface - spherical or inclined. The fuel flows down along it, forming a thin film.
- In the center of this surface there is a hole of small diameter (no more than 0.3 mm), through which the compressor pumps compressed air.
- A Babington waste oil burner operates on the following principle: a stream of compressed air exiting through a small orifice under pressure tears off part of the oil film from the surface.
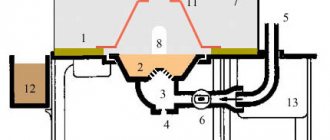
- As a result, we obtain a jet of air-fuel mixture, which, after ignition, forms a stable flame. It is sent to the firebox of a furnace or boiler, heating the walls of the chamber or the water jacket. The figure below shows the operation diagram of the burner device:
Since some of the fuel flows past the hole, a flow back into the tank is organized. Here you can clearly see that the unburnt remains of used oil flow from the hemisphere into a special container, and from there back into the main tank.
From it, the fuel is supplied for combustion under low pressure, and is preheated to liquefy it. As you can see, the design does not provide any filter elements. Preheating waste oil or diesel fuel before burning it with a Babington burner is very important and here's why:
- The heated waste liquefies and forms a thinner film on the working surface, which is well atomized by the air flow. This promotes more efficient combustion.
- The smaller the droplets of liquid fuel suspended in the stream, the easier it is to ignite a boiler or Babington stove in manual/automatic mode.
Nuances of operation and care of equipment
The principle of operation of a gasoline burner:
- Fill the container to the permitted level, usually 2/3 of the volume.
- The air mixture is pressurized using a fuel pump.
- Under the pressure of the medium, the process of moving the mixture into the burner begins, where it is ignited and formed into a torch.
- To ignite the mixture and smoke-free operation, the mixture is heated to an acceptable temperature. To do this, place a special cup that comes with the device under the burner; usually, one cup is enough to get the desired temperature.
- In this case, the fuel is converted into gas in the evaporator and sent to the combustion area through the nozzle. During the combustion process, O2 is absorbed, which is necessary for complete combustion.
- Next, open the adjusting needle valve.
- After a stream of gaseous mixture comes out, it is ignited. To speed up the heating of the BG, it can be installed 2 cm from the metal sheet, where the heating process and the state of the torch are controlled.
- Flame instability or attenuation requires cleaning the nozzle using a special needle.
- After completion, extinguish the torch by closing the valve and lowering the control needle.
- After cooling, the air is released from the vessel.
A gasoline unit is a high-risk device, therefore, during any work, strict compliance with safety regulations, fire safety regulations and manufacturer’s instructions is required. Violating them can lead to an explosion and endanger the lives of others.
Basic safety requirements:
- The burner can be used outdoors.
- In emergency situations, short-term operation of the BG is allowed while ensuring reliable ventilation of the room.
- It is prohibited to use the unit if there is a leak of the gas-fuel mixture.
- It is not allowed to use gasoline with parameters that do not correspond to those specified by the manufacturer.
- It is prohibited to use the unit for a long time, due to the possibility of self-heating of the structure up to 50 C.
- It is not allowed to work with a faulty safety valve.
- It is prohibited to refuel the cylinder while the fuel is burning.
Advantages and disadvantages
Any tool has its pros and cons, and a gas cutter is no exception. Among the advantages of modern devices with intra-nozzle gas mixing, the following should be noted:
- The relatively large thickness of the metal being cut is up to 300 mm, depending on the modification and operating parameters (gas used and oxygen pressure).
- Stable flame burning without pops or backfires.
- Possibility of cutting steel in any direction, regardless of thickness.
- High performance.
- Easy to maintain and long service life.
Photo 4. Oxygen gas cutting process
However, it has no less disadvantages:
- As a result of strong heating, the cut parts may become deformed (especially those made of thin sheet metal).
- The cutting width is quite large, which requires compliance with certain allowances during marking work.
- Low quality of cut - uneven edges with oxides and scale. Therefore, before welding or other work, pre-treatment of the edges is required.
- Quite a high cost of the oxy-fuel cutting process.
Main stages
It is not difficult to make a burner or mini-burner according to the drawings, as already noted, without spontaneously changing the parameters.
Frame
The body is usually steel. A brass rod with a width of 2 cm is suitable for its manufacture. A divider can be made from the same rod. Then several holes are made that will help create oxygen circulation in the device. Fire, as you know, does not exist without oxygen. There should be 4 such holes: each about 1 mm in diameter. They are made in the burner divider rod. The next step is to press the divider into the device body. The internal flange is installed with a gap of 0.5 cm. This gap will subsequently slow down the powerful flow of gas that approaches the igniter.
Nozzle
This part of the device ensures the supply of fuel from the cylinder to the outside. It is made from a metal rod. At this point, the technician will need a two-millimeter drill to form a blind hole in the nozzle. And for the jumper you will need a four-millimeter drill.
Then a hose from the gearbox, made of fabric or rubber special material, is attached to the end of the tube. Fastening is carried out with a clamp using a regular screwdriver.
Assembly
When the mechanism is precisely secured correctly, you should set the required pressure in the cylinder and supply gas from it. The air is then completely displaced from the hose. The length of the fire, if all parts are positioned correctly, will be 40-50 mm. There is another way to manufacture and assemble a burner, in this case a miniature one. This device is convenient because it is easier to make it yourself, and you can hold it in your hands without fear of getting burned. That is, for those who doubt their abilities regarding more complex manufacturing, this option is suitable.
What you need to make and assemble a mini-burner:
- old, out of order gas burner;
- thin copper tube (10 mm);
- copper wire;
- needle from a syringe;
- bolt No. 8.
And everything works like this.
- First, the tube for the burner is prepared (a file is used).
- The nozzle is made from a medical syringe.
- The tube is connected to the wire.
- 2 pieces of copper tube are connected.
- The adjusting bolt is inserted.
- The device adjustment is being tested.
- A tripod for the burner is being made.
- All that remains is to check the functionality of the device.
Natural gas appliances are made from a metal pipe, a blowtorch handle and a can. The homemade device is suitable for soldering copper, for roofing repair work, and for singeing the necessary structural parts.
Features of choosing gas burners
The choice of gas equipment for soldering copper pipes is quite large. There are many manufacturers on the market, for example, Rems, Rothenberger, etc. The price range is wide and depends on the model.
The functions of the torch include not only soldering, but also metal cutting, defrosting, processing at high temperatures, and heating. A propane torch is convenient when working in the wind.
The tool is selected according to the following characteristics:
- burner type: injection, non-injector;
- power: the greater it is, the more efficient the work with thick-walled pipes;
- type of gas: for example, propane, acetylene. Some burners are multifunctional and can be used with other gases. It is recommended to purchase a tool that runs on one type of fuel. The propane torch is used mainly in industry.
- purpose: if the torch is made for soldering, then it is not very suitable for cutting;
- material of products to be processed.
Soldering copper pipes requires compliance with safety regulations: wear protective gloves that will protect your hands from burns; carry out work in a ventilated area with good ventilation; Make sure the connection is cool before checking the connection.
The choice of burner primarily depends on the goals that the master faces.
DIY methods for making a burner
As mentioned earlier, making a gasoline burner with your own hands simply cannot be very difficult. However, if you are new to this matter, then it is best to use the first method, which is the easiest.
First way
two aluminum cans
So, once you've completely rinsed and dried your jars, it's time to get started. Approximately in the center of the bottom of the first jar, you need to make 4 punctures using a nail. Exactly the same holes must be made around the perimeter of the rim of the can. So we made a blank, it is from it that the flame will burst out.
Now we need to cut off the part we made a little earlier from the rest of the can. The length of its side (side part) should be about 3-4 centimeters. You can cut using regular scissors. If they do not fit, you can use a knife or other sharp object.
The next step is to move on to the second can, from which you just need to cut off the bottom, and you should try to do this with the utmost care, without causing nicks. If nicks still cannot be avoided, you need to grind them off with sandpaper.
In conclusion, you just need to connect the two parts that we got. By the way, this is also not such a simple matter, since the cans have the same diameter. To avoid difficulties at this stage, you can simply make a small cut in the side of one of the cans. In this case, after this you need to create a tightness of the structure by wrapping its side surface with aluminum tape.
heat its area with a lighter and set it on fire from above
As you can see, making a high-quality gasoline burner with your own hands turned out to be a very easy task, which can take about 20 minutes.
Second way
If you haven’t forgotten yet, there is a second way to create a gasoline burner with your own hands. However, it is several times more complex than its predecessor. Naturally, it boasts a high level of reliability, strength and durability. Therefore, if you decide to create an excellent high-quality device for yourself that you will use for a long time, and you also do not mind the effort and time to make it, then this method is just for you.
So, to make such a burner we will need:
- Compressor. Here you can use an old car inner tube, which will need to be constantly inflated, or a standard compressor from an old refrigerator, if you have one.
- Receiver. An ordinary plastic canister with a volume of about 10 liters will do here. A dense and translucent cork is also required.
- Fuel tank. A two-liter ordinary metal barrel will be quite enough here. It is necessary to solder two tubes into its lid, the long one should be lowered to the bottom of the tank.
- Burner - can be purchased at the store or made yourself.
Once you have purchased all the necessary “ingredients”, you can begin making a gasoline burner.
To begin, fill the fuel tank described in the third paragraph with regular gasoline to about half the tank's entire capacity. Install a standard filter at the compressor inlet. It is made from a funnel and unnecessary stockings/tights.
Everything else is connected according to a standard and intuitive principle, which does not require a detailed description of the actions,
What you need to know to create a burner
Absolutely every master cannot always afford a ready-made gasoline burner. The cost of the products is so high that the burner is unlikely to quickly pay for itself.
In addition, the quality of the product does not always correspond to its cost. For this reason, we have long learned to make the necessary item ourselves.
If you did everything correctly in the process of creating the burner, then the first time you present a burning match it will give off fire. This indicates good quality and constant correct supply of the fuel-air mixture.
Visible combustion will continue for 3-5 minutes, then the flame turns blue, which indicates the possibility of starting melting work.
The burner can heat up to 1000 degrees Celsius. Due to this effect, even melting of metals and glass is possible.
Many components for creating a gasoline burner can be found on the farm. They are included in other devices and tools. And everything that is missing for the process can be easily purchased at any tool store.
Do-it-yourself gasoline burner for melting
Parameters and materials required for work
saving a lot of money
If you bring a pre-lit match to a homemade gasoline burner, the fire should flare up instantly and ensure a steady burning of gasoline for 3-7 minutes. The flame temperature should be more than a thousand degrees. With such a device, without any difficulties, it will be possible to melt various solders (including hard ones) and metals, soften glass, and also perform various types of heat treatment on all kinds of small-sized tools.
To make your own gasoline torch for soldering and welding, you will need the following materials: body, handle, sleeve, hook, stop, balloon tube, rubber ring, rubber bulb and filler.
Many of the above parts of the device do not need to be made independently - they can be easily borrowed from other tools. For example, a spray bottle will replace a rubber bulb.
Step-by-step process for making a gasoline burner
0.1 mm larger in diameter
A ring made of slag wool or metal mesh is also installed inside the housing.
The next step is to make the stop and bushing with the hook, which will require a steel sheet. Then you need to cut a handle for a gasoline burner from oak or beech.
Next we need to prepare the tube. To do this, you need to very carefully drill two holes so that they are strictly parallel to each other. The finished handle is treated with special sandpaper and then coated with colorless varnish in 3-4 layers.
The last step in making your own gasoline torch for welding and soldering is preparing the tube. The end of this element must be passed through the middle of the body so that it forms a nozzle. Using hard solder PMTs-54, which interacts well with steel, you should solder the end of the tube, and then drill a hole with a diameter of 0.2 mm along its axis.
Solder, if desired, can also be made independently from zinc and copper.
To create copper, you need to take copper wire, burn it and cut it with scissors. To create zinc, you will need a glass from a regular electric battery, which must be emptied of its contents and calcined over a fire. Then the glass is dipped into cold water and a weak solution of hydrochloric acid, after which it is cut into small pieces with scissors.
Next, you need to combine pieces of zinc and copper, pour them into the crucible in equal proportions, and sprinkle them with borax. The fusion of these metals occurs directly on the burner. The resulting block is cooled, secured in a vice and leveled with a file, while collecting sawdust and mixing it with borax.
Types of gas burners
Gas torches for soldering copper pipes are equipment consisting of:
- assembly for fastening a gas cylinder;
- nozzles;
- instrument head;
- devices for regulating gas supply;
- gearbox
Different models of torches for soldering copper pipes can be equipped with auxiliary parts - adapters, tips, etc. Based on the criterion of the combustible mixture used, this equipment is divided into:
- propane torches for soldering copper pipes;
- tool using MAPP gas.
According to technical capabilities, they are distinguished: household gas burners (flame temperature from 1000 to 1500 °C) and industrial (flame temperature from 1500 to 2000 °C).
Gas burners differ in the type of fuel consumed and purpose
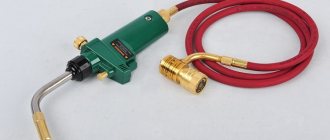
You can also highlight acetylene-oxygen torches; with a cylinder for one-time use or on a stationary basis. This equipment allows for highly reliable connection of highways and components of different systems using hard and soft solder.
A propane burner can be universal or special purpose. It is usually equipped with a piezoelectric ignition function, gas saving mode and gas supply. A torch for soldering copper pipes using MAPP gas is more efficient than a propane one due to its high combustion energy. Despite the fairly high combustion temperature, the flame is soft and does not burn through the pipe material.
Soldering of edge and corner areas is done with a gas soldering iron for copper pipes.
Gasoline burner made from a telescopic antenna
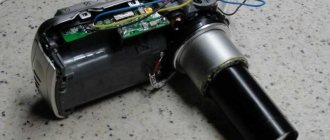
Sometimes, when making homemade products, there is a need to heat up, or even melt, some part or material. Many models of burners can be purchased in stores, but what homemaker would not try to make the tool he needs with his own hands. The author of this homemade product decided to make a gasoline burner from scrap materials. Tools and materials indoor TV antenna; baby juice jar with lid; aquarium compressor (external) with hose; drill ; drill; file; soldering iron; nail 120; ball needle; head-key 4.5.
First, the author disassembles the antenna. Having cut off the antenna on both sides, he pulls out the tubes and gets 3 tubes of different lengths and diameters. A through hole with a diameter of 4 mm is drilled in the middle of the largest tube. To make a faucet, the author cuts a 15mm piece from the average diameter of the tube. Drill a 3mm hole at a distance of 5mm from the edge. Places a piece of tube on the nail, close to the head. Marks on the nail where the hole in the tube is located. Marks the cut line 4mm below the tube. Drills a hole with a diameter of 2 mm in the nail. Cuts the nail along the previously marked line. Inserts the faucet into the hole drilled in the large tube. Aligning the holes in both tubes, solders them. To prevent the nail from popping out, a stopper is used. Cutting off a 4mm piece from the middle tube, puts it on a nail inserted into the faucet. Solders the edge of the nail and the cut piece. It is necessary for the nail to turn in the tap. Next, in order not to break it, the author inserts a piece of wire into the thinnest tube and bends it around the can, forming a semicircle of 70-80 degrees. Makes a nozzle. Cuts off the head of a ball needle. Solders the needle at an angle to the semicircular tube. This is done so that the nozzle can then be inserted into a large tube. Mark the hole on the tube with the tap where the nozzle will be inserted, taking into account that the end of the nozzle should stick out from the tube by a couple of millimeters, and the opposite end of the nozzle tube. The excess can be cut off. Having made a hole (not through) inserts the nozzle. If necessary, the edge of the tube can be trimmed. Cuts the edge of the tube into 6 parts and bends them inward. Inserts the opposite end and solders both sides of the tube. Next he makes the burner head. Cutting off 5mm from the key head, expands the hole with a 5mm drill and places it on the nozzle. Makes a container for fuel. Drill two 4mm holes into the lids of the jars - their holes are opposite each other. Inserts a middle tube into one of them so that it does not reach the bottom of the jar by 1 cm. Stepping back 2 cm from the lid, cuts it off. After sawing off another 2.5 cm from the tube, insert it into the second hole in the lid. Solders the tubes to the lid. The tube from the compressor is connected to the long tube of the container, and the burner is connected to the short one. He pours gasoline into the container and, following safety precautions, lights the burner. You can watch the video in more detail. Source
Become the author of the site, publish your own articles, descriptions of homemade products and pay for the text. Read more here.
Recommendations
The principle of operation of the device is what you should understand before making the device. You can consider it using the example of a burner for roofing work. How does the burner work?
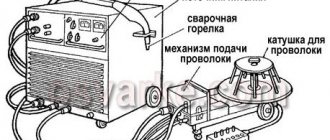
- The device is connected to the reducers of oxygen and propane cylinders by a system of supply hoses.
- Reducers are placed on the cylinders to create working welding pressure.
- A diagram for gas and oxygen is assembled, the tightness of the connections is checked, the nodes are secured, after which the gas can be opened with valves.
- The gas pressure is set to the operating value and the valve opens.
- The fuel is supplied through hoses to the propane appliance.
- The injector carries out the mixing process to form a gas-air environment.
- A working flame with a temperature reading above 2000 degrees comes out of the device.
When performing any welding work, you must wear personal protective equipment: gloves and goggles, special shoes. You can work with propane cylinders only in a well-ventilated area, and at sub-zero temperatures, any actions with the burner are excluded.
What you should absolutely not do:
- work near open fire;
- keep the cylinder tilted;
- place vessels under the sun;
- carry out work without a gearbox;
- Warm up the gearbox over an open fire.
If you can clearly smell the gas, work with the burner should be stopped by closing the valve on the cylinder. Homemade burners, depending on the purpose of use, can be different: burners with a VK-74 valve, devices converted from an acetylene gas cutter and mini gas burners. It is realistic, profitable, and useful to build every homemade device. Only initially you need to decide on the type of structure and its parameters. The gas burner is also used in private households and for commercial purposes. In plumbing, a metal workpiece is heated with a torch, which ultimately comes out quite hardened.
How to make a gas burner, see below.
Peculiarities
A special device is designed for preparing various dishes and creating stunning-looking culinary masterpieces. The range of applications of the device in the kitchen is incredibly wide.
Using a mini gas burner you can do:
- caramelization of desserts and onions;
- create an appetizing crust on many dishes;
- brown meat products;
- peel vegetables;
- singe poultry carcasses;
- prepare desserts;
- melt cheese.
The difference from devices with beam distribution of flame is that a portable gas burner produces fire in a specific place. This device allows you to fry food very quickly.
It should be noted that not using it properly after frying can leave an unpleasant odor and gassy taste on the food.
- the gas stream has not yet ignited;
- fuel does not burn completely.
A yellowish light means the device is not working correctly.
Do you need a gasoline torch when fishing?
- A very interesting question, since a gasoline burner has a certain weight and takes up some useful space. When you go fishing, every kilogram of excess weight is counted. Many people, when going fishing in the summer, do without gasoline burners, since they can light a fire without any problems. But not everyone is always lucky and there are situations when it is impossible to light a fire, especially in bad weather conditions. If wooden branches are very wet, they will not catch fire without additional effort and equipment. Having a gasoline burner will help you light a fire without much difficulty, even if the branches are wet. In addition, you can heat a kettle of water or cook food on a gasoline burner.
- There is another situation when fishing is carried out before dark and no one wants to light a fire because of fatigue. In this case, it’s easier to use a burner to quickly cook dinner, even if it’s late.
- When cold and wet weather has set in for a long time, a gasoline burner will always help out and you won’t have to think about what to cook tea or food with.
Gasoline blow torch
A gasoline burner is designed for the process of high-quality fastening (soldering) together of metal components of a single structure using molten metal. The solder used for soldering has a solid physical state and can be either low-melting or refractory.
Design and principle of operation
When purchasing a gas torch for metalworking by soldering and welding, you should not assume that the kit contains all the elements necessary to organize the work. Since each gas-air burner apparatus has individual drawings, and there are no clearly defined design standards, we will consider the basic (simplified) set of working elements:
- tank for storing gasoline (fuel);
- air compressor;
- gasoline blow torch;
- gas-resistant hoses providing fuel supply,
- stand.
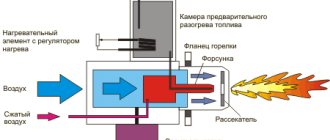
A gasoline burner is a heating device in which the combustion process of gasoline converts it into a gaseous state. Combustion occurs in the evaporator, where oxygen is supplied from the air by a nozzle. As a result, a gasoline-air flammable cocktail is formed, a mixture of the combustion product of gasoline and air, which is involved in the soldering process. The rotary tap located on the handle functions as a regulator of the direction and power of the flame.
Benefits and safety of work
Heating devices for soldering, the initial fuel of which is gasoline, have become widespread in various fields due to their ease of use and thermal performance.
A positive characteristic of the heating device is the ability to operate without preheating.
Advantages of gas burners:
- relatively small weight and dimensions of the device;
- portability and ease of use (compared to its gas counterpart);
- high-quality soldering and welding of metals.
The disadvantage of using the device is the presence of the smell of gasoline in insufficiently ventilated areas. When working with a gas burner, it is prohibited:
- operate the device as intended if a gasoline leak is detected;
- use substances not specified in the instructions as fuel;
- allow the fuel tank to heat up to 500C;
- refuel while soldering or open the container when the evaporator is not cooled down;
- Use in closed or unventilated areas.
Application area
Hard-melting solders and various metals and alloys (brass, bronze, etc.) can easily be soldered with a gas torch. The unit carries out heat treatment (hardening) of small tools, is used in the artistic processing of wood, and even softens glass.
A separate group is represented by tourist burners (primus), they come in gasoline, gas and multi-fuel types.
Advantages and disadvantages of gas cutters
You can quickly and successfully cut metal sheets into individual parts of the required shapes in different ways:
- using hand-held metal scissors, the thickness of the product should be a maximum of 1.5 mm;
- gas cutter (acetylene or oxygen-propane);
- installation of air plasma cutting;
- using an angle grinder.
The advantages of gas processing equipment are:
- you can cut workpieces with a thickness of 4−500 mm (depending on the type of equipment);
- start-up costs for equipment will be minimal.
This solution also has a number of disadvantages:
- thermal deformation occurs;
- sometimes you need to refine the edges and do other operations;
- the cost of obtaining a meter of slot is high;
- it will be necessary to control the chemical reaction of combustion;
- the cutting width is large;
- there is a risk of fire;
- you cannot cut stainless steel and non-ferrous metals;
- with large thicknesses, the taper of the cut is too noticeable.
Using oxygen-acetylene and plasma cutters, you can make curved contours of small radius. When working with both types of equipment, effort will be required to control the distance from the surface of the product to the mouthpiece or nozzle.
The problem is solved by using a special carriage into which the cutter is inserted. When you do this, you will be able to maintain a constant distance to the part as you move. And if you change the angle of inclination, you will end up with a cut with the desired bevel for welding.
What is better than a gas burner compared to a gas burner?
- A gasoline burner uses fuel that can be purchased at any gas station. As for gas, you still need to look for a gas station that refills gas cylinders. Therefore, we can conclude that gasoline is much more affordable compared to gas.
- As gas is produced in a gas burner, the quality of its work deteriorates, which cannot be said about a gasoline burner.
- Far from civilization, although by chance, you can get some gasoline, but gas is unlikely to be found.
- Gasoline burners are lightweight and compact. You can put them in a backpack and take them with you on a hike.
Burner cylinder
The cans for a professional gas burner are almost no different from those intended for everyday use. The best cylinders are those made in Korea. They last up to three hours of continuous use, with a medium flame jet.
- Jigger - types, shapes, styles, measurements and rules of use. 120 photos of jiggers for strong alcohol
Whisk: models, designs, tips for use and features of choosing a whisk (135 photos and videos)
Zest knife - description of a quality tool, use of equipment and use of zest (85 photos and videos)