Circular-type machines belong to the class of specialized processing mechanisms, without which no well-equipped home workshop can do.
This example of woodworking equipment is especially relevant in the conditions of a country house and country house.
When assessing the possibilities of purchasing ready-made equipment, you will encounter a number of problems associated with the inconvenience of handling cheap stand-alone circular saws and the prohibitive cost of professional processing equipment.
The only correct approach to solving this problem is to make a circular saw with your own hands, using materials and equipment that are commercially available.
Note! In order to save money, in small-sized models of machines, an autonomous circular saw, which is rigidly mounted on the bed, is most often used as a cutting tool.
Using a homemade machine, you can saw boards, plane slabs, and also make bars of the desired cross-section.
If desired, you can significantly expand the functionality of your product by providing it with the ability to process wood using an electric planer.
Circular saw device
Being a truly useful tool, the circular saw has a fairly simple design. Its main components:
- bed – frame on which the main units are mounted;
- tabletop with a slot for a disk;
- engine with rotation transmission system;
- cutting tool, disc with teeth.
Optionally, the device can be supplemented with a pusher, which ensures progressive movement of the workpiece towards the disk, and various lifting mechanisms that regulate the cutting depth.
The principle of operation of a circular saw (circular saw) is that the rotation of the electric motor shaft is transmitted to the cutting tool, a disk with sharply sharpened teeth. The center of the disk is located below the level of the tabletop, only a segment of it is removed from it. The workpiece is brought to the rotating disk, the teeth bite into the wood, creating an even cut.
Algorithm for assembling a homemade circular saw
The assembly of a woodworking machine according to the drawing given earlier is carried out in the following sequence:
- a rectangular frame is made from the corners;
- four legs are welded to it at the corners of the required height;
- at a height of about 200 mm from their lower edge, they make a binding from the corners;
- a shaft is mounted on the upper frame;
- fix the driven pulley on one side and the disk on the other;
- a table with a lifting mechanism is made and attached to the frame;
- on the lower frame they make a platform from corners or sheet metal for the electric motor;
- the drive pulley is fixed on the motor shaft;
- put the belt on the pulleys;
- On and off buttons and an electrical panel are mounted on the side panel of the unit;
- using wires of a suitable cross-section, connect the elements of the electrical circuit of the equipment (motor, buttons, protection);
- supply power to the machine from a stationary network.
The final stage is to check the functionality of the assembled equipment. First, you should make sure that all moving parts rotate freely: to do this, simply twist the drive pulley by hand. After which you can start the unit in test mode. If strong vibration is detected, you will need to check the reliability of the bolted connections and fixation of the disk.
You can make a circular saw with a table consisting of two halves or a solid one. In the latter case, you will need to cut a rectangular slot in it for the disk. The design of the machine with a table consisting of two halves is shown in the video below. This video also demonstrates the design of the lifting mechanism for these parts.
Important! To prevent the possibility of the saw jamming due to the connection of fragments of the workpiece being cut, it is recommended to install a riving knife. It should be located at a distance of approximately 3 mm behind the disc.
Making a table top for a circular saw
Assembling the table begins with making the tabletop. The plywood sheet is marked so that the two edges of the lid are the same size as the edges of the iron sheet. Plywood is cut out using a hacksaw or jigsaw.
The edge of the cut can be processed with a milling cutter, but this operation is not necessary. Since the main parameter in the frame is reliability, and not an attractive appearance. The tabletop is rubbed “roughly” with sandpaper.
At the bottom of the tabletop there is a slot for a circular circle. To do this, you first need to measure the dimensions of the sole of the unit. The easiest way to do this is to unscrew the disk from the device and simply circle the desired part of the saw. These measurements are required to determine the seat.
Using a hand cutter, the bars are selected to a depth of approximately 0.9−1.1 cm. If you do not have a cutter, then this work can be done using a chisel, but it will take much more time.
Then, when the seat is made, try the saw on and, if necessary, adjust the recess. Mark the slot locations for the circle and fixing the fasteners. If you need the circle to rise and fall, then you need to install a pendulum mechanism for the tabletop.
In this case, the slot must be made in the shape of a truncated pyramid. In this case, the hypothetical top of the pyramid will be directed downward. The frame itself for the lifting mechanism is best made from steel corners that are welded to each other.
Making a table frame
The markings for fixing the transverse and longitudinal slats, which serve as stiffening ribs, are best installed on the underside of the tabletop. The planks themselves are made from timber. You will need:
- Two transverse parts, length equal to the width of the table top minus 7-9 cm on each side.
- Two longitudinal ribs, the size equal to the length of the lid minus 7-9 cm on each side.
Then you need to make nests for the screws. The slats must be fixed on the lid so that the tabletop extends 7-9 cm beyond the edges of the frame. The fasteners must be as reliable and durable as possible.
The first fastener should be installed approximately 40-50 mm from the edge of the rail. The distance between the screws is approximately 23-25 cm. All parts must be drilled through. The self-tapping screw is attached to the side of the lid so that its head is completely recessed into the wood.
First, the transverse ribs are secured. To make the table top as strong as possible, the edges of the slats must first be coated with wood glue. The structure is fixed with clamps, and without removing them, screws are screwed in.
Allow the tabletop to dry completely. Afterwards, the longitudinal slats are installed in the same way. Then the parts of the frame are pulled together, installing two fasteners on each side. Now the clamps can be removed.
Attaching the legs (supports)
The table legs are made of timber. The height of the supports is selected individually. In practice, it is most convenient to work at the machine when the tabletop is located at hip level. Before fastening, each support must be planed so that the leg goes down to an angle from below. So, the area of the base of the support should be slightly larger, in contrast to the area of the top.
It is best to secure the legs using steel corners. They need to be pressed a little so that the base of the machine is in the “spacer”. This gives the table additional stability. Bolts with washers are used as fasteners; they are secured with their heads facing outward. Otherwise, during work you can be injured by the protruding parts of the fasteners.
The whole structure will be more stable if additional supports are tightened with diagonal slats. They are attached in pairs on each side of the machine.
The surface of the lid is polished and varnished or a steel sheet is used for coating, which is attached to self-tapping screws. At the very end, the instrument is attached directly to the prepared place.
You can additionally make markings on the table top; it will help you cut the wood smoothly and correctly. The control panel of the circular saw is located on the outside of the machine. As a rule, it is mounted on one of the table legs. That's all, your DIY circular saw is ready.
DIY table for a hand-held circular saw
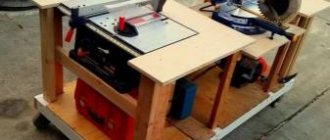
No woodwork is complete without sawing. A manual circular saw is not very convenient for my tasks, and I have long had a desire to make a table for a circular saw. Because My workshop is small, so I needed a small table. Last week I finally made it. (“Laziness is the engine of progress.” It was necessary to saw for the next wooden product, and I didn’t even want to start without it) It took 4 evenings to make the table with equipment.
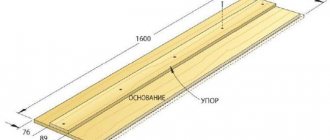
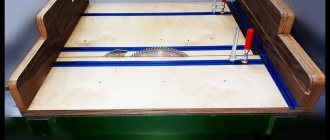
The table turned out to be simple, but quite functional. Table dimensions (W520 x D500 x H230 mm), crosscut sled (W580 x D170 x H 80mm)
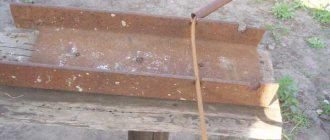
Stop for longitudinal sawing.
For the tabletop, I managed to find a sheet of 9mm laminated plywood on the market. What was very pleasing was that it was sawn off perfectly: all sides were strictly 90 o. I attached a Black&Decker CD601 manual circular saw to the tabletop. (1100 W, 5000 rpm, 170mm). The saw can change the depth and angle of the cut.
Having perfectly aligned the saw with one of the edges of the table, I attached it with M4 screws. To do this, I had to drill the iron base of the circular in four places.
In general, any circular table is suitable for installation on a table, but if you choose the type of fastening with screws to the base, then it is better to choose a model with an iron base. Cast material may crack.
There is another popular way to attach a circular table to a table without drilling holes in the base - attach it using clamps that fix the base, pressing it to the surface. Only this method did not seem to me to be correct enough in terms of accuracy and reliability of installation, and I did not use it.
Another important parameter of a manual circular saw is the ability to connect a vacuum cleaner. If you cut without a vacuum cleaner, fine wood dust rises into the air.
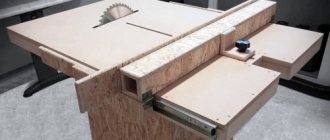
The base was made from 22mm chipboard panels. I chose the dimensions of the base so that equipment could be attached to the edge of the tabletop.
The disc sawed through to the top side of the tabletop. Height - 40mm (Bosh wood disc 160mm). The table top reduces the cutting depth by 9 mm. The cutting depth is set on the circular saw itself. It’s convenient that the disc can be completely hidden in the table.
UPD: IMPORTANT! On a number of budget circular saws, it may turn out that the disk is at an imperceptible angle. And all the cuts will be beveled. Be sure to check with a tool square that the disk is at 90 degrees relative to the table surface. (before installing the saw, you can check the angle relative to the original platform. If the disk is not at a right angle and it is not possible to set the ideal angle of the site, you can place several strips of tin on one side under the platform, achieving an ideal angle (you can use washers for the screws that secure the saw to the table, but this solution is worse)
To make it more convenient to control the start of the saw, I installed a start button (it turned out that this is the most expensive part of my table