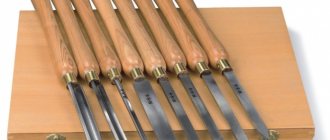
Making a gravel for engraving on metal
Making a serger of the simplest design is possible for a home craftsman with metalworking skills. To do this, take as a basis:
- file or needle file;
- spring leaf;
- part of the bearing race.
The main thing is that the steel is high-strength and elastic. Strength is necessary for the graver to successfully cut the metal of the workpiece, not become dull for a long time and maintain the specified sharpening shape. Elasticity will allow the tool not to break under load.
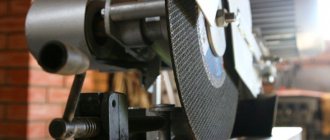
A higher-quality cutter can be obtained by forging, but for this you must have good blacksmithing skills and have a forge. A file made from a needle file will be noticeably inferior to a forged one in both strength and flexibility.
Before you start sawing and forging metal, you should build a drawing of the tool. You will need not only a large-scale image of the cutter itself, but also a drawing of the handle.
How to forge a graver
Beginner engravers make do with purchased gravers or repurposed files. Mature craftsmen often feel the need for a reliable forged chisel.
Making a forged graver yourself requires intermediate level blacksmithing skills. Instructions on how to make a gravel using the hot forging method are given below.
Forging is divided into the following main stages:
- forging workpieces;
- hardening;
- final processing and finishing.
During forging, it is necessary to constantly monitor the temperature of the part. It is determined by a pyrometer or the traditional method - by the color of the glow. At the beginning of the process, the part should be light yellow, in the last operations it should be light red.
A well-heated workpiece must be grabbed from the forge with pliers and placed on the anvil. Light, frequent blows knock off the scale. To obtain a rectangle, the cross-broaching technique is used. To form a triangular shape of a part, it is pulled longitudinally on the edge of the anvil, turning it at the required angle. A similar technique is used for broaching for a trapezoidal section shape.
In a more complex way, the blacksmith achieves a diamond-shaped section. First, the tip is pulled in one direction, then the product is turned over and pulled in the opposite direction. In this case, part of the part will have to be cut off.
The next operation is broaching the tail part of the cutter. it must be additionally calcined and stretched until a pyramidal tail is formed.
You can move on to the next stage - hardening. Hardening of carbon alloys is carried out in the following sequence:
- heat the product to 805 ±15 °C;
- quickly immerse in cold water;
- check the degree of hardening with a file: if it slides over the metal without forming chips, then the required hardness has been achieved;
- When chips form, quenching should be repeated.
And the final stage is machining. The grinder is given its final shape on the abrasive wheel. Here the blade is sharpened to the required sharpness. The final finishing is done on a fine-grained wheel.
Making your own quills
The graver, like all engraving tools, is usually made from carbon tool steels such as U8, U10, U12. Stickers made of alloy steel grades HVG, HV5, although they hold an edge better, are inferior to cutters made of carbon steel in the clarity of the stroke when engraving handwritten fonts and glossy monograms.
The production of gravers begins with filing rectangular steel blanks with a length of 90-100, a width of 9-10 and a thickness of 2-3 mm. They are given a shape that resembles a wedge in cross section. During final processing, the wedge-forming side edges of the Spitztichels are made slightly convex, and the Messerstichels are made flat. When making a graver, the following mandatory conditions must be observed: 1) the cross-section of the cutter must be the same along its entire length; 2) the lower edge of the cutter should be straight or with a slight smooth external rounding from the middle of the blade to the toe; 3) the cutting edge, semicircular in cross-section, must have a constant width or a slight expansion towards the cutting edge.
A bevel is made on top of an unheated gravel (then after hardening it will be easier to sharpen the polished section on a mechanical sharpener), and on the opposite side a flat tongue is filed for attaching the handle. Finished cutters should not be polished: shiny metal glare irritates the eyes and polished gravers are inconvenient to use and slip out of your fingers.
The next operation is hardening. The cutter, heated to a light crimson color (about 800°C), is immersed two-thirds of its length in water. To avoid the formation of a fragile boundary between the hardened and raw parts of the blade, the immersion level is quickly changed. Partial hardening of the graver is done not only because in practical work the cutter is rarely used for more than half its length, but primarily so that it does not break when hammering the handle and especially during work. Breaking the blade in the tang can cause serious hand injury.
Scheme of working with flasks and bolts through the lining The lower edge of the cutter and the thumb of the right hand rest on the lining, the index and middle fingers of the left hold it on the engraved plate.
At an angle of about 70°, the serger is directed towards the surface to be processed and, with the handle lowered down, it simultaneously moves forward, cutting off the metal. The support lining has a bevel on one side. Side edges of different heights allow you to select the most favorable support point for cutting during work, depending on the depth of the cut. To relieve stress, hardened and descaled gravels are tempered. They are uniformly heated to a light straw color in the flame of an alcohol lamp and quickly cooled in water.
After release, the gravers can be attached to wooden handles. The extended necks of the handles allow you to adjust the servimeter exactly to your hand. The most convenient to use will be a gravel, the toe of which in working position protrudes beyond the thumb by 15-20 mm. A safety metal ring with a diameter of about 10 mm is placed on the handle, and a guide hole is drilled in the center of the neck. The handle is stuffed onto the cutter, clamped through spacers in a vice, and then a segment is chopped off from the bottom of the “fungus”.
The working movements of the cutter during the finishing process are made strictly parallel to the plane of the abrasive. A microbevel is formed on the cutting edge as a result of the handle being raised.
On mounted gravers, flat emery stones or diamond files are used to correct possible distortions in the shape of the cutting edge after heat treatment. The finishing of the cutting edge is completed by sanding with micro-abrasives and polishing with chromium oxide applied to thick paper or leather. All finishing work is done on an even flat block.
During final finishing, the following requirements must be met: 1) movements of the cutter during longitudinal grinding and polishing of the cutting edge are made only in one direction—towards you; 2) the graver is evenly rotated around its axis to give the cutting edge the shape of a semi-ellipse; 3) during finishing, the cutting edge should not have any angle between any of its generatrices and the abrasive plane, otherwise microchamfers appear on the cutting edge, preventing the cutter from moving forward or pushing it upward. Chamfers are formed in the final phase of the pen's movement toward itself if the handle is raised upward.
The tear-off angle (alpha) for engraving on a plane is 4-5°. Taper angles for steel (a), brass (b), copper (c).
Further refinement of the cutter involves adjusting its most important working angles.
The lift-off angle, which ensures that the cutter moves at a given depth and removes it from the metal at the desired point, should be approximately 5° for engraving on a plane. It is adjusted during finishing of the cutting edge.
Purpose of the graver
For engraving, the master needs a set of metal stamps of different shapes to engrave various elements of the image. The most common are:
- Spitz is a wedge-shaped cutter with a slope of 30 to 40°, used to design the outline of an image and clear elements of great depth;
- Messer - resembles a knife, the wedge slope is from 15 to 30°, it is used to make fine details;
- flah - similar to a chisel blade 0.15-6 mm wide, used to select depressions in the design;
- bol - a rounded point with a radius of 0.2-0.6 mm; with its help, semicircular depressions are selected, from which text elements of the design are formed;
- hornbeam - diamond-shaped section, large elements on concave elements are chosen with it;
- facet - a trapezoidal section with a blade sharpening angle from 50 to 115°, used for forming images of high complexity;
- Shatir - the blade has a serrated shape with a distance between the teeth from 0.1 to 0.5 mm, it is used to obtain several parallel strokes.
Stichels for carving metal of other shapes are rarely used for restoration work and when making particularly complex images.
Engraving with a graver on metal surfaces
Sticky engraving on metal requires the engraver to have a faithful eye, a steady hand and artistic taste, but above all, patience and perseverance. It is also necessary to decide on the material for the blanks. Copper and brass are more suitable for a novice craftsman. More experienced engravers work on other non-ferrous metals and soft steel alloys, using specific engraving methods and improved tools.
All that is needed for engraving tools and equipment is a work table and a set of gravers. At the first stage of mastering hand engraving technology, it is recommended to achieve stable quality of straight and curved strokes. When they begin to turn out confidently, you can move on to more complex elements of the image.
Before starting to engrave the workpiece, the master traditionally checks the sharpness of the sharpening pen by running it along the tip of the nail. If the strip can be cut without effort or pressure, the sharpness is sufficient. The handle is clamped in the working hand, the thumb and index fingers cover the incisor 10-20 mm from the tip.
The blade is pressed against the surface of the workpiece at an angle of 35-45°, then the angle is sharply reduced to 5-10°, while a piece of metal is cut out of the workpiece and a stroke is formed. For beginners, it is not recommended to limit their length to 3-4 mm. As you gain experience, you will begin to get longer ones.
Pneumostihel Sergei Valtman
and so, I played with these tubes and motors, gradually began to understand for myself what weight of pistons for what work, which compressor is better to take, the engine.
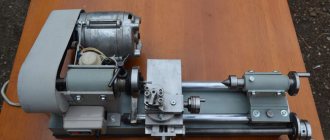
Well, there was an ambush with the turners, but my hands were itching terribly, I bought a lathe and started making my own version from a stainless tube. Based on my considerations, I chose the size of the tool holder and the intermediate impact element, to match the rubber bands that are available in the auto store, sat down and drew on graph paper, and this is the first option I got
The drawings were drawn by Rumen Radkov
Oleg has already posted the details on the forum. The pistons are only now different with fluoroplastic jackets
Of course, I ruined a couple of blanks, but then I got what I needed, well, of course, I sanded the .. raw .. stainless steel and carbonitrated the cylinder tube and lock nut, in the composition that I wrote about at the beginning, after two hours, the result was a beautiful black part like a weapon , with surface hardness, the file slides. Then I used felt and polishing paste to just add gloss and that’s it!
The pistons and tool holders were heated, but this was not worth doing, because after experience, I realized that all the parts can be carbonitrated and that’s it, volumetric hardening is not needed, there are no such impacts that something would rivet.
It is enough to select steel grades with the desired properties, as a result you can obtain a thick layer and high hardness, which also does not require grinding after technical maintenance.
But I’ll say right away that it turns out just great from ordinary food-grade stainless steel 12x18n10t. Here is the first sample, still with an all-steel piston, now they have started to make composite pistons, the jacket is sharpened from fluoroplastic, and it has a steel insert with a flange, to increase the area over which the impact is distributed, otherwise the core will simply pierce the fluoroplastic
Now the pistons have become weighing 1.5, 2.7 and 4.2 grams, respectively, for different jobs, like this
Why several different ones? In order not to make three handles as in GRS, but only three pistons, since the remaining intermediate forces of the piston impact are regulated by decreasing or increasing the piston stroke, due to the thread on the cylinder. The spring is selected to be somewhat longer, and as it is adjusted, it is shortened to the point where at maximum speed, with the spring fully screwed in, the piston strikes are barely audible. The spring was selected experimentally and the most suitable one is made of wire diameter 0.5-0.6mm
Here's a video on how to adjust the handle.
This makes it possible to have the widest range of power, from micro-engraving of names to upsetting thick prongs.
Here you can see the range of capabilities of this very simple machine.
from the side, the engraving of the stamp looks like this (the camera automatically amplifies the sound, in fact it is several times quieter)
This pneumatic clamp doesn’t even need a filter, what’s more, it’s absolutely insensitive to gaps, but it doesn’t pump air, it’s simply consumption-free, closed-loop)))
Adjusting the impact force is also possible in another way, for example, by increasing the parasitic volume, as in a pneumatic hammer, or by partially depressurizing the pneumatic system, for example, a forum member installed a depressurizing valve on the cylinder of the compressor block for adjustment.
Source
Types of gravers
In addition to traditional hand tools, mechanized cutters have recently become increasingly widespread. The shape of their blade is exactly the same as that of a manual blade, but the pressure on the cutter is carried out due to a mechanical drive. Depending on the type of drive, the following types of gravers are distinguished:
- electric softener;
- pneumatic squeegee.
You can buy an electromechanical serger, or you can make it yourself. This will require serious skills in electrical engineering and design.
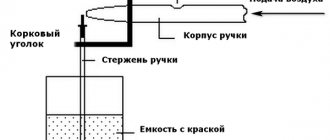
The design and manufacturing technology of a pneumatic hammer for metal is much simpler. To assemble it, it is enough to grind (or select a suitable one) a cylinder and a piston, which, under the influence of compressed air supplied through the pipe, will hit the shank of the graver.
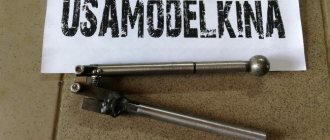
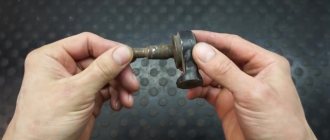
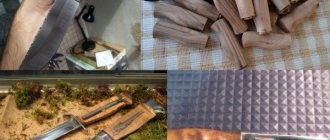
I made a graver out of iron.
I turned blanks from scraps of steel.
I put handles on them and sharpened them. I bought a collet clamp at a hardware store, drilled the handle, put it on glue and sanded it.
I bought a magnifying glass for 100 rubles and attached it to an old camera tripod.
He screwed it to the table.
I tried to cut it. There was no process, I did everything in a hurry.
I sanded it with sandpaper, polished it with GOI paste and stuck it on double-sided tape. Let it hang. And I will have something to do at work. For those who want to try carving on metal, I will say that the organization of this disgrace cost me about a thousand rubles. You can cut it on an old coin by grinding it down to a smooth surface and attaching it to a stand.
Possible duplicates found
Naturlikh, Margarita Palna!
Rasp – file – dry sandpaper)))