A jigsaw machine is a high-precision equipment designed for processing workpieces of varying complexity, made of different materials. To choose the right device, you need to study its design and familiarize yourself with some useful recommendations.
Basically, the einhell jigsaw, like its competitors, is used for the following purposes:
- Processing complex contours from workpieces;
- Cuts on the internal surfaces of the material without affecting the external contours;
- Furniture manufacturing;
- Production of musical instruments;
- Creation of all kinds of wood-based blanks.
In addition to wood, even a self-assembled jigsaw machine is capable of working on plastic, ceramics, plexiglass, polycarbonate and a number of other materials. But still, the main material that jigsaw machines have to deal with is wood. Makita machines cope with this task perfectly.
Design
Studying the jigsaw machine wmss 11 01 or its competitors represented by Makita, Bosch, Excalibur with the aim of assembling a similar device with your own hands, we can say that structurally they all look approximately the same.
If you decide to make a homemade jigsaw machine and equip it with a CNC module in the future, then it is better to start manufacturing by studying the design of factory models.
The main structural elements of the machine are:
- Desktop;
- Electric drive;
- KShM (crank mechanism);
- Sawing tool;
- Tension mechanism;
- Auxiliary elements;
- CNC module.
If we take for example machines such as Makita, Proxxon, Dewalt, Hegner, Holzstar, Excalibur, DKS 502 Vario, Dremel or WMSS 11 03, they will be structurally close to each other. But the estimated price is from 6-10 thousand rubles. Therefore, the choice should be based on technical parameters and your personal needs.
- The work table is used to place the workpieces being processed. A number of machines are offered with rotating mechanisms for the table, which allows the operator to change the angles of inclination and perform inclined processing of parts as necessary. When making a homemade jigsaw machine, you should think about graduation to simplify marking. The size of the table determines the size of the workpiece you can work with. Therefore, base your choice on what materials you will be dealing with. A standard table has a length limit of 30-40 cm.
- The drive differs in power. Manufacturers such as Makita, Hegner, Dremel, Dewalt, WMSS 11 03, Proxxon, Holzstar, Excalibur, DKS 502 Vario offer a wide range of machines, each of which has different drive powers, nuances of the CNC module, etc.
- KShM. This mechanism transmits torque from the electric drive to the saw of the machine. The vertical movement of the file can be 3-5 mm at a speed of up to 1000 vibrations per minute. Some machines, including Makita, Excalibur, WMSS 11 03, Dremel, Dewalt, Hegner, Holzstar, DKS 502 Vario, are equipped with a function for adjusting the sawing frequency. This allows you to adapt the machine to the specific type of material being cut.
- File. With a length of 20-35 cm, it is capable of sawing a workpiece 10 cm thick. Saws vary in size and materials. The choice is based on the density and characteristics of the materials that need to be cut.
- Tension device. Due to it, the file receives the necessary tension at working points. Depending on the model, the device is based on springs or leaf springs.
- Auxiliary elements are primarily a dust extractor. If you decide to make a homemade jigsaw, we recommend providing this functionality. It can be organized using a regular vacuum cleaner.
An ordinary jigsaw is sometimes quite capable of replacing a jigsaw-type machine. A jigsaw is not a stationary unit, but a hand tool. At the same time, the jigsaw has a wide range of applications. For household needs it may be enough. If, for work in a workshop, garage or production, maximum cutting accuracy is required, then instead of a jigsaw it is better to purchase a full-fledged machine. Even better - CNC. The CNC module will provide process automation. The necessary programs are set through the CNC, and the machine independently processes the workpieces according to a given algorithm.
A jigsaw cannot have CNC control, since it belongs to the category of hand-held power tools. A stationary unit is in many ways better, which is why the choice often falls in its direction. This is evidenced by numerous reviews from consumers of Makita, Proxxon, Dremel, Hegner, Dewalt, Excalibur, Holzstar, WMSS 11 03, DKS 502 Vario machines, etc.
Manufacturing of structural elements
The manufacturing instructions will be divided into 5 points and include steps to produce a homemade bandsaw. The article provides photo and video materials that will help you not make mistakes during production.
Base
- Since the band saw must be strong, it is necessary to prepare plywood with a thickness of at least 15 mm. We cut four blanks 550 mm long and 23 mm wide.
- Next, we make the markings using a pre-created stencil, or you can make the markings directly on the workpiece. The two plates located inside must have a niche for the adjustable mechanism. For external parts it is necessary to draw a through groove. The amount of vertical adjustment will depend on the size of this groove. Next, you need to mark a through hole for the lower drive shaft. In addition, we will need a surface for a saw table, the dimensions of which in terms of the width of the table will not exceed 150 mm. In all workpieces, it is necessary to cut a square between the circles in height equal to 15-20 cm, and not exceeding 15 cm in width.
- Using a jigsaw, you need to cut out the necessary parts, as well as the adjustment groove for the upper pulley, then drill a hole for the lower drive shaft.
- Next, you need to assemble the future foundation. For assembly, use PVA glue or any other wood glue. We apply it in an even layer on all the surfaces to be glued, then we apply the parts to each other, avoiding inaccuracy. Fixing the products must be done with clamps, since high-quality gluing requires a tight fit of the workpieces. It is necessary to wait a day until the glue dries completely.
- We install bearings for the lower drive shaft.
Saw blade (band) tension mechanism
- To make a tensioning mechanism for a band saw, you need to make a block, the dimensions of which will correspond to the niche in the saw body. A hole is drilled at the end of the block for the pin and fitting. Sockets for bearings are cut out on both sides.
- We insert the pin and secure it in the block. It should stay firmly in the hole. To increase the strength of the fastening, before inserting the pin, apply PVA glue to its surface, and you also need to additionally secure the pin with a self-tapping screw or screw.
- Next, the shaft bearings and fixing sleeve are installed.
- Using a screw in the foot, the saw blade tensioning mechanism will be rigidly fixed.
- It is necessary to install a handle on the pin, the rotation of which will allow you to change the depth of immersion of the bar into the base, thereby changing the distance between the pulleys - this is how the belt is tensioned.
Pulleys
While the base glue dries, we begin to manufacture the moving elements, namely the pulleys. The entire process of their manufacture is reflected in the photographs provided.
- On a sheet of plywood 15 mm thick, you need to mark the contours - a circle with a diameter of 150 mm.
- Cut the blanks with a jigsaw along the outlined contours and drill a hole in the center of the circle.
- Even the most precise and careful sawing will not give the workpiece perfectly correct shapes, so it is necessary to grind the ends. For this, a grinding machine with a table at 90 degrees relative to the plane being processed will be used. If you do not have a suitable tool, you can grind the edge using a hand-held grinder or a homemade screwdriver with a grinding attachment. The workpiece is fixed with a bolt or self-tapping screw to some base. Thus, when it is fed to the grinding wheel and rotated around its axis, a perfectly smooth circle is obtained.
- After processing the pulley on a grinder, you need to wrap its ends with insulating tape in several layers, and you can also use rubber from bicycle inner tubes.
Sawing table
The saw table will be 15 cm wide. It will be installed on a special end face of the base of the machine between the pulleys. You need to make a cut in the table for free movement of the saw blade. The dimensions of the table being manufactured depend on the needs and preferences of the craftsman. You can make a small table that only slightly protrudes beyond the machine and saves space, or you can make the upper surface area larger for ease of work. As always, in life you need to choose the “golden mean”, so the final decision is up to the master.
Saw blade (cutting band)
It is best not to make the cutting blade yourself, but to buy a ready-made one. In stores you can find a wide variety of options, which differ in type, size, type of steel used, hardening of the material, shape of the teeth, their setting, etc.
Below is a table with some parameters of saw blades.
| International marking | Decoding | Body hardness | Teeth hardness | Application Feature |
| Constant hardness | with equal hardness over the entire area | 45 – 48 units. HRc | 45-48 units HRc | This type is used on small diameter pulleys. |
| Flex back – Hard Edge | with high levels of tooth hardness, but a flexible body | 30-33 units HRc | 63-65 units. HRc | The upper part of the tooth is hardened, while the rest of the product is flexible. Able to withstand larger feeds compared to the previous type. |
| Hard Back | blades hardened over the entire area | 48-53 units HRc | 63-68 units. HRc | The saw band production technology is the most modern and is used in industry. Capable of performing a larger volume of work, but the price is significantly higher. The canvas is used in professional machines. |
In addition, band saws differ in tooth size:
- with small tooth
- with middle tooth
- with large teeth
The greater the hardness of the tape, the greater its resistance to dulling. The rigid blade allows you to cut material at high feed rates without compromising the performance characteristics of the work.
In this case, for our band saw, the best option was to choose a blade 1065 mm long made of carbon steel, marked Constant Hardness.
Criterias of choice
When such machines as Makita, Dremel, Holzstar, Dewalt, Proxxon, Hegner, DKS 502 Vario, WMSS 11 03 are presented on the market, the choice is complicated by the wide range. To make your choice a little easier, carefully consider your machine requirements.
Based on them, you will be able to understand whether the scheppach deco flex jigsaw machine is suitable for you, or maybe you will even prefer a homemade jigsaw machine.
- Power. Equipment Dewalt, Hegner, Makita, Proxxon, Dremel, WMSS 11 03 is offered in various designs - from household to professional. The choice in favor of professional devices with modern CNC should be made by specialists who regularly operate the equipment. The power of such devices is from 1 kW. The power parameters of household models from Dewalt, Proxxon, Makita, Hegner, Dremel are in the range of 500-950 W. Power affects the depth of cut and the duration of non-stop work. You should choose a more powerful model even for domestic use, since they have a margin of durability.
- Weight. The more powerful the selected Dremel, Dewalt, Makita, Proxxon, Hegner or WMSS 11 03 unit, the more weight it will contain. Since this is not a hand tool, it is important to take weighty devices. They generate less vibration, ensuring the required quality of processing.
- Speed. Here the speed is determined in moves per minute. Most machines from Makita, Proxxon, Hegner, Dremel have frequencies in the range of 0-3500 units. Industrial models provide increased travel speed, which guarantees high-precision processing.
- Personal feelings. When choosing a machine, be sure to try it out. This way you will understand how comfortable it will be to deal with him.
- Speed adjustment. Modern machines from Dremel, Proxxon, Makita, Hegner, Dewalt necessarily include the ability to adjust in the list of available functions. Only each model has its own range of adjustments. Be guided by the materials to be cut. The more varied the workpieces are planned, the wider the range of settings you choose. In this regard, CNC models are convenient. They are customized for a specific material, which allows you to practically not take part in operations during cutting. This is the main advantage of CNC, for which many are willing to pay a lot of money.
Before you make a jigsaw machine with your own hands, based on drawings and videos, or purchase Makita, Proxxon products or a WMSS 11 03 machine, carefully consider your actions.
Homemade units are good in some places, but they are far from the level of Makita machines. Makita has proven itself to be very good. Many units from Makita receive numerous positive reviews and laudatory criticism from experts. Yes, in addition to Makita, there are a number of other companies on the market that we talked about.
It is up to you to choose whether it will be a Makita machine, or decide to cut the blanks on Proxxon or Bosch machines. For some, it’s even easier to make a device with your own hands than to pay for what is undoubtedly a high-quality Makita product.
- Device and principle of operation
- Assembly instructions
- How to remake a manual jigsaw
- Sewing machine machine
A tabletop jigsaw is equipment for cutting and sawing out shaped parts from various materials. Its feature is the ability to make cuts while maintaining the integrity of the outer contour of the workpiece. Depending on which saw is installed on the structure, the machine can process natural wood, its derivatives, plastic bases or metal.
The device is indispensable when performing construction and repair work, producing furniture and souvenirs. Equipment is often purchased for domestic purposes. Sometimes it is irrational to buy a factory unit: you can make a jigsaw yourself. The photo shows the design of the tool.
How does a band saw work?
Band saws may vary in design depending on the model. However, for a home workshop, a machine with a vertical blade is usually chosen, which consists of the following main parts:
- frame, or frame;
- sawing table;
- drive, or electric motor;
- pulleys;
- saw blade.
The design is activated when the electric motor is turned on, and the cutting belt begins to move along a closed circular path at high speed.
Important! People most often assemble wood saws for the home with their own hands. Theoretically, machines can work with metal, but it is difficult to build a structure with the appropriate characteristics from scrap materials.
Device and principle of operation
A stationary factory sample includes a work table for a jigsaw, a unit with a cutting element is fixed on it, an electric drive installed under the table top and a crank mechanism. The tension unit is installed at the top or bottom of the machine. Many models of units allow you to cut material at different angles. This is necessary for making bevel cuts. Often, for convenience, markings are applied to the rotating mechanism, stops, and guides. The length of the cut depends on the dimensions of the table; in most models it is 30–40 cm.
The power of an electric jigsaw may be low. For domestic purposes, a 150 W unit is sufficient.
An important element is the crank mechanism. It is responsible for the quality of transmission of engine torque into the translational and reciprocal motion performed by the cutting element in a vertical position.
A standard jigsaw tool is characterized by a vibration frequency of up to 1000 per minute with an amplitude of 3–5 cm. Some samples provide for adjustment of the processing speed of various materials. In most cases, such a tool is equipped with a saw up to 35 cm long, which allows cutting parts up to 10 cm thick.
In order for the cutting element to serve for a long time without breakage or cracks, it is necessary to provide it with optimal tension along its entire length. For this purpose, screw and leaf springs are used. As an additional option, factory machines are equipped with an air pump to remove sawdust from the cutting line. A unit with a drilling unit is useful, but you need to pay extra for each additional unit.
Assembly instructions
A jigsaw is made from a refrigerator compressor or a regular drill. The cutting blade can be set in motion using the motor from the washing machine. Another option is to use hand jigsaws and old sewing machines. The figure shows a design drawing.
How to remake a manual jigsaw
First of all, the table is made. For this, a sheet of thick plywood or metal is used. Through holes are cut out for the cutting blade and fasteners. Through them, the manual unit placed below is fixed to the supporting structure. Next, the jigsaw table is secured to any stable wooden table. Guide rails are added.
If necessary, the machine can be quickly disassembled.
The standard device is equipped with springs that provide the file with the required level of tension. You can’t do without a rocker arm; one of its edges is under spring tension, the second provides attachment to the cutting element of a jigsaw. You can also clamp the blade between two guide rollers.
Before starting work on a homemade jigsaw, be sure to turn off the pendulum stroke.
Sewing machine machine
A jigsaw from a sewing machine contains a saw speed regulator, provided by a speed switch on the equipment.
For manufacturing, the thread weaving mechanism is removed. In most designs it is placed at the bottom. Unscrew the bolts, knock out the cotter pin, remove the drive shaft leading to the thread weaving unit.
Then the upper protective panel opens, the groove along which the needle moved expands to the width of the file. Jigsaw saws are slightly modified: they are cut according to the size of the longest needle that could be installed on the machine. In order not to make an adapter for fixing the cutting element to the seat, grind off the upper incisors and make the lower part of the blade sharp. A cutter is installed in the needle holder. After this, they begin cutting out the blanks.
An electric jigsaw is a tool that in recent years has firmly taken its place in the arsenal of almost every owner. And if you haven’t taken it yet, then this article will come in handy, because choosing a good tabletop or manual jigsaw that would meet all your goals is quite a difficult task.
How to make a machine from a hand jigsaw?
Let's consider the procedure for making a jigsaw machine. The design consists of a work table with a jigsaw attached to the bottom. The rocker consists of a rigidly reinforced post with a movable spring-loaded lever. This option is considered affordable and reliable, devoid of unnecessary components and parts.
For simplicity and clarity, it is recommended to sketch out working drawings that will clarify some design features and answer questions regarding dimensions, connection points and other details of the assembly process.
The creation of a machine can be divided into three stages, which should be considered separately:
Preparatory stage
Before starting the actual manufacture of the machine, it is necessary to make some preparation. First of all, you should make a special adapter for installing the file. In most jigsaws, the seat end of the file is inserted into a socket and clamped with a screw.
The cutting element of the machine is a thinner and longer file with holes at the ends, which are placed on special pins (or through which mounting screws pass). Therefore, it is necessary to make an adapter, the lower part of which copies the shank of a standard file for a given jigsaw, and the upper part is equipped with a hole for a screw with a nut, with which the adapter is connected to the bench saw.
Here the procedure is not limited in any way - some grind a part of the desired shape from a metal plate, others take a piece of a finished file with a shank and weld a steel washer to it, followed by processing for accuracy.
In addition, you need to prepare the necessary tools and materials, including:
Figure 3 – Drawing of a jigsaw machine
- Bulgarian;
- electric drill with a set of drills;
- screwdriver;
- welding inverter with electrodes;
- pieces of chipboard or multilayer plywood for the desktop and bed;
- connecting corners;
- fasteners (self-tapping screws or bolts with nuts).
This list is not exhaustive; additional tools or materials may be needed.
Creating blanks
The first step will be to make a desktop. A piece of plywood or chipboard of the planned size is sawn off. There are no special restrictions here, but you will have to take into account the size of the room in which the machine will be placed. A table that is too small will be inconvenient for working with large parts, and too much table space will take up a lot of space in the room (or workshop).
As a rule, when choosing the size of the table, they are guided by the size of the parts that will be processed on the machine. Holes are made on the table for attaching a jigsaw and for a file. To do this, unscrew the sole from the tool, apply it to the table and mark the centers of the holes for the connecting bolts.
Important! The connecting bolts that secure the jigsaw to the work surface must have a countersunk head so that they do not protrude from the plane of the table and do not scratch the workpiece during operation.
Figure 5 - Rocker arm of a jigsaw machine
The second step will be the manufacture of the rocker arm. It will require two elements:
- rack;
- movable lever.
For the stand, take a profile pipe of rectangular cross-section and weld a support platform at the bottom.
Its size should ensure immobility, stability and reliability of the rack during operation under load.
The height should correspond to the length of the file in the maximum raised state, plus a small margin for the size of the attachment point.
The best option is that in the middle position of the saw, the movable lever is in a horizontal position.
The moving element is a beam mounted on a rack using a hinge joint. The length of the front part ensures that the saw blade attachment point is positioned exactly above the corresponding jigsaw element. The back of the lever is connected to a spring that provides tension.
Then you need to make a tension unit. It is a regular spring, which is tensioned using an adjusting screw. It is attached to one end of the spring, threaded through a special loop on the frame and tightened using a nut and washer.
Attention! Vibration can cause the tension nut to unwind, loosening the tension. It is recommended to secure it with a lock nut.
Assembly
The assembly process is not difficult. You need to do the following:
- Connect the work table and the bed.
- Install the jigsaw.
- Secure the stand with bolts.
- Install the lever.
- Attach the tension spring and secure on both sides.
If the calculations were performed correctly, the file will move exactly vertically without yawing to the sides. It is recommended that before starting the jigsaw, check its progress and make sure that no unforeseen situations are expected.
Hand jigsaw for wood - first cutting lessons
All boys learn what a hand jigsaw for wood is at school during labor lessons. This is one of those tools that you can trust even to a child without fear for his safety. The simplest structure of a U-shaped frame with fasteners on the edges is actually intended for the most delicate work in the art of sawing - although an electric jigsaw speeds up the work significantly, it is not always able to cut out the thin curl you need. Therefore, in any workshop, a manual jigsaw will always take its place of honor, and besides, making such a jigsaw with your own hands is not particularly difficult.
There is one peculiarity in sawing with a hand tool - for convenience and speed of work, the miniature saw blade must be tensioned like a string, eliminating possible sagging. It will be inconvenient to work with a sagging blade, and the blade will most likely break at the first jam. The direction of the teeth is strictly against the downward movement of the blade. The thinner the blade you choose, the finer and smoother the carving will be.
Introduction
In the workshop, everything should be at hand and the abundance of tools makes the master truly free to choose methods and techniques of work. One of the most basic operations in any workshop is sawing workpieces. Moreover, sawing can be different - somewhere you need to saw off quickly and the quality of the cut is not important, somewhere you need a blind saw and a circular saw or jigsaw with a special file can handle it, somewhere you need an extremely even saw, and so on.
A DIY wood band saw deserves pride of place in the workshop. Not everyone has it, however, the ease of its use is undeniable. Its advantages include the following features:
- High cutting quality, as there is no return movement of the cutting blade.
- High sawing speed, as the cutting band moves at high speed.
- High maneuverability when sawing due to the small thickness of the cutting blade.
- High versatility and flexibility of tool use.
- High operational safety.
However, the band saw also has disadvantages. Let's list them:
- This is a stationary saw, so there is no possibility of its mobile movement.
- Limited sawing area due to design features.
- Large dimensions.
Which jigsaw to choose - main characteristics
Before you go to the market, find out for yourself what basic characteristics of the tool you should pay attention to when choosing a jigsaw. Engine power - of course, this parameter should be taken into account first. The minimum and maximum thickness of the material being cut and the cutting speed depend on it. The quality of the cut also depends on the engine power. For household tools, the normal power range is from 280 to 550 W.
Pendulum movement is a function that not all jigsaws have, but its presence is mandatory for serious tasks. If in normal mode the jigsaw moves the file only up and down, then a jigsaw with the pendulum movement turned on deflects the blade from the cut back during the lower stroke and feeds the blade towards sawing on the upper stroke. Due to this, the cut is better cleared of shavings and saw wear is reduced, and cutting with a jigsaw becomes an easier task.
The amplitude of oscillation is adjusted when cutting different materials, for example, for softwood and plastics the maximum mode is selected, while with thicker wood, cutting soft metals and chipboards, the amplitude decreases.
This function is completely disabled when it comes to working with sheets of metal or cutting steel. Number of moves – when deciding which jigsaw to choose, pay attention to this factor. Single-speed jigsaws can only work properly when working with wood; when cutting metal, the tool’s motor may fail. Therefore, for greater functionality, it is recommended to buy devices with the best possible adjustment and the widest range. The broader the latter characteristic, the more versatile the tool becomes.
In some jigsaws, the number of strokes is controlled by a fixed switch, which sets the speed preset by the manufacturer. But jigsaws are considered more professional, in which the speed is regulated by the force of pressing the start button
, located on the handle under the index finger. However, even in such models it is possible to operate at fixed speeds. The maximum power of the tool is turned on when working with wood, the average number is selected for working with soft metals, such as aluminum, and ceramics provides a minimum number of strokes.
At the same time, the load on the engine occurs precisely at low speeds, therefore, when working with metals, let the tool cool down from time to time, either in the off position or at the maximum number of strokes. However, listen to the tool, the sound of the jigsaw and the ease of cutting are the best advisers.
Fastening the saw blade - be sure to pay attention to this characteristic. After all, in the future it will determine how easily you can select files for your tool. Often, the saw blade fastening mechanism provides for the possibility of fixing the blade in the seat with a clamping hex bolt and a notch for a screwdriver or a quick-clamping mechanism. If the tool can work with files that look like a cross on the tail, then you can safely buy it. Cross files are the most common type that you will find in any store.
Choosing a jigsaw - nice extras
In addition to the main characteristics, it doesn’t hurt to pay attention to minor additions that can make working with this tool much more comfortable. Blowing and dust extraction systems are by no means uncommon among this type of tool. The air flow from a running engine, directed in the right direction, does an excellent job of removing sawdust from the cutting line. If it is also possible to connect a dust extraction bag, the work process will become much more comfortable.
The ability to make bevel cuts is another feature that is very useful in any business. Some tools provide for work only in fixed positions, but a jigsaw with smooth adjustment of the inclination of the tool in relation to the “sole” is much more preferable.
If we remembered the so-called “sole”, that is, the platform that serves as a guide in the tool, let’s complete the review of this part. The ease of use largely depends on its quality. Cast soles are the most preferred - compared to stamped counterparts, they provide greater accuracy. Make sure that the model you buy has the ability to install an anti-splinter insert - a small part that makes cutting fragile materials easier.
All kinds of additions, for example, a protective screen and guides for cutting out round shapes, will not be superfluous in the kit. A professional tool must be equipped with parallel stops and a case for storing the tool and carrying all components.
Tabletop jigsaw – buy or make?
Professional-type tools are characterized by long working hours without interruption. Household ones are intended for occasional use, so they are lighter and less powerful. Accordingly, the price will be much lower.
The professional jigsaw also includes a tabletop electric jigsaw, which has many advantages over a manual jigsaw. Its main advantage is the ability to work with thin files, and therefore cut out finer patterns and complex decorative details. Convenience of work is ensured by a wide tabletop, on which you can easily process large parts and make cuts in wide workpieces. Thanks to reliable fastening, the housing is protected from unnecessary vibrations, which in turn protects the motor from overloads.
When working with a benchtop tool, you will be able to pay full attention to the material and grasp it firmly with both hands, which is impossible when working with a hand tool. However, if necessary, you can get out of this situation by making a homemade stationary jigsaw, constructing it from a hand-held tool, a few screws and a piece of durable plywood.
The plywood will serve as a tabletop, in which, using the same jigsaw, you need to make a cut for a file and drill several holes for fasteners. It is quite possible that you will have to drill the same holes in the “sole” of the tool. We fix the tool under the plywood and attach the entire structure to the edge of the table - our desktop jigsaw is ready!
Any man can make a jigsaw table with his own hands, even without special carpentry skills. Since a mains-powered jigsaw is an integral part of any household, it will need a workspace. Such a device significantly speeds up the work time, and also allows it to be carried out efficiently, clearly and quickly.
However, we should not forget that the highest quality can only be achieved through the correct use of this tool, that is, by placing it on a jigsaw table.
A stationary device will allow you to turn your tool into a mini-machine, thanks to which you can make a wide variety of patterns.
Jigsaw
A DIY electric jigsaw table has many advantages. In particular, you can select all the necessary tools for this product without any problems. An important condition is the rigidity and evenness of the surface. Therefore, it is best to opt for a material such as plywood. But the boards should not be thin, as they may warp. Therefore, it is best to take waterproof laminated plywood about 1 cm thick.
Workbench-drawing Box for jigsaw
You can take particle board, which is somewhat thicker than plywood and also stiffer. But the most suitable option would be a high-quality laminate kitchen countertop. The only disadvantage of this material is the poor attachment of tools to the material, so you will have to carefully select fasteners. The main advantage of particle board is its availability - you can place an order for all the necessary elements in any workshop. In this case, choose a thickness of about two cm.
Table for a jigsaw (dimensions) Place the jigsaw on a tabletop made of 12 mm laminated plywood and screw a chipboard base to it. Attach the base flush with the left edge of the tabletop. On the other sides, make small indentations to strengthen the equipment. We make a couple of holes for the bearings on the bracket. We bolt the L-shaped structure to the base of the table with a piece of dense hardboard. Durable L-shaped structure, rear view. Work process. Now the jigsaw file does not bend, even if you cut out parts from thick tree leaf
A DIY metal table is an alternative to wood. The only difficulty is that finding a suitable metal part is somewhat difficult - it must not only be smooth, but also carefully processed. In addition, it will be difficult to make holes for fastenings in such a part. If you watch the video and arm yourself with a drill, everything will be much easier.
At the same time, you should stock up on a simple pencil (it’s better to take a soft one so that it is brighter), a ruler or tape measure, a screwdriver, a drill, and self-tapping screws. In addition, we will need a square with which we will mark the product, and also use it at the last stage of assembly. At the last stage, fiolent tape and bearings will not be superfluous.
How to make a band saw with your own hands
There are several basic technologies for making a DIY band saw for the home. Which one to choose depends on personal wishes and requirements; all options allow you to make a convenient and reliable machine.
How to make a bicycle
An old bicycle that is no longer needed for direct use is perfect for making your own wood band saw:
- The first step is to make a frame with your own hands. It can be built from inch-inch pine, from layers of overlapping boards, from strong sheets of plywood. The frame is traditionally made in the shape of the letter C, with two supports connected to the base mounted at the bottom, and a seat for a guide mechanism with a wheel at the top.
You can make a frame not only from wood, but also from steel - Next, they assemble and install a movable block for securing the wheel in the upper part, which will move vertically. He will be responsible for tensioning the band saw blade. The block is a rectangular frame with a shaft holder for the upper moving wheel.
The upper pulley must move in a vertical plane - The next step is to install pulleys on the structure. According to the classical scheme, they are made independently, but when using an old bicycle, they take ready-made wheels. They are mounted on the shaft from above and below and fixed. Next, you need to throw a drive belt on the upper pulley and perform balancing. To do this, install bearings as supports for the saw blade, secure the wheel so that it rotates with lowering, and make small recesses in the lower part from the rear. Cameras are placed on the pulleys to protect the structure from slipping of the cutting belt.
The bicycle wheel is a ready-made pulley for a band saw with a recess around the perimeter - Then all that remains is to finally secure the wheels to the saw frame. A washer is put on the shaft and secured with a bolt. Then do the same for the lower wheel. The entire structure is aligned with a ruler and put into test work, first with a minimum load.
The pulleys must be located in the same plane, otherwise the belt will not be able to move smoothly
A do-it-yourself band saw for metal or wood is ready; it will not work as smoothly as a purchased one, but it will be able to cut.
How to assemble a band saw from a jigsaw with your own hands
Another simple scheme suggests making a mini band saw for wood with your own hands from an electric jigsaw. The algorithm is proposed as follows:
- A jigsaw is applied to a small square workpiece with the handle down and the metal corners are fixed on both sides. Using a drill, holes for the screws are made in the marked places. The corners are fixed on a wooden stand.
Any hard board or small sheet of chipboard will be suitable as a base for a tabletop machine. - A jigsaw is inserted between the corners, slightly lifted and a piece of rubber is placed between the edge of the metal elements and the body. Since the tool is not pressed flush against the board, there is space underneath to make adjustments using the buttons. Long screws secure the jigsaw between the corners so that it does not wobble or play.
The rubber gasket softens possible vibrations when operating the jigsaw. - Theoretically, something like a band saw can already be used, but it is more convenient to bring the design to perfection and give it the appearance of a classic machine. To do this, a compact tabletop is attached to the jigsaw base using screws. First, you need to cut a narrow hole in it through which the tape blade of the tool will protrude.
Any hard material is suitable for the countertop - steel, textolite, ebonite
For serious work and cutting logs and large boards, a DIY jigsaw band saw is not suitable. But it will be very convenient to process small workpieces with its help.
How to make a band saw from plywood with your own hands
A popular option suggests making a band saw with your own hands from plywood:
- The first step is to assemble the frame for the plywood saw. A cabinet is constructed from boards, inside which an electric motor is installed. A bar is made from a wooden beam, and plywood supports for the pulleys are fixed in the upper and lower parts. The cabinet and frame are connected to each other. In the lower blank under the wheel, a hole is cut for the bushing with bearings. A tabletop made of textolite is laid on top of the support, in which a narrow hole has been prepared in advance for the cutting blade. It is also recommended to attach a small brush to the side of the structure. It must be installed directly in the direction of movement of the band saw along the pulley in order to automatically remove sawdust during operation.
The plywood structure is quite durable, despite its fragile appearance. - Next we begin making plywood pulleys. They are cut out in the shape of circles and glued together so that the thickness of the part is at least 3 cm. A total of three circles are required - one with a groove for the belt drive and two more for the belt. A circle with a groove for the belt is installed inside the cabinet, the second is mounted in the lower part of the structure, and the third is mounted on top. A hole is made in the last pulley for a sleeve with a bearing and it is fixed with glue and wooden slats.
The wheels must be covered with rubber inner tubes so that the cutting blade does not jump off - The upper pulley is movably attached to the structure so that it allows the band saw to be tensioned. For adjustment, a simple lever mechanism is mounted, fixed in different positions with bolts. The lower pulleys are placed motionless on the same shaft and a belt is put on the one of the circles that will transmit rotation from the engine to the saw.
Before the test run, the pulleys must be carefully aligned in a vertical plane relative to each other. - The cutting belt is installed on pulleys, and guides are mounted on the smooth side of the blade to prevent the saw from bending. The easiest way to solve the problem is to use roller bearings. To prevent the belt from moving under load, the bearings must be perfectly level
- At the final stage, all that remains is to cover the upper pulley of the band saw with a casing. It will not hurt to protect the electric motor and the wheel with a belt drive from sawdust and dust. You also need to connect a start button to the motor, placing it in a convenient place, and to increase safety, install a protective device in the electrical circuit that turns off the device when overloaded. You can place a container under the countertop to immediately send sawdust into it during work.
The cover gives the band saw a neat appearance and protects the structure from sawdust
This DIY wood band saw is ready for use. All that remains is to configure it and make sure that the design is operational. To do this, pull the saw blade to the maximum using the upper wheel, check that the edge is perpendicular to the tabletop, and remove the guides. The unit is put into operation and a test cut is performed on a small workpiece, trying not to subject the tape to stress.
If the saw is assembled correctly with your own hands, then the pulleys and blade should move smoothly, without jerking or vibration. After checking, the guides are put back in place, now the belt can be loaded.
Advice! Finally, the plywood saw can be treated with varnish or an antiseptic compound - this will protect the material from rotting.
How the process works
In order to construct a basic table, you must prepare drawings. A correctly drawn or selected diagram will make your work much easier. Use a plywood board up to one cm wide as a work space. If the elements are small, you can take a smaller board. At the same time, step back from the edges up to twenty cm and make several holes. Don't forget to mark the places for fastenings at the bottom of the board.
If the jigsaw stand does not have holes, they must be made in four copies. Using the prepared marks, make holes in the plywood. Please note that steel legs must be attached to the board. In this case, the height of the legs depends on the body of the device itself. In this case, the planks are bent at an angle of 90 degrees. To do this, holes are made for fasteners. The device is secured under the plywood element so that the saw looks out through the hole.
Such an ordinary table can be installed on the same workbench or desktop. At the same time, such a table does not need legs, but is fixed at the edges of the workbench. The device should be outside the table. This product attaches perfectly to wood pieces up to three cm thick.
As you can see, making such a table for a jigsaw is not at all difficult. All you need is a little attention and concentration. And, of course, do not forget to strictly adhere to the scheme.
How to make a jigsaw table
If you want to make a table for a regular jigsaw, the process will be much easier, since you won't have to bother preparing your workbench for mains power. First, cut out a blank for the tabletop from plywood.
Don't forget to prepare the holes with a drill into which the screws will be screwed.
In the corners of the future structure there will be squares of plywood, which will add rigidity. Prepare the holes so that the jigsaw fits freely into them. The tabletop is attached using self-tapping screws. Don't forget to cut holes for the cutlery in the top of the future table. Please note that a parallel stop is fixed in the tabletop; for this, self-tapping screws are driven into the holes. That's all. The most primitive table for a jigsaw is ready.
It’s even easier to make a sawing table:
Diagram of a sawing table Drawing of a sawing table Another design of a sawing table Drawing of a classic sawing table It is made from two blanks. The blanks are connected to each other with screws. The screws must be recessed into the workpiece material so that they do not interfere with work
You can often hear that every home craftsman should have a jigsaw in his collection. But how many of us know what can be done with a jigsaw?
Meanwhile, today there are many operations that are carried out by this tool. It will be of interest primarily to those craftsmen who are not content with a somewhat rough hacksaw for wood. The jigsaw is primarily designed for work that requires particularly high quality finishing and maximum cutting accuracy. In particular, if a craftsman has decided to make a stylish cabinet with his own hands or cut out original wooden trim for a wall, the use of a jigsaw is almost inevitable.
Making tooling for straight sawing with a jigsaw
This section will describe step-by-step instructions for making the product. The whole process is divided into three stages of manufacturing structural elements:
- base;
- guide;
- swivel stop.
For production we will need the following materials:
- plywood;
- solid coniferous wood;
- various fasteners (mainly wood screws, furniture fittings, pins, etc.)
and the following tool will also be used:
- Milling machine;
- Circular saw or jigsaw;
- Drilling machine;
- Grinding machine (grinder);
- Jigsaw with files;
- Various hand tools.
Guide
To make a guide you need to take a board of the following sizes:
| Parameter | Value, mm |
| Length | 800 |
| Thickness | 15-20 |
| Width | / jigsaw sole width / +1mm (for play) +30mm (15mm allowance for boots on each side) |
The jigsaw must slide along the guide, so the features of the guide plate (in technical slang - “sole”) are very important.
We mark the guide blank.
Then you need to select a groove with a router, which will serve as a guide along which the jigsaw sole will move during the sawing process.
We make end stops. Then they need to be glued to limit the movement of the jigsaw along the guide, as shown in the photo.
We check the smooth movement of the jigsaw along the guide and if there are defects or burrs that impede the movement, remove them.
Next, you need to make cylindrical bushings to prevent the wood from jamming when clamped with fixing screws. The bushings can be made from an aluminum tube with a diameter of 10mm. We drill holes and press bushings into them. This completes the production of the guide.
Base
The base, by and large, is just a box, which is the basis for attaching the guide and the rotary stop, and most importantly, it raises the entire structure above the level of the workbench (workbench) so that the file does not damage it.
Assembly of the box is simple and unpretentious - the top base is made of plywood and the sides are made of the same plywood or solid wood. So, we cut out the sides.
And we attach them to the base to form a box, as shown in the photo.
Mark the position of the guide on the base and drill holes in the base along the bushings in the guide.
Next, screw M6 or M8 furniture fittings into the drilled holes in the base.
We screw the studs into them and install the guide.
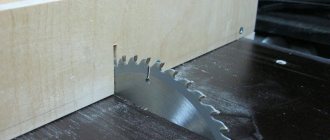
We make a cut in the working groove, as shown in the photo.
We cut out an expanded groove to allow sawing at an angle. Please note that when sawing at an angle, you need a fairly long file, and you can use the “quick cut” type of file.
We mark the location of the future straight and rotary stop.
We fasten the straight stop with screws, make a hole and install an M6 or M8 furniture fitting to attach the rotary stop. See photo below.
At this point, we consider the manufacture of the base complete.
Rotary stop
The design of the stop is simple and unpretentious; it is a guide with a semicircular element glued to it for fixation on the base.
Install the stop using a bolt of the appropriate diameter. The bolt head can be “fitted” into a comfortable handle so you don’t have to use a wrench every time. We also secure the guide using homemade nuts made from mortise wing nuts.
At this point we consider the sawing machine ready.
We hope that the material presented was useful to you.
What is an electric jigsaw?
This device belongs to the class of cutting tools powered by an electric drive. In fact, this is an electrified version of a manual jigsaw. Its working cutting element is a fairly narrow saw blade, which cuts the workpiece thanks to reciprocating movements in the vertical plane.
Due to its design features, including the relatively small size of the file, using this power tool you can perform a variety of cutting jobs with straight and curved configurations. The use of the device also allows you to cut through holes of various sizes and shapes in wooden (plastic) panels and blanks. Moreover, the thinner the saw blade is, and the faster it moves during operation, the thinner the cut edges will be.
Today, jigsaws of different designs and purposes are known. Thus, they are divided into manual and stationary, for home use and professional models (designed for fairly long and intensive use in the conditions of, for example, a furniture factory).
There are also electric saws with one or two handles. The first option is sometimes called a traveling option, since it does not require the presence of special devices at the cutting site for rigid fixation of the workpiece. The performer has to hold the workpiece being processed with his other hand.
Accordingly, two-handed models are good because they can be held with both hands, while the workpiece is firmly secured to the base of the machine by some kind of locking device. This circumstance ultimately has a very favorable effect on the high quality of workpiece processing.
Return to contents
What and how you can do with a jigsaw: functionality
This power tool can perform a wide range of cutting operations. First of all, this applies to various works in the construction and repair industry, in the production of furniture products, as well as for everyday housekeeping, when minor repair and restoration work is periodically required.
This application is made possible by the design of the electric jigsaw.
A thin saw, an active drive from an electric motor and a flat platform on the mechanism body ensure fairly fast and high-quality cutting from sheet lumber of a wide variety of contours in pattern and complexity.
Using a jigsaw, you can make various connecting components with a fairly high degree of accuracy. The specified power tool is used to produce accurate bevel cutting in places of corner connections of wooden (plastic) workpieces with each other. A jigsaw is practically indispensable in cases where adjustment trimming is performed at the joints of flat wooden panels.
A special area of application of the device is the production of various openwork wooden cladding of both individual pieces of furniture and the entire room interior. In this area, the jigsaw traditionally has no equal. With its help, talented craftsmen create wall shelves, furniture fronts, wall decor details, etc. that are completely unique in shape and beauty.
The possibilities for artistic use of a jigsaw are determined by its design. The small width of the saw blade and its fixation in the device body with only one end significantly increases the maneuverability of the mechanism.
Thanks to this design, you can still use a jigsaw to cut holes of different diameters and shapes (figures with a closed contour) without disturbing the outer contour of the cut figure. To do this, you will first have to drill an initial hole on the workpiece, which in diameter should be equal (or slightly larger) to the width of the saw blade. Next, a file is inserted into the hole, the electric drive is turned on, and the jigsaw begins to move along the contour marked with a pencil. It is worth noting that this function in many cases can be very important and even decisive.
Return to contents