Selection of materials
To make a workbench, it is customary to use two main types of material, which differ significantly in strength and reliability.
- Metal construction is considered the most durable, strong and comfortable. However, in this case it will not be possible to do without welding, that is, the process of making a workbench will take more time and effort. In addition, you cannot do without welding skills, since it is extremely difficult to process the workpiece yourself. This will require special welding equipment.
- The easiest way to make a workbench is from durable types of wood. To make it yourself, you will need a standard set of tools. However, wooden workbenches are less strong and durable than metal ones.
The ideal option would be to combine materials. The frame is best made of wood, but the working surface is made of durable metal. This will allow you to create a durable, reliable and convenient design in just a few hours.
Workbench design and installation
Those who decide to make a universal workbench for the garage with their own hands must first of all decide on the parameters of the future installation, its configuration, that is, make a detailed schematic plan with all the shelves, the height of the lid and the dimensions of the tabletop itself.
Then purchase the necessary tools and materials, such as:
- welding machine, grinder, electric drill;
- tape measure, building level and paint brushes;
- metal corners, profiles, sheets and strips (with a thickness of 3 mm or more);
- dry boards and antiseptic mixtures for wood processing;
- You will also need additional metal paint and primer.
To build a frame for a workbench in the garage, you should start by cutting blank parts using a grinder, which were prepared in advance and marked in accordance with the required dimensions.
Then you will need to decide on the method of fastening the parts. This can be either a threaded connection using fasteners, or a welded one. The latter connection is very stable and is used mainly for metalworking workbenches, while the threaded connection is most often used for a small carpentry workbench, as it is more mobile and comfortable. To give the frame rigidity, metal corners are used, which are welded to the rear legs of the tabletop at the bottom and at a height of 10 cm from the floor. For greater stability of the structure, you can screw the table legs to the floor.
After the frame is installed, you can begin to make the tabletop elements. To do this, construct a frame from a metal corner, which should be 15-20 cm larger in width and length than the base of the frame. Next, the frame is welded to the frame and, using self-tapping screws with a countersunk washer, the boards under the tabletop are fixed to it.
Types of workbenches
Workbenches are classified according to several parameters: by the number of workstations, for example, single, double and multi-seat; for additional functions - folding (with folding work surfaces) and in the form of cabinets with many pull-out shelves.
Depending on the intended purpose of the equipment, the following types of workbenches are distinguished:
- A carpenter's workbench is installed less often. It has a maximum length of up to six meters, which allows you to fasten very thick and long boards and other lumber to the surface of the tabletop. In addition, clamps for lumber are installed on the surface of the device so that the boards remain motionless during processing.
- A carpentry workbench has a working surface that is always mounted on a durable frame. The tabletop is usually made of strong metal or dense wood (oak or beech), thanks to which various metal parts can be processed on it without fear of damaging the coating. The base consists of two strong support posts, fastened with longitudinal bars. A working vice is placed on the front surface of the tabletop to fix metal parts, and a rectangular cutout is made on the back surface, which is used to move additional vices. Holes are made in the tabletop for installing stops or clamps necessary for carpentry work.
- The best option for a garage is a metalworking workbench, which can be classified as universal. The surface is made mainly of metal, which is ideal when working with hard and heavy metal parts. On the surface of the tabletop you can perform any repair and construction work: sawing, grinding, engine disassembly, sharpening, cutting and much more. This design is much stronger and more stable than others due to the metal frame.
Do-it-yourself portable workbench for a summer residence
If necessary, you can transport it to your apartment. It will not take up much space, as it can be folded. It consists of two parts: a removable tabletop and a folding base.
Making a bench top
1. Make a platform from a board with dimensions 1700x190x35 mm.
2. Cut the slider out of wood so that it measures 350x90 mm.
3. Cut out the overhead strips from beech, with the help of which the slider is connected to the platform.
4. Make 8 through holes in the platform at a distance of 173 mm from each other, and 3 in the slider at a distance of 85 mm. The dimensions of all holes are the same 3x3 cm.
Through holes allow processing of parts of different lengths.
5. Cut out adjustable stops from square bars. Then you attach an L-shaped steel profile to each. Its thickness should be 1 mm.
6. Cut out the slats and attach them with self-tapping screws to the bottom of the tabletop, having previously made a cutout on them so that the tabletop does not move during operation.
7. Install a transverse vice on the platform, and a longitudinal one on the slider.
Here's a drawing to help you make a folding workbench table top:
Making a folding base
You need to cut a board to the appropriate dimensions, two frames and split struts.
You need to assemble the base like this:
- Place the plank and crossbar on the floor. They must be parallel.
- Attach the base board to them with self-tapping screws.
- Attach three planks to the upper part of the base (they will be separators), and connect their ends with another plank of equal cross-section.
- From below, nail 3 mm thick plywood to the plank and crossbar. In this case, it must be installed flush with the board.
- Attach bosses to the middle and right dividers so that the workbench tabletop does not move during operation.
- Mount the racks on the door hinges. The posts must be trapezoidal.
A drawing of a folding base will help you.
Three mistakes
Amateurs, sometimes, judging by their designs, very experienced, knowledgeable and diligent, sometimes make themselves workbenches on which, figuratively speaking, you can smash a tank with a sledgehammer. They take a lot of time and labor, and hardly less money than a good branded amateur workbench. Repeating industrial prototypes in a design for your own use, designed for intensive work in 3 shifts and a static load of more than a ton, with a service life of 20 years or more, is one of the typical mistakes in developing workbenches of your own design.
Amateur workbench, reliable, but unnecessarily complex, heavy and bulky
The second is neglect of vibrations. Not a clearly felt “game” or “recoil”, but a small tremor that significantly complicates the work and reduces its quality. Vibrations have a particularly strong effect on workbenches on a metal frame.
The third - repeat carpentry or metal workbenches; perhaps with some modifications to suit your needs. Meanwhile, there are many designs of workbenches for home/amateur work of various types. There are workbenches that are more or less specialized or, conversely, universal, temporary, made from scrap materials, etc.
In this article we will figure out how to make a workbench taking into account these mistakes, firstly, more simply and cheaper, in accordance with the range of needs and/or hobbies of the craftsman. Secondly, how to make a workbench for general purpose or a universal one for special conditions of use - in a cramped garage, for carpentry at a construction site from scrap trash, at home for small precision work, for children.
I'm finalizing the tabletop
I had already cut the tabletop to size from the bowling alley cover. But it needed some work because there were support rails attached underneath with an insane amount of nails.
Using a nail puller and pliers, I remove them, then sand the coating using a sander so that it can be laid on the metal base without distortion. I treat the wood with Danish oil and leave it to dry overnight.
Preparatory work
Creating a drawing of a workbench is an obligatory part of the preparatory stage
Preparation for assembling a workbench consists of determining the design features, choosing the dimensions and installation location of the structure. In order to ensure that not a single moment escapes attention or is forgotten, it is recommended to create a working drawing of the workbench, made to scale with reference to the size of the garage
Particular attention should be paid to the height of the tabletop - it differs significantly from the height of a regular dining table. The optimal option is the height from the floor to the bend of the elbows of a person standing straight
Considering the difference in height between different people, assembling the optimal workbench for yourself can be a very useful exercise.
In addition, we must remember that the width of the tabletop should not be too large. The size of the garage is relatively small; you often have to work next to a car parked inside.
You will need space for a person to pass through, so the optimal width is considered to be 50 cm. You also need to decide on the size of the shield for the tools that are needed most often.
Workbench design
If the design of a work table for a garage is made by hand, then first of all you need to carefully think through every detail, figure out where the tools will be placed, what work will be carried out on the workbench. The model of the garage table depends on this.
Metal workbench
Standard models are often equipped with drawers, which can be made of wood or metal. Also, the table design can be supplemented with shelves, a power shield for hanging tools, which will always be at hand. But most importantly, the workbench must be stable, durable and reliable.
Workbench design
The height of the device must be correlated with your own height. With an average height of a person (170 cm), it is rational to make a workbench with a height of 90 cm. It will be very convenient to work at such a table.
The configuration of a workbench for a home is selected taking into account the work that is planned to be performed on it. In the usual sense, a workbench should have stops, recesses on the working surface for various parts, and a vice.
When designing a structure, it is necessary to take into account which hand of the master is the leading one - left or right.
Simple single workbench project
The dimensions of the workbench largely depend on the size of the room. The following standard desktop dimensions are established: 2×1 m.
It is better to place the structure near the window. It is necessary to provide additional lighting sources. You need to leave space for sockets near the workbench.
If possible, place the workbench near a window
Peculiarities
A workbench is essentially a table on which work with metal and wood is performed. The following requirements are imposed on him.
- Strength and rigidity. The machine is designed to work with shock loads.
- Sustainability. He shouldn't wobble.
- Ease of use.
- Reasonable price.
Therefore, most home craftsmen prefer to make workbenches with their own hands. This not only saves a lot of money, but also allows you to get exactly the design you need.
Before making your own, pay attention to a number of features
Only a well-designed workbench will be comfortable and ergonomic, so always take into account the height and build of the master. The height of the working surface should be at the level of the navel. When working, your arms should be slightly bent and your hands should be at the level of your trouser belt.
The length of the table doesn't really matter. But in spacious rooms it is recommended to do more of it to process larger parts. In the working position, it is advisable to reach with your hands to the edges of the table or, as a last resort, take half a step to the side.
If the workbench is large, the structure can be made collapsible. But keep in mind that bolted connections are less durable than welded ones. An alternative is to make several workbenches, place them side by side and connect them with bolts.
The width (or depth) of the table is in the range of 50–60 cm. This is quite enough.
It’s good if the workbench has a niche for the feet, then it’s convenient to work with it while sitting. If it is not there, more tools can be placed on the lower shelf, and the rigidity of the entire structure increases.
The workbench, in principle, does not have excess strength
The more rigid the structure, the better, because they work on the table with heavy tools with shock loads.
Pay special attention to sustainability. If the workbench wobbles, you won’t be able to work properly.
In a particularly severe case, its entire mass will fall on a person, and then serious injuries cannot be avoided. Therefore, machines for heavy work are attached to the floor and/or wall with anchor bolts.
Some tables have 6 or more legs. It's stronger, but it will wobble on a curved floor (and most workshops have uneven floors). Therefore, the legs must be adjustable in length. By the way, for most workbenches 4 legs are enough.
The center of gravity should be as low as possible, so the heaviest tools should be placed on the lower tiers. Some craftsmen additionally weld ballast. The heavier the workbench, the better, since it becomes more stable and less responsive to shock. True, it is more difficult to transport it, but this is extremely rarely necessary.
This is probably all that concerns the general requirements. Let's start designing.
Material used
To make a workbench for your garage with your own hands, two materials are used: wood and metal. The difference between these designs will be reliability and resistance to various force and mechanical influences. In this regard, a metal workbench will significantly outperform a wooden one. There are other points worth mentioning:
It is difficult to make a metal structure with your own hands, because it will require welding work, and you also need to have skills in working with metal. Processing an iron blank is also quite difficult. Therefore, to make a desktop of this type with your own hands, you will need special equipment and specific knowledge. A tree is a completely different matter. To make a wooden workbench for your garage with your own hands, you will only need a standard set of household tools - an angle grinder, a screwdriver, an electric jigsaw, a hammer, etc.
You can even use only a hand saw, but in this case the work will be a little more complicated. If we take into account the operational and technical aspects of a desktop made of one material or another, then it is necessary to highlight the large weight of the metal product and the rather low strength of the wooden workbench. The ideal option would be to combine these two materials in one product, for example, make a workbench from wood and cover its tabletop with a thin layer of iron
In this case, even the use of a vice and other similar devices will not harm it.
Thus, combining materials is an ideal solution for making a workbench for the garage with your own hands. However, if the desktop will not be used too often, but from time to time, then it is best to get by with a completely wooden structure.
Preparatory work
When equipping a garage with your own hands, it is very important to choose the right place where the workbench will be installed. The best option would be a part of the garage where there is good lighting and electrical outlets.
It is also necessary to take into account such a moment as the direction of natural light. The light should come from the left side or straight ahead. In this case, the working surface will always be illuminated.
The length of the tabletop should be such that it can easily accommodate tools and large parts required for work. Its width should not be more than 50 - 60 cm. This allows you to easily reach the opposite edge. One side can be equipped to work with an electric cutting tool: a circular saw, jigsaw, etc. For this purpose, fix the board so that it protrudes beyond the edge of the workbench by 200 - 300 mm.
Also, before you make a workbench in the garage with your own hands, you need to clarify one more parameter - its height. The ease of carrying out the work depends on how correctly it is determined. To determine the height, you need to stand up straight, bend your elbows and mentally lean on an imaginary table. The distance between the floor and bent arms will be the ideal height for the future design.
Required tools and materials
To make a workbench in the garage, you will need the following tools:
- a grinder with a grinding disc and a circle for cutting metal;
- level;
- screwdriver;
- drill;
- welding machine and electrodes;
- roulette;
- jigsaw for cutting plywood.
Materials:
- corner 4 mm thick;
- steel strip 4 mm thick;
- steel sheet required for the manufacture of holders for drawers with a thickness of 2 mm;
- plywood for making the back and side walls of the table and drawers, 15 mm thick;
- screws;
- anchor bolts;
- square pipe 2 mm thick;
- steel sheet that will be used for the countertop, 2 mm thick;
- wooden boards for tabletops 50 mm thick;
- guides for table drawers;
- metal screws;
- paint for metal and wood.
A structure made from these materials will be reliable and very durable. Boards will be used for niches and shelves, and steel strips will be needed to create edges on the table surface.
Preparatory stage
Competent design is the key to successful work. The dimensions of the workbench must correspond to the size of the room and the height of the master, and the design must correspond to the types of work performed. In this case, the table can be straight or angular (it is not recommended to make the table U-shaped).
You can use computer-aided design. To build 3D models, there are many programs (Compass 3D, SOLIDWORKS, AutoCAD) that have libraries of materials and fasteners. They can calculate material costs, select the required rolled products and adjust the design. Moreover, the kernel built into them allows you to virtually apply efforts and identify weak elements of the structure.
In addition, during the work you can always see the subtleties of the design. And another advantage of modeling is that you can make drawings using the prepared model and order the work from a professional welder.
If the model doesn’t work out, you still need to prepare sketches and drawings in a scale convenient for you (not necessarily according to GOST). Only very experienced craftsmen can do without design, and the result will not always be positive.
We will present several interesting diagrams of metalworking workbenches with basic dimensions:
- here metal elements are shown in blue, and wooden elements in yellow;
- a couple more worthy designs.
Materials and components
As you can see, workbenches vary greatly in design, and the materials can be very different. Usually these are what you have in the garage, but they can also be purchased.
For example, to make the frame of such a workbench you will need:
- corner 50x50x4 6.4 m long;
- pipe 60x40x2 24 m long;
- corner 40x40x4, length 6.75 m;
- strip 40x4 8 m long.
A total of 121 kg of metal is needed. Its quantity may vary depending on the size.
For this model you will need:
- 225 m square pipe;
- 8 m corner;
- 10 m strips measuring 40x4 mm.
Rental sizes may vary. The main rule is that the larger it is, the stronger and heavier the structure.
This thick section can be small and used as an anvil, while the other part of the tabletop can be relatively thin. The main thing is to ensure the reliability of the connection.
Consider other points as well.
- For the drawers and toolboard you will need plywood 5 mm thick. And if you want to make an outlet, you will need an extension cord and wire.
- In addition, bolts with washers and nuts are needed.
- For finishing work you need a primer, paint and varnish.
Required Tools
To make a workbench we will need:
- “grinder” or hacksaw for metal;
- cutting and sanding wheels for it;
- wood saw;
- welding machine and accessories;
- drill;
- roulette;
- chalk for marking.
Once everything is ready, we begin production.
How to make a carpentry workbench drawer from plywood
Saw the box body blanks from 10mm plywood, and for the bottom take a 5mm thick sheet.
Scheme of cutting parts for two plywood boxes: 1 – front panel; 2 – rear liner; 3 – side wall; 4 – front liner.
Sand the workpieces with a grinder.
Make grooves for the plywood bottom in the side walls, back and front liner. Remove burrs with sandpaper.
Glue and screw together the parts of the front and back walls.
Apply glue to the joints and into the groove.
Assemble the structure using angles and clamps.
Fasten the parts with screws, drilling guide holes.
Assemble the second plywood box with your own hands.
Install a panel on the back wall of the carpentry workbench designed to increase the rigidity of the structure and to accommodate hand tools.
Cover the drawers and cut ends of the particle boards with finishing compound.
Connect power to your homemade workbench and start filling the containers with tools.
Assembly steps
First you need to prepare the previously measured workpieces. To do this, use a grinder to cut off all the required metal and wooden parts, after which you can begin assembling the equipment.
- The first step is to weld the main frame elements. To do this, two parts of the frame are connected: lower and upper, after which the body of the workbench is assembled, and four legs are welded to it. The height of the legs, which are made from pipe blanks, should not be higher than one meter. The main part of the structure is ready.
- To give the structure strength, it should be strengthened. To do this, it will be necessary to weld additional stiffeners, which consist of corners and steel strips.
- Next, you should make a protective screen from a steel sheet. To do this, you need to weld racks of corners at the corners of the tabletop, and then cover them on top with a horizontal corner over the entire surface. To strengthen the structure, additional stiffeners can be welded. After this, the screen is sheathed with a sheet of durable plywood.
- Drawers and shelves are made from plywood. They are assembled using small corners. After this, the guide elements should be installed and the handles secured, treated with impregnation and painted.
- The selected material is installed on top of the tabletop - it can be a sheet of plywood, several boards or DSP. Then the tabletop is fixed to the frame using self-tapping screws.
- A steel sheet is again attached to the top of the installed and secured work surface, cut around the perimeter of the table and painted over.
- After this, all that remains is to insert the previously prepared drawers and shelves, as well as all the fixing elements on the screen for attaching various tools.
- At the end, plumbing tools are installed and fastened on top of the tabletop: a vice, sharpening, and so on. Garage equipment is laid out on the shelves, and tools are hung on the screen.
Upon completion of all work, the structural elements must be degreased and painted over. It is best to choose hammer paint, since it is resistant to many external influences and mechanical damage.
Preparing tool boxes
I wanted a little storage underneath the countertop for hammers, pliers, drills, and chisels. To do this, I purchased a large tool box with two pull-out sections.
First, I cleaned off the old paint from the boxes - army camouflage was not part of my plans. And then I attached them under the tabletop. I also prepare the vice for installation - I clean off all the grease from it, then wipe it dry and mark the attachment points to the tabletop. I drill holes for the screws and screw the vice to the workbench.
What material is better to make a workbench for the garage with your own hands?
There are several options for making a desktop. According to the type of material used for manufacturing, workbenches are:
- wooden;
- metal;
- combined.
Combination workbenches use a wooden base and a metal sheet to reinforce the worktop. In addition, the design contains metal combs, as well as threaded screws. Combined devices include metal tables with drawers and tool shelves made of wood.
Advantages and disadvantages of a wooden workbench in the garage
The choice of material for making a table is primarily determined by its purpose. A wooden workbench in a garage is usually installed in cases where you need to quickly organize a workspace to perform simple operations. To create the frame part, you can use boards measuring 4x8 cm or timber measuring 5x10 cm. The rectangular base is assembled taking into account standard dimensions, and its components are fixed with nails or self-tapping screws.
A wooden workbench is installed in cases where it is necessary to quickly organize a workplace
To strengthen the structure, wooden spacers are installed in the upper and lower parts between the legs. The lower ones, which are located at a height of 15 cm from the floor, can be used as a basis for a shelf. To assemble the tabletop, a planed tongue-and-groove board made of oak or beech is suitable. You can also use a couple of sheets of moisture-resistant plywood 1.8 cm thick, which are glued together and sheathed along the edges.
To create a workbench in your garage out of wood with your own hands, you don’t need much effort or skill in handling a welding machine. The set of tools is minimal (electric jigsaw and drill), and the process itself takes much less time than manufacturing a metal structure.
On the other hand, a wooden table has many disadvantages:
- not able to withstand significant power loads;
- the working surface is not intended for the installation of several tools, which does not allow the simultaneous use of a heavy bench vice and sharpening or drilling;
- the wooden frame is short-lived;
- wood reacts poorly to humidity and contact with various paints, oils and other substances;
- there is a risk of fire.
The disadvantage of a wooden workbench is its inability to withstand large force loads
Advantages and disadvantages of a metal workbench for a garage
To assemble a welding table with your own hands, you will need special equipment and skills in handling it. The workbench elements are connected by welding. Not every craftsman can produce a high-quality metal structure. In addition, the table turns out to be very heavy, and the material itself, unlike wood, is not cheap.
On the other hand, workbenches in a metal garage have many advantages that many car owners will appreciate:
- compactness with a high degree of reliability;
- ability to withstand severe mechanical loads;
- increased weight of the structure, making it more stable;
- a large selection of modifications (the design can be folding, mobile, shortened or with a folding tabletop);
- strength and reliability of all connections;
- fire safety;
- durability and ease of maintenance;
- the absence of sharp corners makes the tabletop safe;
- the working surface allows you to install two sets of vices;
- due to the high strength of the material, the table can be used for cutting and sawing, as well as grinding and turning metal and wooden parts;
- the space under the tabletop can be used to install shelves, organizers, grids and tool boxes;
- metal shavings do not damage the surface.
How to make a folding workbench with your own hands for wall mounting
If you have space on the wall and it is undesirable to install a stationary workbench on the floor, you can use the proposed master class and install a table-workbench with a folding tabletop with your own hands. It's actually a hanging cabinet with several compartments inside. In the working position - with the tabletop lowered - the compartments are accessible, the raised panel closes them from dust and prying eyes.
Table 4. List of materials
| Detail | Material | Dimensions, cm |
| Wall frame | timber | 340x2.5x5 |
| Perforated board or plywood | 50x120, thickness 4…8 mm | |
| External frame (rack) | Board | 370x2.5x25 |
| Table top frame | timber | 500x2.5x10 |
| Tabletop | Plywood or chipboard | 50x120x1.2 |
| Folding legs | timber | 5x10x250 |
| Shelves inside the rack | Board | 5x20x180 |
| Screws for drywall or wood (self-tapping screws) | M8…M24 | |
| Dowels for attaching the frame to the wall | M50…M72, 4 pcs. | |
| T-shaped furniture hinges | 12…15 cm, 4 pcs. | |
| Bolts with locknuts and washers | M8…M24 | |
| Fuse for fixing the folding table top, hinged | 2 pcs. | |
Table 5. Cutting parts
| Part name on the assembly drawing | Quantity | Material used | Part dimensions, cm | Name/ application |
| A | 2 | Beam 2.5x5 cm | 120 | Long side of wall frame |
| B | 2 | 50 | Short part of wall frame | |
| C | 1 | Perforated plywood or board 4...8 mm | 120x50 | Base for mounting tools on a wall frame |
| D | 2 | Board 2.5x25 | 55 | Long side of shelving frame |
| E | 2 | 120 | Short side of shelving frame | |
| F | 1 | Board 2.5x20 | 55 | Rack spacer |
| G | 1 | 75 | Shelf | |
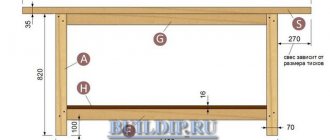
| H | 1 | Plywood 12 mm | 125x60 | Tabletop |
| J | 2 | Board 2.5x10 cm | 125 | Long side of table top reinforcement |
| K | 2 | 40 | Short side of table top reinforcement | |
| L | 2 | 60 | Table top side | |
| M | 1 | 120 | Tabletop front panel | |
| N | 2 | Beam 5x10 cm | 85 | Legs |
To correctly complete the sequence, we recommend watching the video on how to make a workbench with your own hands from wood.
Sequencing
Assembly is carried out without gluing the parts, but this can be done if desired. If you use pine timber, it is better to drill holes for self-tapping screws. Dowels are attached to the wall depending on its material; a conventional drill or hammer drill is used to drill holes. All elements are checked for squareness before final assembly.
Important: if you plan to mount the workbench on a partition, you need to check its load capacity. It is better to mount the work cabinet on a solid wall (brick, concrete, blocks).
- Assemble the wall frame and secure it to the wall with dowels. Mount perforated plywood (panel) onto the finished frame.
- Assemble the shelving frame. For ease of assembly, the elements are secured with clamps.
- Secure the shelving frame to the wall frame using screws.
- Assemble the tabletop frame and attach the tabletop to it.
- Loops secure the legs of the workbench to the tabletop and the tabletop itself to the rack. Before attaching the legs to the tabletop, protectors are installed to prevent the legs from deviating forward from the vertical position.
- Install a spacer and shelf in the rack.
- By installing wooden, plastic or metal pins into the holes of the pegboard, you can place any light hand tools on it in any order.
For greater convenience, you can attach special strips and containers to it, and mount rails with hooks and holders on shelves or under them.
Frame assembly
Assembling the structure of a mechanic's workbench is not difficult if you have the skill to work with a welding machine. Thanks to the prepared parts, everything becomes simple and clear. The best solution would be to use a semi-automatic machine rather than arc welding. In this case, the material is heated to the required temperature and does not burn out from the electrode. The seams are neat and durable.
The first thing you need to do is make a rectangular base for the construction of the bench. To do this, you will need two blanks, the length of which is equal to the depth of the table, and two blanks, the length of which is equal to the width of the workbench. The ends are cut with a grinder at an angle of 45 degrees to ensure an ideal junction. The workbench blanks are laid out on a flat horizontal surface. Initially, they need to be fixed with small tacks and trimmed if necessary. Next, a full suture is applied to the structure. In this case, it will be necessary to make penetration on the other side.
The next step is to install the four bench posts. They are welded to the prepared frame. They must be positioned vertically. After this, the lower strapping is performed on three sides. At the same stage, vertical stands are welded under the stand for the tool, which will be located above the bench. The next step is the installation of frames for drawers and shelves, as seen in the photo above. In this case, an additional crossbar is fixed between them, but it is welded offset to the middle, so that it is convenient to stand behind the bench.
Carpentry workbench frame
Take smooth pine boards without large knots with a cross-section of 50x150 mm. Dry the raw lumber: the lower the moisture content of the boards, the less likely the structure will warp. The carpentry workbench in question is designed for comfortable work by a craftsman with a height of 170–180 cm. To change the height of the structure, make the legs higher or lower.
Drawing of a carpentry workbench (front view).
Workbench drawing (side view).
Table 1 - list of frame parts
Finish dimensions, mm
All elements of the base of the carpentry workbench are paired, so mark two parts of the same length on a 150 mm wide board at once.
Saw all the wooden pieces to length, with the exception of the spacers: it is easier to cut the short ones already planed, and the long ones should be sawed off later in place.
Measure the width of the board, subtract the thickness of your circular saw blade and divide the result in half. Set the calculated size on the measuring scale and make sure that the saw blade is perpendicular. Unfold the boards exactly in the middle.
Board cutting diagram.
Sharpen the parts and sand them with medium-grit sandpaper.
File the bottom spacers and sand the ends. After cleaning the surfaces from dust, apply glue to the small leg and to the end of the leg.
Squeeze the parts together with a clamp, wipe off the squeezed out glue and drill holes with a countersink drill.
Fasten the workpieces with 6.0x70 screws. Prepare the remaining legs of the woodworking bench frame.
Bevel the bottom ends to reduce the likelihood of the wood splitting when the workbench moves.
Prepare the joints connecting the legs with the longitudinal legs for gluing. Fasten the parts with screws, setting a right angle.
Screw all four legs into place.
Place the frame halves and longitudinal drawers on the floor, measure the length of the upper spacers.
File the parts and secure them with glue and screws.
Assemble the top frame of the woodworking bench on a flat surface. Fasten the bars with wood glue and 6.0x80 mm screws, drilling guide holes for them.
Assemble the lower frame of the workbench, using clamps and auxiliary boards for convenience.
Replace the top frame and level the entire structure. Connect the frame parts with screws.
Cut out the bottom shelf from sheet material 16 mm thick and secure it to the bars
Use of a bench workbench
The following types of work are performed on such a table:
- finishing;
- metalwork and assembly;
- adjusting;
- installation;
- commissioning;
- straightening and others.
Such equipment is used not only in utility rooms, but even at car service stations, car service centers and large industrial enterprises.
A reliable metalworking table is additionally equipped with lighting units for processing and repairing various products, a vice and other devices.
The workbench is intended for more efficient use of the workplace, therefore, when creating it with your own hands, take into account the specifics of production and the layout of the premises
Tool cabinet in the garage
This bedside table will serve both for performing a variety of tasks and for storing tools. It will take up very little space in the garage, and if you try, its pleasing appearance will decorate the room.
First you need to draw up a plan diagram of such a bedside table. You can choose the proposed option, or based on it you can design your own, taking into account all your personal wishes for the arrangement of the workplace.
For a novice carpenter, it will be useful to build a bedside table for storing working tools. This will allow you to acquire the necessary experience in carpentry and build the mini-workshop necessary for full-fledged work, which will fit in a small wooden box.
The proposed tool cabinet in this case is a small floor cabinet. Inside it is equipped with nests for storing various tools, and outside it has a workbench board. It is made from plywood boards or boards 20 mm thick. The bench board must be carefully trimmed and trimmed.
The tool cabinet is equipped with two drawers: one hinged on the door, the other pull-out - the number of drawers and their functionality can be any depending on your needs. The top of the bedside table is equipped with a hinged lid in the form of a drawer. The lid is attached to the frame with hinges. In the working position, it can be folded back and leaned against the wall, or it can be equipped with holders so that it independently remains in a given position. When not in use, the lid will simply lower and close the bedside table.
To make the frame of the bedside table, you need to use either bars or boards with a cross section of 1.5 X 2 cm. The product can be lined with plywood or wood board.
The device for keeping tools in the cabinet is made at your own discretion.
As you can see in the photo, this garage furniture is either painted or covered with film. You can use a transparent finish, but this will require more painstaking carpentry preparation of the product.
The interior decoration can be simple; it will be enough just to carefully and repeatedly sand the parts from the inside or paint them with varnish or light-colored paint.