Types of chisels
Chisels come in the following types:
- straight or percussive;
- semicircular;
- oblique;
- coal;
- cranberry cutters.
A straight chisel is used to level the surface and remove flat layers of material. Allows the carpenter to do most types of basic work.
A semicircular chisel is used to form semicircular surfaces and decorate with carvings. Allows you to cut cutlery (spoons, dippers), as well as various parts.
Bevel and carbon tools are used for complex geometric cutting. Allows the formation of surfaces with complex shapes.
Cleaver cutters are used for carving deep holes and depressions to form a smooth surface.
The procedure for sharpening a semicircular chisel
A chisel with a semicircular cutter is sharpened using a wooden block. Moreover, its edge should repeat the shape of the cutting edge.
To do this you will need the following:
- wooden blank;
- silicon block;
- abrasive powder;
- sandpaper (grain size from 400 to 2000 microns);
- a piece of polishing leather.
How is sharpening done?
Sharpening is performed in the following sequence:
- The silicon block is moistened with a soap solution. During work, the chamfer is pressed to the touchstone at the desired angle and movements are made to the sides. The operation is carried out until a burr appears.
- Then take a wooden block, the edge of which is rounded and on which sandpaper is fixed. During the work, the abrasive is changed, gradually reducing its grain size.
- Finish sharpening by polishing and straightening the edge on a piece of leather.
General rules for sharpening chisels
Sharpening chisels should be carried out taking into account the following rules:
- sharpening with emery requires selecting its roughness depending on the wear of the tool and the presence of damage on it;
- when machining, it is unacceptable to exceed the heating threshold of the blade, since it will lose its strength properties as a result of heat treatment;
- sharpening is carried out with the application of a special lubricant to cool the tool being sharpened;
- the surface of the abrasive material must be smooth, since it is necessary to ensure uniform pressure on the plane of the tool to prevent distortions;
- when changing a coarse sharpening disk to a fine one, it is important to make sure there are no burrs so as not to damage the edge;
- For fine cleaning, it is recommended to use GOI paste or a powder cleaning agent, as well as a flat, strong base.
Proper sharpening involves performing all actions in one direction. This will allow you to accurately control the pressing force of the abrasive tool, monitor the process and promptly eliminate possible errors.
Sharpening technique
In order to properly process the working surface of the chisel, it is recommended to use special products that have both grinding and polishing properties. Most often, preference is given to sharpening water stones or fine-grained sheet abrasives on a water-resistant basis.
Preparatory stage
Sharpening stones are pre-soaked in water. During the sharpening process, the liquid helps create a viscous grinding suspension, as it mixes with abrasive dust.
Angle editing and chamfering
The wood chisel is fixed at a given angle; according to the standards, the inclination is about 25°. This parameter may vary depending on the purpose of the joinery:
- The chamfer of the tool for slotting work is sharpened at an angle of 27-30°;
- for accurate trimming of wood with the removal of thin chips, a correction of the working surface by 20-22° is required;
- A universal chisel for most woodworking is sharpened at an angle of 25°.
It is worth considering that the sharpening angle of the chisel also depends on the parameters of the blade: thick blades provide a relatively steep bevel.
If you need to form a chamfer with significant adjustments to the sharpening angle, you should start working on a sharpening machine. To easily correct the sharpness of the cutting edge, perform the following steps:
- process the chamfer on the abrasive stone until visible damage is completely eliminated. In this case, the specified slope must be maintained both in the longitudinal and transverse directions;
- check the cutting edge for geometric evenness. Here it is necessary to achieve strict perpendicularity of the line in relation to the canvas. Otherwise, you will have to straighten the edge on the sharpening stone, after which the working surface is ground again to an ideal sharpness.
The angle for sharpening chisels should be about 25°
If it is necessary to adjust the sharpness of a chisel with a bevel on the edge, grind it with a stop, lifting the cutting blade up within 5°.
Features of cutter processing
The work is carried out taking into account the following recommendations:
- First, the flat side of the canvas is processed. Movements are performed along the same trajectory along the entire length of the stone;
- then change the position of the chisel and work with the main working surface of the wood carving tool. Movements should be uniform, without jerking, but quite fast. In this case, it is necessary to maintain the desired angle of inclination;
- after the coarse-grained abrasive begins to leave scratches on the surface of the cutting blade, switch to a medium-grained stone. Next, if necessary, use an abrasive material with fine grain;
- when sharpening the chamfer, 1.5-2 mm is allocated, the perimeter is made at an acute angle of 5-7°. The chamfer is formed in just a few movements along the entire length of the stone.
It is noteworthy that the process of sharpening a wood chisel takes no more than 10 minutes if a simple correction of the sharpness of the carpentry is performed. If there are significant irregularities, chips or other defects on the surface of the tool, sharpening will take up to 1 hour or more.
Final polishing
The process of sharpening a chisel for wood carving is completed by straightening using various devices. Most often, they use a leather belt rubbed with GOI paste, or a kitchen cleaner on a flat wooden surface. The blade can also be polished on a felt wheel using polishing paste.
Chisel sharpening angle
Chisel sharpening angles are selected based on the following principles:
- obtuse angles are used for processing hard wood;
- the larger the angle, the worse the quality and accuracy of cutting;
- sharp sharpening angles allow you to speed up the processing process, but this increases the risk of blade chipping and dullness;
- sharpening should be carried out without changing the angles of inclination of the blade, since equality of angles or linearity of surfaces will lead to the unsuitability of the tool;
- The angles of the chamfer and cutting edge can be viewed in the corresponding table in GOST 1184-80.
The optimal sharpening angles are from 200 to 300. The angle between the edge and the chamfer should be no more than 50.
Correct sharpening angle
Tool sharpening
Each of us has encountered a situation in life when blunt tools, be it an ordinary knife or carpentry tools, interfere with normal work.
Dull tools require greater effort and therefore your hands get tired faster and dangerous situations may arise. Sharpening the tool in advance will provide you with a quick and easy work process without any extra effort. Each type of tool has a cutting edge with its own individual sharpening angle. Tools with sharpening angles up to 25° have sharper edges, but are not suitable for work that requires significant effort; in this case, tools with a large sharpening angle are used. It is necessary to take this fact into account and therefore, before starting the sharpening process, we advise you to familiarize yourself with the optimal sharpening angles for various tools. By the way, good sharpeners are equipped with an angular scale for setting the supporting surface for a specific tool, which greatly facilitates the process of sharpening the tool.
Sharpening equipment
To sharpen by hand you will need the following tools:
- abrasive for rough processing;
- grinding tool;
- frame for fixing the position.
For machining, a sharpening machine with replaceable grinding wheels should be used. Spindle rotation speed from 1.8 to 2 thousand rpm. You can use a sharpening stone with a special filler (aluminum oxide or other similar properties) that has a medium or low level of hardness.
To obtain a perfectly flat, smooth surface of the cutter, you need to sharpen the chisel or chisel with polishing equipment. A water stone is used, the surface of which is wetted in abrasive dust or suspension.
To perform finishing, exclusively hand tools are used. This is due to the need for precise control of the geometry of the cutter and chamfer relative to the blade.
To manually sharpen a semicircular chisel, you will need the following tools:
- silicon block;
- abrasive powder;
- thick plywood;
- leather;
- a set of sandpaper with grit from 400 to 2000.
Sharpening a semicircular chisel
General sharpening rules
Before you start sharpening a chisel, it is worth considering several general rules for performing this type of work:
- It is necessary to accurately determine the sharpening angle. This requires correct fixation of the chamfer in the sharpening device. The correct slope is selected for the longitudinal and transverse directions.
- Initially, you need to decide on the type of frame. One is designed to perform work on an automated grinding wheel. The second is for manual sharpening using whetstones and sheet abrasive.
- For work, an abrasive with a stone grain of 300-400 microns is used.
- At the end of the work, an abrasive with a stone grain of 50 or 80 microns is used for manual finishing.
Sharpening semicircular chisels for wood carving is carried out according to the same scheme as flat ones. The only difference is the number of stages - with a semicircular blade, all sides and parts of the blade are sharpened separately.
General rules on how to sharpen a semicircular chisel:
- First you need to dull the cutting edge. This will align the end.
- Next, an angle of 20-25° is selected for the semicircular blade profile and processed. Sometimes you have to divide the plane of a metal part into several parts and sharpen each one in turn.
- Next, additional processing is carried out using coarse-grain abrasives.
- The last stage will be finishing.
Often the same pattern is used for chisels and plane knives. This is the wrong decision, since the tools themselves (and, accordingly, their components), their operating principle and structure are completely different.
In order not to make mistakes when processing the cutting part of the tool, you need to know exactly how sharpening a chisel differs from a plane knife. To more accurately determine the differences, it is worth considering the following table:
Comparison of sharpening a chisel and a plane knife
| Processing the chisel | Planer knives |
| First, an abrasive wheel with a fine grain is used, and finishing is done by using a coarse abrasive. | Primary processing is carried out with a large abrasive, correction of defects is carried out with a fine one, and fine-tuning and final polishing are carried out using a leather belt or leather strip. |
| The procedure can be carried out manually or using an automated circle. | Sharpening is carried out only on automated wheels with different abrasive grain sizes. Otherwise, the procedure will take a long time. |
| The sharpening angle usually varies from 25° to 35°. | The angle for the plane knife when sharpening can be 25° - 45°. |
| The inclination of the chamfer is determined in accordance with the thickness of the metal of the chisel. | The inclination of the knife blade when sharpening is selected in accordance with the thickness of the wood with which you will have to work. |
After such comparisons, it immediately becomes clear how sharpening a chisel differs from a plane knife. The difference is quite striking and should be taken into account in the process of preparing a particular tool for working with wood.
Materials and assembly rules
An excellent option for wood chisels is black sandpaper, the working surface of which is silicon carbide. This material is suitable for dry and wet grinding; the high hardness of the abrasive determines increased productivity when sharpening the cutting edge. The key points are the following:
- To sharpen a wood chisel at home, you need sheet paper with different grain sizes.
- The work is carried out in several stages. At the finish, sandpaper with fine abrasive is used.
- It is possible to ensure comfortable work when sharpening the tool in question for wood only by placing the sandpaper on a flat wooden surface. An MDF block is suitable for this, which is pre-wetted to eliminate the possibility of sandpaper slipping. This device is very convenient to use.
Don't miss: What is the difference between a jointer and a plane: what is common, what is the difference between a jointer and a plane
Even with the proper experience, it is almost impossible to carry out the procedure in question without a special device; most often, a lens with eightfold magnification is used. Thanks to such a device, it is possible to see most of the flaws of the instrument.
A device for sharpening a wood chisel of this type does not allow you to control the sharpening angle, which significantly reduces the quality of the resulting edge. That is why a special wooden device is being created that allows you to control this indicator with high accuracy. Due to it, the instrument is fixed at the proper angle. In addition, reliable fixation ensures uniform removal of material over the entire surface.
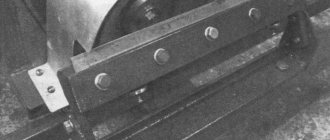
Making a sharpening device
The device shown in the figure is suitable for chisels and plane blades with a length of at least 75 mm with a sharpening angle of 25°. You can make several of these to sharpen at other angles.
Elements that make up the sharpening device
First, cut out the base (A) from hardwood, such as maple, with an allowance for length. The workpiece should have dimensions of about 13x76x255 mm. Install a mortise disk into the saw and cut out a tongue 5 mm deep and 45 mm wide at a distance of 19 mm from the rear edge. Then install the rip saw blade and tilt it at an angle of 25°. Using double-sided tape, attach the workpiece to a support board made from scraps, the dimensions of which should be larger than the workpiece. Position this assembly and cut the bevel on the workpiece. Return the blade to a vertical position and saw the workpiece to a final length of 190 mm.
Make a holder (B) from a piece measuring 19x45x255 mm. Tilt the saw blade at an angle of 25° and, attaching the holder to the supporting board, file the bevel. Place the disc in a vertical position and saw the holder to a length of 190 mm. Drill two holes with counterbores (an additional recess for the head of a screw or nut) on the bottom side for installing screws. The centers of the holes are located at a distance of 32 mm from the ends of the holder. First make the counterbores and then drill a 5mm hole in the center of each one. Install a groove disk into the sawing machine and, using a transverse (angular) stop, make a recess 102 mm wide and 1.5 mm deep. This recess will help secure the tools to be sharpened at right angles to the work surface.
Saw out the clamp (C), and drill holes for the screws. Place the holes at a distance of 32 mm from the ends of the clamp in the middle of its width. Make a handle (D) and glue it to the clamp. Once the glue has dried, assemble the fixture by adding screws, washers, and wing nuts. Apply a little wax paste to the tongue of the base so that the holder moves easily from side to side.
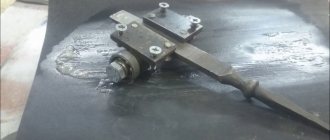
Sharpening an oblique knife
We sharpen the tool, in this case the jamb - an oblique knife, on a medium-grained stone (abrasive stone), which is first immersed in water. Having chosen a sharpening angle that is convenient for you, fixing your hands in this position, using light pressure from yourself, we sharpen the tool. The sharpening angle depends on the density of the material you are going to cut.
We sharpen on a medium-grained block until a strip of metal similar to foil appears on the tip of the cutter. We wet the block periodically. Having achieved, through our labor, a uniform thin strip of foil on the tip, we move on to a small diamond bar. Using the same movements, we continue sharpening, turning the cutter from one side to the other, until the foil falls away from the cutter tip.
After the diamond block, we apply paste to a moistened leather belt nailed to a wooden block and continue to sharpen (polish) the tip of the cutter to a mirror shine.
A sharpened chisel is checked for readiness in different ways: on the nail, but I usually check by cutting off the edge of a newspaper.
If you succeed, congratulations, your tool is ready to go! For cutters with one-sided sharpening, one side is sharpened and the other is polished. That's all! I hope it wasn't difficult for you. See you in the next lesson.
With just sandpaper and this simple homemade sharpening tool, you can get your chisel and your other tools razor-sharp in minutes. Do you wait to sharpen your tools until they are completely dull? There is a simple and cheap way to return them to their former sharpness. We are confident that with its help you will always keep the blades of your planes and chisels in excellent working condition.
This is worth doing, if only because sharp tools make the job easier, more accurate and much safer. If the chisel cuts wood easily and you don't use much force to do it, it's unlikely to break off, damaging the surface or your hand. Using the correct sharpening technique, you will not waste extra time on it. Although sharpening time depends on the hardness of the steel and the condition of the cutting edge, on average it takes no more than 10 minutes to get a dull chisel razor-sharp.
Finishing process
When finishing, the tiny scratches left by the sandpaper are removed, and both surfaces that form the cutting edge become polished like a mirror. You can perform finishing on a leather belt rubbed with green chromium oxide paste (GOI paste). Instead of a belt, you can take a piece of any tanned leather, for example, the top of an old boot, and instead of a polishing paste, any cleaning powder used in everyday life.
Sprinkle a little abrasive powder onto a flat surface and proceed in the same way as with sandpaper. A few strokes are usually enough to finish polishing the cutting edge.
Excellent results can be achieved even easier. Apply a pinch of cleaning powder to a flat piece of dense wood such as maple or a piece of MDF sheet. Then use the sharpening tool again. Then, taking the chisel out of it, polish the back side (back). The fine abrasive particles contained in the cleaning powder will remove most scratches and polish the steel to a shine.
Sharpened chisels should be stored carefully so that nicks do not appear on the cutting edge. When you have finished finishing the planer blade, immediately insert it into the block and do not extend the cutting edge below the sole unless you intend to immediately begin planing. Once you have all your cutting tools in order, develop the good habit of always keeping them sharp by regularly sharpening them. Then you don’t have to start working with 100 grit abrasive, but can immediately take paper No. 320 and move on to smaller numbers.
Tools and accessories
Depending on the alloy, hardness, sharpening angle and other technological details, it is necessary to select a tool for sharpening the cutters. Each device has its own advantages and disadvantages.
Musaty
An effective tool, which is a metal rod with a ridge. Processing is carried out using a handle.
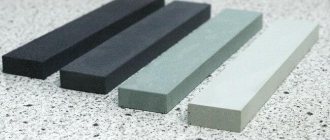
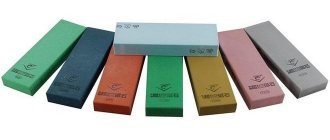
Sharpening stones
Another option for manual processing. Sharpening cutters using sharpening stones requires skill, which can only be acquired with experience. The cutter must be applied to the part and passed over it at least 10 times.
Mechanical sharpeners
Automated sharpening method. First you need to set the input parameters and, depending on them, actively operate the tool.
Electric sharpeners or sharpening machine
This is the most universal and simple method. The sharpening machine is convenient to use; in appearance it resembles a metal bar with holes of different sizes.
Emery, diamond wheel
The diamond wheel is widely used because it ensures high cleanliness of cutting surfaces. Also, with the use of diamond wheels, the service life of sharpening cutters increases - the number of possible resharpenings increases by 20-30%.
Control of sharpening results under a microscope
We sharpened several chisels using our jig and sandpaper, followed by a belt polish with an abrasive paste, and then sent them to the lab where we took photographs of the cutting edges using a scanning electron microscope.
| A section of a chisel blade that was sharpened on a homemade jig, at 150x magnification. Under a microscope you can see traces of scratches that have not disappeared even after finishing and polishing. | This chisel is sharpened using special expensive equipment with a magnification of 150 times. Scratches are located perpendicular to the cutting edge and are less noticeable. The sharpness of the chisel is almost the same. |
One of these samples is shown in the left photo. For comparison, we sharpened another chisel using special high-precision equipment and also polished the cutting edge. This sample is shown in the right photo.
Conclusion: Our primitive sharpening method provides very similar results at significantly lower cost.