Copy rings and templates
A copying sleeve for a router is a device with a protruding edge that slides along the template and thus sets the movement of the cutter in the required direction. Such a ring can be fixed on the base of the router in various ways: screwed with screws, screwed into a threaded hole, inserted with special tendrils into holes in the base of the tool.
Calculation of cutter offset when using a copy sleeve
The diameters of the copying ring and the tool used should have close values, but it is important that the ring does not touch the cutting part of the cutter. If the diameter of the ring exceeds the transverse size of the copy cutter, then such a template to compensate for the difference between its size and the diameter of the tool should not exceed the size of the workpiece.
A milling template, made in the form of a ring, can be fixed to a piece of wood using double-sided tape and clamps, with which both parts are pressed to the work table. After milling according to the template, you should check that the ring was pressed tightly against the edge of the template during the milling operation.
Making an oblong hole using a template and a copy ring
Milling templates can be used not only to process the entire edge of a product, but also to give its corners a rounded shape. Using such a template for a router, you can make roundings of various radii at the corners of the wood product being processed.
Templates used for working with a hand router can be equipped with a bearing or ring. In the latter case, the following conditions must be met: the ring must exactly match the diameter of the cutter, or stops must be provided in the design of the fixture that allow the template to be moved away from the edge of the workpiece and thereby eliminate the difference between the radii of the tool and the ring.
Using templates, which can be adjustable, you can not only mill the edges of the wood product being processed, but also create shaped grooves on its surface. In addition, if you make a template of the appropriate design, which is not very difficult, you can quickly and accurately cut grooves for door hinges with it.
Milling devices for processing bodies of revolution
Many accessories for manual milling machines, made by users to suit their needs, do not have serial analogues. One of these devices, the need for which arises quite often, is a device that facilitates the process of cutting grooves in rotating bodies. Using such a device, in particular, you can easily and accurately cut longitudinal grooves on posts, balusters and other wood products of a similar configuration.
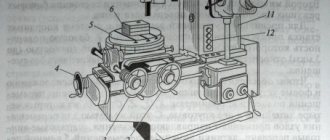
Device for cutting flutes in balusters
Milling cutter and frame assembly
Router carriage
Dividing disc
The design of this device is:
- frame;
- mobile milling carriage;
- a disk used to set the rotation angle;
- screws that secure the workpiece being processed;
- locking screw
If such a device is additionally equipped with a simple drive, which can be used as a conventional drill or screwdriver, then milling on it can successfully replace processing performed on a lathe.
Cutting round and elliptical grooves
To cut grooves in the shape of a circle or ellipse in wood with a hand router, use compass devices. The simplest compass for a router consists of a rod. One end of it is connected to the base of the router, and the other is equipped with a screw and pin. The pin is inserted into a hole that acts as the center of a circle, along the contour of which a groove is formed. To change the radius of the groove circle, for which such a compass for a router is used, it is enough to move the rod relative to the base of the router. More convenient to use are compass devices, the design of which includes two rods rather than one.
The simplest compass rod often comes complete with a router
Equipment operating on the principle of a compass is a fairly common type of device used to work with a router. With their help, it is very convenient to mill shaped grooves with different radii of curvature. As mentioned above, the typical design of such a device, which you can make yourself, includes a screw with a pin that can move along the groove of the device and thereby allows you to adjust the radius of the groove being created.
In cases where it is necessary to create a hole of small diameter with a milling cutter on wood or other material, a different type of equipment is used. A design feature of such devices, which are fixed on the bottom of the router base, is that their pin, installed in the central hole on the workpiece, is located under the base of the power tool being used, and not outside it.
Homemade compass with two guides
Base
Corner
Guides
Centering pin
Compass assembly. Bottom view
Compass assembly. View from above
Using special devices, you can use a hand router to create not only round, but also oval holes in wood. The design of one of these devices includes:
- a base that can be fixed to the wood product being processed with vacuum suction cups or screws;
- two shoes that move along intersecting guides;
- two mounting rods;
- bracket connecting the base of the device to the router.
Due to special grooves in the bracket of such a device, its base plate is easily aligned in the same plane with the base of the router. If this equipment is used to perform milling along a round contour, then one shoe is used, and if along an oval contour, then both. The cut made with such a device is of higher quality than if it was made using a jigsaw or band saw. This is explained by the fact that processing with the milling cutter used in this case is carried out by a tool that rotates at high speed.
The result of working with a homemade compass is a round hole with smooth edges
Rip fence for straight and curved cuts
A rip fence for a router table or other base surface, which allows straight cuts in wood relative to these surfaces, is one of the most popular devices and is included in the standard kit of many models. Using such a device, the base element for which, in addition to the work table, can be the side of the workpiece or a guide rail, the grooves on the workpiece are processed, and its edge part is also milled.
Factory-made rip fence device
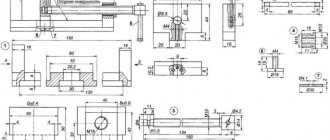
The design of the parallel stop for the router includes the following components:
- rods that are inserted into special holes in the milling cutter body;
- a locking screw, by means of which the rods are fixed in the required position;
- fine adjustment screw, which is needed in order to more accurately adjust the distance at which the cutter axis will be from the base surface;
- support pads with which the device rests on the base surface (in some models of parallel stops it is possible to change the distance between the support pads).
To prepare the router stop for work, you need to do the following:
- insert the stop rods into the holes in the base of the router and secure them in the required position with a locking screw;
- Loosen the locking screw and use the fine adjustment screw to adjust the distance between the cutter axis and the supporting surface of the fixture.
Homemade hardwood rip fence
Base drawing
Clamping bars are made from a single piece
By adding one simple part to the rip fence, you can use this device to create not only straight, but also curved cuts in wood. Such a part is a wooden block, one side of which is straight, and on the other there is a round or angular recess. It is placed between the support pads of the stop and the base surface of the processed wood workpiece, which has a curved shape.
In this case, naturally, the straight side of the block should rest against the support pads of the device, and the side with the recess should rest against the curved base surface. You should work with a parallel stop, additionally equipped with such a block, with extreme caution, since the position of the router itself in this case will be quite unstable.
Modification of the standard stop for milling roundness
Guide rail
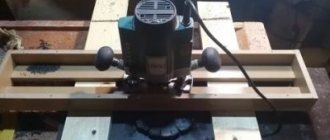
To cut through wood, you need to precisely control the location of the router in space.
Using a guide bar, a straight tool path can be ensured.
The following points stand out as characteristic features of this device:
- Guides for a hand router can be positioned at a convenient angle on the surface to be cut. This device helps to work out the necessary schedule for moving the device along a horizontal surface in any direction.
- Sometimes it becomes necessary to make holes in the plywood so that they are located at a certain distance from each other. To create holes with the required parameters, additional parts are included in the fixture.
- To hold the tool in one position, special clamps are used, sold as a set with the device. If there are none, they are replaced with clamps.
- Some mono models can be purchased together with an adapter for the milling table.
To create a guide bar with your own hands, use a long beam secured to blanks using clamps. For comfortable use, the device is supplemented with side stops.
In some situations, using this DIY device for a router is not comfortable. In this case, choose the second option for a homemade device. The guide rail will consist of a sheet of plywood and two boards attached to it in a parallel position. Its use is especially convenient when cutters of the same size are used for cutting. Having two boards allows you to create a precise and stable fixture.
If cutters of different sizes are used, the type of guide bar changes slightly. To secure the template, use a folding board attached to the hinges. After the template is securely fixed, the board folds back and work begins with cutters of different sizes.
Clamps will allow you to securely fasten the equipment. During torsion, the router will be able to firmly press against the prepared material, which will ensure greater cutting accuracy.