A country plot for the construction of a private house can be located in low-lying lands. In such a landscape, the groundwater level is quite high, which makes living unpleasant due to constant flooding during heavy melting of snow or heavy summer rains. But this problem can be solved.
To do this, you just need to purchase and install storm wells and connect them with a single drainage system.
Types of drainage wells
The well shaft has several types, which can be classified according to purpose and type.
According to its purpose, the drainage shaft can be:
- Lookout.
- Collector.
- Absorbent.
The inspection well for drainage has several other working names. It may be called audit or inspection. Designed to monitor the technical condition of the drainage system, its timely cleaning, maintenance and repair.
An inspection well is installed for drainage in places where pipes turn or change their direction. On straight pipes, installation of shafts is carried out every 30 meters with a pipeline diameter of 15 cm or every 50 meters with a pipeline diameter of 20 cm. Additionally, you can install an inspection well for drainage at the intersection points of the drains.
Attention! The diameter of the shaft depends on whether a person will descend into it.
If it is planned that there will be a descent for maintenance, then the plastic inspection well shaft must have a diameter of at least 1.0 meters. If the shaft is cleaned with water pressure from an external hose, then the optimal diameter for the shaft will be 35-45 cm.
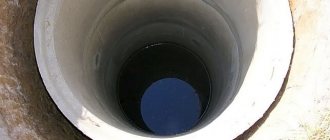
A collector or water intake well is designed to collect water after precipitation or drain it when located high in the ground. It is a closed reservoir that completes the drainage structure.
Plastic stormwater collection wells are typical for private country houses. If the site has a slope, then the installation of the shaft is carried out at the lowest point of the site.
If the site is flat, then the installation of drainage pipes is carried out at a slight slope of the sewer system, and storm wells are installed slightly below the level of the pipes. This will ensure a random outflow of water from the pipes into the mine.
The liquid can accumulate or drain naturally into the central drainage channel, the nearest body of water. If there is no outlet, then the water is pumped out using a pump, which often comes with the tank.
The collector storage tank can serve as an element of the sewer system. The drainage well for sewage is equipped with a system for removing solid elements. After passing through several levels of purification through the septic tank, liquid accumulates , which is subsequently pumped out. The dimensions of the drive are not adjustable, it all depends on the wishes of the owner.
An absorption or filter storage tank is designed to drain a certain small area of the area where it is impossible or there is no need to install a general drainage structure. For drainage, soil is selected in which the volume of liquid passing through the well is no more than 1 cubic meter. m.
Installation of such a shaft is relevant on loose and sandy soils that are highly permeable to moisture.
A characteristic difference between a well is the absence of a bottom, its shape and method of installation. It has the shape of a truncated cone, which is installed with a smaller diameter upwards. If desired, you can install a shaft of a different shape.
For installation, a pit with a depth of about 2.0 meters will be equipped. A cushion of crushed stone, 2-3 cm thick, is placed at the bottom of the pit. But the cushion is installed in a cone wrapped in geotextile. Inside the shaft, a lining is made of small stone, crushed stone or slag, which is covered with geotextile. When the mine is flooded, the liquid is pumped out and the geotextiles are replaced.
By type, wells are divided into:
- Turning.
- Tee.
- Cross.
- Passage.
- Dead end.
- No holes.
A plastic rotary drainage well is installed at the turning points of the pipes . Often these are the external and internal corners of buildings. These areas are most vulnerable to clogging. The pipes at the rotary well are located at an angle of 90°.
The pass-through storage tank is installed along the line of drainage pipes. Essentially, this is a manhole for drainage. The pipes are installed in one line.
A cross-well and a tee-well can be located in the place of rotary shafts, to which additional drainage lines are connected. The cross and tee can be used as inspection points in certain areas where several drainage lines are connected to one point.
The pipes in such shafts are located at an angle of 90° relative to each other.
The dead-end type of shaft is applicable to a collector well and has one inlet pipe. A storage tank without holes is used as an absorption shaft.
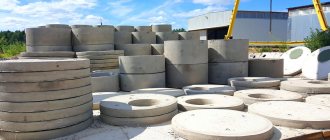
Tools and materials for a concrete ring drain
The device requires the collection of the necessary construction tools. Based on the project and installation method, you can use reinforced concrete products of various sizes, for example:
- with bottom;
- end-to-end;
- with hatch and cover.
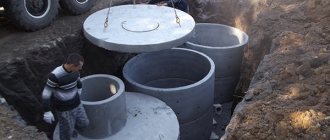
The large weight of the rings requires the use of lifting equipment for their careful installation and transport to deliver them. Shovels will be required for digging trenches and holes; if the volume of work is large, then special equipment will be ordered. To properly install RC rings, sand, crushed stone and gravel are required.
Step by step: digging and installation yourself
Installation is carried out in two ways:
- If the diameter of the ring allows, immediately install it in the proper place. A man climbs inside it and starts digging. The soil is gradually removed, and it will sink down under its great weight. Using this technology, all rings are installed without the use of special equipment.
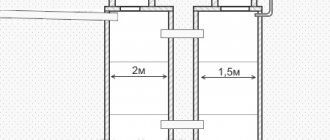
- The mine is first dug. The diameter of the pit should be 400 mm wider than the outer ring. Digging can be done manually if there is no access for an excavator to the work site. Before installing the rings, it is recommended to fill the bottom with a gravel cushion up to 200 mm thick. This is especially good when the soil is soft. If the collector is storage or inspection, then the lower ring must have a sealed bottom. You can do it yourself.
Regardless of the installation method, the joining of the rings is carried out using a cement-sand mixture. After it has dried, it is recommended to treat the inside of the structure with a waterproofing bitumen-polymer composition.
The next stage involves digging trenches for laying the pipeline.
In the right places, a hole is punched in the ring using a puncher. A pipe is inserted into the hole, after which this place must be covered with cement-sand mortar and bitumen-polymer waterproofing.
After installation is completed, all empty space on the outside of the ring is filled with crushed stone. After adding stones in a layer of up to 0.5 m, the rest is covered with clay.
If there is a reinforced concrete cover, then it is simply installed on top of the structure, and a hatch is mounted in it.
Construction of a drainage well
A plastic drainage well is an excellent replacement for its counterparts made of iron pipes, concrete or brick. Such a plastic tank includes a set of parts, combining which produces a structure ready for installation:
- Hatch with sealing rubber gasket.
- Hatch support telescope with rubber gasket. Serves as a connecting element between the hatch and the neck. May not be installed on some models
- Neck. Passage element between the hatch and the shaft.
- Construction shaft. Serves as the main storage tank.
- Tray. Serves for connecting and distributing pipes.
- Sewer couplings. Sealing element between the tray and the nozzles.
- Connecting pipes. Connect the tray with drainage pipes.
Depending on the purpose and type of drainage tank, parts may be added or excluded in its design.
How to choose a plastic sewer well?
The choice depends on the outdoor network where the device is intended to be used. For example, if the well is tap water, then this assumes that it will be dry there, which means open water is not provided.
If additional equipment is required, then the device simply must not allow groundwater to pass through. Therefore it must be airtight.
Wells are free-flowing, they are called wet. Therefore, water is assumed to be there. Here it is necessary to exclude the possibility of runoff entering the soil. For this type you need to pay attention to the pipes. These must be products made of polyvinyl chloride.
Materials for production
The production of plastic wells is carried out according to a certain technology , for which materials such as polyvinyl chloride, polypropylene and low-density polyethylene are used.
Plastic structures made from polyvinyl chloride are characterized by resistance to aggressive and chemical influences. They can be used in a drainage system for any purpose. Due to their properties, they are used for sewer lines or septic tanks.
Polypropylene containers have good wear resistance, but cannot be used at low temperatures.
When the temperature drops, they become brittle and can break.
Polyethylene structures can be used as a storage tank at any ambient temperature. A characteristic feature is that the installation depth should be small, since polyethylene is not capable of bearing the high load that the upper earthen backfill will give.
A drainage inspection hatch is a mandatory element of any tank. The need for a hatch is as follows:
- Access to mines for their repair and maintenance.
- Protecting the tank from external debris (branches, leaves, paper).
- Protection from unpleasant well odor.
- Prevention of injuries to people and animals, vehicle breakdowns.
It is made from the same material as the tank.
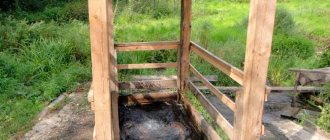
Reanimation of old well shafts
Using plastic wells, you can restore old water intake structures made of concrete or wood. If there is an ancient collapsed well on the site, its use will save on geological exploration.
The procedure for resuscitating an old well shaft is carried out in the following sequence of operations:
- Pump out the water and dismantle the old fittings.
- The sediment, bottom filter and part of the soil are removed.
- Geotextiles and crushed stone are used to strengthen the bottom.
- Install a well column of the required length and diameter.
- After lowering the assembled structure into the old shaft, the space between the two columns is filled with gravel and sand.
- The bottom of the well is equipped with a new bottom filter.
- It is convenient to pump water with a submersible pump lowered inside. This procedure is stopped only after clear water appears.
Plastic well on the site of an old concrete well
Manufacturers
The drainage structure can be installed efficiently if the parts selected for it meet established standards and are purchased from trusted manufacturers. of the Dutch corporation are popular in the domestic market . It produces corrugated products for drainage systems.
The corrugated shape allows the well to move in the direction of the ground and prevents its destruction. The availability of wells with a diameter from 1.0 to 6.0 meters allows you to choose any necessary design. In addition to high-quality top hatches, wells can be equipped with a bottom cover.
Domestic produces drainage systems of various types and purposes. The tanks are manufactured in corrugated and straight shapes.
They have high strength and a long service life. The main advantage over foreign analogues is lower cost. The material for the mines is polyvinyl chloride and high-strength polyethylene.
Matline is another domestic corporation. It produces drainage systems of any designs and sizes , 100% ready for installation. The body of the drainage structure is welded using extruders.
Advantages and disadvantages
The active use of plastic tanks is due to a number of advantages . These include:
- Simplicity and speed of installation. There is no need for special equipment.
- Compliance of the material. If necessary, the pipe can be cut to the desired length with a regular hacksaw.
- Insignificant mass. You can move and install structural elements manually.
- Long period of operation. The material is not afraid of corrosion and destruction.
- Resistance to small rodents and insects.
- Lack of environment for the formation of fungi.
- Resistant to temperature changes.
- Good resistance to chemical and aggressive components. Not afraid of oxidation.
- Sufficiently high resistance to loads.
- Possibility of quick dismantling.
- Budget cost and the possibility of free purchase in the retail chain.
Among the main disadvantages, one can note lower strength compared to reinforced concrete structures. As a result, there is a need to select a tank for the type of soil on which the plastic structure will be installed.
Self-installation
To install a drainage well, you can use two options , which differ in cost. The first option is more expensive. You can buy a ready-made drive equipped with a tray and holes for drains. It must be installed in the pit, drains connected and sprinkling done.
Attention! The second method is more economical, but requires more installation time.
To implement it, you need to purchase the necessary tools and materials and perform installation operations.
The tools you will need are a shovel, a hacksaw, a measuring tool, and containers for removing soil and mixing cement.
The list of materials required for work includes:
- Fine crushed stone.
- Sifted sand.
- Cement.
- Corrugated pipe: with a diameter of 35-45 cm - under a plastic inspection well without a person descending, with a diameter of 1.0 meters and above - under a tank into which a person will descend.
- Rubber sealing elements of the required diameter.
- Covers for the bottom and hatch.
- Mastic.
Installation of a drainage well is carried out in accordance with a drawing drawn up in advance, and consists of the following operations:
- The pipe for the drainage tank must be cut to the required height. This height should correspond to the future depth of the pit.
- It is necessary to leave a distance from the bottom edge of the pipe and make holes according to the diameter of the drains being inserted. The height of the holes depends on the depth of the drains.
- Using mastic, you need to attach the bottom to the base of the pipe and make sure that the connection is tight .
- When the barrel is ready, you need to dig a pit for it. The diameter of the pit should be 30-40 cm larger than the diameter of the pipe.
- The bottom of the pit is compacted and filled with crushed stone to a height of 20-25 cm.
- Crushed stone is filled with cement mortar, 10-15 cm high.
- After the solution hardens, the bottom and walls of the pit are covered with geotextiles.
- A storage or inspection well for drainage is installed at the bottom of the pit and connected to the drains. The entry points of the drains into the shaft are sealed with mastic.
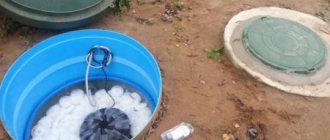
- If necessary, a pump is installed in the shaft.
- The space between the tank and the walls of the pit is filled with crushed stone.
- The cover is installed. It should tightly cover the top opening of the tank.
- The top layer is decorated with turf.
The main advantages of plastic wells
The advantages of plastic drainage wells include:
- Low weight, which allows you to do without a crane during loading/unloading.
- Good resistance to aggressive environments, low temperatures and mechanical damage.
- Service life is 50-70 years without major repairs.
- Availability of all necessary inputs/outputs in the housing.
- Minimum amount of excavation work due to the reduced diameter of the well structure and thin walls.
- Simple installation - the plastic product is cut to the required dimensions.
- High structural strength that can withstand tens of tons of load from above, as well as soil heaving as a result of frost from the sides.
The lightness of the plastic components of the well body allows all installation work to be carried out by several people.
But this lightness also hides the main drawback of such products - during heaving and floods, they can simply be squeezed out of the ground. Important! To prevent water from pushing a light well structure out of the ground, it must be tied to some kind of heavy “anchor,” for example, a concrete slab.
Another disadvantage is the high cost of a plastic drainage well. But here it is worth considering not only its price, but also the costs of its installation. After all, when buying a plastic well, you will not have to spend additional money on special lifting equipment. A few installers and ropes are enough to lower the elements into the pit.
Considering the long service life, which amounts to several decades without the need for repairs, the cost will no longer seem so high. The initial costs for a plastic well pay off with interest.
In addition, it is much easier to connect pipes to such a well than to a brick or concrete analogue. Its installation does not require specialized skills, so you will do without inviting qualified specialists to work.
Construction of a plastic well
The well structure includes in its structure:
- a round shaft (working chamber);
- body neck;
- bottom and tray for collecting sand.
A drainage cushion made of gravel can act as a sealed bottom, since leakage of drainage water during system repair does not pose any danger to the environment and underlying soils.
The structure is closed from above with a regular lid or hatch. They are made from plastic, polymer sand or cast iron. In this case, the neck of the well container may be missing, while the hatch is placed directly on the shaft.
Attention! A prefabricated plastic well consists of a shaft of different heights, a neck, a tray and special sealing collars for reliable hermetically sealed fixation of pipes.
The shaft is made corrugated, which increases the strength characteristics. When compressed by soil, it will not collapse and will remain sealed and intact.
The tray and the bottom with pipes make up the kinetic part of the well, where the pipes are laid. In addition, silt and debris that gets inside with drains settle in it. Often they come with a special form for pouring the supporting concrete base.
When installing a sealed well structure, it is permissible to use more than just a tray for the drainage system. You can use a simple flat bottom instead. This design will be cheaper, but this option is susceptible to clogging with large debris. You will have to look into the well shaft more often for inspection, and even if there is the slightest clutter, you will have to clean it immediately.
A hanging ladder can be built inside the well or steps can be made as inserts into the body. The pipelines are connected to special holes that were cut at the factory. In addition, such an insert can be made almost anywhere on the body.
A hanging ladder can be built inside the well or steps can be made in the form of inserts into the body. The pipelines are connected to special holes that were cut at the factory. In addition, such an insert can be made almost anywhere on the body.
Which well is better: monolithic or prefabricated?
A prefabricated drainage well is assembled from various plastic parts, similar to a construction set. The monolithic product is already ready for installation; it just needs to be lowered into the hole dug for this.
Attention! Before you buy a monolithic well, you need to carefully calculate everything; you will not be able to replace part of it or extend the shaft after installation.
Monolithic options are stronger and cheaper compared to prefabricated counterparts. But they are produced in a rather narrow range of standard sizes. They are installed only to the depth specified in the instructions.
Individual components of a prefabricated structure are easier to load into a car and transport than a large monoblock product. But in terms of compressive strength, even when assembled, they are inferior to a solid well. By definition, a solid hull can withstand severe mechanical and hydrodynamic loads.
Attention! To extend the body, the prefabricated well is equipped with several shaft rings in the middle part and a special telescopic extension located under the hatch.
The assembly of plastic components of wells involves the need to seal the place where they are fixed. And every such joint is a potential leak and hole.
In addition, bolts and nuts are required to tighten the elements. They must be supplied complete. If they are missing, then you should only buy galvanized fasteners, which are less susceptible to corrosion.
How is a plastic drainage well installed? Step-by-step instruction
If you have chosen a prefabricated structure, then it must first be assembled. This can be done in a pit, but then it will have to be quite voluminous.
- Installation of the assembled part of the drainage into a dug trench. The bottom and tray part of the collector well are assembled on a flat area, and then installed on the compacted and leveled bottom of the trenches.
- Trimming a pipe for a well shaft. The main part of the shaft is cut out of a corrugated pipe, taking into account the design and height of the conical neck.
- Construction of a corrugated shaft for a plastic collector well. A corrugated pipe is attached to the parts of the well pre-aligned using a laser level.
- Fixing the conical neck to the corrugated part. A conical neck with a hatch is fixed to the top of the corrugated part of the well, and then the trench is filled with soil.
The depth of the hole under the plastic drainage well is dug in such a way that the pipes enter it below the freezing point of the soil and the upper aquifer in it. It is important to remember that under the structures it is necessary to pour a crushed stone cushion of 15 cm and lay an anchor concrete slab of similar thickness.
If a plastic well will be used to drain moisture into the ground, then the layer of crushed stone below must be at least 30 cm. In this case, the hole must be large.
As for the width of the pit, it should be 30-40 cm larger than the outer diameter of the installed tank. This will be enough to lower the plastic product inside and you won’t have to dig up extra soil.
The height of the well structure is selected so that it is not more than 20 cm above the ground. The only exception is the drainage option with a grate on top instead of a lid.
The hatches of other types of wells should be 10-20 cm above the turf level. Otherwise, during rain, water streams will flow into them, carrying with them tree leaves and other debris.
- Preparing to lay a drainage well.
Before installing the inspection well and connecting drainage pipes to it, the bottom of the trench is leveled and compacted well.
- Leveling the bottom of the drainage well.
The position of the bottom is checked again with a laser or conventional building level. If necessary, level by adding sand under the drainage component.
- Connecting drains to the bottom of the well.
Sewer pipes are connected to the bottom installed in the trench by pressing them into the sockets.
- Cutting the pipe to the design height.
The corrugated pipe is cut to the height specified by the project. Cutting is done with a hand hacksaw or electric saw.
- Installation of a seal on a well shaft.
A sealant is placed on the outside of the corrugated shaft. It is located in the recess between the bottom and the next corrugation.
- Silicone treatment of the bottom of the well.
Before connecting the shaft to the bottom, it is cleaned and treated with silicone grease.
- Installation of the well shaft on the bottom.
The reinforced shaft is snapped into the bottom socket in such a way that the sealant is evenly distributed around the connection.
- Filling the trench with soil around the well.
Filling the trench around the well is carried out layer by layer with gradual compaction. Thick backfilled layers no more than 30 cm.
If in the spring groundwater regularly rises to the surface, then it is necessary to make a concrete foundation under the well made of plastic. They are connected to each other using a nylon torso, which will not rot in the ground. If your site is dominated by dense rocky soils, then you are in luck - you will not need a concrete anchor.
To cut additional holes, you will need a cutter of the appropriate size. After making a hole, special rubber sealing rings are inserted into it, inside which the adapter coupling is placed. It should fit tightly into the rubber gasket without gaps.
To do this, their sizes must match. To ensure a tight seal, the joints must be coated with silicone grease, which will make it easier to press the coupling in and create a tight connection.
Attention! Installation of small-sized plastic wells can be done alone, but to install large or medium-sized ones you will need one or two assistants.
Then, drainage and sealed sewer pipes, which may be needed to drain drainage water, are connected to the plastic well installed in the pit.
To ensure the free movement of water collected by drainage, it is necessary to maintain the slope. Thus, water under its own weight will flow towards the collector, storage tank or filter well.
Then all that remains is to fill the hole with a sand-cement mixture or soil. This is done layer by layer and evenly so as not to squeeze the plastic case, which can lead to its deformation. Then lay the hatch and installation is ready.
Attention! The well shaft is cut to the required height using a simple hacksaw in the center of the protruding segment of the corrugation.