Any fence around an individual development site must have a conveniently equipped entrance for people and a gate for vehicle entry into the territory. At the same time, the design of wickets and gates must be strong enough to provide, if necessary, protection from the entry of strangers. One of the popular materials that meets these requirements is a metal profiled sheet or corrugated sheet, mounted on a frame made of a profile steel pipe and angle.
Gate designs
According to the opening method, gates made of profile pipes and corrugated sheets can be sliding or swinging. A single sliding gate leaf moves to the side along the line of the installed fence of the site. Moving such a structure can be done manually, but more often a mechanical drive with an electric motor is installed for this purpose.
The main advantage of sliding gates is that they do not require free space on the street or yard side to open them. However, with large dimensions of the canvas, it is necessary to strengthen the entire structure or install special elements so that the side farthest from the load-bearing support does not sag down under its own weight.
Swing structures
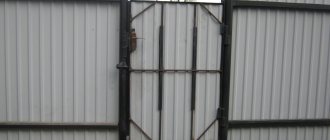
These are simpler gates made of corrugated sheets with a wicket, consisting of 1 or 2 rotating leaves, each of which is installed on a separate support post. The gate for the passage of people can be mounted separately or located on the surface of one of the doors.
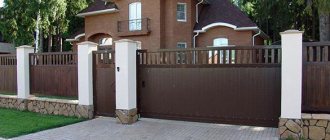
Gate option with jibs.
Gate option with top lintel and crossbars.
Thanks to its simple design, you can make swing gates from corrugated sheets yourself and install them yourself.
Why modern homemade garage doors are upright
Although time is a relative concept, not so long ago private garages were equipped exclusively with “as simple as five kopecks” swing gates. Two metal doors on hinges, with an upper and lower stop; if there is no second exit from the garage, then a door is cut into one of the doors. The doors were attached to a load-bearing frame made of metal profiles, either rectangular or U-shaped; in the first case, a threshold was created in the entry area. In fact, the whole process boiled down to welding the frame, welding the frames of the shutters, lining the shutters with metal sheets, installing and fixing the frame in the opening and fixing the shutters to the frame. The main advantage of swing structures was their simplicity and accessibility, especially at a time when metal cost a penny, and you could weld it yourself or ask your godfather, brother, or matchmaker. Disadvantages are abundant - unreliability and leaks, no matter how you observe the angles and planes, but through so many joints it still “siphons”. Plus, opening the valves requires additional space, and the main thing that people are paying attention to now is that they are inconvenient. Therefore, now the favorites are more ergonomic and practical options, for example, lifting ones.
FredikFORUMHOUSE Member
Lifting gates have a huge advantage - ease of use, even without an electric drive, to open them you need to 1 - open the bolts 2 - lift the gate up. Moreover, it will remain open under the influence of counterweights and the wind will not slam it shut at the most unexpected moment. Conventional gates: 1 – open the bolts, 2 – open one leaf, 3 – lock in the open position, 4 – open the other leaf, 5 – also lock. Laziness, however, is a great thing and an engine of progress.
But you have to “pay” for progress, in this case by complicating the design and high expenses on consumables even with a manual drive, not to mention automatic control. However, making overhead garage doors on your own is quite possible.
Gate sizing
The accepted width of swing structures depends on the overall dimensions of the car that will drive through them. To this size it is necessary to add 1200-1500 mm to simplify the possibility of entering with a turn from the street, or 800-900 mm if there is a direct access road in front of the gate.
In addition, you need to take into account the width of the profiled sheet, which will reduce the amount of scraps and metal waste in the manufacture of gates to a minimum.
The overall dimensions of most passenger car models do not exceed 2000 mm, on average it is 1700-1900 mm. Based on this, we can say that the optimal width of swing gates is in the range of 4000-4500 mm , taking into account the overall dimensions of the support pillars. The width of the gate convenient for people to pass through is usually taken to be 1200 mm.
The height of swing gates depends on the length of the profiled sheet, which in the standard version is 2000 mm. When adding to this value the gap between the doors and the ground, we obtain a height in the range of 2150-2250 mm . An elevated position above the ground is necessary to be able to open in the presence of ice or snow in winter.
Drawing of a gate made of corrugated sheets.
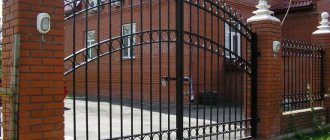
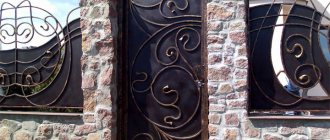
Beautiful gates made of corrugated sheets
By showing a little imagination and using artistic forging elements sold in huge quantities on the construction market, you can make beautiful gates from corrugated sheets that will not only perform protective functions, but will also decorate the interior of the site. Forged gates with corrugated sheeting also look good, photos of which can help when designing and creating your own unique design.
Related article:
Lifting garage doors : designs and their design, principle of operation, advantages and disadvantages; materials used in production; installation procedure; homemade structures and a video describing the process of their manufacture are in our publication.
What to make gates, wickets and pillars from
Calculation of the required amount of materials for a gate with a wicket made of corrugated sheets can only be done on the basis of a drawing of the gate, which contains the following data:
- the width of the opening between the support pillars;
- dimensions of swing doors;
- configuration of the supporting frame of the sashes, indicating the material and cross-section of its constituent elements;
- number, location and dimensions of support pillars;
- installation location and dimensions of the gate;
- mounting locations for welded hinges;
- information about the lock and fasteners.
If necessary, structural reinforcement elements should be added to the drawing to increase resistance to wind loads. The kit includes:
- profiled sheet for cladding;
- steel pipes 60x60 mm with a wall thickness of 2.5-3.0 mm for installation as a support post for pillars;
- profile pipes 40x40 mm or 60x20 mm for assembling the supporting frame of the doors and gates;
- self-tapping screws with a hexagonal head for securing the corrugated sheet;
- metal sheet or strip for making scarves and mortgages;
- welded mesh for reinforcing brick masonry pillars;
- hinges, latch locks and bottom latches;
- primer, paint, solvent;
- welding electrodes.
Reinforcement of the frame structure is carried out using a 20x20 mm profile pipe or an equal-flange angle of the same size. For additional artistic decoration of the gates, you can purchase forged decorative elements that will be welded along the upper edge of the gates.
Characteristics of corrugated sheeting for gates and fences.
Materials
For pillars, they usually take a profile welded pipe 80*80 mm, with a wall thickness of 3 mm. They are dug in below the freezing depth of the soil, placed strictly vertically and filled with concrete mortar. Gate installation work begins after the concrete has gained about 50% strength. If the outside temperature is not lower than +20 °C, this will take 5-6 days, if colder - up to two weeks. For the shutters, profile pipes of different sections are used: depending on the strength of the winds and the span of the gate: there is an option of 60*40 mm, there is a 40*20 mm option. Choose based on your own conditions. For jumpers they take either the same pipe or a slightly smaller cross-section, up to 20*20 mm. All these pipes can be taken with a wall thickness of 2 mm, or 3 mm. Thicker ones are more expensive (they are sold by the kilogram) - they are heavier, but 3 mm metal is easier to weld, which is important for beginners in welding.
Prepared metal
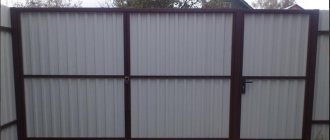
The material for the gate is the same as for the fence made of corrugated sheets, and it is attached to the same screws. Before starting work, the metal must be prepared: remove all rust (with an angle grinder and a wire brush), prime with Anti-Rust and paint. After drying, you can start working.
Marking and excavation work
In order to mark the placement of support pillars, it is necessary to determine the location of the gate. When it is installed separately, there will be 3 pillars, and when the sash is built into the leaf, 2 supports are enough.
If a fence has already been installed around the property, stretch the cord between its outer posts. The position of the thread will indicate the position line of the fence made of corrugated sheets with gates and wickets, and will also allow you to mark the installation locations of the pillars in accordance with the prepared drawing.
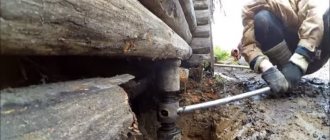
The load-bearing basis of the brick pillar is a 60x60 mm profile pipe.
For its vertical installation and subsequent concreting, you need to drill 2 or 3 holes in the ground. Drill diameter 120-140 mm. Digging holes with a shovel will increase their size and waste concrete. The depth of the pit must be at least 1/3 of the height of the installed rack.
Materials for making support pillars
After completing the excavation work, you can begin installing poles for hanging gate leaves and wickets. They can be made from:
- steel round or profile pipes with a cross section of 150 mm;
- asbestos-cement pipes with a diameter of at least 200 mm;
- finished reinforced concrete products of appropriate shape;
- natural stone;
- building blocks;
- red clay or silicate brick.
The most reliable, beautiful and affordable do-it-yourself construction for gates made of corrugated sheets are brick supports. Their masonry is reinforced with a metal stand in the form of a 60x60 mm profile pipe and welded reinforcing mesh.
Photo of sliding gates made of corrugated sheets
The presented gallery clearly shows various options for the most common sliding gates.
PHOTO: roomester.ru Sliding gates with a separate wicket, view from the yard
PHOTO: master-style.com.ua Sliding gates made of corrugated sheets with a built-in wicket
Related article:
Do-it-yourself sliding gates : step-by-step instructions for making different types of structures, an overview of the necessary materials, tips and recommendations from experts.
The procedure for erecting brick pillars
Clean the profile pipe of the required length from traces of rust, if any, and paint it in two layers. After that:
- pour a 100 mm thick layer of crushed stone and a 50 mm layer of sand into the hole, compact the bulk material well;
- prepare concrete from cement, sand and crushed stone in a component ratio of 1:3:4(5);
- assemble the formwork;
- Install the metal stand vertically and concrete it.
Fixation of the rack strictly vertically can be ensured using spacers of a metal rod or fittings.
The upper plane of the concrete pour should be 50-100 mm above ground level. To do this, formwork is installed, the edges of which should extend beyond the dimensions of the future pillar by 50-70 mm. After concrete hardening:
- cover the surface with waterproofing material or bitumen mastic;
- lay a layer of mortar and lay the first row of 4 bricks;
- after 4-5 rows, weld a metal rod with a mounting plate to a vertical metal post to secure the rotary hinges.
The laying of subsequent rows is carried out with the obligatory bandaging (overlapping) of the lower vertical seams. Every 3-4 rows, place a reinforcing mesh that can be placed over the top of a steel vertical post. The thickness of the seams is 8-10 mm.
Constantly monitor the vertical position of the masonry using a building level or plumb line. 2-3 embedded plates should be installed on the surface of each pillar on the sash side. Their number depends on the size and total weight of the structure.
Assembly of frames of doors and gates
On a flat surface, draw or mark a rectangle corresponding to the size of the gate leaf. To check the accuracy of right angles, measure both diagonals of the rectangle. They must be absolutely the same. Weld an outer frame from a profile pipe of the main section, cut at an angle of 45 degrees.
Strengthening the frame is carried out by installing transverse and diagonal jumpers from a profile pipe of a smaller cross-section or angle.
If the gate for a fence made of corrugated sheets is located on the plane of the sash, you need to weld two vertical posts from a pipe of the main section and one horizontal one at a height corresponding to the dimensions of the entrance inside the frame. The welded stand on which the hinges for hanging the gate will be located is best made from two vertical pipes welded together.
Clean all welds to a smooth surface using a grinder. Remove rust, if any, from the metal surface, traces of dirt, oil and paint it 2 times with exterior paint.
Fastening the loops
Installation of gate leaves and gates is carried out on large garage hinges. Initially, all hinges are electrically welded to the embedded plates on the support posts. The weld is made along the entire length of the fastening edge.
When installing, make sure that the central part of the hinge does not fall into the gap between the post and the sash. Before hanging the gate on its hinges, do not forget about a sufficient amount of lubricant, which should work in a wide range of temperatures and not be washed away by water.
Installation of accessories
A complete set of swing gate fittings may include the following devices:
- locks with which you can securely close gates and gates from any side;
- lower clamps necessary to hold the lower part of the sashes in a stationary position and partially relieve the load from the lock;
- a latch or bolt for locking the gate from the inside;
- mechanical drive and automatic remote control;
- lighting, alarm and external surveillance camera.
The installed lock can be padded, overhead or mortise. Mortise locks are installed completely or partially inside the profile pipe from which the sash frame is welded. Sometimes overhead metal boxes are used for such installation.
Bottom clamps.
Do-it-yourself wicket and gates made of corrugated sheets from square pipes
Initially, you should decide on the configuration of the corner docking unit. There are two options that you can use.
A more complex, but professional method is to use workpieces with an end cut at an angle of 45°.
The second, simpler, but no less reliable way to install gates made of corrugated sheets: the crossbars are butt welded to the vertical posts, and plugs are installed on the end holes.
PHOTO: uz.everaoh.com Separate wicket and gates made of frame and corrugated sheets
If the fence is already installed, it is most convenient to start by installing the posts, and then start installing the corrugated gates. If you plan to initially install a gate and then a fence, then the best option would be to manufacture the entire structure assembled and then install it. When starting to make wicket leaves and gates from corrugated sheets with your own hands, you should cut a blank from pipes according to the dimensions of the drawing. For the gate - four vertical posts and four crossbars, for the gate - two vertical and two horizontal blanks made of square pipes.
The assembly of structures must be carried out on a flat surface of an assembly table or platform. The frame blanks are fixed with small tacks, the angles are adjusted using a square and the identity of the diagonal of the rectangle of the structure is checked.
After making sure that all angles are 90°, you can begin welding the seams. Finished welding seams are cleaned of irregularities with an angle grinder, popularly called a “grinder”. To strengthen the sash frame, additional diagonal slopes from a profile pipe are welded.
READ ALSO: How to Make Wrought Iron Gates with Your Own Hands Drawings Schemes Sketches
PHOTO: kuznez-center.ru Design with unusual forging
The hinged canopies are marked, adjusted and tacked to the posts and sashes. Then the frames of the shutters are hung on the poles and the smooth operation of the hinge joints is checked. Having completed the final adjustment, the hinged hinges are welded and the welding seams are cleaned.
On a note! It is easy to make fence gates from corrugated sheets with your own hands at minimal financial costs. Especially if the farm already has suitable material, and you have an idea in your head to build an interesting structure.
Before installing the corrugated sheets, the finished structure is primed and painted. Sheets of corrugated sheets are adjusted and fastened with self-tapping screws, the length of which should not exceed the thickness of the square pipe.
Fastening the profiled sheet
In simple designs, corrugated sheeting is mounted on the outside of swing gates. A more complex and heavier, but beautiful and neat option involves cladding on both sides. Laying sheets is carried out with the obligatory overlap of adjacent sheets into one common wave.
Fastening is carried out using special roofing screws for a hexagonal bit with a washer and a rubber gasket. In this case, the fasteners are screwed not only into the frame around the perimeter, but also into all horizontal and diagonal jumpers.
Cross-shaped jumpers.
The recommended spacing between fastening hardware is 80-100 mm. Instead of self-tapping screws, you can use rivets that can be installed on one side using a special tool. This will cost more, but will avoid corrosion of the fasteners and the possible formation of rusty streaks over time.
Nuances of installing built-in gates
A gate located on one of the gate leaves is less convenient for everyday use than a free-standing one, but it allows:
- reduce the cost of installing swing gates;
- reduce the size of the required opening in the fence;
- refuse to install a third support pillar.
Diagram of a gate with a wicket in one of the leaves.
The opening for the gate can be located at the edge near the support post, in the center of the plane of the leaf, or closer to the middle of the gate.
It is possible to manufacture gate leaves of different sizes, when the smaller one will be used as a gate. In terms of cost, this option is the most low-budget. However, one should take into account the increase in weight load on the support column on which the larger sash will be attached.
When installing a gate on the plane of the gate leaf, the presence of lower clamps in the fittings kit is mandatory.
Sliding gates made of corrugated sheets: design price
Sliding gates are easy to use, but have a more complex design. There are two most common types. Sliding gates with lower rollers and a guide rail have one significant drawback - the gutter constantly needs to be cleared of road debris, and in winter - of snow and ice.
The most common sliding gates are equipped with an upper guide rail and sliding rollers. This design, for all its advantages, has some disadvantages. If the rail is above the work area, there are height restrictions for entering vehicles.
PHOTO: otkatnie-vorota.com The roller tool for rolling back must be periodically processed so that it does not rust
The location of the guide rail along the fence, outside the working area, requires a significant increase in the door leaf. For this type of sliding gate made of corrugated sheets, the price will be significantly higher due to the greater amount of material consumed and the large volume of concrete foundation. Often it is at least 5 thousand rubles per 1m2. As a rule, the cost with installation starts to vary from 6-7 thousand rubles.
PHOTO: stroypomochnik.ru Scheme for manufacturing sliding gates from corrugated sheets