Extruder for 3D printer: design features
A 3D printer has its own characteristics, like any device. If we talk about an extruder, its design can be divided into two main components:
- Cold-end. Pushing mechanism. It consists of a gear and a pinch roller that grip and push the filament forward. The gear is driven by a small motor through a special shaft. The pressure roller is spring loaded. This arrangement of the unit allows you to work with rods of different thicknesses.
- Hot-end. Heating part. It consists of: a nozzle, a heater, a heating sensor and a thermal insulator. The latter plays the role of a cutting bridge. It traps excess heat so that the filament does not start to melt in the feed tube. A nichrome wire or a special plate with two resistors is placed on the heater.
The assembly may have a one-piece design where both components are installed one behind the other. This arrangement is called Direct Extruder. This scheme is found in a large number of modern printers. The second extruder option is Bowden Extruder. Here the cold-end and hot-end are located in different parts of the printer. The hot end is fixed in the Z-axis carriage, and the feed unit is mounted on the frame. They are connected to each other with a Teflon tube. This arrangement greatly simplifies the print head itself. It clogs less. But there are also disadvantages. The rod may simply get tangled or break off while traveling from the feed unit to the heater.
Extruder operation diagram
Interesting! There are more complex designs with paired print heads. They allow you to work with two filament strands at once. For the purposes of this article, we will talk about a simple extruder with one heater and a feed mechanism.
How to choose a hotend?
It is worth noting that the extruder is a rather expensive part. Assembled, this spare part can cost $80–150. Moreover, the cost in Russian retail stores is not much different from that in China. It turns out that this is one of the most expensive components in the entire printing device.
That's why many 3D makers make homemade printers. They also assemble the extruder themselves, using open blueprints on the Internet. To assemble the printing unit correctly, you need to initially calculate what tasks it will solve. To do this, you need to evaluate several parameters of the future printer:
- Engine power. It directly depends on the size of the nozzle. If a 3D maker is going to make projects with greater detail, he will need a small nozzle and a powerful motor. Otherwise, the plastic may simply get stuck.
- Nozzle. As mentioned above, the diameter of the nozzle opening is selected based on the assigned tasks.
- Feed roller. This is a weak point in the printer. Often the roller slips and the filament does not flow. Printing defects appear. For example, PLA and ABS rollers interact very poorly with nylon thread.
- Extruder design. All components can be fastened into one unit by printing them on a 3D printer. Or cut it out of plywood. Both options are easy to do. However, a monolithic plastic structure will be stronger than a plywood box.
- Extruder type. It all depends on the experience of the printer and the tasks he will solve. The Bowden type extruder is said to be more accurate, but is a little more difficult to make. And in home-made entry-level designs, its advantages disappear. Direct does not print as accurately, but is easier to manufacture.
The situation with the hot-end is a little more complicated. There are two ways to go here. First: buy ready-made spare parts on the Internet, which is also not cheap. Second: do it yourself. To do this, you need to be patient and have the necessary components. We will provide more detailed instructions for assembling the hot end towards the end of this material.
Attention! If you don't want to make your own hot end, you can order one on E-bay. For example, a model from E3D. True, this part alone will cost you the price of a new extruder assembly.
Filament Production Process
In the industrial production of filament, as a rule, large extrusion lines are used in the form of large machines that are capable of making several rods at once in one batch (and without variation in diameter), which makes it possible to achieve large production volumes. A huge number of raw pellets are heated together with a certain amount of masterbatch, and in order to achieve color constancy, the same proportions are used, pre-determined in the research and development departments of the filament manufacturing companies. However, the basic principle of industrial filament production is almost no different from home production. The illustration below shows a schematic representation of this process, and the two photographs below show what these conveyor lines look like in real life.
The most significant differences are that the filament created at home is not cooled immediately after extrusion, and that a desktop extruder can extrude only one rod, and therefore the volume of home production is noticeably inferior to industrial production, where several can be made in an hour. hundreds of kilograms of filament. Additionally, a home extruder may not have a special machine that automatically winds the extruded filament onto spools. Plus, in some cases these devices are equipped with a device for automatically checking the filament diameter.
How to make an extruder for a 3D printer with your own hands?
Essentially, you need to separately assemble the cold-end, then attach the hot-end to it. Fix the resulting structure on the Z-axis carriage and supply power to the resulting structure. But before that, you should write out in advance all the components that will be useful in your work.
Extruder mechanics
What do you need?
To assemble an extruder, you will need to make or buy mechanical components, electrical parts, and also make parts of the housing in which all the components of the extruder will be located. Tools you will need: sandpaper, drills, screwdrivers, soldering iron and soldering supplies.
Mechanical components
Interesting! Some sellers on AliExpress offer disassembled extruders, piece by piece. This option can also be considered.
Main mechanical components for assembly:
- main parts of the extruder frame (printed on another 3D printer, made of plywood);
- metal guides;
- gears for electric drive;
- main gear and pressure roller with spring;
- mounting screws and bolts;
- work site.
The entire mechanical part of the extruder is cold-end. The feeder is assembled like a construction set. Here we propose a general outline of the mechanics. It may vary slightly, depending on the selected drawing and manufacturing method.
Scheme for printing frame
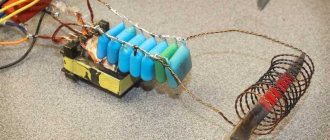
Electrical components
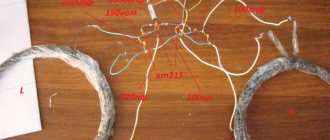
Electrical components include three things: wires, a motor, and a heating element. We will tell you more about the motor power a little later. For now, let's take a look at the heating element assembly diagram.
Homemade extruders often use an aluminum plate. It is not necessary to take a solid block; you can get by with a plate at least 4 mm thick. It is sold in building materials stores. Heater construction diagram:
- Connect two metal plates together, drill a hole between them for the hot-end. Place the resulting “sandwich” in a vice and secure it with a bolt.
- At the junction of the plates, make holes for: two resistors, a thermistor and a fastening bolt. Connectors for heating resistors must fit without gaps. The slightest air gap can lead to an uneven filament melting zone.
- Install all components into the plates and fasten them together with a bolt.
- Mount the heating element to the hot end. Solder the wires.
Two 5–10 Ohm resistors can be used as heating elements. Select the required resistance based on the performance of the power supply.
Important! A 100 kOhm NTS thermistor (B57560G104F) can be used to control heating. Thermistors with lower resistance should not be used. At high temperatures they give a large error.
Step-by-step instructions for assembling a 3D printer extruder
At this stage, we already have an assembled frame for the extruder with an installed roller, as well as a pressure gear. All that remains is to select a suitable motor, adjust the pressure roller and screw on the hot end with the installed heating element. Let's look at each step separately.
Engine selection
For home needs, you will need a Nema17 type stepper motor. But you can do it easier: find a working element in an old printer or scanner. This is the “weakest” engine option. For the printer, take a bipolar motor with 4 outputs.
Interesting! For rods with a diameter of up to 1.75 mm, you can look for a motor from the Epson “EM-257” printer. It produces a torque on the shaft of up to 3.2 kg/cm.
If the motor does not cope, you need to install an additional gearbox. For example, from an old screwdriver. The resulting design is sufficient for rods up to 3 mm in diameter.
Adjusting the pinch roller
The clamping force can be checked experimentally when the cold-end is already assembled in the extruder. Carefully insert the rod between the roller and gear. Apply voltage to the motor. The cold-end structure itself can be carefully fixed in a vice.
If the filament does not grip or slips: the spring needs to be stretched or replaced. The thread is not pushing in, is the gear scraping against the rod? Press or bite off the spring coil. Try to find the optimal ratio of length and clamp.
Creating a hot end
To create your own hot-end you will need:
- Hot end barrel. You can make a spare part in a turning workshop. This solution will be optimal, since you will receive an all-metal hot-end, which will need to be modified to a minimum.
- Radiator. It is advisable to provide it with active cooling in the form of a small cooler. You can buy a cheap blower at a computer store.
- A heating element. The assembly is described above in the article. You can also buy a ready-made version on AliExpress.
Hot end circuit
The diagram for turning the barrel is shown in the drawing. A heating element and a radiator are attached to it. Electrical connection. A nozzle of the required diameter is screwed to the resulting hot-end.
Barrel drawing
Assembly
The entire assembly process can be divided into several stages:
- Manufacturing of cold-end mechanical parts. Assembly of all mechanical parts into a single frame.
- Selecting a suitable engine. Installing the motor in the mechanical part. Assembling the heating element.
- Pressure roller calibration.
- Hot end assembly. Connecting a heating element to it.
- Installation of hot-end to cold-end.
- Installing a nozzle of the required diameter.
The wires can be partially soldered while assembling various components, or they can be dealt with at the last moment. There is no fundamental difference.
Filament production costs
However, the most pressing question is how much will it cost to produce a kilogram of artisanal filament? Let's start with the fact that the costs of home and industrial production cannot be compared for obvious reasons, since industrial production is subject to the so-called “economies of scale”
, i.e. economies due to increased scale of production. For individuals who bought desktop extruders for personal use to make a spool or two, this rule cannot be applied.
Therefore, the figures given here are merely indicative as home filament production is a fairly new area and there are few retailers operating in it. Most companies sell pellets and masterbatches to wholesalers and most of them have a minimum order size of 10-25 kg
or more. However, recently there has been some progress - a number of people considered this market to be potentially profitable and began to sell raw materials in smaller volumes. However, finding a reliable supplier who would be able to provide high-quality material in retail quantities and at reasonable prices is still a problem.
At the time of writing this article (May 2014), a kilogram of raw pellets costs approximately 3.5 to 4 euros
.
Color masterbatches cost approximately 1.2 to 3.5 euros per kilogram
, but they can often only be purchased in large quantities (
5-10 kg or more
).
But please remember that these are indicative wholesale prices. You also need to take into account the prices of electricity, the cost of the extruder itself, its depreciation, as well as various small things, and in the end it turns out that a kilogram of filament costs about 5-7 euros
.
If you compare this with retail prices, the savings are enormous - about 70%
. True, before reaching self-sufficiency you will have to print quite a lot of filament, since extruders are very expensive. A list of currently available desktop extruders (along with prices) can be found in the table below.
Mistakes and ways to avoid them
During assembly, you can make a number of mistakes that will later affect the print quality:
- Choosing a low-power motor. Lack of gearbox. An error in electrical design can lead to frequent extruder blockages as well as printing defects.
- Incorrect electrical calculation. Even at the development stage, you need to calculate the entire load in terms of power and resistance on paper. Otherwise, some components will simply burn out or perform poorly.
- Air gap in the heating element. Make neat holes in the aluminum plates so that the resistors fit snugly in place.
- Lack of pinch roller calibration. It is worth deciding this point in advance, otherwise you can ruin a large amount of filament.
An indirect mistake that may come back to haunt you in the future is a weak extruder frame. Once again, make the frame from the least amount of parts. Give preference to plastic over plywood. The structure must be strong. Otherwise, backlashes may appear. Print quality will noticeably drop.
Assembling the extruder is not difficult, but at some points you need to be patient. For example, in the manufacture of a hot-end barrel. It is also worth keeping in mind all the errors that may arise during the assembly of this unit.
- March 28, 2021
- 701
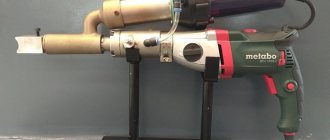
Operating principle
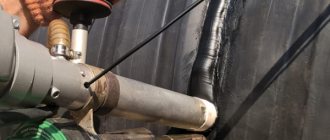
A welding extruder is a specialized apparatus for so-called extrusion welding, which is used to join polymer materials of various classes - high-density polyethylene (HDPE) and low-density polyethylene (HDPE), polypropylene, polyvinyl chloride (PVC) and other plastics most commonly used in everyday life and industry.
Extrusion welding is the process of joining polymer materials using a mass of material melted to the consistency of thick sour cream that is homogeneous with the ones being welded or similar in physical and chemical properties.
Unlike the more well-known welding of metals, joining plastic parts by extrusion does not involve melting the edges of the parts being joined, although heating to a certain extent still occurs.
The seam is formed when the semi-molten extruded mass hardens and sets with the edges. In this case, high strength of the welded joint is achieved - up to 0.8 of the strength of the base material.
Welding plastic with an extruder is most often used in plumbing - for connecting water pipes, in construction, in various works, the purpose of which is the manufacture of any plastic structures - tanks, pontoons, greenhouses.
The production of the extruded mass is carried out either from polymer granules - the starting material for creating any plastics, or from so-called filler rods, which are ground to a granular state inside the extruder itself.
In some (not all) models, the role of a rod can be a narrow piece of the same material that is planned to be welded. For example, when welding a product made of polypropylene sheets, you can use an unnecessary piece of polypropylene as a rod, but not other plastic.
Read also: Processing a vegetable garden with a walk-behind tractor video
Most Western-made welding extruders are designed to be used with filler material from the same manufacturer. Domestic developments are less demanding on the additive. A manual welding extruder is often called an extrusion gun in everyday life.