November 16, 2020
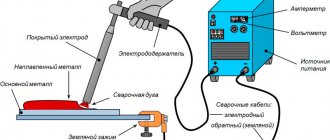
A plane is a tool for planing and processing wooden parts. It is popular among professional carpenters and hobbyists. Using a plane, you can make the workpiece perfectly even. An electric plane works much faster than a manual one, the main thing is to use the tool correctly.
Electric planers are conventionally divided into professional and household. Objectively, they differ in the duration of work without interruption and power. The main structural part of the plane is the electric motor. It consumes current from the network, causing the working knives to rotate. When working with wood, a large amount of chips and dust will be generated - a pipe is designed to remove it, which can be connected to a vacuum cleaner.
Preparing to work with an electric planer
Before you start working with a new tool, you need to read the instructions for it. This will help you understand the features of a particular model and work more effectively with it. The following parts of the tool must be checked during the first and each subsequent use:
- the housing, cable and knives must not have any damage;
- cutting elements must be well secured in place;
- the mechanism must be clean.
When working with a tool, you must wear work clothes with no loose or loose edges. Sleeves should not be too long. Gloves should not be used when working with a tool that has a rotating shaft, as they may get pulled in.
The wire of the electric planer must reach the power supply freely and not be stretched. If it is not long enough, you need to use an extension cord. The workpiece must be well secured to the workbench.
Rules
- The beginning of surface treatment with an electric planer consists of a smooth first pass. At the beginning of the movement, you should press with slight force on the front part of the device, and when the blade completely enters the part, you can release the pressure. For normal planing, the weight of the electric planer itself is enough. You must continue moving while holding the device with both hands.
- Approaching the end of the surface to be planed, press the back of the plane, this will prevent “collapsing”.
- After passing one strip, check the surface for defects. Recesses and bevels will indicate incorrect adjustment of the knives. To understand how to adjust them, I advise you to read the instructions for the device. Each model has its own specific differences.
- If the surface of the product turns out to be wavy, then you moved the electric planer too quickly.
- It is necessary to plan as smoothly as possible, without unnecessary jerks and stops.
Checking and adjusting the position of the front plate
One of the important stages of preparation is setting up the front plate:
- disconnect the tool from the power supply;
- prepare an overlay - glass or a ruler of a suitable size;
- fix the front plate and secure the working knife in the upper position by rotating the drum;
- use a ruler to check whether the plates match;
- if they are not parallel, the cause may be clogging or prolonged use of the tool without maintenance.
Interskol R-110/1100M
The first hero of our TOP is Interskol R-110/1100M. This is an excellent plane, the planing width of which is 110 mm in 1 pass. It has high-speed steel knives, an aluminum alloy platform with high-quality geometry that ensures precision work, and also allows you to adjust the processing depth in the range from 0 to 3 mm. Among the design features of this planer, it is worth noting the V-shaped grooves in the front sole, which facilitate chamfering and the ability to convert the tool into a full-fledged planer. It is also worth noting that the plane has a smooth start and is equipped with a comfortable handle with a rubber pad and controls that fits well in the hand and saves the operator’s strength. Considering that this plane weighs only 4.5 kg, it will be easy to work with even for a long time. It is also worth noting that the planer comes with a spare belt, an adapter for connecting a vacuum cleaner, a spare set of knives and a device for straightening them. Those who have already acquired such a tool speak mostly positively about it, noting the good quality of workpiece processing, reliability, ease of use and affordable cost. For home use and small-scale work, such an electric planer will be just right.
- Nom. power: 1100 W.
- Plunge rotation: 16000 rpm.
- Planing width: 110 mm.
- Planing depth: 0 – 3 mm.
- Smooth start.
- Starting current limitation.
- Weight: 4.5 kg.
Adjusting the position of the cutting edge
The next step is to adjust the cutting edge relative to the sole of the electric planer. The extent to which the knife extends beyond the sole depends on the selected cutting depth and the type of knife. You can set the planing depth using a special regulator. The knife should be parallel to the tool plate, being at each point at the same distance from it.
To change the position of the knife, you need:
- unscrew the fastening bolts;
- adjust the height of the knives using eccentrics;
- align the cutting elements, if there are several of them;
- check if the drum rotates easily.
Types of electric planers and operating principles
An electric planer is a device that operates using an electric motor installed in it. The latter drives the cutter head, which provides planing. The device body is equipped with one or two handles for ease of use. The range of electric planers on the Russian market is quite large. They differ from each other in many respects: power, maximum planing depth, passage width, dimensions and shaft speed. To adjust the planing depth, you must use a special mechanism. It moves part of the sole higher or lower, depending on the need. This element is one of the most important components of the electric planer. I want to say that the smaller the step of this adjustment, the cleaner and higher-quality surface treatment result you can get. Like most other power tools, electric planers are divided into:
- household – intended for home use;
- industrial - more expensive electric planers, used in enterprise production.
I want to say that the electric motor power rating of 700 watts in electric planers for home use makes it possible to use the device for domestic needs. In most cases, the width of the planing area of such devices is 100 mm.
Checking the installation of knives
Electric planer knives can have different shapes - straight, wavy or have a rounded end. If they are positioned correctly, the drum will turn easily and the blade will barely touch the ruler. If the knife does not reach the pad, collides with it, or catches the edge of the sole, you need to change the position of the cutting edge.
Main characteristics that you should pay attention to when choosing
With almost the same functionality, different models differ in the following main parameters.
Engine power
For shallow planing of workpieces with a width of 82-110 mm (width of knives), high engine power is not required. The engine power on different models ranges from 600-1000 W, and this is quite enough.
The more powerful the engine, the easier it can handle the load without losing speed or overheating. But this plus is offset by minuses: the greater the engine power, the greater the weight of the tool, the cost and energy consumption. Therefore, the most popular models have an average power of 650-800 W.
Power type
Cordless electric planers have the only advantage - the ability to work without an electrical cord and without a nearby power supply. Sometimes this is enough for such a tool to become indispensable. An electric planer with a battery is convenient when you need to plan a small surface area at a site where there is no electricity. At heights, in hard-to-reach places where it is difficult to pull the wire.
It’s rare, but it happens when a cordless electric planer is more convenient in a carpentry workshop. For example, when you have to plan long workpieces, and the power cord gets in the way.
Disadvantages in comparison with network ones:
- lower power, blade speed and planing width;
- higher cost;
- the need to regularly charge batteries.
Planing depth
This figure is comparable on almost all models: from 0 to 2 mm, in rare cases up to 2.5 - 3 mm. For this type of wood processing, this is quite enough.
Finishing is carried out at a minimum depth, from 0.1 to 1 mm.
When it is necessary to significantly reduce the workpiece, to remove excess volume, the knives are released to their full depth. Also, the knives are released completely if the workpiece is wavy. In this case, knives extended by a maximum of 2-3 mm can remove a smaller layer due to the fact that the sole of the electric planer rises on uneven wood when moving along the workpiece.
Since the planing depth on all models is almost the same (from 0 to 2-3 mm), little attention is paid to this factor when choosing.
Type of knives and their width
Knives are an important element, since they are the ones who directly perform the work itself - planing the wood. Knives are characterized by the following points.
Steel
The higher the quality of the alloys and heat treatment (hardening), the better the knives. But when purchasing, it is impossible to determine the quality of knives. Even if the steel grade is indicated: HSS (high-speed cutting), TST (carbide alloys), this does not mean anything to the user until the real work begins. Good knives do not become dull for a long time even when processing hard wood, and vice versa.
Availability of spare kit
A standard set of knives can last the entire life of the plane. However, irreparable damage is possible on any knives. For example, if there is a nail or self-tapping screw in the wood. A gouge will form and planing will leave a streak in the wood.
If the damage is shallow, the knives can be resharpened to remove the damage. If it’s big, it’s no longer possible. They will become low and will not reach the workpiece even when fully released.
You need to know that all knives need to be sharpened and then balanced by weight. Otherwise, due to the difference in weight, the shaft will rotate like an eccentric. At high speeds this is fraught with strong vibration, beating and destruction of the shaft bearings.
Therefore, it is better if the kit includes spare knives.
Knife straightening clamp
It’s good if the kit includes a clamp for straightening knives. It is difficult to professionally sharpen knives at home without changing the weight and imbalance. But it is quite possible to refill slightly dull ones. The knife is clamped into a truing clamp, which sets a certain sharpening angle. By lightly rubbing a fine abrasive with water, the knives can be restored to their factory sharpness.
Width
Three main standards have been adopted for the width of knives - 82 mm, 100 mm and 110 mm. Ideally, the width of the processed plane should be less than the width of the knives, so that during a double pass there are no differences in height. That is, it is better to plan timber with a cross-section of 100 mm using knives 100-110 mm wide, but not 82 mm. Therefore, the width of the knives is chosen based on the size of the workpieces that are planned to be processed.
The shape of knives and their sharpening
Knives can be straight or rounded at the ends. The second option leaves fewer steps when passing wide planes. For example, when a board 200 mm wide is planed with a knife width of 82-110 mm. At the same time, the roundness reduces the working width of the knives by several mm.
Sharpening knives can be either straight at a certain angle (about 45 degrees), or semicircular, concave. Knives with a semicircular concave sharpening become dull more slowly. When the tip of the tip is abraded, a further part of the knife comes into operation, which, by definition, is much thinner and sharper than that of straight-sharpened knives.
The disadvantage of concave semicircular sharpening is that on the working side they can only be sharpened on special machines with an abrasive wheel of suitable diameter. The disadvantage is small, since such a knife can be threaded in the usual way from the working side using a thin abrasive, or sharpened from the reverse plane on a conventional surface grinder.
Sometimes in sets and separately sold there are special figured knives with a shallow profile. They are selected to give the desired relief to the workpiece.
Double sided knives
Knives can have single or double-sided sharpening. If one side becomes dull or damaged, double-sided knives can be turned over and the sharp side used. Thus, double-sided knives are equivalent to a second spare set of single-sided knives.
Double-sided sharpening is not found on all models. Due to the peculiarities of the fastening and the location of the fastening holes in the knives, it is not always possible to turn them over so that they fit into the fastenings from either side. On models where the design of the knife mounting allows them to be turned over, as a rule, the sharpening is double-sided.
Maximum number of revolutions
An important point is that the higher the speed of the shaft with knives, the cleaner the processing, the less scuffing on the wood. In this case, the more revolutions, the higher the gear ratio and the less power when the shaft rotates. (Similar to 3rd and 4th gear in a car). If the characteristics indicate a record number of revolutions, this may have two negative sides:
- The shaft rotates quickly, but with little force, the engine will lose speed and overheat during operation.
- Only high-quality special bearings can withstand the highest speeds, for example, 15,000 - 20,000 rpm. If such speeds are indicated on a cheap budget model, this is either a marketing ploy, or the unit will quickly fail due to engine overload or bearing failure.
For high-quality processing of wood with a manual electric planer, 8000-12000 rpm is quite enough. Anything higher is better, but may have the disadvantages described above.
Smooth start
When starting any electric motor, current is consumed that is 3 times the motor rating. Therefore, the voltage drops in the network at the moment of starting a sufficiently powerful engine. The soft start system allows you to avoid this. It also ensures smooth starting.
Speed support under load
Modern electronic systems allow you to adjust the current depending on the load. With such a system, the plane loses less speed under increased load, for example, on branches or hard wood. A drop in speed leads to scuffing of wood, engine stalling, and even failure. The system allows you to avoid this.
Tool weight
It is more convenient to work with a light electric planer. But too light a weight may mean a lack of safety margin in all parts, although not always to a certain extent.
For example, Makita models are lightweight due to the well-thought-out design of every detail by Japanese engineers. Expensive alloys of magnesium and aluminum can lighten the weight, while cheap ferrous metals, on the contrary, make it heavier.
When working, the electric planer is rarely held by hand; as a rule, it is located horizontally on the workpiece. Here weight can play a positive side - the instrument is pressed with its own weight, there is no need to put undue pressure on it with your hands.
A lightweight electric planer is better suited for working with vertical and diagonal surfaces.
Therefore, weight ultimately does not fundamentally determine the quality of the model.
Surface treatment
An electric planer can not only plan, it can be used to cut chamfers and select a quarter. To achieve a smooth surface, you need to have some experience and be able to move the tool smoothly.
Here are tips for working with an electric planer that will help you achieve high-quality results:
- Take your time and try to apply the same amount of force to the instrument at every moment. When approaching a workpiece, make sure that the front platform is completely adjacent to the workpiece and place emphasis on it. When exiting the part, emphasis should be placed on the rear sole. With some skill, you can ensure that there are no differences at the beginning and end of the workpiece.
- Make sure that sawdust does not fall under the slab and that it remains parallel to the workpiece.
- Select workpieces with a small margin of length for work.
- Work with hard wood in stages, without putting too much strain on the tool.
- Set the processing depth based on the curvature of the board surface.
When processing wood, there are some nuances that you should always remember. The inclination of the tool or the pressing force must not be allowed to change, otherwise the surface will come out crooked.
Included with electric planer
When you install a separate side stop on the electric planer (it is usually supplied as a kit), you can perform folding . The stop, fixing the tool at a certain distance, must touch the workpiece.
Important: If the surface being processed with a plane is uneven, it means you are using dull knives or have released them incorrectly (see at the beginning of the article).
Folding boards
Folding a board
The depth of folding depends on the number of passes with a plane over the workpiece. The more passes, the deeper the rebate.
After planing, remove the knives from the electric planer, wash them with kerosene and place them in a separate box until next time.
Planing with an electric planer
Before you begin processing the wooden surface, the workpiece must be securely fastened. How well it is secured affects not only the cleanliness of planing, but also directly affects the safety of the work performed.
The board or block being touched should not have even a slight play. Otherwise, when in contact with the rotating knives of the electric planer, the workpiece may be torn out and thrown to the side with force, which can lead to injury to both the worker and people nearby.
After the workpiece is securely fastened, you need to stand so that, starting to plan from one edge, you can freely move next to the workpiece parallel to the movement of the plane. The body position should not be tense, and nothing should interfere with holding the power tool firmly with both hands.
Before turning on the electric planer, its knives should not come into contact with the surface to be cut. Only after starting should you carefully move the knives from the end of the board and start moving forward.
With each pass, try not to tip the electric plane onto your toe or heel. The sole of the plane must always be positioned strictly parallel to the surface being processed.
The pressure on the front and rear handles of the electric planer should be the same. In this case, at the beginning of the passage you should press a little harder on the front handle, and at the end - on the back. This will avoid blockages. The required pressing force is determined only by practice.
While the electric planer is moving along the surface being processed, jerking, acceleration or stopping is unacceptable. Otherwise, the surface will not be able to be made perfectly flat and various pits will be visible on it.
The speed of movement of an electric plane over the surface being processed is usually 1.5-2 meters per minute. In this case, you need to make sure that the shavings removed by the plane do not get under the sole.
Preparation of the workplace
The requirements for the planing workplace are general, the same as for all types of carpentry work with power tools. The location should be:
- Dry, preventing rain from getting on the electric planer and the workpiece.
- Illuminated.
- Free so that the master does not trip while planing.
It is better if the room temperature is comfortable and there is ventilation. When operating, the electric planer makes quite a loud noise. It is desirable that the walls of the room have good sound insulation, or at least that the work is carried out during working hours.
Electric planer: which company should you choose?
Ease of use
The tool enjoys such well-deserved popularity that many large companies prefer to produce not just one model, but several different ones. There is no point in considering each one; besides, their number is huge. Let's focus on the most tested and proven items.
In the so-called quality rating, tools can be divided conditionally into household and professional: the difference between their cost and quality is too great.
In professional tools, the palm, without a doubt, belongs to Japanese electric planes Makita, German Bosch, and famous American brands Skil and DeWalt. Products from Mafell, Hilti and Hitachi are also recognized as very high quality. But the goods produced by these companies are very high-quality, but not cheap, instruments.
When choosing a plane, it is not enough to be guided by just one brand. Most manufacturers often have their own production not in domestic countries, but in many other countries. This includes China. And although sellers claim that the Chinese assembly is no worse than any other, and is in no way inferior to it, the usual prejudice against such goods is not so unfounded.
If the instrument is chosen for frequent, actually professional use, it is better to pay more, but buy a more reliable original.
Well suited for everyday use Skil and Black&Decker, Bosch (professional ones are painted blue, household ones are painted green), Blaukraft, Energomash, Interskol, Fiolent and other models. When choosing a worthy brand, pay attention to the fact that there are enterprises masquerading as popular European and Russian companies.
Review
For example, the very popular Stern, or Sturm, have nothing to do with European manufacturers. The well-known AEG and Milwaukee also have nothing in common with the German or US assembly.
The overwhelming majority of brands with big names are usually registered at the very end of the 90s. And although they are listed in Europe, they are most often deployed in Asian countries.
All their activities actually boil down to copying famous brands. True, the components used are not at all of the same quality as those of the originals.
Therefore, it won’t hurt at all, before deciding on the final choice of nonsense, to learn more about the history of the manufacturer, the assortment they produce, and read the reviews on it.
Chinese-Russian plane
Models bearing Russian names, but obviously manufactured in China, also cause deserved concern. These include “Bison” and “Grad”, representatives of which can often be somehow distinguished only by the color of the body and the sticker on it.
For those who plan to use the tool only a couple of times a year and have a fairly modest budget, it is quite possible to purchase such a model.
This fairly new tool has no complaints about its operation, operating quite reliably and properly. But the resource of his entire work activity is often limited to only tens of hours of hard work, and such a product is practically not subject to repair.
What should you expect from such an acquisition?
The cutting surfaces of the knives will quickly become dull, the planing depth adjustment regulator will break down, and the drive belt will become loose. Even the motor may burn out under moderate loads. Any model that costs less than two thousand rubles may turn out to be one of these examples.
Buying an Electric Planer: A Selection Guide
Appearance
If you are not very knowledgeable about manufacturer brands or the technical characteristics of their products, but want to make a choice focusing more on appearance, then be guided in your actions by the information presented below. She can provide you with invaluable assistance.
- The case must consist of two parts (and this is at least). This is the main part of the tool that covers the motor, and its sole . The housing is manufactured in a single block with a chip ejection pipe and its handle. If a removable belt drive cover is not provided, then certain inconveniences may occur if it needs to be replaced. In addition, this is evidence of imperfect design development. This usually distinguishes inexpensive products from manufacturers with unknown brands.
- The instrument should fit perfectly in the hand, that is, be well balanced. The start button should be conveniently located so that the start can be done freely with one finger, in the working position of the hand. Those models in which to perform this operation you have to help yourself with your other hand, or grab the handle, are best put aside. Even if you are now delighted with its performance, you will very soon be disappointed in the choice you made. Especially in cases where you have to work with a large number of workpieces.
- Of particular importance is the presence of a special groove on the sole. It is designed to remove air from the working area and also helps when processing chamfers. You may not have to deal with the latter very often, but an air cushion can significantly spoil the quality of the surface being treated. Each representative of these instruments should have a depth adjustment regulator. It can be of two types - rotary and push-button. Both are easy to use and equally effective.
- A pipe for removing waste material (chips) is strictly necessary for the device . There are options with double-sided outlet and one-sided. If you are choosing between two models, then, other things being equal, give preference to the two-sided one. Some copies have a special bag for chips. This is a very convenient device, especially when working in a residential area. It will also not be superfluous in the workshop, since it is not always possible to connect a special outlet pipe.
Technical indicators
Comparison
From the variety of instrument models on the market, it seems quite difficult to choose the best one for yourself. To make comparisons easier, you can divide the tools into separate categories that are most meaningful to you. The field of choice will immediately narrow significantly, and it will be much easier to navigate the mass of models.
What qualities are important for work that you should pay attention to? This:
- shaft rotation speed;
- motor power;
- price;
- weight;
- planing depth;
- planing width;
- possible options;
- equipment.
Motor power
Leveling the board
If you focus on power, then preference should be given to models with power from 600 to 1000 W. This is enough for small household and repair work related to wood processing. In general, the power of household tools in this category reaches 2000 W.
An increase in power is accompanied by an increase in the weight of the tool and higher electricity consumption.
Purchasing more powerful models may be justified when it may be necessary to process an impressive amount of material in a limited time. In other cases, excessive power can be burdensome and waste money.
Shaft rotation
Shaft drawing
The most suitable speed for working with wood species is within 10 thousand revolutions. It will correspond to these indicators if the passport contains data from 12 thousand revolutions. The fact is that under significant load, the speed of the shaft decreases, and sometimes quite significantly. For a tool with a designated rating of 10,000, the actual operating speed of rotation can reach only 8 thousand. Models from leading manufacturers have an automatic speed control system associated with a specific load. True, household models are equipped with it quite rarely.
Planing depth
The data range for this indicator is from zero to four millimeters, but even “three” is not in demand very often. Therefore, for most users, a model with a depth adjustment of up to 3 mm (or at least 2) will be sufficient.
Planing frequency indicators
These indicators indirectly influence the choice of a suitable tool. Since the types of proposed work can vary greatly, they usually take a tool with a certain supply of required indicators.
Typically, a power reserve of 1000 W is quite enough to manipulate a plane with a sole up to 110 mm wide. These are the ones you should buy. Narrower models are designed for processing small shapes: they are more convenient for planing slats and edges, in addition, they are much lighter.
It is difficult to plan a wide workpiece with them - processing must be carried out in two passes, and this requires a certain skill.
Weight
Weight can only affect the effective operation of a tool if it is used intensively. If you only have to process a couple of boards in an hour, then its weight is not so important. If the work takes many hours, then it begins to be felt. In general, an average power electric plane should weigh approximately three to four kg. This data should be taken into account when purchasing.
Buy online - Leroy-Merlin Store =>>
When do you need to adjust or replace electric planer knives?
The knives on an electric planer wear out over time. They need to be removed and sharpened or replaced altogether, and then installed back on the drum. Newly installed cutting attachments need to be adjusted in order to process lumber as efficiently as possible. The blades of new power tools also need to be pre-adjusted before use.
The following signs indicate that adjustment is necessary:
The change in sound is not typical for all models. This symptom may also indicate a number of other problems.
If, after adjusting the blade blades, the symptoms discussed above do not disappear, then more serious repairs to the power tool will be required.
Setting the correct position of the cutting attachments is carried out according to the following parameters:
By correctly adjusting the position of the knife blades on the drum, high final quality of lumber processing is achieved.
Types of knives for electric planers
Knives on an electric planer are consumables. With their help, wood surfaces are processed.
Often knives come complete with power tools in the amount of 2 pieces.
Electric planer knives are classified according to the following criteria:
When buying an electric planer, in addition to checking its performance and configuration, you should pay attention to the quality of the knives installed on the drum and their sharpening. The blades should be sharp, with a straight edge and no bends or gouges. Spare knives should also be checked. The final quality of lumber processing depends on the correct selection of cutting attachments.
Disposable knives
Knives intended for disposable use are made of steel-based hard alloys in the form of plates sharp on both sides. Such cutting parts cannot be sharpened. After the edge being used is completely worn out, the blade is turned over and placed on the drum with the other side. At the same time, the tool continues to work. If the second cutting edge becomes dull, then the blade is simply thrown away.
Disposable knives are intended only for performing work that does not require high precision and quality of workpiece processing. But they are convenient for practical use: during installation they do not need to be precisely adjusted and balanced.
The shapes of disposable products are:
The first type of product has a straight cutting part. It is convenient to use such consumables to process parts that have a smaller width than the length of the installed blade, and to select quarters. Wavy knives are used when it is necessary to carry out rough processing of lumber. With their help, you can give a wooden surface a different texture, for example, to simulate “aging.” Straight cutting edges, rounded at the edges, are good because they do not leave marks (grooves, steps) on the surface of the wood being processed. This is a suitable option if you need to work with wide wooden pieces.
Disposable blades have a longer service life, but can break quite easily if they accidentally collide with metal (for example, a nail, bolt). They are the best option for attachments when it is necessary to work with hard wood workpieces.
Reusable cutting attachments
Products that are intended for reusable use differ in both their shape and size from disposable cutting attachments. They are made using high quality steel, which ensures ease and quality of processing of wooden surfaces.
It is more profitable to buy reusable cutting attachments because they can be sharpened multiple times. But high-speed steel products do not allow processing hardwood (for example, larch or oak).
The working drums of most models of electric planes can be equipped with both disposable and reusable cutting attachments. But there are also devices that can only be equipped with blades that are not intended for sharpening. For this reason, when purchasing an electric planer, it is recommended to give preference to universal power tools.
Classification by size
Knives for electric planers can be standard or non-standard sizes. Products of the first type, called “plates,” have a length of 82 mm, a width of 5.5 mm, and a thickness of 1.2 mm. Such cutting attachments are suitable for most models of electric planes from foreign companies Makita, Skil, Bosch, Black&Dekker.
Selection of quarters with an electric planer
Often there is a need to select a quarter in the workpiece being planed. Modern electric planers have this option and can make this task much easier for you. However, when selecting quarters using an electric planer, there are also some features that should be taken into account when performing work.
As you know, when cutting a quarter, the side stop of the plane moves along the edge of the board. Therefore, in order for the groove to be smooth, you should be sure that this edge does not have any bulges or dimples.
When planing a quarter, the pressure on the plane handles is slightly different from the pressure when planing flats. With one hand you need to point the plane forward, and with the other, press its side stop to the edge of the workpiece.